Oh, friends, gather ’round because I have something truly special to share today. You know those nights when a craving hits, a *serious* craving, and you just want something decadent, something comforting, something that feels like a warm hug in dessert form? This s’mores pizza dessert is that hug. It’s the kind of treat that brings back all those campfire memories, the sticky fingers, the starry nights, but without any of the fuss of actually building a fire. Honestly, I first whipped this up on a whim because the kids were begging for something sweet and I was just too tired to even think about breaking out the cake pans. And let me tell you, it was an instant hit. It’s like a classic s’mores but elevated, all wrapped up in a delightful pizza format that feels both familiar and excitingly new. If you’ve ever loved a s’mores, you are going to fall head over heels for this s’mores pizza dessert. It’s a game-changer!
Thank you for reading this post, don't forget to subscribe!What is a S’mores Pizza?
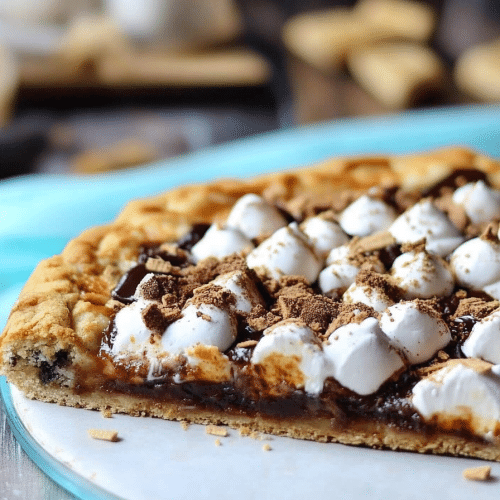
So, what exactly *is* this magical creation we’re calling a s’mores pizza dessert? Think of it like this: all the glorious flavors of a perfectly toasted s’mores – gooey melted marshmallows, rich melted chocolate, and that satisfying Graham Cracker crunch – but presented in a wonderfully shareable, sliceable pizza form. It’s not a traditional pizza, of course! Instead of a savory dough, we’re talking about a sweet, cookie-like crust that’s the perfect vehicle for all those iconic s’mores toppings. It’s essentially a giant, deconstructed s’mores that’s incredibly fun to make and even more fun to eat. The name itself, s’mores pizza dessert, just tells you everything you need to know: it’s a dessert, it’s pizza-shaped, and it tastes exactly like your favorite campfire treat. It’s the best of all worlds, really!
Why you’ll love
There are so many reasons why this s’mores pizza dessert has become a staple in my kitchen, and I just know you’re going to love it too. First off, let’s talk about the flavor profile. It’s pure bliss! You get that incredible combination of sweet, slightly salty Graham Cracker crust, creamy melted milk chocolate (my personal favorite, but you can totally play with that!), and of course, those perfectly toasted, pillowy marshmallows that have that signature caramelization. It’s like a flavor explosion in every bite. And the texture? Oh my goodness. You have the slight crispness of the crust, the molten chocolate rivers, and the airy, chewy marshmallows. It’s pure joy.
Then there’s the sheer simplicity of it. Honestly, this is a lifesaver on busy weeknights when you need a crowd-pleaser but don’t have hours to spend. It comes together surprisingly quickly, and the ingredients are all things you can probably find in your pantry or at any grocery store. Speaking of ingredients, it’s also incredibly budget-friendly! You don’t need fancy, expensive items to create something truly spectacular. This recipe proves that you can make an impressive dessert without breaking the bank.
What I love most about this s’mores pizza dessert, though, is its versatility. While it’s absolutely divine as a dessert (obviously!), I’ve also served it as a fun weekend brunch treat, and the kids even gobble it up as a special after-school snack. It’s just so adaptable. If you’re craving something sweet at 10 pm but don’t want to bake a whole cake, this is your answer. It’s a little bit like my popular Chocolate Chip Cookie Bars: What are some of the best chocolate chip cookie bars? recipe in that it’s easy to make ahead and always a hit, but this one has that extra layer of nostalgic s’mores magic that’s truly irresistible. It’s also way easier than trying to get everyone to agree on their perfect s’mores ratio around a campfire!
How do I make a S’mores pizza?
Quick Overview
This recipe is delightfully straightforward. We’re essentially making a quick, press-in crust that bakes up golden and delicious. Then, we’ll generously spread it with chocolate, top it with a mountain of marshmallows, and give it a quick bake until everything is melted and gloriously toasted. The whole process, from start to finish, is remarkably efficient, making it perfect for spontaneous dessert cravings or planned get-togethers. You get all the iconic s’mores flavors without any of the campfire smoke or messy skewers!
Ingredients
For the Graham Cracker Crust:
This is the foundation of our s’mores pizza dessert, so we want it to be sturdy enough to hold all that gooey goodness but still have that classic graham cracker crumble. I usually use about 1.5 cups of graham cracker crumbs. You can buy them pre-crushed or pulse whole graham crackers in a food processor until they’re fine crumbs. For the binder, melted unsalted butter is key. About 6 tablespoons should do the trick. And for a little extra depth of flavor and to help it set up nicely, I always add a tablespoon or two of granulated sugar. Sometimes, if I have it on hand, I’ll even add a tiny pinch of salt to enhance the sweetness.
For the Chocolate Filling:
This is where the magic happens! You have options here. My go-to is a generous layer of milk chocolate chips. About 2 cups should give you a beautiful, melty layer. If you’re a Dark Chocolate fan, feel free to use dark chocolate chips, or even a mix! Some people like to spread a thin layer of chocolate ganache or even Nutella for a different twist. For this recipe, I’m sticking with simple milk chocolate chips because they melt so beautifully and give you that classic s’mores vibe.
For the Marshmallow Topping:
This is the star of the show! You’ll want plenty of marshmallows. I usually use about 3-4 cups of regular-sized marshmallows. Some people prefer to cut larger marshmallows in half to get more even coverage, and that works wonderfully too! For an extra-special touch, you can even use jumbo marshmallows and gently press them down before toasting. The key is to get a good, fluffy layer so they puff up and toast to golden perfection.
Step-by-Step Instructions
Step 1: Preheat & Prep Pan
First things first, preheat your oven to 350 degrees Fahrenheit (175 degrees Celsius). This is a pretty standard baking temperature that works perfectly for getting our crust golden and our toppings melted without burning. Now, grab a 9 or 10-inch round pizza pan or a 9×13 inch baking pan. If you don’t have a pizza pan, a regular cake pan works too! I like to lightly grease mine with cooking spray or butter, or even better, line it with parchment paper, leaving some overhang. This makes lifting the finished s’mores pizza dessert out so much easier, which is a lifesaver when it’s hot and gooey. Make sure the overhang is enough to get a good grip!
“New family favorite! This Smores Pizza Easy Dessert Pie was so flavorful and ridiculously easy. Crowd-pleaser for sure.”
Step 2: Mix Dry Ingredients
In a medium bowl, combine your graham cracker crumbs, granulated sugar, and that tiny pinch of salt if you’re using it. Give it a good whisk or stir with a fork to make sure everything is evenly distributed. This step is super important because it ensures that every bite of the crust has that perfect balance of sweet and slightly salty flavors. It also helps to distribute the sugar and salt so you don’t get clumps of sweetness or saltiness. You want a uniform mixture.
Step 3: Mix Wet Ingredients
Now, in a separate small microwave-safe bowl, melt your unsalted butter. I usually do this in 30-second increments, stirring in between, until it’s fully liquid and just warm. You don’t want it piping hot, just nicely melted. Pour the melted butter over the dry graham cracker mixture.
Step 4: Combine
Using a fork or your hands (my preferred method, because it helps me feel the consistency!), mix the graham cracker crumbs and melted butter together. You want to keep stirring until the crumbs are evenly moistened and clump together when you squeeze them. It should have a texture like wet sand. If it seems too dry and crumbly, add a tiny bit more melted butter, about a teaspoon at a time, until it holds together. If it seems too wet, add a tablespoon more of graham cracker crumbs. Don’t overmix at this stage; just get it all nicely combined.
Step 5: Prepare Filling
Now, press the graham cracker mixture evenly into the bottom of your prepared pizza pan or baking dish. Use the bottom of a glass or measuring cup to really pack it down firmly. This creates a nice, stable crust that won’t crumble apart when you slice into it. Make sure you press it all the way to the edges. Once the crust is pressed, you’ll spread your chocolate chips evenly over the top. Just pour them right on and spread them out with a spatula or your fingers. Make sure they go all the way to the edges, too, so you get chocolatey goodness in every single bite.
Step 6: Layer & Swirl
Now for the best part – the marshmallows! Scatter the marshmallows evenly over the chocolate layer. You want a nice, thick, fluffy blanket of marshmallows. Don’t be shy here! The more marshmallows, the better the s’mores experience. If you want a super-toasted look, you can gently press the marshmallows down into the chocolate a little bit. This helps them melt and spread more evenly when they bake.
Step 7: Bake
Pop that glorious creation into your preheated oven. Bake for about 8-12 minutes, or until the marshmallows are puffed up and starting to turn golden brown. Keep a close eye on it, because marshmallows can go from perfectly toasted to burnt in a flash! You’re looking for that beautiful, lightly browned, slightly gooey look. The chocolate underneath should be melted and bubbly. Ovens can vary, so start checking around the 8-minute mark.
Step 8: Cool & Glaze
Once it’s out of the oven, let your s’mores pizza dessert cool on a wire rack for at least 10-15 minutes. This is *crucial*! I know it’s tempting to dive right in, but letting it cool allows the chocolate to set up a bit and makes it much easier to slice cleanly. If you try to cut it when it’s too hot, everything will just ooze out. Patience, my friends, is a virtue, especially with warm, gooey desserts!
Step 9: Slice & Serve
After it’s had a chance to cool slightly, use a sharp knife or a pizza cutter to slice it into wedges. Serve it warm, when the marshmallows are still wonderfully gooey and the chocolate is melty. It’s absolutely divine on its own, but you could also serve it with a dollop of whipped cream or a scoop of vanilla Ice Cream if you’re feeling extra decadent. Enjoy every single sticky, chocolatey, marshmallowy bite!
What to Serve It With
This s’mores pizza dessert is so wonderfully versatile, it can truly fit into any occasion. For a delightful breakfast treat, especially on a weekend, I love serving it with a steaming mug of good quality coffee. The rich chocolate and sweet marshmallows are a perfect contrast to the slightly bitter coffee. I’ll often slice it into smaller, more manageable pieces for a “Breakfast Pizza” vibe. For a more elegant brunch spread, I’ll plate a larger slice with some fresh berries like raspberries or strawberries on the side – the tartness of the berries cuts through the sweetness beautifully. A glass of sparkling cider or a light mimosa pairs wonderfully here too.
As a dessert, it’s the star of the show, of course! After dinner, I like to serve it slightly warmer, maybe with a tiny drizzle of caramel sauce or a sprinkle of Sea Salt for an extra touch of flavor complexity. It’s also incredibly satisfying for those cozy snack moments. Think movie nights, game nights, or just a quiet evening curled up with a good book. A cold glass of milk is the ultimate pairing for this casual setting. My family has a tradition of making this after a particularly long school week, and it always feels like a special occasion. It’s the ultimate comfort food, a dessert that truly brings smiles and happy sighs to the table.
Top Tips for Perfecting Your S’mores Pizza Dessert
Okay, let’s talk about fine-tuning this masterpiece. When it comes to the graham cracker crust, the key is the moisture level of the crumbs. You want them to be like wet sand – they should clump together easily when squeezed. If they’re too dry, they’ll just crumble apart. If they’re too wet, they can become gummy. I’ve learned that adding the butter a little at a time and mixing until you reach that perfect consistency is worth the extra minute. Don’t be afraid to really press that crust into the pan; a firm crust is your best friend here to prevent it from falling apart.
“The Smores Pizza Easy Dessert Pie turned out amazing. My kids asked for seconds. Saving this one!”
For the chocolate layer, while chips are easy and effective, consider the quality. Using good quality milk chocolate chips will yield a better melt and flavor. If you want to get fancy, you can even chop up a good chocolate bar. Another tip I’ve picked up is to slightly overlap the marshmallows when you lay them down. This ensures there are no gaps and you get a beautiful, even toasted surface. Some people like to cut larger marshmallows into thirds or halves for better coverage, and that’s a great idea too. Make sure they are spread evenly so they all get a chance to toast nicely.
When it comes to baking, ovens really do differ! I’ve found that mine tends to toast marshmallows quickly, so I always keep a very close eye on it after about 7 minutes. You’re looking for that golden-brown hue, not burnt edges. If your oven has a broiler setting, you can even use that for the last minute or two to get an extra beautiful toasty top, but you have to watch it like a hawk! I learned that the hard way after a slightly singed batch. For ingredient swaps, if you can’t find graham crackers, digestive biscuits or even shortbread cookies can work as a base, though the flavor will be a bit different. You can also experiment with different types of chocolate – White Chocolate chips would be a fun, sweet variation, or even add some chopped nuts for crunch. And if you’re dairy-free, look for dairy-free chocolate chips and marshmallows – they are becoming much more common and work wonderfully!
Storing and Reheating Tips
This s’mores pizza dessert is truly best enjoyed fresh and warm, but don’t worry, it stores surprisingly well! If you have leftovers (which, let’s be honest, doesn’t happen often in my house!), you can keep it at room temperature for up to a day. Make sure to cover it loosely with plastic wrap or foil to keep it from drying out. The marshmallows might deflate a bit overnight, but the flavor is still fantastic. For longer storage, I always opt for the refrigerator. Wrap the slices tightly in plastic wrap and then place them in an airtight container. It will stay good in the fridge for about 3-4 days. The crust will soften slightly in the fridge, but it’s still delicious.
If you want to freeze it, I recommend slicing it first. Wrap each slice individually and tightly in plastic wrap, then place them in a freezer-safe bag or container. It can be frozen for up to 2-3 months. To reheat, simply unwrap a slice and either pop it in a toaster oven at 300°F (150°C) for a few minutes until warmed through and the marshmallows are slightly gooey again, or even microwave it for about 20-30 seconds. For the best results, especially if you want that toasted marshmallow effect, the toaster oven is your best bet. If you’ve frozen it, the crust might be a bit softer upon reheating, but the flavors will still be there. I usually add the marshmallows *after* reheating if I want them perfectly toasted, as they can get a bit sticky when frozen and reheated. But honestly, even straight from the fridge or reheated gently, it’s still a delightful treat!
Frequently Asked Questions
Final Thoughts
There you have it, my friends! A s’mores pizza dessert that’s sure to become a favorite in your home. It’s more than just a dessert; it’s a sweet trip down memory lane, a guaranteed crowd-pleaser, and proof that you don’t need to be a pastry chef to create something truly magical in your own kitchen. The blend of textures and tastes is just heavenly, and the sheer joy on people’s faces when they take their first bite is absolutely priceless.
If you love this s’mores pizza dessert, you might also enjoy exploring some of my other easy-to-make treats, like my famous Fudgy Brownies or my crowd-pleasing Apple Crumble Bars. They share that same spirit of simple ingredients yielding big flavor.
I genuinely can’t wait to hear how your s’mores pizza dessert turns out! Please, if you make it, let me know in the comments below. I love seeing your creations and hearing about your family’s reactions. Don’t be shy about sharing your own little twists or variations – that’s what makes cooking so much fun! Until next time, happy baking!
smores pizza dessert
Ingredients
S'mores Pizza Ingredients
- 1 Pillsbury refrigerated pie crust
- 7 tablespoons butter melted, divided
- 1.25 cups graham cracker crumbs
- 6 ounces semi-sweet chocolate chips about 0.75 cup
- 0.33 cup heavy whipping cream
- 3 bars Hershey's chocolate 1.55 oz each, broken into pieces
- 2.5 rectangles graham crackers broken into pieces
- 2 cups mini marshmallows
- 1 as needed chocolate sauce for drizzling, optional
Instructions
Preparation Steps
- Preheat oven to 350 degrees F (175 degrees C).
- Unroll one Pillsbury pie crust. Lay it flat on a 12-inch pizza pan and poke it all over with a fork.
- Spread 1 tablespoon of melted butter onto the pie crust, then cover it with 0.25 cup of graham cracker crumbs.
- Bake the pie crust for about 9-10 minutes, removing from the oven just before the edges start to brown.
- While the crust bakes, place chocolate chips in a metal bowl.
- Microwave heavy cream until it starts to boil. Remove from microwave and pour over the chocolate chips.
- Cover the bowl with plastic wrap for 5-7 minutes to allow chocolate to melt.
- While the chocolate sits, combine the remaining melted butter and graham crackers (for the topping). Set aside.
- Whisk the chocolate and cream until smooth to create a ganache.
- Allow the ganache to sit for about 5 minutes to thicken slightly.
- Remove the baked pie crust from the oven and allow it to cool until the chocolate ganache is ready.
- Pour the ganache over the pie crust and spread into an even layer.
- Add the prepared graham cracker crumbs in an even layer on top of the chocolate ganache.
- Top with pieces of Hershey's chocolate bar, pieces of broken graham cracker rectangles, and a layer of mini marshmallows.
- Bake at 350 degrees F (175 degrees C) for about 4-5 minutes, until marshmallows get puffy. Then, if desired, switch oven to convection bake or broiler (watch carefully!) at 350 degrees F for about 2-3 minutes to toast marshmallows.
- Allow to cool for about 5 minutes. Serve warm, drizzled with extra chocolate sauce if desired.


