You know those nights, right? The ones where the clock is ticking, the fridge looks like a war zone, and the thought of making anything remotely elaborate sends a shiver down your spine. That’s precisely when this Mexican pizza recipe swoops in like a culinary superhero. It’s my absolute go-to, the one I can whip up with one eye open, and it always, *always* hits the spot. It’s not quite a traditional pizza, nor is it a taco, but somewhere delightfully in between, a cheesy, saucy, wonderfully messy creation that my family devours faster than I can even set the table. I first stumbled upon something similar years ago, a quick weeknight hack, and since then, it’s evolved into this perfected version. It’s the kind of dish that makes you feel like a kitchen whiz, even if you’re just assembling pre-made ingredients. If you’re a fan of a good loaded taco or a gooey quesadilla, you’re going to adore this. Honestly, the ease and flavor packed into this Mexican pizza are just mind-blowing for how little effort it takes.
Thank you for reading this post, don't forget to subscribe!What is Mexican pizza?
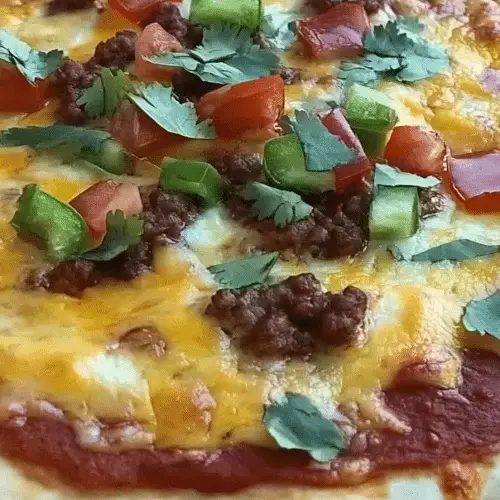
So, what exactly *is* this magical creation I call Mexican pizza? Think of it as a delicious rebellion against traditional culinary norms. It’s essentially a layered marvel that starts with crispy tortillas, piled high with all your favorite taco fixings, and then baked until gloriously melted and bubbly. It’s not a deep-dish Chicago style, nor a thin-crust Neapolitan. Instead, it’s a delightful fusion that captures the heart of Mexican flavors with the comforting, crowd-pleasing format of a pizza. Some people might call it a baked taco salad, others a deconstructed Enchilada Casserole. Whatever you want to call it, the essence is the same: layers of savory goodness on a crispy base, topped with cheese and sauce. It’s approachable, customizable, and frankly, just plain fun to eat. It’s the kind of food that brings a smile to your face and makes you forget about your busy day.
Why you’ll love this recipe?
There are so many reasons why this Mexican pizza has earned a permanent spot in my recipe rotation, and I’m so excited for you to experience them too. First off, the flavor profile is just incredible. You get that satisfying crunch from the tortillas, followed by the savory depth of seasoned Ground Beef (or your protein of choice), the brightness of salsa and beans, and then, of course, that glorious blanket of melty cheese. It’s a symphony of textures and tastes that just works perfectly together. And let’s talk about simplicity. I swear, this is one of those recipes that feels like cheating because it’s so easy. It requires minimal actual cooking, mostly just assembly and baking, which is an absolute lifesaver on those nights when you’re short on time or energy. It’s also incredibly budget-friendly. Using pantry staples and common grocery items means you can feed a crowd without breaking the bank, which is always a huge win in my book. Plus, its versatility is off the charts! You can swap out the meat, add different veggies, go vegetarian, make it spicy or mild – the possibilities are endless. It’s a dish that adapts to your cravings and what you have on hand. What I love most about this Mexican pizza, though, is that it’s incredibly forgiving. Even if you’re not a seasoned cook, you can follow these steps and end up with something truly delicious. It’s a culinary hug in every bite, perfect for feeding hungry kids or impressing friends without breaking a sweat.
How do I make Mexican pizza?
Quick Overview
This recipe is all about layering goodness and letting the oven do the hard work. We’ll start by prepping our crispy tortilla base, then pile on a seasoned filling, followed by a generous topping of cheese and a drizzle of salsa before baking it to golden perfection. It’s a straightforward process that guarantees a delicious, satisfying meal with minimal fuss. You’ll have a crowd-pleasing Mexican pizza ready in under an hour, and the best part is how customizable it is to your own taste preferences.
Ingredients
For the Crispy Base:
* 8-10 medium corn tortillas (I prefer the white corn ones for a classic flavor and good crispness, but yellow work too!)
* 2-3 tablespoons vegetable oil (or any neutral oil you have on hand)
This is crucial for getting those tortillas nice and crispy, preventing them from getting soggy under all that delicious filling.
For the Savory Filling:
* 1 pound Ground Beef (or ground turkey, chicken, or even crumbled plant-based meat)
* 1 small onion, finely chopped
* 2 cloves garlic, minced
* 1 packet (about 1 ounce) taco seasoning (or your own blend of chili powder, cumin, paprika, and a pinch of cayenne)
* 1/2 cup water (or beef broth for extra flavor)
* 1 can (15 ounces) refried beans, warmed (I like to warm them gently in a small saucepan or microwave to make them easier to spread)
* 1 can (15 ounces) black beans, rinsed and drained (optional, but adds great texture and extra protein!)
The quality of your taco seasoning can really make a difference here. Feel free to adjust the spices to your liking – more chili powder for a kick, more cumin for earthiness.
For the Cheesy Topping & Drizzle:
* 2 cups shredded Mexican cheese blend (cheddar, Monterey Jack, and a little pepper jack is my favorite)
* 1/2 cup your favorite salsa (mild, medium, or hot – depending on your preference!)
* Optional toppings: chopped cilantro, diced jalapeños, Sour Cream, avocado or guacamole for serving
Don’t skimp on the cheese! It’s what holds everything together and makes it wonderfully gooey.
“New family favorite! This Mexican pizza was so flavorful and ridiculously easy. Crowd-pleaser for sure.”
Step-by-Step Instructions
Step 1: Preheat & Prep Pan
First things first, preheat your oven to 375°F (190°C). While the oven is warming up, grab a large baking sheet. Lightly brush the bottom of the baking sheet with a little bit of your vegetable oil, or you can use cooking spray. This will help prevent the bottom tortillas from sticking. We’re essentially creating a base for our pizza.
Step 2: Mix Dry Ingredients
This step is mostly about getting the ground meat ready. In a large skillet over medium-high heat, add your Ground Beef (or other protein). Break it up with a spoon and cook until it’s browned. Drain off any excess grease. Add the chopped onion and cook until it starts to soften, about 3-5 minutes. Then, stir in the minced garlic and cook for another minute until fragrant. Now, sprinkle in the taco seasoning and pour in the water or broth. Stir everything together, bring it to a simmer, and let it cook for about 5-7 minutes, or until the sauce has thickened nicely. This is where all that delicious flavor really comes from!
Step 3: Mix Wet Ingredients
This step is less about mixing and more about preparing our flavor components. Gently warm your refried beans in a small saucepan over low heat or in the microwave until they are spreadable. You want them smooth and easy to work with, not stiff. If you’re using black beans, simply rinse and drain them. Have your salsa ready to go – open that jar and get it within easy reach. This is the phase where you gather your building blocks for the layers of flavor.
Step 4: Combine
This is where we start assembling our masterpiece! Lay out a layer of corn tortillas on your prepared baking sheet, slightly overlapping them if needed to cover the surface. Spread a generous, even layer of the warmed refried beans over the tortillas. Then, spoon the seasoned meat mixture over the beans. If you’re adding black beans, scatter them evenly over the meat. This creates the hearty core of our Mexican pizza.
Step 5: Prepare Filling
The “filling” here is mostly the seasoned meat mixture and the beans we just prepared. Make sure the meat is well-seasoned and the beans are spread smoothly. The key is to have a good base layer that’s flavorful and cohesive. If you want to add any other cooked elements like sautéed peppers or corn, this is the stage to layer them in before the cheese.
Step 6: Layer & Swirl
Now for the cheesy magic! Sprinkle about half of your shredded Mexican cheese blend evenly over the meat and bean layer. Then, drizzle about half of your salsa over the cheese. You don’t need to be too precise here; a rustic drizzle is perfect. Place another layer of tortillas on top of the cheese and salsa. Spread another layer of refried beans (you might not need all of them for this second layer, depending on how many tortillas you used). Top this second layer of beans with the remaining meat mixture, if you have any left, or focus on ensuring good coverage with beans. Finally, sprinkle the rest of the shredded cheese all over the top. This is your glorious, melty crown!
Step 7: Bake
Pop that beautifully assembled Mexican pizza into your preheated oven. Bake for about 15-20 minutes, or until the tortillas are golden brown and crispy around the edges, and the cheese is melted, bubbly, and starting to turn a lovely golden hue. Keep an eye on it, as ovens can vary. You want that delightful crispness without burning.
Step 8: Cool & Glaze
Once it’s out of the oven, let it rest for about 5-10 minutes. This is crucial! It allows the cheese to set a bit, making it much easier to slice and serve without everything falling apart. While it’s resting, you can warm up any extra salsa or prepare any toppings like sour cream or guacamole. After resting, drizzle the remaining salsa over the top of the hot Mexican pizza. The residual heat will warm it up slightly, and it looks so appealing!
“The Mexican pizza turned out amazing. My kids asked for seconds. Saving this one!”
Step 9: Slice & Serve
Using a sharp knife or a pizza cutter, slice your Mexican pizza into wedges or squares. Serve immediately while it’s hot and the cheese is wonderfully gooey. Garnish with fresh cilantro, a dollop of sour cream, or some creamy avocado slices if you like. This is best enjoyed fresh out of the oven when the tortillas are at their crispiest!
What to Serve It With
This Mexican pizza is practically a meal in itself, but it also plays wonderfully with a few side dishes to round out the experience, especially for different occasions. For a quick and satisfying Breakfast, I love serving a smaller portion alongside a big mug of strong coffee. The savory, cheesy goodness is surprisingly perfect for kickstarting the day, almost like a breakfast burrito you can eat with a fork. When it comes to Brunch, I elevate it a bit. Serving it with a fresh, vibrant side salad with a zesty lime vinaigrette adds a lovely freshness that cuts through the richness. A small bowl of Mexican street corn (esquites) is also a fantastic addition, offering a burst of sweet and spicy flavors. As a Dessert, though it might sound unconventional, a very lightly spiced version (think cinnamon and a hint of cocoa in the meat) can be surprisingly delicious when served with a dollop of sweetened whipped cream or a light drizzle of Mexican chocolate sauce. But my favorite way to enjoy it is as a Cozy Snack. It’s perfect for game nights or casual hangouts. I’ll often serve it with a big bowl of tortilla chips and some guacamole or a creamy ranch dip on the side. My kids always ask for this when their friends are over, and it’s always a huge hit. One family tradition is serving it with a side of seasoned black beans and a simple rice pilaf. It’s comfort food at its finest.
Top Tips for Perfecting Your Mexican Pizza
Over the years, I’ve learned a few tricks that can take this already delicious Mexican pizza from good to absolutely phenomenal. When it comes to the tortillas, the key to getting them perfectly crispy is a light coating of oil and not overcrowding the pan if you decide to fry them briefly before assembling. I often just brush them lightly with oil and let the oven do its thing, which works wonderfully and is less messy. Another tip I learned the hard way is to really drain the grease from the ground beef thoroughly; no one wants a greasy pizza! For the refried beans, warming them is non-negotiable in my house. It makes them so much easier to spread evenly, preventing tears in the tortillas and ensuring consistent flavor in every bite. Don’t be afraid to season your meat generously; taco seasoning can be a bit mild sometimes, so taste and adjust if you like things spicier. When it comes to layering, I find that a gentle hand is best. You don’t want to mash down the ingredients too much, or the tortillas can get soggy. For the cheesy topping, I love mixing my own blend – a little extra sharp cheddar always adds a nice bite. And for that salsa drizzle, I use a good quality salsa that has some texture; a super watery salsa can make things a bit too saucy. If you find your tortillas are browning too quickly on the bottom before the cheese is melted, you can always place the baking sheet on a lower rack or loosely tent the pizza with foil for the last few minutes of baking. I’ve also experimented with adding a layer of seasoned cooked chicken or even shredded pork instead of ground beef, and it works beautifully. If you’re feeling adventurous, a thin layer of enchilada sauce under the cheese on the second layer can add another dimension of flavor. Lastly, letting it rest after baking is crucial for neat slicing and a less messy eating experience!
Storing and Reheating Tips
This Mexican pizza is, without a doubt, best enjoyed fresh. However, life happens, and sometimes you have leftovers! When it comes to storing, I usually aim to eat it the same day it’s made. If there are any delicious remnants, I’ll let it cool completely on the baking sheet before carefully transferring it to an airtight container. At room temperature, it’s not something I’d recommend keeping for more than a couple of hours, especially if it’s warm out, as the cheese and meat are best kept cool. Refrigerator storage is your best bet for leftovers. It will keep well in the fridge for about 3-4 days. Make sure it’s covered tightly with plastic wrap or foil, or stored in a sealed container. I find that wrapping it well helps to prevent the tortillas from getting too soggy from any residual moisture. For freezing, I’m a little hesitant with this one because of the crispiness factor. Tortillas can sometimes lose their texture when thawed after being frozen. However, if you absolutely must freeze it, I would recommend wrapping individual slices very tightly in plastic wrap and then in foil, or placing them in a freezer-safe bag. It can last in the freezer for up to 1-2 months. When it comes to reheating, the microwave is the fastest option, but it can make the tortillas a bit chewy. For a crisper result, I highly recommend reheating in a toaster oven or a regular oven. Set your oven to around 350°F (175°C) and bake for about 8-12 minutes, or until heated through and the cheese is re-melted. You can also pop slices in a skillet over medium-low heat with a tiny bit of oil to revive the crispiness. If you froze it, thaw it in the refrigerator overnight first, then reheat using the oven or toaster oven method. I always suggest adding fresh salsa and any cold toppings like sour cream or avocado *after* reheating, so they stay fresh and vibrant.
Frequently Asked Questions
Final Thoughts
So there you have it – my tried-and-true, super-easy Mexican pizza! It’s the kind of recipe that truly makes life a little bit easier and a whole lot tastier. I love how it brings everyone to the table, no matter how hectic the day has been. The magic of this Mexican pizza lies in its simplicity, its vibrant flavors, and the sheer joy it brings to your taste buds. It’s a reminder that sometimes, the most delicious meals come from the simplest ideas. If you’re a fan of this kind of easy, flavorful meal, you might also enjoy my Speedy Skillet Lasagna or my One-Pan Lemon Herb Roasted Chicken. They share that same spirit of minimal fuss with maximum flavor. I genuinely can’t wait for you to try this Mexican pizza and experience that weeknight magic for yourself. Don’t be shy about leaving a comment below to tell me how yours turned out, or if you discovered any amazing variations. Your feedback always makes my day! Happy cooking, and I hope this recipe becomes a beloved staple in your kitchen too!
Mexican pizza
Ingredients
Main Ingredients
- 1 large Flour Tortillas
- 0.5 cup Salsa Your favorite kind
- 1 cup Shredded Cheddar Cheese
- 0.5 cup Cooked Ground Beef Seasoned with taco seasoning
- 0.25 cup Black Beans Rinsed and drained
- 0.25 cup Diced Tomatoes
- 0.125 cup Diced Green Chilies Optional
Instructions
Preparation Steps
- Preheat oven to 400 degrees F (200 degrees C).
- Place tortillas on a baking sheet.
- Spread salsa evenly over each tortilla.
- Sprinkle with shredded cheese, cooked ground beef, black beans, diced tomatoes, and green chilies (if using).
- Bake for 15-20 minutes, or until cheese is melted and bubbly.
- Let cool slightly before slicing and serving.