You know those recipes that just *feel* like home? The ones that smell amazing while they’re baking, make your kitchen feel instantly cozy, and are always a guaranteed hit with everyone? Well, this is one of those for me. I’m talking about Grinch Cookies, and let me tell you, they’re not just for Christmas time, even though that’s when they really shine. These cookies are a little bit magical, a little bit chewy, and packed with a flavor that’s somehow both comforting and exciting. Forget those store-bought cookies that taste like cardboard; these are the real deal. They’re so good, they’ll make even the grumpiest person crack a smile. I’ve been making them for years, and every single time, my family raves. They’re a bit like a classic Sugar Cookie but with this incredible texture and a vibrant pop of green that just screams fun. If you’re a fan of soft, chewy cookies with a hint of something special, then stick around because these Grinch Cookies are about to become your new obsession.
Thank you for reading this post, don't forget to subscribe!What are Grinch Cookies?
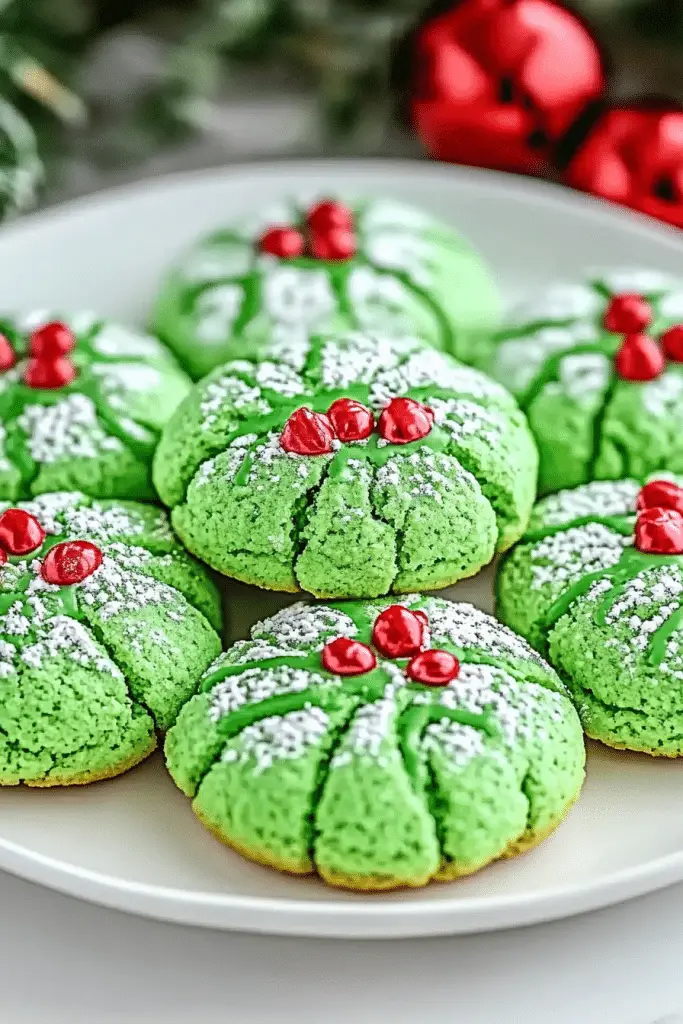
So, what exactly are these magical Grinch Cookies? Think of them as your favorite soft, chewy Sugar Cookie, but with a delightful twist. They get their signature vibrant green color from a touch of food coloring, which instantly makes them fun and festive. But the real charm isn’t just the color; it’s the texture. These cookies are wonderfully soft and chewy in the center, with just the slightest crisp edge, making them utterly irresistible. They’re not flat and brittle like some sugar cookies can be, nor are they super cakey. They hit that perfect sweet spot. The name, of course, comes from their whimsical appearance, reminiscent of the Grinch’s famously green complexion and his even more famously green heart. They’re designed to bring a smile to your face, just like the Grinch when his heart grew three sizes! It’s a simple concept, really – taking a beloved cookie base and giving it a playful, holiday-ready makeover that’s as fun to make as it is to eat.
Why you’ll love this recipe?
Honestly, where do I even begin with why this Grinch Cookie recipe is so special? First off, the FLAVOR. Oh my goodness. It’s that perfect sweet, buttery vanilla taste that just sings. It’s not overly sweet, which I appreciate, allowing the good quality butter and vanilla to really shine through. Then there’s the TEXTURE. I’ve made so many cookies in my life, and getting that chewy-soft center with those slightly crisp edges? It’s a game-changer. These cookies don’t spread out into sad, flat discs. They stay beautifully thick and cloud-like. And SIMPLICITY – this is truly a lifesaver on busy nights. You don’t need any fancy equipment, just a couple of bowls and a whisk. The ingredients are all pantry staples, which is a huge plus for me. I’m always looking for budget-friendly treats that don’t compromise on taste, and these fit the bill perfectly. The COST-EFFICIENCY is fantastic; you can make a massive batch for very little. Plus, they are so VERSATILE. While they’re incredible on their own, you can dip them in white chocolate, drizzle them with extra icing, or even sandwich them with a Cream Cheese filling (though I haven’t personally tried that last one yet, it’s on my list!). They’re a holiday staple in my house, but honestly, they’re perfect anytime you need a little pick-me-up. They remind me of the sugar cookies my grandma used to make, but with a fun, modern twist. What I love most is seeing the kids’ faces light up when they see that vibrant green. It’s pure joy in cookie form!
How do I make Grinch cookies?
Quick Overview
This recipe is delightfully straightforward. You’ll start by creaming butter and sugar until light and fluffy, then adding eggs and vanilla. The dry ingredients get whisked together separately, and then it’s just a matter of combining the wet and dry until a soft dough forms. The key to that beautiful green color is adding a good quality gel food coloring. Once the dough is ready, you’ll scoop it onto baking sheets and bake until the edges are just set. The result is a batch of wonderfully soft, chewy, and vibrantly green cookies that are guaranteed to be a hit.
Ingredients
For the Main Batter:
3 cups all-purpose flour: Make sure it’s fresh! Sift it if you want extra insurance against dense cookies, but usually, a good whisking does the trick.
1 teaspoon baking soda: This is what gives them their lift and chewiness.
1/2 teaspoon salt: Balances the sweetness.
1 cup (2 sticks) unsalted butter, softened: Use good quality butter; it really makes a difference. Make sure it’s soft, not melted. I usually leave mine out on the counter for about an hour.
1 1/2 cups granulated sugar: For that classic cookie sweetness.
2 large eggs: Room temperature eggs incorporate better. Just pop them in warm water for 5-10 minutes if you forget to take them out.
2 teaspoons pure vanilla extract: Don’t skimp on the vanilla! It adds so much depth of flavor.
1/2 to 1 teaspoon green gel food coloring: Gel coloring is key here for a vibrant, consistent color without adding too much liquid. Start with 1/2 teaspoon and add more until you achieve your desired Grinchy hue.
For the Glaze:
1 cup powdered sugar: Sifted to avoid lumps.
2-3 tablespoons milk (or water): Start with 2 tablespoons and add more to reach your desired consistency. Whole milk makes a slightly richer glaze, but any milk works.
1/2 teaspoon vanilla extract (optional): For a little extra flavor kick.
Step-by-Step Instructions
Step 1: Preheat & Prep Pan
First things first, preheat your oven to 375 degrees Fahrenheit (190 degrees Celsius). Line your baking sheets with parchment paper or silicone baking mats. This is a crucial step for me; it prevents sticking and ensures your cookies bake evenly without spreading too much. If you don’t have parchment, you can lightly grease the pans, but parchment is my go-to for easy cleanup and perfect cookies every time. Make sure you have enough baking sheets so you can work efficiently.
“The Grinch Cookies turned out amazing. My kids asked for seconds. Saving this one!”
Step 2: Mix Dry Ingredients
In a medium bowl, whisk together the all-purpose flour, baking soda, and salt. Whisking them together ensures that the leavening agent (baking soda) and salt are evenly distributed throughout the flour, which is really important for consistent cookie texture. You want to make sure there are no clumps of baking soda hiding in there!
Step 3: Mix Wet Ingredients
In a large bowl, cream together the softened unsalted butter and granulated sugar with an electric mixer (or a sturdy whisk and some arm power) until the mixture is light and fluffy, about 2-3 minutes. This creaming process incorporates air, which is essential for a tender cookie. Then, beat in the eggs one at a time, mixing well after each addition. Stir in the pure vanilla extract. Now comes the fun part: add the green gel food coloring. Start with about 1/2 teaspoon, then add more, a little at a time, until you reach that perfect, vibrant Grinch green. Mix until the color is uniform throughout the wet ingredients.
Step 4: Combine
Gradually add the dry ingredients to the wet ingredients, mixing on low speed (or with a spatula) until just combined. Be careful not to overmix! Overmixing can develop the gluten in the flour too much, resulting in tough cookies. You should have a soft, slightly sticky dough that’s a beautiful shade of green. If the dough seems a bit too wet, you can add another tablespoon of flour, but usually, it’s perfect at this stage.
Step 5: Prepare Filling
This recipe doesn’t actually have a separate “filling” in the traditional sense, as the color is incorporated directly into the Cookie Dough. The magic is in the dough itself!
Step 6: Layer & Swirl
Since the color is in the main batter, there’s no layering or swirling needed for this specific Grinch Cookie Recipe. We’re aiming for a uniformly green cookie that’s wonderfully chewy.
Step 7: Bake
Drop rounded tablespoons of dough onto the prepared baking sheets, spacing them about 2 inches apart. They will spread a little, but not too much if you haven’t overmixed. Bake for 9-12 minutes, or until the edges are lightly golden and set, but the centers still look slightly soft. The exact baking time will depend on your oven and the size of your cookies. I usually start checking around the 9-minute mark. They’ll continue to cook slightly on the hot baking sheet after you take them out.
Step 8: Cool & Glaze
Let the cookies cool on the baking sheets for about 5 minutes before transferring them to a wire rack to cool completely. Once they are completely cool (and I mean *completely* cool, otherwise your glaze will melt off!), you can prepare the glaze. Whisk together the powdered sugar and 2 tablespoons of milk (plus vanilla, if using) in a small bowl. Add more milk, a teaspoon at a time, until you reach a pourable but not too thin consistency. Drizzle or spread the glaze over the cooled cookies. You can dip the tops or just do a pretty drizzle. Let the glaze set before serving or storing.
Step 9: Slice & Serve
Once the glaze has set, these Grinch Cookies are ready to be devoured! They’re delicious on their own, but their vibrant color makes them perfect for any celebration or just a fun afternoon treat. Enjoy them with a glass of milk, coffee, or tea!
“Made the Grinch Cookies tonight and wow — perfect weeknight dinner. Will definitely make again!”
What to Serve It With
These Grinch Cookies are so versatile, they’re practically begging to be paired with all sorts of delightful beverages and occasions. For a cozy FOR BREAKFAST treat, they’re absolutely divine with a hot cup of coffee or a steaming mug of tea. I love having one with my morning coffee while I read the news. They’re not overly sweet, so they don’t feel like a dessert at breakfast time. For a slightly more elevated FOR BRUNCH, especially around the holidays, I like to arrange them on a tiered stand with other pastries and fruit. A mimosa or a sparkling cider would be a lovely beverage pairing. When serving them AS DESSERT, they’re wonderful on their own after dinner, but if you want to go all out, a scoop of vanilla bean ice cream or a warm berry compote on the side is heavenly. They also make a fantastic addition to a holiday cookie platter. And for those FOR COZY SNACKS, which is honestly my favorite time to eat them, just a glass of cold milk is pure perfection. My kids would happily eat these cookies for every snack. A personal family tradition we have is making a huge batch the week before Christmas and decorating them together. It’s become a cherished memory every year, and the cookies are always the star of the show.
Top Tips for Perfecting Your Grinch Cookies
I’ve made these Grinch Cookies more times than I can count, and along the way, I’ve picked up a few tricks that I think really help elevate them. For the ZUCCHINI PREP, you actually don’t need zucchini for this specific recipe; it’s just the green color that makes them “Grinch Cookies”! But if you were thinking of other green cookies, like zucchini cookies, then yes, you’d absolutely want to shred your zucchini and squeeze out as much moisture as possible. For these cookies, focus on getting your ingredients right. For MIXING ADVICE, the biggest one is don’t overmix the dough after adding the flour. Mix until *just* combined. You’ll see no dry streaks of flour left, and that’s your cue to stop. Overmixing develops gluten, which makes cookies tough, and we want these to be wonderfully soft and chewy. For ingredient swaps, I’ve experimented with different fats. While unsalted butter is my favorite for flavor, I have tried using half butter and half shortening, and they still turned out great, just a little less rich. I haven’t tried dairy-free butter extensively, but I imagine a good quality one would work, though the texture might be slightly different. For BAKING TIPS, always use parchment paper. It’s my secret weapon for cookies that don’t stick and bake evenly. Also, pay attention to your oven. Ovens can vary wildly! Get to know yours. If your cookies tend to spread too much, try chilling the dough for 30 minutes before baking; this can help them hold their shape better. For the GLAZE VARIATIONS, if you want a thicker glaze, just use less milk. For a thinner glaze that drizzles easily, add a little more milk. You can also add a tiny pinch of cream of tartar to the glaze to help it set a bit firmer, if you prefer. I sometimes add a little almond extract to the glaze for a different flavor profile, but the vanilla is classic and delicious.
Storing and Reheating Tips
One of the best things about these Grinch Cookies is how well they keep, making them perfect for making ahead. For ROOM TEMPERATURE storage, once the glaze is completely set, I store them in an airtight container. They’ll stay wonderfully soft and chewy for about 3-4 days this way. I usually don’t stack them more than two layers high, with parchment paper in between if I’m stacking. REFRIGERATOR STORAGE is also an option, especially if it’s very warm where you live, or if you want them to last a bit longer. They’ll keep well in an airtight container in the fridge for up to a week. Just a heads-up, the texture might change slightly, becoming a bit firmer when cold, but they soften up quickly at room temperature. For FREEZER INSTRUCTIONS, these cookies freeze beautifully! You can freeze the baked and cooled cookies (glazed or unglazed) in a single layer on a baking sheet until solid, then transfer them to a freezer-safe bag or airtight container for up to 2-3 months. To thaw, just bring them to room temperature. If you’re reheating them, a few seconds in the microwave (seriously, just 5-10 seconds!) can bring them back to that fresh-from-the-oven softness, especially if they’ve firmed up a bit in the fridge or freezer. For GLAZE TIMING ADVICE, I always wait until the cookies are completely cool before glazing. If you glaze them while they’re warm, the glaze will melt off into a messy puddle, and that’s just not what we want! If you’re freezing them, you can freeze them unglazed and glaze them after thawing for the freshest look and taste.
Frequently Asked Questions
Final Thoughts
I truly hope you give these Grinch Cookies a try! They are more than just a recipe; they’re a little bit of edible joy that brings smiles to faces, young and old. The soft, chewy texture combined with that perfect hint of vanilla and that fun, festive green color makes them a winner every single time. They’re simple enough for a weeknight treat but special enough for any holiday gathering. They’re proof that sometimes, the most delightful treats are the ones that are easy to make and bring a burst of fun to your day. If you love these, you might also enjoy my {Link to another popular cookie recipe, e.g., Soft Molasses Cookies} or my {Link to a festive bread recipe, e.g., Cranberry Orange Bread}. They share that same cozy, homemade goodness. I can’t wait to hear how your Grinch Cookies turn out! Please leave a comment below to share your experience or any fun variations you tried. Happy baking!

Grinch Cookies
Ingredients
Cookie Dough
- 1 cup unsalted butter softened
- 1.5 cup granulated sugar
- 2 large eggs
- 1 teaspoon vanilla extract
- 4 cup all-purpose flour
- 1 teaspoon baking soda
- 0.5 teaspoon salt
- 0.5 teaspoon green food coloring gel or liquid
Grinch Heart Decoration
- 0.5 cup red candy melts
Instructions
Preparation Steps
- In a large bowl, cream together the softened butter and granulated sugar until light and fluffy.
- Beat in the eggs one at a time, then stir in the vanilla extract.
- In a separate bowl, whisk together the flour, baking soda, and salt.
- Gradually add the dry ingredients to the wet ingredients, mixing until just combined. Be careful not to overmix.
- Add the green food coloring and mix until the dough is evenly colored.
- Cover the dough and refrigerate for at least 30 minutes.
- Preheat oven to 350°F (175°C). Line baking sheets with parchment paper.
- Roll out the dough on a lightly floured surface to about 1/4-inch thickness.
- Use a heart-shaped cookie cutter to cut out cookies. Place them on the prepared baking sheets.
- Bake for 10-12 minutes, or until the edges are lightly golden.
- Let the cookies cool on the baking sheets for a few minutes before transferring them to a wire rack to cool completely.
- Melt the red candy melts according to package directions.
- Once the cookies are completely cooled, use a small spoon or piping bag to drizzle or dot red candy melts onto the center of each cookie to resemble a Grinch heart.
- Allow the candy melts to set before serving.


