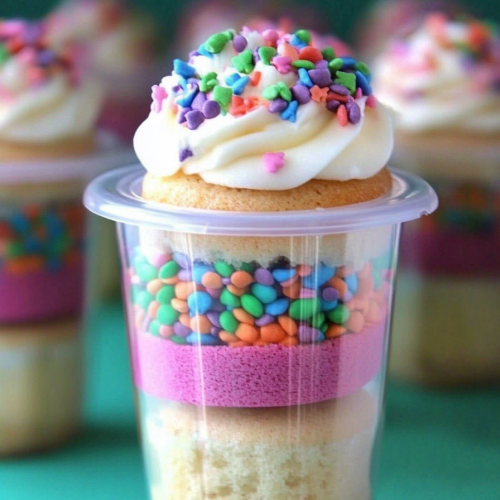
There’s something about a batch of cupcakes that instantly makes me feel like a kid again—eyes lighting up at the sight of colorful sprinkles, hands sticky with frosting, and that sweet, buttery smell filling the entire kitchen. One of my all-time favorites to whip up is the classic funfetti cupcakes. Honestly, these little bursts of vanilla and rainbow magic are my secret weapon for brightening any day, whether it’s a family celebration or just a Tuesday that needs a little something special. I’ve tested countless recipes, and I swear, nothing beats that perfect balance of fluffy crumb, moist interior, and an explosion of colorful sprinkles in every bite. Plus, they’re way easier to make than you might think—no fancy ingredients, just simple pantry staples. My kids ask for these all the time, and trust me, if I don’t keep a batch in the fridge, I hear about it! This recipe is a lifesaver on busy nights or when friends drop by unexpectedly. Ready to turn your kitchen into a rainbow wonderland? Let’s get baking!
Thank you for reading this post, don't forget to subscribe!What is Funfetti Cupcake?
Think of funfetti cupcakes as the playful, colorful cousin of your classic vanilla cupcake. The “funfetti” name is actually a clever blend of “fun” and “confetti,” referring to those tiny rainbow sprinkles stirred directly into the batter. The idea originated years ago with Pillsbury’s famous Funfetti Cake Mix, which became a childhood staple for birthdays and school parties. They’re essentially fluffy vanilla cupcakes loaded with cheerful sprinkles that melt into the batter, giving each bite a bit of crunch and a splash of color. It’s like a mini celebration every time you bite into one. The best part? They’re incredibly versatile—decorating them is half the fun, whether you keep it simple with some glaze or go all out with frosting and more sprinkles. And don’t let the bright appearance fool you—these are totally grown-up approved, especially when you want something festive but not too complicated to whip together. Think of funfetti cupcakes as the joyfully easy way to add a splash of happiness to your plate!
Why you’ll love this recipe?
What I love most about these funfetti cupcakes is how they manage to be both super fun and surprisingly simple. The flavor is basically vanilla, but the magic comes from that rainbow sprinkle crunch and the sweet, tender crumb. They’re perfect for birthdays, but honestly, I make them all year round for no reason at all — because let’s be real, who can resist a cupcake that looks like a party in every bite? These cupcakes are budget-friendly too; you probably have most of the ingredients in your pantry right now. And if you’re feeling creative, there’s so much you can do with the decorations—more frosting, edible glitter, extra sprinkles—you name it. Plus, they’re a fantastic way to involve kids in the kitchen. Mine love pouring in the sprinkles and helping me whisk the batter; everything gets a little more special when it’s a family affair. What I find especially appealing is how forgiving this recipe is—overmixing? No problem. Baking time? Pretty flexible. The real joy is watching those colorful sprinkles burst through the batter as they bake, transforming plain vanilla into a cheerful masterpiece. Whether you’re baking for a birthday, pajama brunch, or just because, these cupcakes bring a little sunshine into any day.
How do I make Funfetti Cupcakes?
Quick Overview
This recipe comes together in just a few straightforward steps. First, you cream butter and sugar to create a light, fluffy base. Then, you gently fold in flour, baking powder, and a splash of vanilla essence, followed by mixing in your favorite milk—almond milk, cow’s milk, whatever you have on hand—to keep everything moist. The secret to that tender crumb is not overmixing the batter; I always do this when I make cupcakes to keep them light. After the batter’s ready, fold in a generous handful of rainbow sprinkles, then pour the mixture into cupcake liners. A quick bake at 350°F (175°C) for about 20 minutes, and they’re golden, fluffy, and loaded with color. Once cooled, a simple glaze or frosting, plus a sprinkle of extra sprinkles, takes them over the top. Trust me on this—these are effortless but look like a million bucks!
Ingredients
For the Main Batter:
- 1 1/2 cups all-purpose flour – I like to use unbleached for a richer flavor
- 1 teaspoon baking powder – makes the cupcakes rise beautifully
- 1/4 teaspoon salt – essential for balancing sweetness
- 1/2 cup unsalted butter, softened – I tested this with coconut oil once and it worked beautifully
- 3/4 cup granulated sugar – keeps things sweet and tender
- 2 large eggs – at room temperature for best volume
- 1 teaspoon pure vanilla extract – because vanilla makes everything better
- 1/2 cup milk (dairy or plant-based) – for moisture and softness
- 1/2 cup rainbow sprinkles – the star of the show!
For the Glaze or Frosting:
- 1 cup powdered sugar
- 2-3 tablespoons milk or cream
- 1/2 teaspoon vanilla extract
- Extra sprinkles for decoration
Step-by-Step Instructions
Step 1: Preheat & Prep Pan
Set your oven to 350°F (175°C). Line a muffin tin with colorful paper liners—because, why not? Make sure your butter is softened; I usually pull mine out about 30 minutes before baking. It’s easier to beat, and you’ll avoid doughy lumps. You can also give the liners a quick spray with non-stick spray to ensure easy removal later. I always do this, especially if I’m making a big batch for friends — no sticky cupcakes in sight!
“New family favorite! This Easy Celebration Cupcakes with a Fun Twist was so flavorful and ridiculously easy. Crowd-pleaser for sure.”
Step 2: Mix Dry Ingredients
In a bowl, whisk together the flour, baking powder, and salt. This step is important for even rising, trust me. I’ve overmixed the batter before and ended up with dense cupcakes, so take your time here. A quick whisk is all it takes to incorporate everything evenly.
Step 3: Mix Wet Ingredients
In your stand mixer or with a hand whisk, beat the softened butter and sugar until they’re light and fluffy—about 2-3 minutes. Then, add the eggs one at a time, making sure each is fully incorporated before adding the next. Splash in the vanilla, and mix again. Your kitchen should smell amazing at this point!
Step 4: Combine
Gradually add the dry ingredients to the wet, alternating with the milk. Start and end with the dry, mixing on low speed just until everything comes together—overmixing will make the cupcakes dense, and nobody wants that. Fold in the rainbow sprinkles last, gently, to keep the color distribution even and prevent all the sprinkles from sinking to the bottom.
Step 5: Prepare Filling
Honestly, I throw in an extra handful of sprinkles here if I’m feeling especially festive. If you want, you can also fold in Mini Chocolate chips or crushed candies for added fun. The batter should be thick but pourable; if it’s too runny, add a little more flour.
Step 6: Layer & Swirl
Scoop the batter into your cupcake liners, filling each about two-thirds full. For a fun marbled look, I sometimes add a small spoonful of contrasting batter and swirl gently with a toothpick. This creates a pretty marbled effect that looks delightful when baked!
Step 7: Bake
Pop them into the oven and bake for about 18-20 minutes. They’re done when a toothpick inserted in the center comes out clean—or with just a few moist crumbs. Keep an eye on them; ovens vary, and you don’t want dry cupcakes. The tops should be golden and slightly springy to the touch.
Step 8: Cool & Glaze
Transfer the cupcakes to a wire rack and let them cool completely—this is key for a smooth frosting or glaze. While they cool, mix your powdered sugar, milk, and vanilla for a quick glaze. It should be smooth but slightly pourable. Drizzle or spread it over the cupcakes, then sprinkle with a few extra sprinkles for that finishing touch. If you prefer frosting, go wild! I love piping on a buttery vanilla or Cream Cheese Frosting for extra indulgence.
Step 9: Slice & Serve
The best part is slicing into a cupcake and seeing all those rainbow sprinkles peek out. Serve at room temperature, maybe with a glass of cold milk or a cup of coffee. These funfetti cupcakes disappear in minutes at my house—every single time. Trust me, once you try them, they’ll be your go-to for any celebration or just a happy snack after a long day.
“Made the Easy Celebration Cupcakes with a Fun Twist tonight and wow — perfect weeknight dinner. Will definitely make again!”
What to Serve It With
Honestly, these cupcakes are pretty much good on their own, but I like to serve them with a few personal touches to make them extra special. For breakfast, I love pairing a cupcake with a hot cup of vanilla latte—because why not start the day with a little celebration? When I serve these at brunch, I optional add fresh berries on the side, which balances out the sweetness and adds a pop of freshness. As a dessert, they’re perfect on their own or with a scoop of vanilla Ice Cream for an indulgent treat. My family often pulls out a tray of these at our casual weekend get-togethers, accompanied by fruit punch or sparkling lemonade. And honestly, the pure joy on my kids’ faces when I set these out with a big bowl of rainbow sprinkles is priceless. They’re versatile enough to go from casual snacks to party-centerpieces—just adjust the decorative flair and presentation. Nothing beats a plate of homemade funfetti cupcakes that fill the room with color and happiness. They’ve become our family’s signature treat—bright, fun, and downright delicious.
Top Tips for Perfecting Your Funfetti Cupcakes
After making these dozens of times, I’ve picked up a few tricks that might help your cupcakes turn out even better. First, don’t skip softening your butter; it makes mixing way easier and yields a lighter crumb. If your batter seems thick, a splash more milk can help; if it’s too runny, add a bit more flour, but do so gradually. When folding in sprinkles, be gentle—overmixing can crush the colors or sink the sprinkles to the bottom. For a more even sprinkle distribution, I sometimes add a tiny dusting of flour to the sprinkles before folding them in—I learned this trick from trial and error. Want to make these dairy-free? Substitute plant-based milks and coconut oil, and they’ll still turn out beautifully fluffy. When baking, positioning your oven rack in the middle gives the most even heat, ensuring perfect rising and no burnt edges. I also like to bake cupcakes slightly longer at a slightly lower temperature when I have guests coming—sometimes ovens can vary, and the extra minute makes a difference. The glaze is totally customizable—try adding lemon zest, a splash of coconut milk, or even a dollop of Cream Cheese to jazz things up. The key is to keep experimenting because that’s how you truly make a recipe your own. The first time I added a touch of almond extract, the flavor instantly elevated—trust me on this one! Keep it fun, keep it colorful, and don’t be afraid to adapt these cupcakes to your taste. They’re forgiving, festive, and just downright joyful to make and eat.
Storing and Reheating Tips
If you have leftovers—or if you want to prepare a batch in advance—storing properly keeps your cupcakes fresh and delightful. For short-term storage, keep them covered at room temperature in an airtight container for up to 2 days. I usually tent a plate with plastic wrap or store them in a cake dome—no drying out that way. If I need to keep them longer, I pop them in the refrigerator, tightly wrapped or in an airtight container, for up to 4 days. They’re still moist and fresh, especially if you add a slice of bread in the container to prevent drying out. To freeze, wrap each cupcake individually in plastic wrap, then place them in a freezer-safe bag or container for up to 3 months. Thaw at room temperature or pop in the fridge overnight—never microwave directly, or they might get soggy. When serving leftovers, a quick 10-second zap in the microwave can bring back some of that freshly baked warmth. If you glazed the cupcakes, wait until they’re completely thawed before reapplying the glaze—frosting and glaze tend to ‘melt’ if applied to frozen treats. Trust me, these tips will help you enjoy your beloved funfetti cupcakes any time you crave a sweet, colorful pick-me-up.
Frequently Asked Questions
Final Thoughts
There’s just something magical about making and sharing funfetti cupcakes. They turn an ordinary day into a celebration—and honestly, who doesn’t need a little extra color and joy now and then? These cupcakes are my go-to when I want something sweet, bright, and surprisingly easy. They’ve become a staple in my baking repertoire, and every time I make them, I’m reminded of childhood parties and family gatherings. They’re perfect for sharing, and trust me, once you get the hang of the simple steps, you’ll be turning out these adorable treats in no time. Plus, endless ways to customize them mean they grow with your tastes—add marshmallows, swap sprinkles for mini chocolate chips, or even tint the batter for more fun. So grab your sprinkles, whisk up some batter, and get ready for a burst of happiness in the form of cupcakes. I can’t wait to see how yours turn out—please share your photos and tweaks below. Happy baking!
Funfetti cupcakes
Ingredients
Main Ingredients
- 2.5 cups all-purpose flour
- 1.75 cups granulated sugar
- 1 cup unsalted butter softened
- 4 large eggs
- 1 cup milk
- 2 tsp vanilla extract
- 1 cup confetti sprinkles multicolored
Instructions
Preparation Steps
- Preheat oven to 350°F. Line a cupcake pan with liners.
- In a large bowl, cream together butter and sugar until light and fluffy.
- Beat in eggs one at a time, then stir in vanilla extract.
- In separate bowl, whisk together flour and baking powder.
- Gradually add dry ingredients to wet mixture, alternating with milk. Mix until just combined.
- Fold in confetti sprinkles.
- Fill cupcake liners three-quarters full with batter.
- Bake for 20-22 minutes or until a toothpick inserted into the center comes out clean.
- Cool cupcakes in the pan for 10 minutes, then transfer to wire racks to cool completely.


