I still remember the first time I made Oreo pie for a sleepy Friday night crowd—the kitchen smelled like a chocolatey hug, and the fridge looked mysteriously proud with a glossy pie sitting on the shelf. My sister whispered that it tasted like childhood, the kind of dessert that brings everyone to the table without a single complaint. It’s funny how a simple crust of crushed cookies and a creamy filling can stitch together memories sweeter than any fancy cake. Oreo pie is a lifesaver on busy nights too: you mix a few pantry staples, press and chill, and later you slice into something that feels like a victory. This version leans into the classic no-bake vibe, but I’ll show you a couple of tiny tweaks I’ve learned over the years—the kind of tweaks that make it feel almost tailored for your family. If you’ve got a few Oreos left in the bag and a craving for something creamy, you’re in the right kitchen with this recipe in your hands.
Thank you for reading this post, don't forget to subscribe!What is an Oreo Pie?
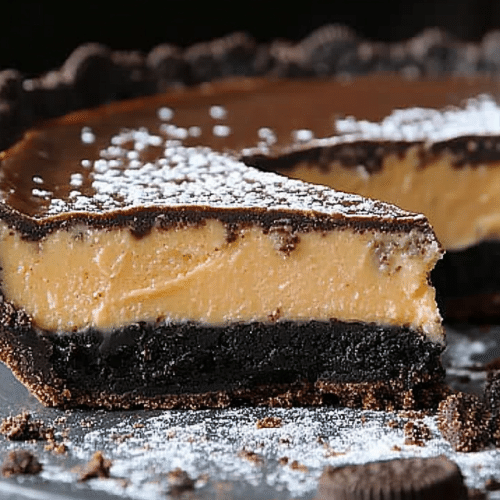
Oreo pie is basically a dream team of a crumb crust and a luscious filling that you don’t need to bake to set. Think of it as a chilled, chocolatey headliner: crushed Oreo cookies bind with a touch of butter to form a sturdy crust, then a silky filling—usually a blend of Cream Cheese, whipped cream, and vanilla—pours over and settles into creamy perfection. The name comes from the star player themselves—Oreo cookies—the same cookies that crinkle and crumble into those iconic, black-and-white bites. It’s essentially a simplified cheesecake in a pie form, minus the fussy water baths and long wait times. The result is a crowd-pleasing dessert that’s rich, but not heavy, and it’s always folks’ first suggestion when we’re gathering after a long week. It’s comforting, familiar, and a little bit nostalgic—a dessert that invites conversation just as much as it invites a spoonful.
Why you’ll love this recipe?
What I love most about this Oreo pie is how it feels like a special treat that you can whip up in under an hour, including chilling time. The flavor is unmistakably chocolatey from the Oreo crust, with a creamy, tangy balance from the cream cheese filling that keeps things from getting too sweet. The crust offers a satisfying crunch, while the filling glides on your tongue with a light, airy texture—thanks to the whipped cream folded in gently. It’s incredibly versatile, too: you can add extra crushed cookies on top for a crunchy finish, or swirl in a hint of Peanut Butter or espresso chocolate to switch up the vibe. What I love most about this recipe is how forgiving it is—confidence comes from simple steps, not from fancy techniques. It’s a go-to for holiday gatherings, weekend breakfasts with coffee, and last-minute dinner party desserts where you want big flavors without stress. And yes, it disappears in minutes at my house—my kids actually ask for seconds every single time, which always makes me smile. If you’re cooking for a crowd, you can scale the filling easily, and the crust stays crisp and inviting as leftovers rest in the fridge for a day or two.
How do I make Oreo Pie?
Quick Overview
This Oreo pie starts with a crunchy, chocolatey crust made from crushed Oreos and a whisper of butter. The filling is a luxurious blend of softened Cream Cheese, sugar, vanilla, and whipped cream, folded together until smooth and cloud-light. Pour the filling into the crust, swirl in a few extra cookie bits if you fancy, and chill until set. If you’re feeling extra fancy, a glossy chocolate glaze drapes over the top for a professional finish. The beauty is in the ease: no baking required, just a little patience in the fridge and a lot of love in the bowl. It’s creamy, balanced, and every bite feels like a celebration, especially when you serve it with a few fresh berries or a dollop of whipped cream.
Ingredients
For the Main Crust (Crust):
– 2 cups crushed Oreo cookies (about 22–24 cookies), fine crumbs with a few larger chunks for texture
– 6 tablespoons unsalted butter, melted, plus a pinch of salt (optional for brightness)
– A pinch of sugar (optional, to enhance the chocolate notes)
For the Filling:
– 8 ounces Cream Cheese, softened to room temperature
– 1/2 cup powdered sugar (adjust to taste)
– 1 teaspoon vanilla extract
– 1 cup heavy cream, chilled (for whipping or you can use whipping cream)
– 1/4 cup mini chocolate chips or additional finely crushed Oreo pieces (optional for texture)
For the Glaze:
– 3 ounces dark or semisweet chocolate, chopped or chips
– 2 tablespoons heavy cream
– 1 teaspoon light corn syrup (optional, for shine)
Step-by-Step Instructions
Step 1: Preheat & Prep Pan
If you’re going no-bake, you can skip the oven entirely—but I like to pre-rub a light coat of butter on the pie pan to keep the crust from sticking. If you do choose to bake the crust, preheat the oven to 350°F (175°C). Line a 9-inch pie pan with parchment for easy release, and set aside. You’ll press the crust directly into the pan, then chill or bake as you prefer.
Step 2: Mix Dry Ingredients
Place the Oreo cookies in a resealable bag and crush them with a rolling pin until you’ve got a mix of fine crumbs and a few larger chocolatey shards for texture. If you like extra chocolate punch, reserve a tablespoon or two of the cookie crumbs to sprinkle on top later. Stir in a pinch of salt or a whisper of sugar if you’re using unsalted butter.
Step 3: Mix Wet Ingredients
In a medium bowl, beat the Cream Cheese with powdered sugar and vanilla until smooth and creamy. I’ll tell you a little secret: letting the cream cheese soften a bit on the counter makes this step a breeze. If you’re adding any mix-ins, fold them in now so they distribute evenly through the filling.
Step 4: Combine
In a separate bowl, whip the heavy cream until stiff peaks form. Gently fold the whipped cream into the Cream Cheese mixture until you have a fluffy, pale filling with no visible lumps. The trick is to fold, not whisk, to keep that light texture.
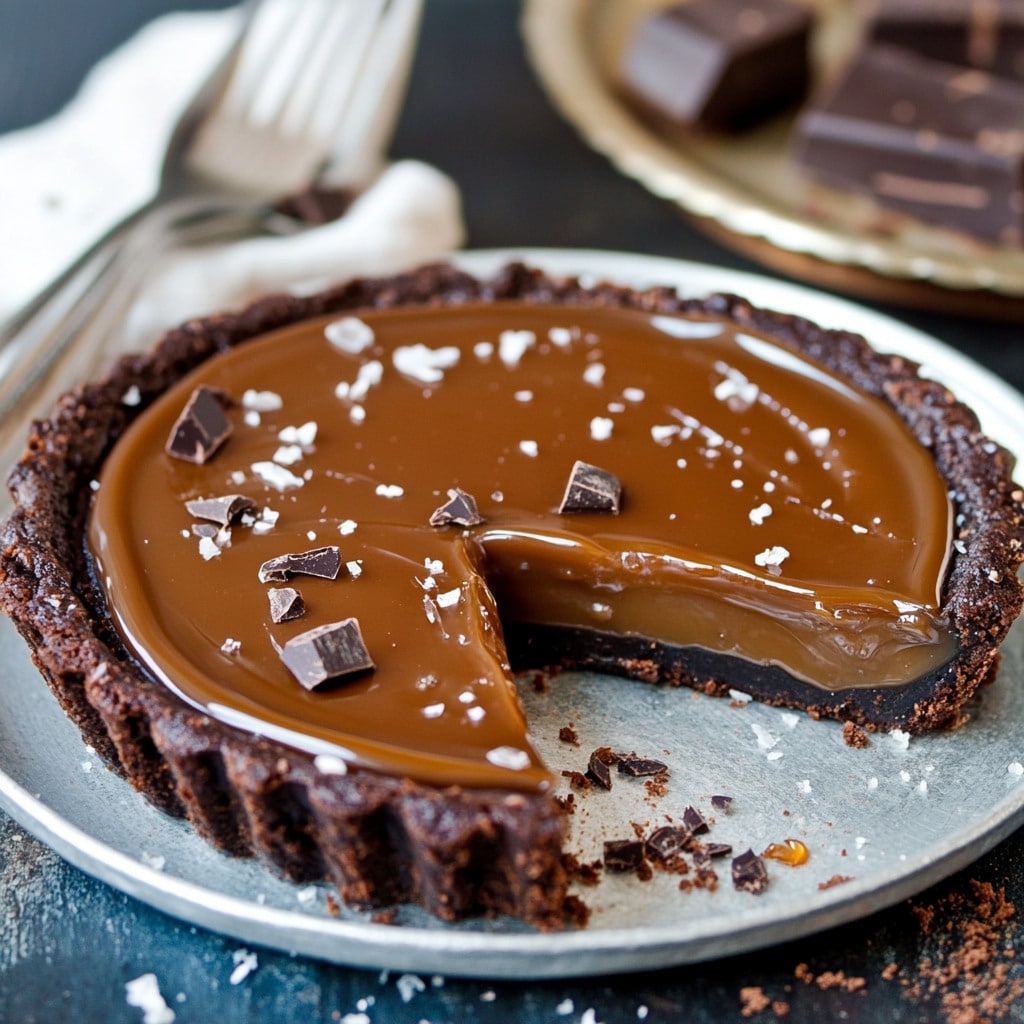
“I don’t know if I’ve ever eaten a better Dark Chocolate Salted Caramel 7 Oreo Pie. The rub alone is wonderful, but the sauce??? Over the top!”
Step 5: Prepare Filling
Fold in the crushed Oreos and optional mini chips into the filling, reserving a few cookie crumbs for the top if you like. This is where you can tailor the sweetness: start with half the powdered sugar, taste, then adjust. You want a filling that’s creamy enough to scoop but not too soft that it loses shape when you slice.
Step 6: Layer & Swirl
Press the crust into the pie pan and smooth it with the back of a spoon or the bottom of a measuring cup. Spoon in the filling and use a spatula to level the top. If you want a little decorative swirl, use a fork or the end of a spoon to create gentle lines in the surface. Sprinkle the reserved cookie crumbs along the edge or in the center for a rustic, inviting look.
Step 7: Bake
For a no-bake version, chill the pie in the refrigerator for at least 4 hours, preferably 6–8 hours, until the filling is set and the crust is firm. If you’re short on time, you can pop it in the freezer for 2–3 hours to speed things up. If you baked the crust, bake 8–10 minutes at 350°F, cool completely, then proceed with the filling as above.
Step 8: Cool & Glaze
For a glossy finish, melt the chocolate with the cream and optional corn syrup to a smooth, pourable glaze. Let it sit for a minute to cool slightly, then pour over the set pie. Use a spatula to spread evenly. If you prefer a lighter finish, simply dust with a light sprinkling of cocoa powder or crush more Oreos for a crunchy top. Chill again for 15–20 minutes to set the glaze before slicing.
Step 9: Slice & Serve
Dip the knife in hot water and wipe clean between slices for clean cuts. Slice with confidence and serve chilled, with a dollop of whipped cream or a fresh strawberry on the side if you’re feeling fancy. I love a small splash of Sea Salt on top of the glaze for a playful contrast—trust me on this one. The pie is best enjoyed within 2–3 days when stored in the fridge; the flavors deepen as it sits.
What to Serve It With
This Oreo pie pairs beautifully with coffee, a glass of cold milk, or a peppermint coffee for a festive touch. It also shines as a dessert centerpiece for a simple dinner party, where people gather around the dish with forks in hand and stories ready to share. If you’re serving it for breakfast or brunch (yes, it happens in my house), present it with fruit and a Light Yogurt parfait to balance the richness. For a cozy night in, I like to lay a thin chocolate shard across the top and a few raspberries for color and brightness. My family’s tradition is to set a little bowl of extra crushed cookies on the side for people to press onto the slice if they want a extra crunch. It’s little rituals like that that make this pie feel incredibly welcoming.
Top Tips for Perfecting Your Oreo Pie
Here are a few tricks I’ve learned that make this pie consistently reliable and pretty enough to impress guests:
Crust Prep: If you’re not baking the crust, press it in firmly and chill for at least 30 minutes before filling. If you bake it, let it cool completely to avoid cracking the filling on top. A pinch of salt in the crust helps cut the sweetness and brings out the chocolate flavor.
Mixing Advice: Don’t overbeat the filling once you add the whipped cream. Overmixing can make it dense instead of fluffy. Gently fold until just combined and smooth. If you want extra flavor, add a teaspoon of espresso powder to the Cream Cheese mixture for a mocha twist.
Swirl Customization: If you want a marbled look, reserve a few tablespoons of the filling and mix with a little melted chocolate, then layer in alternating patterns before swirling. You’ll get a gorgeous contrast without losing the creamy core.
Ingredient Swaps: Use lactose-free Cream Cheese and coconut whipped cream for a dairy-free version. You’ll lose a touch of richness, but the texture can still be wonderfully creamy. Gluten-free Oreos work beautifully if you need a GF crust. For a lighter touch, use half-and-half in place of heavy cream in the glaze, or reduce the sugar in the filling slightly and add a splash of vanilla to keep it balanced.
Baking Tips: If your oven runs hot, bake the crust a few minutes longer and let it cool completely before filling. For no-bake versions, the chilling time is your friend; longer chilling yields a more sliceable pie. If you’re in a hurry, the freezer method gives you a sliceable pie in under 2 hours.
Glaze Variations: Try a white chocolate glaze, a raspberry drizzle, or a caramel topping for a different finish. For a more intense chocolate finish, whisk in a tablespoon of coffee to the glaze so the top gleams with a glossy, mocha sheen.
“New family favorite! This Dark Chocolate Salted Caramel 7 Oreo Pie was so flavorful and ridiculously easy. Crowd-pleaser for sure.”
Over the years I’ve found that the best results come from three things: quality ingredients, patient chilling, and a willingness to let imperfections show—like a few extra cookie crumbs along the edge that give it character. This Oreo pie has saved me more times than I can count on busy weeknights or when I wanted to treat the crowd without turning the kitchen into a full-on project. It’s a simple recipe that rewards you with a dessert that tastes like a hug and feels like a celebration every time you serve it.
Storing and Reheating Tips
Storing this pie is mostly about keeping the cream filling safe and tasting fresh. In the fridge, cover loosely with plastic wrap or store in an airtight container so the crust doesn’t absorb any fridge odors. Room temperature isn’t ideal for this dessert because the filling can soften too quickly. Here’s how I handle it:
Room Temperature: Not recommended for long; the filling will soften and crumbs can lose their structure. If you must, keep it out for no more than 1 hour for a quick serving.
Refrigerator Storage: Up to 3–4 days. Keep it covered and chill. Slice only what you’ll eat in a day to maintain texture and appearance of the remaining pie.
Freezer Instructions: You can freeze the pie for up to 1 month if you wrap it well in plastic wrap and then in foil. Thaw overnight in the fridge before serving for best texture. If you freeze with glaze, you may notice a slight change in gloss; a quick re-glaze before serving refreshes the look and brings back the shine.
Glaze Timing Advice: If freezing, wait to glaze until ready to serve to avoid the glaze cracking. If chilling only, glaze after the pie has fully set and is cold. A thin layer of glaze goes a long way.
My favorite routine is to slice the pie, keep the rest chilled, and serve slices on a small plate with a curl of whipped cream and a few fresh berries. It feels almost café-like, but I never leave the kitchen until everyone has first bite energy of pure happiness.
Frequently Asked Questions
Final Thoughts
This Oreo pie is the kind of dessert that travels from my kitchen to yours like a friendly hello. It’s simple, deeply comforting, and endlessly adaptable. The crust stays crisp enough to hold a slice, the filling remains luscious and airy, and the glaze—when you choose to add it—gives that glossy finish you see in bakery cases without the fuss. It’s the kind of recipe I reach for when I want to show up with something confident yet unstressed, something that says, “Hey, I brought dessert, and it’s made with cookies and cream, just like we used to love.” If you try it, I’d love to hear how you customized it—did you add espresso for a mocha kick, or swap in white chocolate for a softer sweetness? Leave a comment, rate the recipe, or share your own playful twists. Happy baking!
Oreo pie
Ingredients
Main Ingredients
- 36 whole Oreo cookies about one standard package, crushed finely
- 0.5 cup butter melted, for crust
- 0.5 cup butter solid, for caramel layer
- 0.66 cup brown sugar packed, light or dark
- 0.25 cup heavy whipping cream for caramel layer
- 12 oz dark chocolate chips semi-sweet or 60% cacao
- 1 cup heavy whipping cream for chocolate layer
- flaky sea salt like kosher salt or fleur de sel, for garnish
Instructions
Preparation Steps
- Finely crush the Oreo cookies using a food processor or blender. Mix the crumbs with 8 tablespoons (0.5 cup) melted butter until fully combined. Press the mixture evenly into the bottom and up the sides of a 9-inch pie pan. Place in the freezer for 10 minutes to set.
- In a small saucepan, combine 8 tablespoons (0.5 cup) butter and packed brown sugar. Cook over medium heat, stirring constantly, until the mixture begins to bubble. Continue cooking for 1 additional minute. Remove from heat and slowly whisk in 0.25 cup heavy whipping cream until smooth. Let the caramel cool for 15 minutes, then pour it over the chilled Oreo crust. Return to the freezer for 30 to 45 minutes, until the caramel is firm but not frozen solid.
- Place the dark chocolate chips in a heatproof glass bowl. In a separate saucepan, bring 1 cup heavy whipping cream to a simmer over medium-high heat, then immediately pour it over the chocolate chips. Let sit undisturbed for 5 minutes, then whisk until completely smooth. Pour the chocolate over the set caramel layer. Freeze for 30 minutes, or refrigerate until fully chilled. Before serving, sprinkle the top lightly with flaky sea salt.


