You know those nights? The ones where dinner feels like a monumental task, the fridge looks a little sad, and you’re craving something comforting, flavorful, and ridiculously easy? This walking taco casserole is my absolute go-to. It’s the kind of dish that makes your whole house smell amazing, brings a smile to everyone’s face, and most importantly, comes together with minimal fuss. I first stumbled upon the idea years ago, and honestly, it’s become such a staple that I can’t even remember life before it. It’s like a delightful mashup of everything good about casual, fun food, all baked into one glorious pan. Forget complicated layering or fancy techniques; this is pure, unadulterated comfort food that tastes like childhood nostalgia and weeknight wins all rolled into one. It’s the easiest, most satisfying dinner when you just need something reliable and delicious!
Thank you for reading this post, don't forget to subscribe!
What is walking taco casserole?
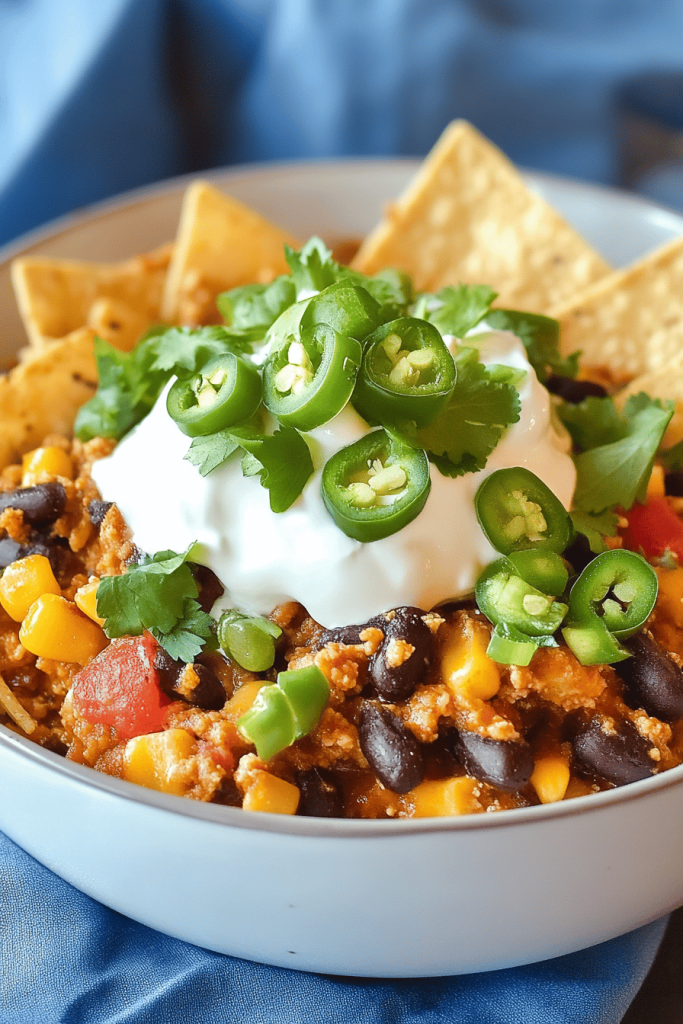
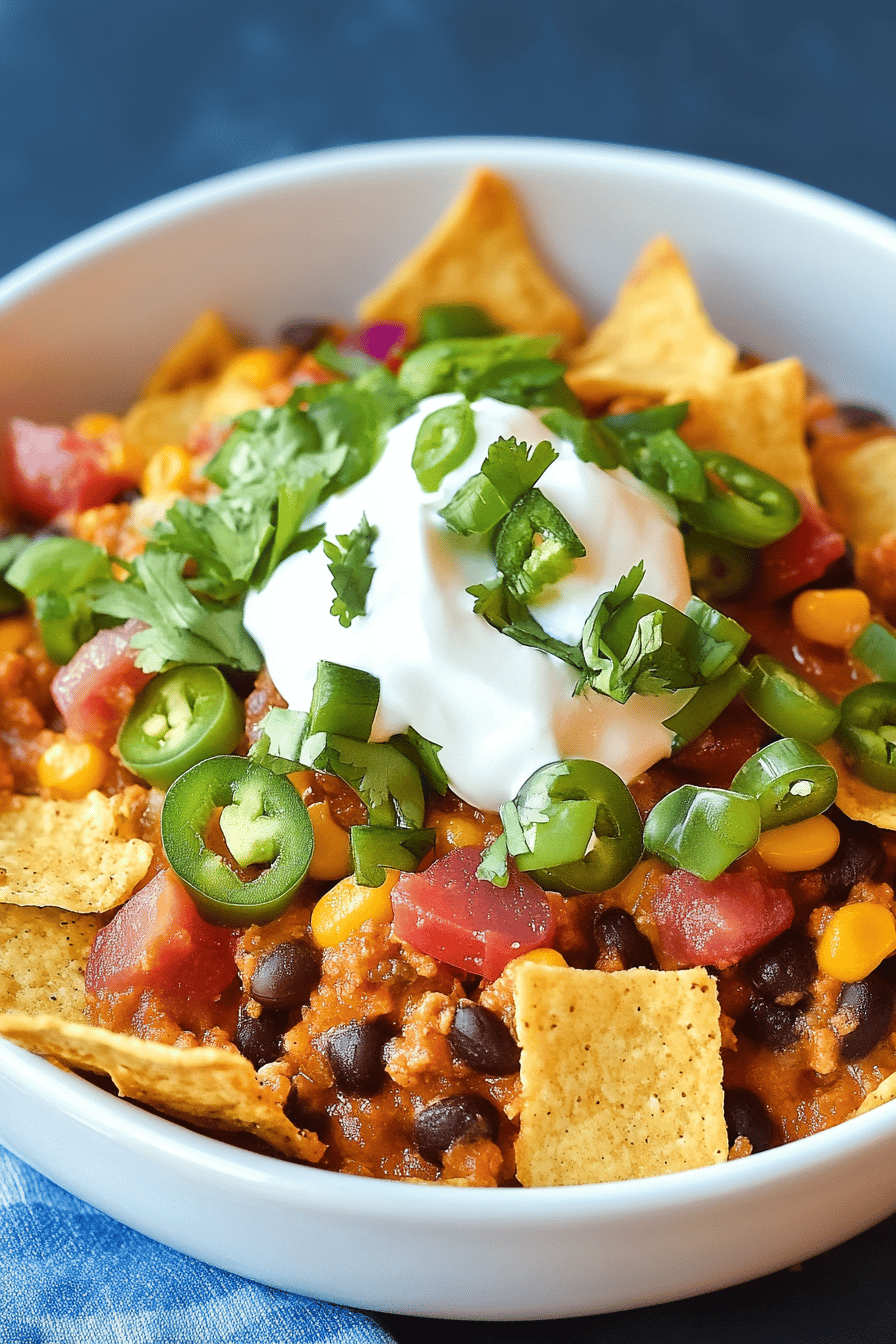
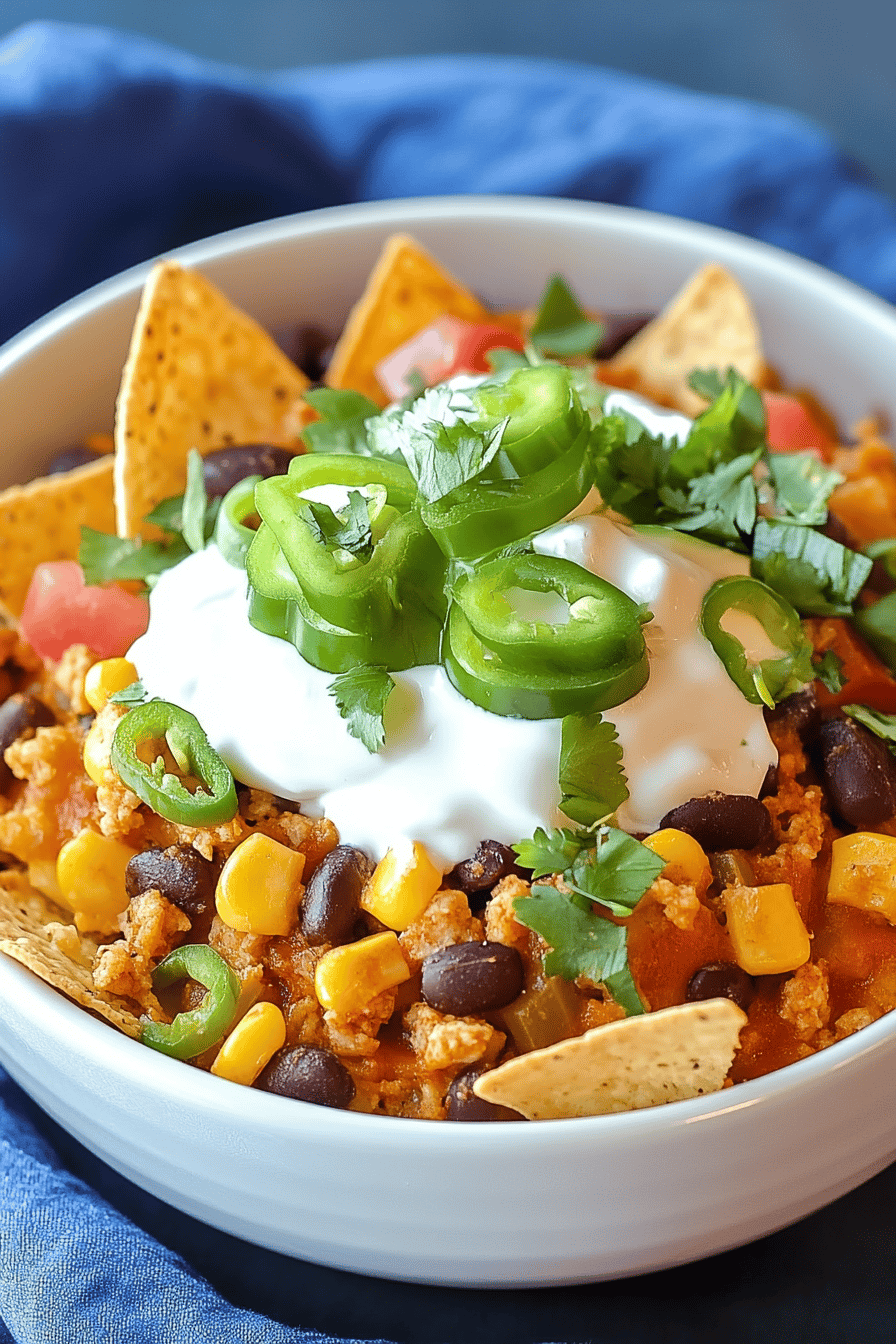
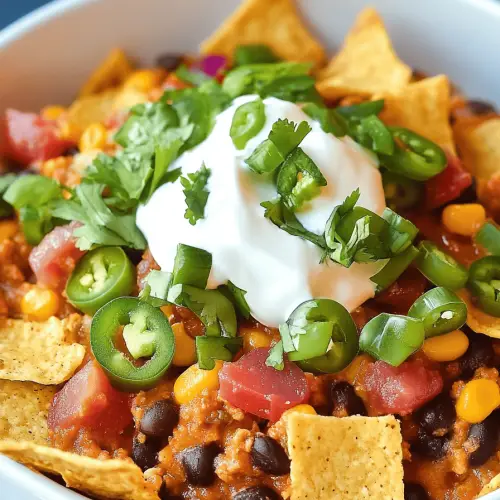
So, what exactly is a walking taco casserole? The name itself just makes you smile, doesn’t it? Think of it as the ultimate deconstructed taco, transformed into a comforting, cheesy, hearty casserole. The “walking taco” part comes from the brilliant idea of serving tacos in a bag of chips, which you can then… well, walk around with! This casserole takes that fun concept and bakes it all together. It’s essentially a layered dish featuring seasoned ground meat, creamy cheese, and, of course, crushed Tortilla Chips, all baked until bubbly and golden. It’s familiar, it’s fun, and it delivers all those beloved taco flavors without the mess or the fuss of individual tacos. It’s comfort food at its finest, designed to be scooped up and savored.
Why you’ll love
Honestly, I could rave about this walking taco casserole all day, but let me tell you the highlights. First and foremost, the FLAVOR! It’s like a party in your mouth – savory, slightly spicy Ground Beef, melty, gooey cheese, and that satisfying crunch from the chips. It hits all the right notes. Then there’s the SIMPLICITY. This is a lifesaver on those evenings when you’re juggling a million things. You can honestly have this prepped and in the oven in under 30 minutes, which is a miracle in my book. It’s also incredibly COST-EFFECTIVE. Most of the ingredients are pantry staples, making it a budget-friendly option that doesn’t skimp on taste. And the VERSATILITY! While I love it as is, you can easily customize it. Add beans, corn, different kinds of cheese – the possibilities are endless. What I love most about this is that it’s a crowd-pleaser. My kids devour it, my husband requests it weekly, and it’s always a hit when I bring it to potlucks. It’s just… happy food.
How do I make walking tacos?
Quick Overview
This walking taco casserole is all about layering deliciousness. We start by browning seasoned Ground Beef, then create a creamy, cheesy base. The magic happens when we top it all off with crushed tortilla chips and bake it until it’s a bubbly, golden masterpiece. It’s a straightforward process that guarantees a fantastic meal with minimal effort. You’ll be amazed at how simple it is to create something so deeply satisfying.
Ingredients
For the Main Filling:
1.5 pounds Ground Beef (80/20 is my favorite for flavor)
1 medium onion, finely chopped
2 cloves garlic, minced
1 packet (about 1 oz) taco seasoning (or my homemade blend if you’re feeling adventurous!)
1/2 cup water or beef broth
For the Creamy Cheese Layer:
1 can (10.5 oz) condensed cream of mushroom soup (or cream of chicken if you prefer)
1/2 cup Sour Cream
1 cup shredded cheddar cheese, plus more for topping
1/2 cup shredded Monterey Jack cheese (or a Mexican blend)
For the Topping:
2 cups crushed tortilla chips (plain or nacho cheese flavor works best!)
Optional garnishes: shredded lettuce, diced tomatoes, sliced jalapeños, a dollop of sour cream or Greek yogurt
“New family favorite! This walking taco casserole was so flavorful and ridiculously easy. Crowd-pleaser for sure.”
Step-by-Step Instructions
Step 1: Preheat & Prep Pan
Preheat your oven to 375°F (190°C). Lightly grease a 9×13 inch baking dish. This little step prevents anything from sticking and makes cleanup a breeze!
Step 2: Brown the Beef & Onions
In a large skillet over medium-high heat, brown the ground beef. Add the chopped onion and cook until softened, about 5-7 minutes. Drain off any excess grease. This is where the flavor foundation begins!
Step 3: Season the Meat
Stir in the minced garlic and taco seasoning. Cook for another minute until fragrant. Pour in the water or beef broth and bring to a simmer. Let it cook for about 5 minutes, stirring occasionally, until the sauce has thickened slightly. This infuses all those delicious taco spices into the meat.
Step 4: Mix the Creamy Cheese Layer
While the meat is simmering, in a separate medium bowl, combine the condensed soup, sour cream, cheddar cheese, and Monterey Jack cheese. Stir until everything is well combined and creamy. This is going to be your luscious, cheesy binder.
Step 5: Combine and Layer
Spread the seasoned meat mixture evenly in the bottom of your prepared baking dish. Then, spoon the creamy cheese mixture over the top of the meat, spreading it gently to cover the entire surface. Don’t worry if it’s not perfectly smooth – the swirls will be beautiful!
Step 6: Add the Crunchy Topping
Crush your tortilla chips – I usually just pop them into a zip-top bag and give them a few good whacks with a rolling pin or even just my hands. Sprinkle the crushed chips evenly over the cheese layer. You can add a little extra shredded cheddar on top of the chips for good measure, if you like!
Step 7: Bake Until Bubbly
Place the baking dish in the preheated oven and bake for 20-25 minutes, or until the casserole is hot and bubbly around the edges, and the cheese topping is melted and slightly golden. The aroma filling your kitchen at this point is just heavenly!
Step 8: Rest and Garnish
Let the casserole rest for about 5-10 minutes before serving. This allows everything to set up a bit. While it’s resting, prepare your optional garnishes like shredded lettuce, diced tomatoes, or a dollop of sour cream. They add a wonderful freshness and contrast.
Step 9: Slice and Serve
Cut the walking taco casserole into squares and serve hot. You can serve it as is, or with your favorite taco toppings. Enjoy that incredible mix of flavors and textures!
“I don’t know if I’ve ever eaten a better walking taco casserole. The rub alone is wonderful, but the sauce??? Over the top!”
What to Serve It With
This walking taco casserole is a meal in itself, but it’s also fantastic with a few simple accompaniments that complement its flavors. For a classic approach, I love serving it with a big, crisp green salad. The fresh crunch of lettuce and veggies is a perfect foil to the rich, cheesy casserole. If you’re feeling a bit more adventurous, a side of black beans or refried beans is always a winner. For a fun twist, try serving it alongside some corn salsa – the sweetness of the corn is divine. My kids often just want a big glass of milk with it, which totally makes sense because it’s so hearty and satisfying. If you’re serving this as a potluck dish, it stands beautifully on its own and is usually the first thing to disappear!
Top Tips for Perfecting Your Walking Taco Casserole
Over the years, I’ve picked up a few tricks that I think make this walking taco casserole even better. When browning the beef, I always try to get a good sear on it; it adds depth of flavor that you just can’t get otherwise. And don’t be afraid to really chop your onion finely; it disappears into the sauce and adds sweetness without being chunky. For the creamy cheese layer, using a blend of cheddar and Monterey Jack gives it the best of both worlds – the sharp cheddar flavor and the glorious meltiness of Jack. My absolute FAVORITE tip, though, is about the chips. Instead of just dumping them on top, I sometimes lightly toss them with a tiny bit of melted butter and a pinch of chili powder before sprinkling them on. It makes them extra flavorful and prevents them from getting soggy too quickly. Another thing I’ve learned is to not overmix the condensed soup and sour cream; just combine them enough to be smooth. And if you’re not a fan of cream of mushroom, cream of chicken or even a can of mild diced green chiles mixed in adds a lovely subtle kick. Trust me on the chip trick; it’s a game-changer!
Storing and Reheating Tips
This walking taco casserole is fantastic for leftovers, which is a huge win in my busy household. If you have any that is, which is rare! Store any leftovers tightly covered in the refrigerator for up to 3-4 days. When you’re ready to reheat, I usually scoop out individual portions into microwave-safe dishes and heat them until warmed through. If you want to reheat a larger portion, you can gently warm it in a covered baking dish in a 300°F (150°C) oven for about 15-20 minutes, or until heated through. My personal preference is to add a few fresh tortilla chips on top after reheating, just to get that fresh crunch back. I’ve also found that if you plan to freeze this, it’s best to bake it *without* the top layer of chips. Let it cool completely, then freeze it in an airtight container. When you’re ready to bake, thaw it overnight in the fridge, then top with fresh crushed chips and bake as directed, possibly adding a few extra minutes to the baking time. This method helps keep the chips from getting too mushy. The key is to ensure it’s heated thoroughly to maintain its deliciousness.
Frequently Asked Questions
Final Thoughts
There you have it – my beloved walking taco casserole! It’s more than just a meal; it’s a shortcut to happiness on a busy weeknight, a guaranteed hit with picky eaters, and a comforting embrace in casserole form. The blend of savory meat, creamy cheese, and that essential crunchy chip topping is just pure magic. I truly hope you give this recipe a try, and more importantly, that you love it as much as my family and I do. If you’re a fan of this kind of easy, flavor-packed comfort food, you might also enjoy my Sheet Pan Nachos or my Quick Chili Mac recipe – they hit similar notes of delicious simplicity. Let me know in the comments below how yours turns out, and if you have any fun variations! I’m always excited to hear your kitchen adventures. Happy baking!
Walking Taco Casserole
Ingredients
Main Ingredients
- 0.5 pound ground beef
- 1 package taco seasoning
- 1 can diced tomatoes with green chilies, undrained
- 1 can black beans, rinsed and drained
- 1 can corn, drained
- 1 box corn chips or Fritos, crushed
- 2 cups shredded cheddar cheese
Instructions
Preparation Steps
- Preheat your oven to 375°F (190°C).
-
In a large skillet, brown the ground beef over medium heat. Drain off any excess grease.0.5 pound ground beef
-
Stir in the taco seasoning, diced tomatoes with green chilies (undrained), black beans, and corn. Cook for 5-7 minutes, stirring occasionally, until heated through.0.5 pound ground beef
-
Spread half of the crushed corn chips in the bottom of a 9x13 inch baking dish.0.5 pound ground beef
- Pour the meat mixture evenly over the chips.
-
Top with the remaining crushed corn chips.0.5 pound ground beef
-
Sprinkle the shredded cheddar cheese over the top.0.5 pound ground beef
- Bake for 20-25 minutes, or until the cheese is melted and bubbly.
- Let stand for a few minutes before serving. Serve with your favorite taco toppings like sour cream, salsa, lettuce, and avocado.


