You know those nights? The ones where you stare into the fridge, hoping for inspiration to magically appear, but all you find is a half-empty jar of pickles and some slightly sad-looking carrots? Yeah, I’ve been there. More times than I care to admit, actually. But then, a little voice in my head – or maybe it’s just my stomach rumbling – reminds me of this absolute gem: my sticky Chicken Rice bowls. Honestly, if you could bottle the feeling of pure comfort and satisfaction, this recipe would be it. It’s got that perfect balance of sweet, savory, and a little bit of tang, all clinging to tender chicken and fluffy rice. It’s my go-to when I’m short on time but big on cravings. Think of it as a hug in a bowl, but way more delicious than any actual hug I’ve ever received (sorry, Mom!). It’s honestly as addictive as my grandma’s famous caramel brownies, but a whole lot easier to whip up on a Tuesday. This is one of those meals that just makes everything feel a little bit better, a little bit simpler.
Thank you for reading this post, don't forget to subscribe!What is sticky chicken rice bowl?
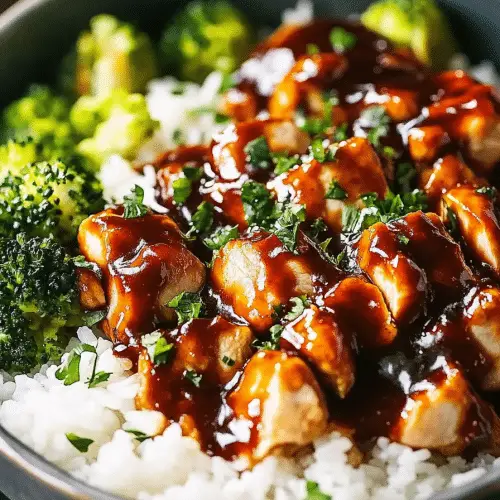
So, what exactly are these magical sticky Chicken Rice bowls? At its heart, it’s incredibly simple: tender pieces of chicken coated in a glorious, glossy, and yes, wonderfully sticky sauce, served over a bed of perfectly steamed rice. The “sticky” part comes from a combination of ingredients that meld together in the pan, creating this irresistible glaze that just clings to everything. It’s not just about the chicken, though. The magic truly happens when that saucy chicken meets fluffy rice. You get those little pockets of saucy goodness soaking into the grains, making every single bite an adventure. It’s like a deconstructed stir-fry, but with way more luscious sauce. Think of it as the ultimate comfort food, elevated just enough to feel special, but still down-to-earth enough for a weeknight dinner. It’s essentially a flavor explosion waiting to happen in your kitchen.
Why you’ll love this recipe?
Honestly, where do I even begin with why this recipe is my absolute favorite? First off, the flavor. Oh my goodness, the flavor! It’s this incredible symphony of sweet from the honey or maple syrup, savory from the soy sauce, a little punch from the ginger and garlic, and that subtle tang from the rice vinegar. It’s complex enough to make you feel like a gourmet chef, but so approachable. And the texture! The chicken is always so tender, and that sticky glaze? It’s just divine. What I really love is how ridiculously easy it is. I can have this on the table in under 30 minutes, which is a lifesaver on those crazy evenings when the kids are demanding dinner *now* and I haven’t even thought about what to make. Seriously, it’s faster than ordering takeout, and tastes a million times better. Plus, it’s super budget-friendly. The ingredients are all pantry staples, meaning I can whip this up without a special trip to the grocery store. And the versatility! You can add in any veggies you have on hand – broccoli, bell peppers, snap peas, even a handful of spinach wilted in at the end. It’s a blank canvas for deliciousness. It’s become a staple in our house, right up there with my No-Bake Chocolate Peanut Butter bars in terms of how often we make them. This recipe truly shines because it delivers maximum flavor and satisfaction with minimum fuss.
How do I make sticky chicken rice bowls?
Quick Overview
This recipe is all about creating a fantastic, glossy sauce that coats tender chicken, which then gets piled onto fluffy steamed rice. You’ll marinate the chicken briefly, sear it until golden, then toss it with the quick-to-make sticky glaze. While the chicken is cooking, your rice should be steaming away. It’s a streamlined process that prioritizes maximum flavor with minimal active cooking time. I promise, it’s way simpler than it sounds, and the result is pure deliciousness.
Ingredients
For the Chicken & Marinade: For the Chicken &
1.5 lbs boneless, skinless chicken thighs or breasts, cut into bite-sized pieces. I always go for thighs because they stay incredibly juicy, but breasts work great too if you watch them closely so they don’t dry out.
2 tablespoons soy sauce (or tamari for gluten-free). Use a good quality one, it makes a difference!
1 tablespoon rice vinegar. Adds a nice little zing.
1 teaspoon sesame oil. Just a touch for that lovely nutty aroma.
1 clove garlic, minced. Fresh is best here.
1/2 teaspoon grated fresh ginger. Again, fresh makes all the difference! You can usually find little tubes of this in the produce section too if you’re in a pinch.
For the Sticky Glaze:
1/4 cup soy sauce (or tamari). This is the savory base.
1/4 cup honey or maple syrup. I love maple syrup for a slightly less sweet, more complex flavor, but honey is classic and works beautifully.
1 tablespoon Brown Sugar (optional, for extra caramelization). If you like it really sweet and glossy, add this in.
1 tablespoon rice vinegar. Balances the sweetness.
1 teaspoon cornstarch or arrowroot powder, mixed with 1 tablespoon of water to make a slurry. This is the secret to that glorious stickiness!
1 clove garlic, minced. More garlic, always more garlic.
1/2 teaspoon grated fresh ginger. The warmth of the ginger is essential.
For Serving:
Cooked rice (Jasmine or Basmati are my favorites). Make sure it’s nice and fluffy!
Optional garnishes: chopped scallions, toasted sesame seeds, a sprinkle of chili flakes.
“I don’t know if I’ve ever eaten a better sticky chicken rice bowls. The rub alone is wonderful, but the sauce??? Over the top!”
Step-by-Step Instructions
Step 1: Preheat & Prep Pan
First things first, get your rice cooking according to package directions. While that’s happening, grab a large skillet or wok and place it over medium-high heat. We want it nice and hot! Once it’s hot, add about 1 tablespoon of your preferred cooking oil – I usually use a neutral oil like canola or vegetable, but avocado oil works too. Make sure the oil is shimmering before you add the chicken; this helps get a good sear and prevents sticking.
Step 2: Mix Dry Ingredients
In a medium bowl, combine the chicken pieces. Pour in the 2 tablespoons of soy sauce, 1 tablespoon of rice vinegar, 1 teaspoon of sesame oil, the minced garlic, and grated ginger for the marinade. Give everything a good toss with your hands or a spoon until the chicken is evenly coated. Let it sit for about 10-15 minutes while your pan heats up. Don’t worry, this quick marinade is just enough to add a layer of flavor!
Step 3: Mix Wet Ingredients
While the chicken is marinating and the pan is heating up, let’s whip up that amazing glaze. In a small bowl or measuring cup, whisk together the 1/4 cup soy sauce, 1/4 cup honey (or maple syrup), the optional Brown Sugar, and 1 tablespoon of rice vinegar. In a separate tiny bowl, mix the cornstarch (or arrowroot) with 1 tablespoon of water to create a smooth slurry. Set both of these aside. This whole glaze prep takes maybe 2 minutes, tops.
Step 4: Combine
Now for the chicken! Carefully add the marinated chicken to the hot skillet in a single layer. Don’t overcrowd the pan; you might need to do this in batches. You want to sear the chicken, not steam it. Let it cook undisturbed for about 2-3 minutes per side, until it’s nicely browned and mostly cooked through. Once all the chicken is seared, if you did it in batches, return it all to the pan.
Step 5: Prepare Filling
This is where the magic happens! Push the chicken to one side of the pan, or if you’re using a wok, clear a space in the center. Add the minced garlic and grated ginger for the glaze to the hot pan. Sauté them for about 30 seconds until fragrant – be careful not to burn them! Now, pour the soy sauce and honey mixture over the chicken and aromatics. Stir everything together.
Step 6: Layer & Swirl
Bring the sauce to a simmer. Once it’s bubbling gently, give your cornstarch slurry a quick re-whisk and slowly pour it into the simmering sauce while stirring constantly. The sauce will thicken up almost immediately, becoming wonderfully glossy and sticky. Keep stirring for another minute or so until the sauce coats the chicken beautifully. You’re looking for that thick, syrupy consistency that clings to the chicken pieces. This step is crucial for that signature sticky texture!
Step 7: Bake
We don’t actually bake this recipe in an oven, but this is where the cooking is finished in the pan! Keep stirring and tossing the chicken in the thickened glaze for another minute or two until every piece is perfectly coated. The residual heat will finish cooking any slightly underdone bits and ensure everything is melded together. Taste the sauce and adjust seasoning if needed – maybe a pinch more salt or a drizzle more honey. My kids are always hovering around at this stage, sniffing the air.
Step 8: Cool & Glaze
Once the chicken is beautifully coated and the sauce is thick and glossy, it’s ready to serve. You don’t need to cool it down too much; the warmth is part of the appeal. The glaze should be perfectly sticky and ready to adhere to the rice. This whole process, from start to finish, usually takes me about 25 minutes on a good night. It’s so satisfying to see the transformation from simple ingredients to this incredibly flavorful dish.
“The sticky chicken rice bowls turned out amazing. My kids asked for seconds. Saving this one!”
Step 9: Slice & Serve
To serve, spoon a generous portion of your fluffy steamed rice into bowls. Top with the glistening Sticky Chicken. Drizzle any extra sauce from the pan over the top – don’t leave any of that deliciousness behind! For a pop of freshness and color, sprinkle with chopped scallions and toasted sesame seeds. A tiny pinch of chili flakes adds a nice little kick if you like it. It’s ready to eat immediately and enjoy!
What to Serve It With
These sticky Chicken Rice bowls are so satisfying on their own, but I love to add a few things to round out the meal and make it feel extra special, depending on the occasion. For a quick and easy weeknight dinner, a simple side of steamed broccoli or bok choy is perfect. The crisp-tender greens are a lovely contrast to the rich chicken. If I’m feeling a little fancier, perhaps for a casual brunch or a get-together with friends, I’ll whip up a quick Asian-inspired slaw. Think shredded cabbage, carrots, and a light sesame-ginger dressing. It adds a refreshing crunch and a bit of tang that cuts through the sweetness of the glaze beautifully. I’ve also found that serving these alongside some simple cucumber salad, dressed with rice vinegar and a touch of sugar, is a brilliant idea for a lighter touch. For those times when I want a full-blown feast, I might add some pan-fried dumplings or even some spring rolls on the side. My kids always ask for edamame, so that’s usually on the table too. The beauty of these bowls is their adaptability; they play well with so many flavors and textures.
Top Tips for Perfecting Your Sticky Chicken Rice Bowls
Over the years, I’ve picked up a few little tricks that make this recipe even better. For the chicken, if you’re using thighs, make sure to trim off any excess fat. This helps the glaze adhere better and prevents a greasy finish. When searing, don’t move the chicken around too much initially; let it develop a nice golden-brown crust. This adds so much depth of flavor. For the glaze, the cornstarch slurry is your best friend for achieving that signature stickiness. Make sure to whisk it well before adding it to the pan, and always stir constantly as it thickens. If your sauce seems too thin, just add a tiny bit more slurry. If it gets too thick, a splash of water or broth can thin it out. I’ve learned that using fresh ginger and garlic makes a huge difference; the dried versions just don’t have that same pungent, aromatic punch. If you’re out of fresh, the pastes in tubes can work in a pinch, but they’re not quite the same. When it comes to sweetness, I find that honey and maple syrup behave slightly differently. Maple syrup can sometimes lead to a richer, more complex sweetness. If you prefer a less sweet glaze, you can reduce the honey or maple syrup slightly and add a little extra soy sauce for saltiness. I also find that a little bit of toasted sesame oil added right at the end, off the heat, gives an amazing aroma boost. It’s a small step, but it really elevates the final dish. Don’t be afraid to play with the spice level either; a pinch of Red Pepper flakes in the glaze can add a lovely warmth without making it overly hot. And one final tip: make sure your rice is fluffy and separate. Soggy rice just doesn’t do the sticky chicken justice!
Storing and Reheating Tips
One of the best things about this sticky Chicken Rice Bowl is that it’s pretty forgiving when it comes to leftovers. If you happen to have any, of course! I usually store any leftover chicken and sauce in an airtight container in the refrigerator. It tends to keep well for about 3 days. The glaze can sometimes firm up a bit in the fridge, but don’t worry, it’s easily revived. For reheating, I usually take the chicken out of the fridge about 15-20 minutes before I plan to eat it. Then, I’ll gently warm it in a skillet over low heat with a tiny splash of water or soy sauce. This helps loosen up the glaze and bring back that lovely saucy consistency. You can also microwave it, but I find the stovetop method gives you a better texture and prevents the chicken from getting rubbery. If you want to reheat the rice too, you can do that separately. Some people like to add a touch of oil to the rice when reheating to keep it from drying out. I haven’t found it strictly necessary if the rice was cooked well initially. If you’re planning to freeze portions, I’d recommend storing the chicken and sauce separately from the rice. Freeze them in well-sealed freezer bags or containers for up to a month. Thaw overnight in the refrigerator before reheating as described above. For the best texture, I always recommend serving the glaze fresh, so if you’re meal-prepping, you might consider making the glaze fresh when you reheat the chicken if possible, but honestly, it’s still delicious reheated!
Frequently Asked Questions
Final Thoughts
There you have it – my tried-and-true recipe for sticky chicken rice bowls. I hope you’re as excited to make it as I am to share it. It’s one of those dishes that consistently delivers pure joy, from the enticing aroma that fills your kitchen to that first glorious bite of tender chicken coated in that perfect sticky glaze. It’s proof that delicious, comforting food doesn’t need to be complicated. It’s a lifesaver for busy weeknights, a winner for picky eaters (mine practically lick their bowls clean!), and always feels like a treat. If you end up making this, please, please let me know how it turned out! I love hearing about your kitchen adventures. Drop a comment below or tag me on social media if you share a photo – I can’t wait to see your sticky chicken creations! Happy cooking, my friends!
sticky chicken rice bowls
Ingredients
Main Ingredients
- 1.5 pound chicken thighs boneless, skinless, cut into bite-sized pieces
- 2 tablespoon soy sauce
- 0.25 cup honey
- 2 tablespoon rice vinegar
- 1 tablespoon sesame oil
- 2 cloves garlic minced
- 1 teaspoon fresh ginger grated
- 4 cup cooked rice for serving
- 0.5 cup green onions sliced, for garnish
- 0.25 cup sesame seeds toasted, for garnish
Instructions
Preparation Steps
- In a bowl, whisk together soy sauce, honey, rice vinegar, sesame oil, minced garlic, and grated ginger.
- Add the chicken pieces to the marinade and toss to coat. Let it marinate for at least 15 minutes.
- Heat a skillet or wok over medium-high heat. Add the marinated chicken (reserve the marinade) and cook until browned and cooked through, about 5-7 minutes.
- Pour the reserved marinade into the skillet. Bring to a simmer and cook, stirring occasionally, until the sauce thickens and coats the chicken, about 3-5 minutes.
- Serve the sticky chicken over cooked rice. Garnish with sliced green onions and toasted sesame seeds.


