
Just thinking about Gingerbread Cookies takes me right back to childhood holidays—those warm, spicy aromas wafting through the house, the crunch as I bit into that freshly baked edge, and the sticky fondant smiles I’d squeal over. I remember sneaking a few tiny pieces of dough—okay, maybe a lot—and the chaos of decorating the cutouts with sprinkles and icing. Honestly, I’ve made these more times than I can count, and I swear, they still manage to spread cheer in my home every single holiday season. What’s funny is, I used to think they were super complicated—lots of fancy spices, measuring, chilling, rolling—but I found a recipe that’s surprisingly easy and foolproof. And trust me, the smell alone will have everyone in your house asking, “When are these coming out of the oven?” This recipe is the kind of classic that becomes part of your family’s traditions, just like mine. So, grab your rolling pin—let’s make some gingerbread magic!
Thank you for reading this post, don't forget to subscribe!What is gingerbread cookies?
Think of Gingerbread Cookies as those cozy, spice-infused treats that come out every holiday season, but the truth is, they’re good all year round if you ask me. They’re essentially a spiced, ginger-flavored cookie with a hint of molasses, giving that rich, deep color. The name “gingerbread” dates back centuries, originally rooted in European baking traditions—originally, the cookies weren’t just sweet but also medicinal, thanks to all that cinnamon, ginger, and cloves. Nowadays, they’re more about nostalgia and that warm, homey smell that instantly makes your house feel festive. The dough is usually firm enough to roll out and cut into all sorts of shapes—gingerbread men, hearts, stars—you name it. What I love is how versatile they are: you can decorate them elaborately or enjoy them plain with a nice cup of tea. They’re perfect to make with kids, as a thoughtful homemade gift, or just a cozy treat for yourself.
Why you’ll love this recipe?
There’s so much to love about making gingerbread cookies at home—first and foremost, the flavor. That bold ginger, the warmth of cinnamon, a hint of nutmeg, and that sticky, caramel-like molasses come together in a way that just screams, “Holiday season!” What really keeps me coming back to this recipe is how easy it is. I’ve tested it countless times, and it’s almost foolproof—even if you’re a beginner baker, you’ll get perfect results every time. Plus, it uses pantry staples most of us already have, so no special trips needed. And can I tell you? The dough is super manageable and doesn’t require fancy equipment. I particularly love how adaptable it is—you can roll it thin for crispy cookies or thicker for chewier bites. If you’ve ever found yourself craving a warm, spicy treat but don’t want to mess around with complicated recipes, this one’s a lifesaver on busy nights. My kids actually ask for these all the time, and I love how it becomes a fun family project—cutting out shapes, decorating, and of course, sneaking tastes from the bowl. Honestly, the best part is how the smell fills the house—nothing beats the cozy aroma of baking gingerbread.
How do I make gingerbread cookies?
Quick Overview
This recipe is all about simplicity. You start by mixing the dry spices—ginger, cinnamon, nutmeg—with your flour, then creaming butter and sugar until fluffy. Add in that rich molasses, and blend everything into a firm dough. Roll it out on a floured surface, cut into festive shapes, and bake until just golden. The key is not overbaking—these will stay chewy if you pull them out at the right moment. Once cooled, I like to decorate mine with icing, sprinkles, or even a drizzle of chocolate if I’m feeling fancy. The whole process takes about an hour from start to finish, but the result? Well worth every minute. These cookies freeze beautifully, so you can bake a batch now and enjoy that holiday magic later. Honestly, once you get the hang of it, it’s almost addicting. I swear, I’ve spent entire weekends just making shapes and swapping out decorating ideas—so, prepare for a sweet, spicy adventure!
Ingredients
For the Main Batter:
- 3 ½ cups all-purpose flour (I always opt for unbleached for a richer flavor)
- 1 teaspoon baking soda
- 2 teaspoons ground ginger
- 1 teaspoon ground cinnamon
- ½ teaspoon ground cloves
- ½ teaspoon nutmeg
- ½ teaspoon salt
- ¾ cup unsalted butter, softened (trust me, don’t skip the softened step)
- ¾ cup packed brown sugar
- 1 large egg
- ½ cup unsulfured molasses (the darker, the more intense the flavor)
For the Filling (Optional):
- ½ cup royal icing or buttercream for decorating
- Assorted sprinkles, edible glitter, or colored sugars for festive touches
For the Glaze:
“New family favorite! This Spiced Cookie Magic How to Bake Gingerbread was so flavorful and ridiculously easy. Crowd-pleaser for sure.”
- 1 cup powdered sugar
- 2–3 tablespoons milk or cream
- ½ teaspoon vanilla extract (or lemon juice for a citrus twist)
Step-by-Step Instructions
Step 1: Preheat & Prep Pan
Set your oven to 350°F (175°C). Line baking sheets with parchment paper—trust me, clean-up is so much easier, and the cookies won’t stick. Keep your rolling pin nearby and a little flour for dusting. I also like to gather all my cookie cutters first—it makes the whole process so much more fun, especially if little helpers are involved.
Step 2: Mix Dry Ingredients
In a medium bowl, whisk together your flour, baking soda, and all those lovely spices. This helps evenly distribute everything and prevents clumps. It’s what gives the cookies their iconic flavor profile—so don’t skimp on this step.
Step 3: Mix Wet Ingredients
In a large mixing bowl, beat the softened butter and Brown Sugar until light and fluffy—about 2-3 minutes. Then, add the egg and molasses, mixing well until smooth. The molasses may be thick, but don’t worry; it will blend in beautifully. The smell alone at this stage is heavenly! I always crack open a window because the aroma is so strong, the house feels instantly festive.
Step 4: Combine
Gradually add the dry ingredients to the wet, stirring just until incorporated. Be gentle here—overmixing can make the cookies tough. The dough should be firm but pliable. If it feels too sticky, pop it in the fridge for 20 minutes to firm up. Trust me, patience makes a difference in shaping perfect cookies.
Step 5: Prepare Filling
If you’re decorating, prepare your Royal Icing or buttercream in advance. Color it with food gel if you want vibrant decorations. Keep it covered until ready to use so it doesn’t dry out. I like to divide my icing into small bowls, tint different colors, and get creative. My kids love helping with piping little buttons and faces.
Step 6: Layer & Swirl
Roll out the dough on a lightly floured surface to about ¼ inch thick. Use cookie cutters to cut into your favorite shapes—gingerbread men are classic, but I really love stars and hearts. For a fun twist, I’ve started doing layered patterns—smearing a tiny bit of jam or chocolate in the middle before pressing shapes together, creating a little surprise inside!
Step 7: Bake
Transfer the cutouts to your prepared baking sheet. Bake for 8-10 minutes—they should be just set but still soft. Keep an eye on them, especially if your oven runs hot; overbaking can make them too crispy, and I prefer mine just chewy around the edges. Allow them to cool on the sheet for 5 minutes, then transfer to a wire rack.
Step 8: Cool & Glaze
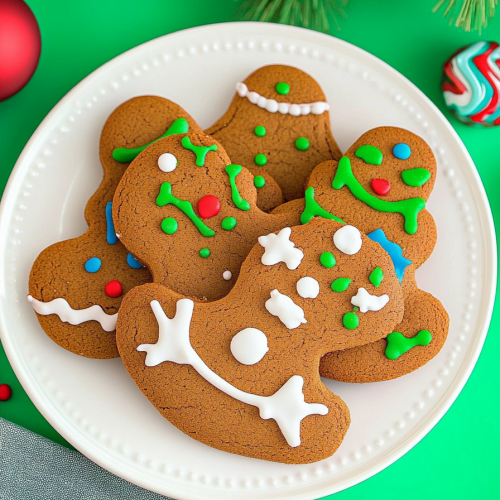
Once cooled, drizzle or spread your glaze over the cookies. I like to do this when they’re slightly warm because the glaze spreads more smoothly. Add sprinkles quickly before the glaze sets—instant festive magic! If you’re short on time, just dust with powdered sugar and skip the glaze altogether.
“Packed with flavor and so simple. Exactly what I wanted from this Spiced Cookie Magic How to Bake Gingerbread!”
Step 9: Slice & Serve
For beautifully decorated cookies, wait until the glaze is fully dry—about an hour—before stacking or stacking. These cookies can be stored in an airtight container for up to a week—if they last that long! They’re perfect with hot cocoa, tea, or even a scoop of vanilla Ice Cream if you’re feeling decadent. Honestly, I’ve made a plate of these for a last-minute party and watched them disappear in minutes—people just can’t resist!
What to Serve It With
This is where the magic continues. For breakfast, I love a Gingerbread Cookie alongside a strong cup of coffee—kind of like a little holiday pick-me-up. During brunch, serve them with whipped cream and fresh berries for a more elegant touch. As an after-dinner treat, they’re perfect dipped in a mug of hot cocoa or spiked eggnog. And for cozy snack moments, I set out a platter with a variety of decorated cookies, a cheese board, and maybe some spicy roasted nuts—everything that makes the season merry and bright. Personally, I also hide a few in my kid’s lunchbox for a mid-afternoon surprise—they always light up when they find them. These cookies are more than just treats—they become a warm, nostalgic centerpiece at every gathering, big or small.
Top Tips for Perfecting Your Gingerbread Cookies
Over the years, I’ve learned a few tricks that turn good cookies into great ones. For starters, don’t skip chilling the dough—about 30 minutes in the fridge really helps firm it up for clean cutting. If your dough feels too dry, a splash of milk can bring it back to life, but only a teaspoon at a time. Regarding rolling, I always dust my surface and rolling pin with a little flour—trust me, sticking is the enemy of those perfect shapes. If you want extra crispy cookies, roll a bit thinner, but if you prefer chewier bites, go a little thicker and bake less. Swirling the icing in different colors makes for such a pretty presentation—try doing a quick spiral or a starburst pattern. Whenever I want to switch things up, I experiment with different spices—cardamom, allspice, even a touch of chili powder for a spicy kick. Baking times can vary depending on your oven, so start checking around 8 minutes. The cookies should be firm around the edges but still soft in the center—they will firm up as they cool. For the glaze, I tested adding a splash of lemon juice or brandy for extra depth—I highly recommend it for more complex flavors. My biggest lesson? Don’t rush the cooling process. Patience here ensures beautiful, crack-free cookies. Honestly, the most satisfying part is seeing kids’ eyes light up and hearing their excited “Oohs” when they see the decorated cookies!
Storing and Reheating Tips
These cookies are sturdy but best enjoyed fresh or within a week. Store them in an airtight container at room temperature—layer them with parchment paper to prevent sticking, and they’ll stay crisp for days. If you want to keep them longer, pop them in a resealable bag in the fridge—just bring them to room temp before serving. For the freezer, wrap each cookie in plastic wrap, then store in an airtight container or zip-top bag for up to 3 months. When you’re ready to enjoy, let them thaw at room temperature—no need to reheat unless you want to serve warm. If you’ve glazed them, wait until they’re fully dry before stacking or freezing—otherwise, the glaze can crack or become sticky. Want warm, freshly baked cookies? A quick 10-second zap in the microwave can bring back some of that fresh-out-of-the-oven magic, but honestly, I prefer letting them sit at room temp to preserve the texture. Remember, always keep a small container with a piece of bread in the same jar or container—you’d be amazed how well that keeps them from getting stale! These little tricks ensure that your gingerbread cookies stay luscious, flavorful, and just as delightful as the moment they left the oven.
Frequently Asked Questions
Final Thoughts
Honestly, homemade gingerbread cookies hold a special place in my heart—they’re the embodiment of family, tradition, and comfort. This recipe makes cookies that are flavorful, beautifully textured, and endlessly customizable. Whether you’re baking with kids, making a quick gift, or just indulging your own sweet tooth, I can’t recommend giving this a try enough. The best part? Once you’ve mastered the simple steps, you’ll want to make these year-round—spiced, cozy, and perfect anytime you need a little pick-me-up. Plus, the smell alone will turn your home into a holiday wonderland. So, go ahead—break out your rolling pin, get your hands sticky with dough, and let the delightful aroma do its magic. I’d love to hear how your batch turns out! Drop a comment, share your decorating ideas, or tell me your secret ingredient—happy baking, friends!
gingerbread cookies
Ingredients
Main Ingredients
- 0.5 cup shortening
- 0.5 cup sugar
- 0.25 teaspoon salt
- 1 egg egg
- 0.5 cup molasses
- 1 tablespoon white vinegar
- 2.5 cups flour
- 0.75 teaspoon baking soda
- 0.5 teaspoon ground cinnamon
- 0.5 teaspoon ground cloves
- 0.5 tablespoon ground ginger
- optional Icing and candy for decorating
Instructions
Preparation Steps
- In the bowl of a stand mixer, add the shortening, sugar, and salt. Mix until smooth.
- Add in the egg, molasses, and white vinegar. Beat on medium speed until well combined.
- In a separate medium bowl, whisk together the flour, baking soda, cinnamon, cloves, and ginger.
- Gradually add the dry ingredients to the wet mixture on low speed until combined.
- Cover the dough and refrigerate for at least 2 hours.
- Preheat oven to 375°F. Line baking sheets with parchment paper.
- Divide dough into balls, roll out to 1/8 inch thick between parchment paper, and cut shapes.
- Place cut cookies onto prepared baking sheets.
- Bake for 5-6 minutes or until edges are firm.
- Cool on wire racks. Decorate with icing and candies as desired.


