Oh, these peanut butter brownies. They’re more than just a dessert for me; they’re a memory. I can almost smell them baking, that warm, sweet aroma mingling with the rich, nutty scent of peanut butter, filling our little kitchen. It takes me right back to when my kids were little, and I’d whip up a batch after school. The way their faces lit up, smeared with chocolate and peanut butter, is something I’ll never forget. They’d practically inhale them, asking for more before the last bite was even swallowed! If you’re anything like me, a good brownie is a necessity, a little slice of comfort. And when you add that irresistible swirl of peanut butter? Well, that’s just pure magic. These aren’t your average brownies; they’re fudgy, deeply chocolatey, and have this incredible ribbon of Creamy Peanut Butter running through them. They’re the kind of treat that makes a Tuesday feel like a Saturday. Forget complicated cakes, these peanut butter brownies are my go-to when a serious craving hits, and you know what? They’re surprisingly easy to make, even on a chaotic weeknight. I’ve tried a lot of brownie recipes over the years, but this one, with its perfect balance of chocolate and peanut butter, has truly earned its permanent spot on my recipe card.
Thank you for reading this post, don't forget to subscribe!What is peanut butter brownie?
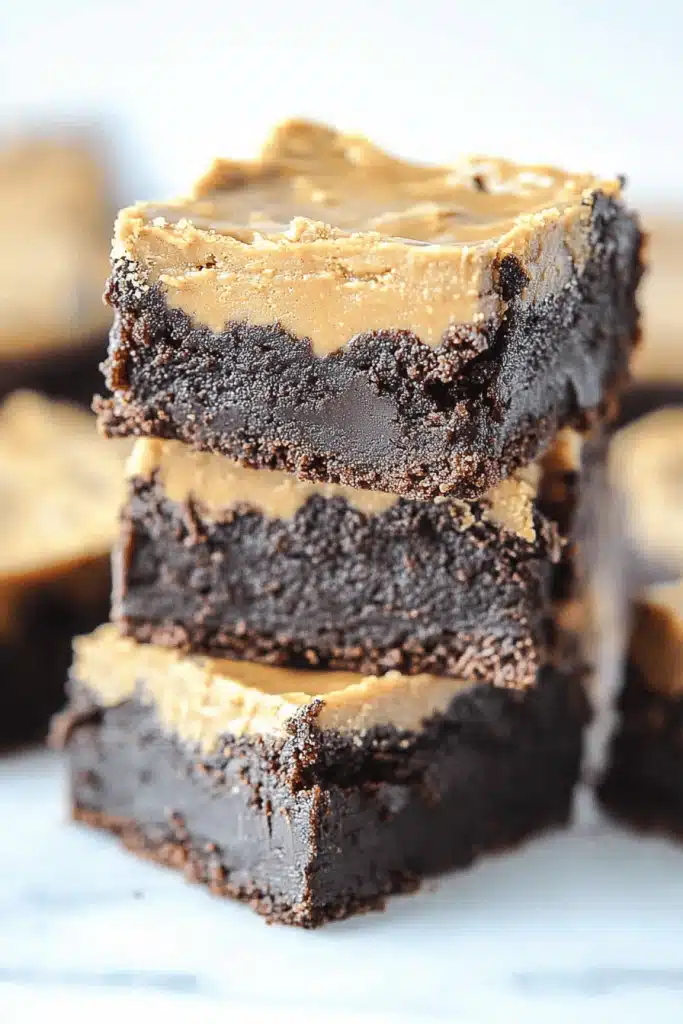
So, what exactly are these glorious Peanut Butter brownies we’re talking about? Think of them as your favorite, most decadent chocolate brownie, but with a dreamy, swirled-in layer of creamy peanut butter goodness. It’s not just a topping; it’s integrated right into the fudgy chocolate base, creating these beautiful, marbled patterns that are as stunning to look at as they are delicious to eat. The name pretty much says it all, right? It’s a fusion of two universally loved flavors that just… work. They’re denser and chewier than a cakey brownie, with that satisfyingly rich texture that melts in your mouth. The peanut butter isn’t overpowering; it complements the chocolate perfectly, adding a nutty depth and a silky smoothness. It’s like the best of both worlds colliding in the most delicious way possible, a true testament to how two simple ingredients can create something so extraordinary. They’re the ultimate comfort food, elevated.
Why you’ll love this recipe?
What are some of the reasons why this Peanut Butter Brownie recipe has become a staple in my kitchen, and I have a feelingflavor is just out of this world. You get that deep, dark chocolate intensity that we all crave in a brownie, but then that creamy, slightly salty peanut butter swirl cuts through it in the most perfect way. It’s not too sweet, not too rich, just perfectly balanced. My husband, who’s a bit of a peanut butter fanatic, says these are his absolute favorite dessert, and he’s not easily impressed! Then there’s the simplicity. I know, I know, brownies can sometimes seem intimidating, but these? They are surprisingly straightforward. You don’t need any fancy equipment, just a couple of bowls and a whisk. I’ve even made them with slightly sticky hands because my youngest wanted to “help.” The steps are clear, and the result is consistently amazing. What I love most about this is how cost-effective it is. Most of the ingredients are pantry staples – flour, sugar, cocoa, eggs, butter, and peanut butter. You likely have most of them already, making it a budget-friendly way to satisfy a serious sweet tooth. And the versatility! While they’re incredible on their own, I’ve found so many ways to enjoy them. They’re fantastic for a quick after-school snack, impressive enough for a potluck or family gathering, and absolutely divine served warm with a scoop of vanilla ice cream for dessert. They even hold up well for a few days, which is a lifesaver when you need a grab-and-go treat. Compared to other recipes I’ve tried, these peanut butter brownies hit that perfect spot of being intensely satisfying without being overly complicated or fussy. They’re just pure, unadulterated joy in every bite.
How do I make peanut butter brownies?
Quick Overview
Making these ultimate peanut butter brownies is a delightful, straightforward process that yields incredibly rich and satisfying results. You’ll start by melting butter and chocolate, then whisking in sugar and eggs to create a glossy base. Dry ingredients are gently folded in, followed by the simple preparation of a Peanut Butter Swirl. The magic happens when you layer and swirl the two mixtures in the pan, then bake them to fudgy perfection. The whole process, from mixing to the final bake, is designed to be fuss-free, ensuring you get those coveted chocolate-peanut butter swirls without any kitchen stress. It’s a recipe that promises big rewards for minimal effort, and trust me, the aroma filling your kitchen will be your first hint of the deliciousness to come.
Ingredients
For the Main Batter:
* 1 cup (2 sticks) unsalted butter, melted. Using good quality butter really makes a difference here, it adds a depth of flavor that’s hard to replicate.
* 6 ounces bittersweet or semi-sweet chocolate, chopped. I prefer using a good quality baking chocolate, not chocolate chips, as they melt smoother and give a richer flavor. If you can only find chips, try to get the ones that are meant for melting.
* 1 ½ cups granulated sugar. This is your standard sweetener. If you prefer a slightly less sweet brownie, you can reduce it by a tablespoon or two, but I find this amount perfect for balancing the chocolate and Peanut Butter.
* 3 large eggs, room temperature. Room temperature eggs incorporate better into the batter, creating a smoother, more emulsified mixture.
* 1 teaspoon vanilla extract. Don’t skip this! It enhances all the other flavors.
* 1 cup all-purpose flour. Just regular all-purpose flour is perfect here.
* ½ cup unsweetened cocoa powder. This is where the deep chocolate flavor comes from. Use a good Dutch-process cocoa powder if you can, it gives a darker color and a smoother taste.
* ½ teaspoon baking powder. This helps give the brownies just a little lift, keeping them from being too dense.
* ½ teaspoon salt. Crucial for balancing the sweetness and bringing out the chocolate flavor.
For the Filling:
* 1 cup creamy peanut butter. Use your favorite brand! I find regular creamy peanut butter works best. Natural peanut butters can sometimes separate too much, but if that’s all you have, give it a good stir.
* 2 tablespoons powdered sugar. This helps to slightly lighten the peanut butter and makes it easier to swirl.
* 1-2 tablespoons milk (any kind). Just enough to get the peanut butter to a swirlable consistency.
For the Glaze:
* ½ cup semi-sweet chocolate chips. These will melt down beautifully.
* 1 tablespoon unsalted butter. Adds shine and helps the glaze set nicely.
* Optional: a pinch of salt, or a tiny drizzle of extra peanut butter for swirling on top.
Step-by-Step Instructions
Step 1: Preheat & Prep Pan
First things first, let’s get your oven ready. Preheat it to 350°F (175°C). Now, grab an 8×8 inch baking pan. I like to line mine with parchment paper, leaving an overhang on two sides. This makes lifting the brownies out so much easier later, and cleanup is an absolute breeze. Just grease the pan lightly before you put the parchment in, and then fold the paper to fit. This step ensures your beautiful brownies won’t stick, and you can lift them out in one perfect piece. Let’s not have any brownie casualties!
“New family favorite! This Rich Peanut Butter Brownies The Best was so flavorful and ridiculously easy. Crowd-pleaser for sure.”
Step 2: Mix Dry Ingredients
In a medium bowl, whisk together the flour, cocoa powder, baking powder, and salt. You want to make sure these dry ingredients are really well combined. Whisking them together aerates them a bit and ensures that the baking powder and salt are evenly distributed throughout the batter. This is super important for getting consistent results. Nobody wants a bite that’s too salty or a brownie that didn’t rise properly. Give it a good whisk until everything looks uniformly mixed and has a lovely, dark color.
Step 3: Mix Wet Ingredients
In a large bowl, combine the melted butter and chopped chocolate. Let it sit for a minute or two to allow the chocolate to start melting, then stir until smooth. Once that’s looking glossy and delicious, whisk in the granulated sugar until everything is well combined. Now, add the eggs, one at a time, whisking well after each addition. You want to achieve a smooth, emulsified mixture that looks almost like pudding. Finally, stir in the vanilla extract. This is the base for your rich, fudgy brownies!
Step 4: Combine
Now it’s time to bring the wet and dry ingredients together. Pour the dry ingredients into the bowl with the wet ingredients. Using a spatula or wooden spoon, gently fold them together until just combined. Be careful not to overmix! Overmixing can develop the gluten in the flour, which can lead to tougher brownies. Stop mixing as soon as you no longer see streaks of dry flour. A few little lumps are perfectly okay. The batter should be thick and glossy. This is the key to that fudgy texture we love so much.
Step 5: Prepare Filling
In a separate small bowl, combine the creamy peanut butter, powdered sugar, and 1 tablespoon of milk. Stir it all together until it’s smooth and spreadable, but still holds its shape. If it’s too thick to swirl, add the second tablespoon of milk, a little at a time, until you reach a good consistency. You want it smooth enough to spread, but not so thin that it just disappears into the batter. This mixture is going to create those amazing pockets of peanut butter flavor.
Step 6: Layer & Swirl
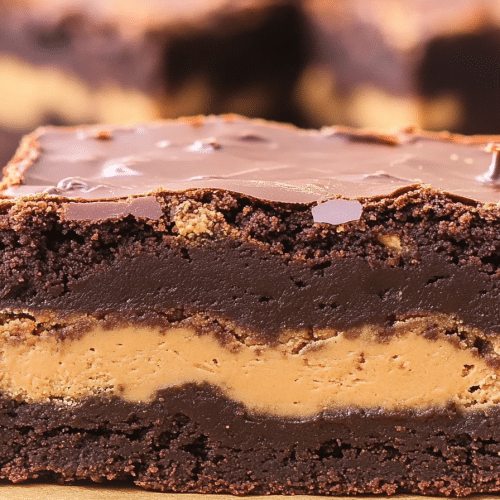
Spoon about two-thirds of the brownie batter into your prepared pan and spread it out evenly. Then, dollop spoonfuls of the peanut butter filling evenly over the batter. Next, add the remaining brownie batter on top of the peanut butter layer, spreading it as best you can to cover the filling. Now for the fun part! Take a knife or a skewer and gently swirl the peanut butter mixture into the brownie batter. Don’t overdo it; you want distinct swirls and pockets, not a muddy mess. Aim for zig-zag motions and figure-eights. This is what gives you those beautiful marbled patterns.
Step 7: Bake
Pop the pan into your preheated oven. Bake for 25-35 minutes. The exact time will depend on your oven, but you’ll know they’re ready when the edges look set and a toothpick inserted into the center comes out with moist crumbs attached, not wet batter. If it comes out completely clean, they might be a bit overbaked. I always err on the side of slightly underbaked for that super fudgy texture. Resist the urge to open the oven door too often, as this can cause them to sink.
Step 8: Cool & Glaze
Once they’re out of the oven, let them cool completely in the pan on a wire rack. This is crucial! While they’re still warm, they’re delicate and will likely fall apart. Patience is key here. Once they’re completely cool, you can make the glaze. In a small microwave-safe bowl, combine the ½ cup chocolate chips and 1 tablespoon butter. Microwave in 30-second intervals, stirring in between, until smooth and melted. Drizzle this over the cooled brownies and spread it evenly. Let the glaze set for about 30 minutes at room temperature, or pop them in the fridge for about 15 minutes if you’re impatient (like me sometimes!).
Step 9: Slice & Serve
Once the glaze has set, use the parchment paper overhangs to lift the entire slab of brownies out of the pan. Place it on a cutting board. For the cleanest slices, I recommend using a sharp knife that you’ve dipped in hot water and wiped dry between each cut. This really helps get those perfect edges. Cut them into your desired size – I usually cut mine into 9 or 16 squares. These peanut butter brownies are fantastic served at room temperature, but I have a secret: they’re even better slightly warmed up, especially with a scoop of vanilla bean ice cream. Pure heaven!
What to Serve It With
These peanut butter brownies are so versatile, they fit into almost any occasion! For a delightful breakfast treat, I love pairing a smaller square with a strong cup of black coffee. The bitterness of the coffee cuts through the sweetness beautifully, and it just feels like a little weekend luxury, even on a weekday. For a more festive brunch, I’ll arrange them on a tiered stand with some fresh berries – the bright fruit adds a lovely contrast. A mimosa or a sparkling rosé pairs wonderfully with the rich flavors. If you’re serving them as dessert after a nice meal, I highly recommend warming them up slightly and serving with a generous scoop of high-quality vanilla ice cream. A drizzle of extra chocolate sauce or a few chopped peanuts on top makes it feel extra special. My personal favorite for a casual cozy snack is to have one with a big glass of cold milk, maybe while curled up with a good book. My kids also love them with a dollop of whipped cream! Honestly, they’re so good on their own that they don’t really need anything else, but these pairings just take them to the next level.
“The Rich Peanut Butter Brownies The Best turned out amazing. My kids asked for seconds. Saving this one!”
Top Tips for Perfecting Your Peanut Butter Brownies
I’ve made these peanut butter brownies more times than I can count, and over the years, I’ve picked up a few tricks that I think really elevate them. For the moisture removal part, when it comes to the zucchini (oh wait, these aren’t zucchini brownies! My mind wandered to another favorite for a second!), but for these peanut butter ones, it’s all about the quality of your ingredients. Make sure your butter is fresh, and your chocolate isn’t stale. For mixing advice, remember that rule about not overmixing? It’s super important for fudgy brownies. Mix until you just see no dry flour. A few lumps are fine! I learned this the hard way after one batch turned out a bit too tough. For swirl customization, don’t be afraid to get creative! You can use a toothpick, a skewer, or even the back of a spoon to make swirls. Don’t try to get every last bit of peanut butter into the batter; leaving some dollops on top before swirling can create lovely pockets. If you’re looking for ingredient swaps, I’ve experimented a bit. For the chocolate, you can use milk chocolate if you prefer a sweeter brownie, but I find bittersweet gives a richer flavor. If you don’t have cocoa powder, you can use melted unsweetened chocolate for the base, but adjust the butter slightly. For the peanut butter, any creamy variety works, but a good quality one will yield the best flavor. When it comes to baking tips, I can’t stress enough how important it is to not overbake them. My oven runs a little hot, so I often check them a few minutes earlier than the recipe states. Look for that toothpick test with moist crumbs! If you’re making them in a different size pan, adjust the baking time accordingly. For glaze variations, if you want a thinner glaze, just add a touch more milk or butter. If you prefer a thicker, more frosting-like glaze, use a bit less butter. You can also add a pinch of sea salt to the glaze for a salty-sweet kick, or even swirl a tiny bit more peanut butter on top of the glaze before it sets for extra peanut butter punch!
Storing and Reheating Tips
The best part about these peanut butter brownies is that they actually taste even better the next day, which is amazing when you’re craving something sweet. For storing them at room temperature, once they’re completely cooled and the glaze has set, you can simply cover the pan tightly with plastic wrap or transfer them to an airtight container. They’ll stay wonderfully fresh and fudgy for about 3-4 days. I usually just leave them in the pan they were baked in and wrap it up. For refrigerator storage, if your kitchen tends to be warm, or if you just want them to last a bit longer, they can be stored in the fridge for up to a week. Again, an airtight container is your best friend here to prevent them from drying out. Just be aware that refrigeration can sometimes make them a bit firmer, which might be exactly what you want for a chewier texture! When it comes to freezer instructions, these brownies freeze incredibly well, which is a lifesaver for future cravings. Let them cool completely, then cut them into individual portions. Wrap each portion tightly in plastic wrap, then place them in a freezer-safe bag or container. They can be kept frozen for up to 2-3 months. To thaw, simply take a portion out of the freezer and let it sit at room temperature for about 20-30 minutes. For the glaze timing advice, it’s best to apply the glaze *after* the brownies have completely cooled and *before* you store them, whether that’s at room temperature, in the fridge, or in the freezer. If you freeze them with the glaze already on, the glaze might crack a bit upon thawing. So, cool, glaze, then store!
Frequently Asked Questions
Final Thoughts
So there you have it – my absolute favorite peanut butter brownies! I truly believe this recipe is a winner because it strikes that perfect balance between decadent flavor and simple execution. They’re the kind of treat that makes you feel like you’ve accomplished something special in the kitchen, even on a busy day. The way the rich chocolate and creamy peanut butter swirl together is just pure happiness in every bite. If you love chocolate and peanut butter as much as I do, you absolutely *have* to give these a try. They’re perfect for any occasion, or, let’s be honest, no occasion at all! I’d be so thrilled to hear how yours turn out, or if you have any fun twists you put on them. Leave a comment below and let me know what you think! Happy baking, everyone!
Peanut Butter Brownies
Ingredients
Brownie Layer
- 2 cups granulated sugar
- 1 cup salted butter melted
- 0.75 cup unsweetened cocoa powder
- 2 tsp vanilla extract
- 4 large eggs
- 1 cup all-purpose flour
- 0.5 tsp salt
Peanut Butter Layer
- 2 cups powdered sugar
- 0.5 cup butter softened
- 0.5 cup creamy peanut butter
- 2 tablespoons milk or cream
Chocolate Topping
- 2 cups semi-sweet chocolate chips
- 0.5 cup butter sliced into 1 tablespoon pieces
- 1 tablespoon milk
Instructions
Brownie Preparation
- Preheat oven to 350°F (175°C) and spray a 9" x 13" baking pan with non-stick cooking spray or line with parchment paper.
- In a large bowl, combine granulated sugar, melted butter, cocoa powder, vanilla extract, and eggs. Mix well until smooth.
- Add flour and salt to the mixture and mix until just combined. Be careful not to overmix.
- Spread the brownie batter evenly into the bottom of the prepared pan. Bake for 30 minutes, or until a toothpick inserted in the center comes out clean. Allow brownies to cool completely on a wire rack.
Peanut Butter Layer Preparation
- While brownies are cooling, combine powdered sugar, softened butter, creamy peanut butter, and milk in a mixing bowl. Beat for about 2 minutes until the mixture is smooth and fluffy.
- Once the brownies are completely cool, spread the peanut butter mixture evenly over the top.
Chocolate Topping and Finishing
- Melt chocolate chips and butter in a microwave-safe bowl. Microwave for 30 seconds, stir, then repeat in 15-second intervals until the chips are completely melted and the mixture is smooth. Let it cool for 10 minutes.
- Add 1 tablespoon of milk to the cooled chocolate mixture and mix well until it reaches an easily spreadable consistency.
- Spread the melted chocolate evenly over the peanut butter layer. Cover the pan and refrigerate until the chocolate layer is firm, about 1-2 hours.
- Cut into squares and serve. Store any leftovers covered in the refrigerator.


