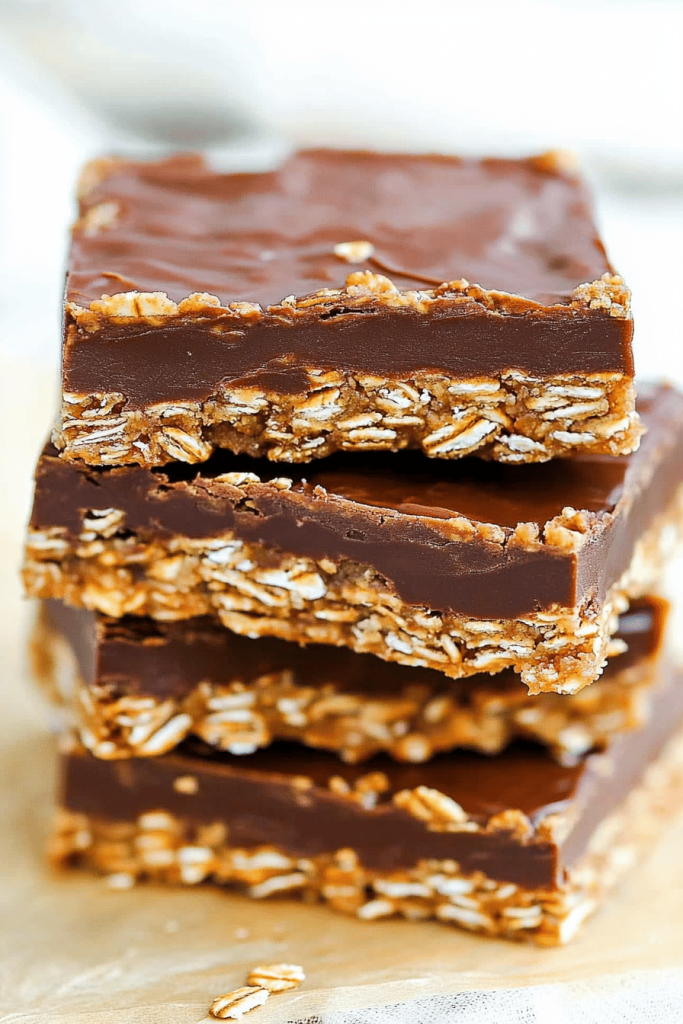
You know those days when a craving hits, but you just don’t have the energy for a full-blown baking project? Or maybe you need a reliable treat that the whole family will devour without question? That’s exactly where these amazing oatmeal bars come in. Honestly, they’re a lifesaver for me! They’re ridiculously easy to whip up, taste like pure comfort, and smell heavenly while they’re baking. They remind me a bit of my grandma’s classic Chocolate Chip Cookies, but in a more portable, less crumbly form. These oatmeal bars are my secret weapon for school lunches, quick breakfasts, or when that 3 PM sweet tooth strikes. They’re just *so* good, and the best part is you probably have most of the ingredients in your pantry right now. I’ve tinkered with this recipe for ages, and I’m finally ready to share my absolute favorite version with you.
Thank you for reading this post, don't forget to subscribe!
What are Chewy Oatmeal Bars?
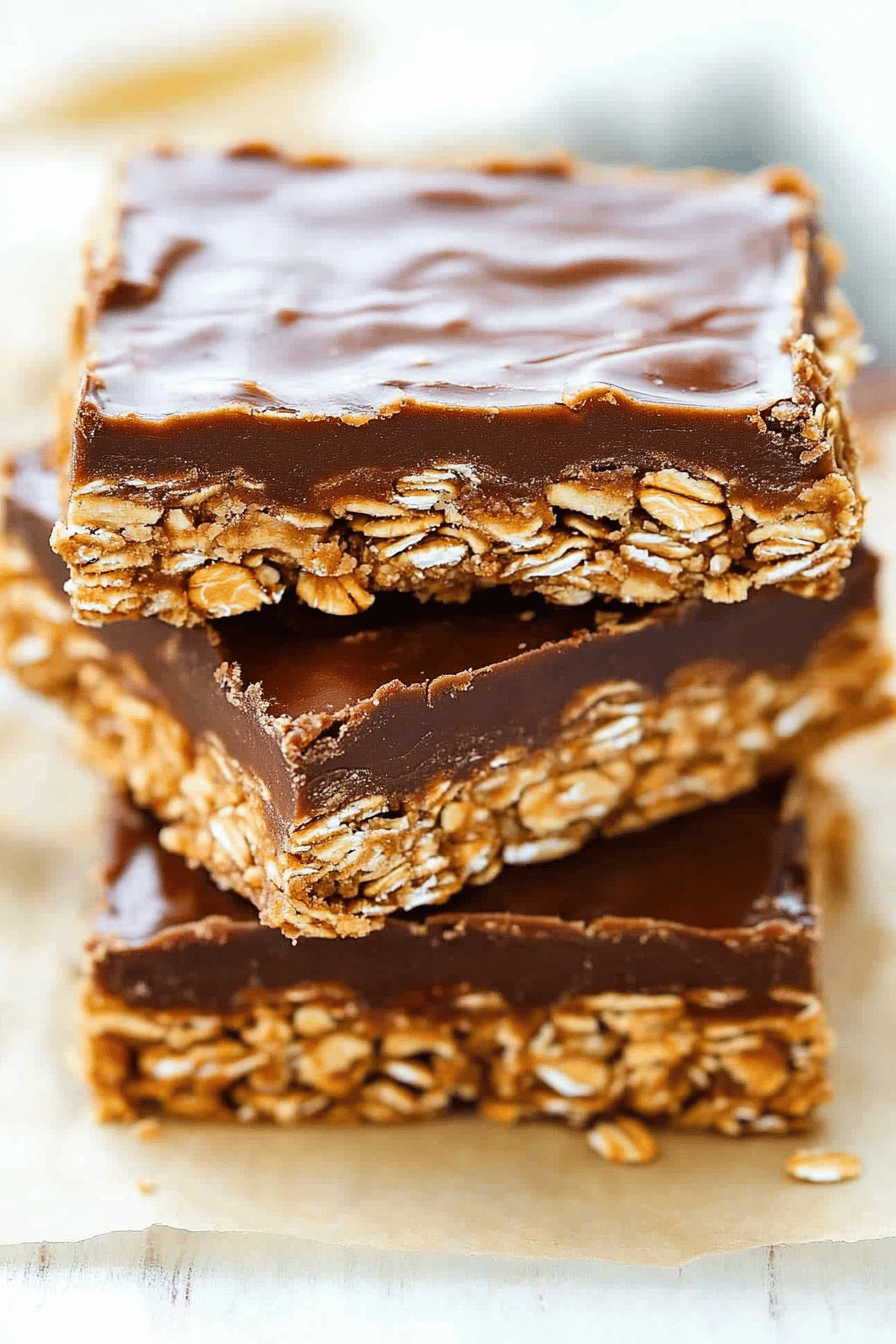
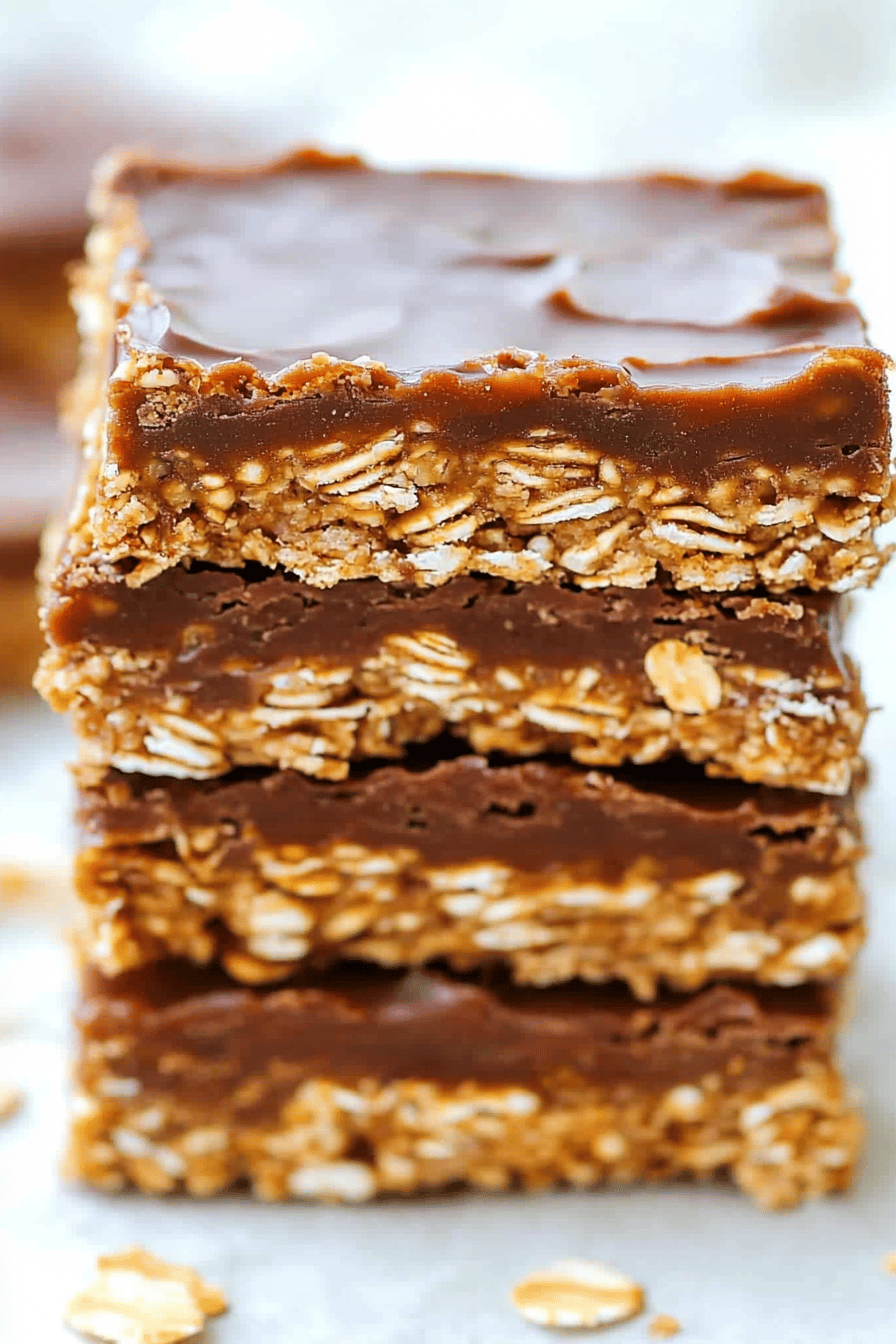
So, what exactly *are* these magical things? Think of them as a grown-up, way more delicious version of those Breakfast Bars you might have grabbed on the go. They’re essentially a soft, chewy base made primarily with oats, butter, and a touch of sweetness, baked into a perfect slab. What makes them truly special, though, is the gooey, slightly tangy filling nestled right in the middle. It’s not quite a jam, not quite a curd, but something wonderfully in between that just melts in your mouth. This recipe is my spin on a classic baked oatmeal, but elevated with a delightful surprise. They’re sturdy enough to pack for a picnic or to keep in the car for emergencies (you know, *those* emergencies), but tender and flavorful enough to feel like a real treat. It’s the kind of recipe that just makes people happy.
Why you’ll love this recipe?
Okay, let me tell you why this oatmeal bars recipe is a keeper, a true five-star in my book. First off, the flavor profile is just divine. You get that comforting, wholesome taste of oats, perfectly balanced by the sweet, buttery base. Then comes that burst of tangy filling – I usually go for a raspberry or apricot jam, but honestly, any good quality fruit jam works wonders here. It cuts through the sweetness beautifully. Second, the simplicity. I swear, from start to finish, you can have these in the oven in under 15 minutes. No fancy equipment, no complicated steps, just straightforward goodness. They’re incredibly cost-efficient too; oats, flour, sugar, eggs, butter – staples that don’t break the bank. And talk about versatile! I’ve mentioned breakfast and snacks, but they also make a lovely, rustic dessert. If you’re a fan of my LEMON BLUEBERRY Scones, you’ll appreciate the balance of sweet and slightly tart here, but in a totally different texture. What I love most is how forgiving this recipe is. I’ve accidentally used slightly less flour, or a bit more jam, and they still turn out spectacularly. It’s the kind of bake that reassures you that you *can* bake, even on your busiest days.
How do I make these Oatmeal Bars?
Quick Overview
This recipe is all about simplicity and deliciousness. You’ll mix up a quick, no-fuss dough that forms the base and topping, prepare a luscious fruit filling, layer them together in a pan, and bake until golden and bubbly. It’s a straightforward process that guarantees a comforting, chewy texture with a delightful fruity surprise. You won’t believe how easy it is to get such fantastic results!
Ingredients
For the Main Batter:
You’ll need 2 cups of rolled oats – make sure they’re old-fashioned rolled oats, not the instant kind. They give the best texture! Then, 1 ½ cups of all-purpose flour for structure, ½ teaspoon of baking soda to give them a little lift, and a pinch of salt to really make those flavors pop. For the sweet and binding elements, we’ll use 1 cup of packed light Brown Sugar (for that lovely caramel note), and ½ cup (1 stick) of unsalted butter, melted and slightly cooled. And to hold it all together, 1 large egg.
For the Filling:
This is where the magic happens! You’ll need about 1 ½ cups of your favorite fruit jam or preserves. My personal favorites are raspberry, strawberry, or apricot because they have a nice tartness. Make sure it’s a good quality jam that’s not too watery. If your jam is very stiff, you can stir in a tablespoon of water or lemon juice to loosen it up slightly.
For the Glaze (Optional but highly recommended!):
This adds a lovely touch and extra sweetness. I usually whisk together about ¾ cup of powdered sugar with 1 to 2 tablespoons of milk (or even lemon juice for a tangier glaze) until it’s smooth and pourable, but not too thin. You can also add a tiny splash of vanilla extract.
“The Oatmeal bars turned out amazing. My kids asked for seconds. Saving this one!”
Step-by-Step Instructions
Step 1: Preheat & Prep Pan
First things first, preheat your oven to 350°F (175°C). Grab an 8×8 inch baking pan and line it with parchment paper, leaving some overhang on the sides. This makes lifting the bars out so much easier later on. You can lightly grease the pan before adding the parchment, just to be extra sure nothing sticks.
Step 2: Mix Dry Ingredients
In a large bowl, whisk together the rolled oats, all-purpose flour, baking soda, and salt. Give it a good stir to make sure everything is evenly distributed. This ensures your oatmeal bars have a consistent texture throughout.
Step 3: Mix Wet Ingredients
In a separate, medium-sized bowl, whisk together the packed light Brown Sugar, melted and slightly cooled butter, and the large egg. Mix until everything is well combined and smooth. It should look glossy and delicious!
Step 4: Combine
Pour the wet ingredients into the bowl with the dry ingredients. Now, using a spatula or wooden spoon, gently mix everything together until just combined. Be careful not to overmix! You want to see streaks of flour still – that’s perfectly fine. Overmixing can lead to tougher bars, and we want chewy, tender goodness.
Step 5: Prepare Filling
If you haven’t already, have your 1 ½ cups of jam ready to go. If it’s a bit stiff, give it a stir with a tablespoon of water or lemon juice to make it more spreadable. This will make it easier to distribute evenly over the base layer.
Step 6: Layer & Swirl
Take about two-thirds of the oatmeal mixture and press it evenly into the bottom of your prepared baking pan. It doesn’t have to be perfect, but try to get a nice, even layer. Spoon the jam over this base layer, spreading it out almost to the edges. Now, crumble the remaining one-third of the oatmeal mixture over the top of the jam. You can leave it as crumbles, or gently press it down a little. For a really pretty look, you can even swirl the jam up into the topping a bit with a knife, but don’t overdo it.
Step 7: Bake
Pop the pan into your preheated oven and bake for 30-35 minutes. You’re looking for the edges to be golden brown and the center to be set, with maybe a few bubbly spots from the jam. The best way to test is to gently press the center – it should feel firm, not gooey. If it’s still very soft, give it a few more minutes.
Step 8: Cool & Glaze
This is a crucial step for perfect bars! Let the oatmeal bars cool completely in the pan on a wire rack. I know it’s tempting to dive in, but this is how they set up properly. Once they are totally cool, whisk together your glaze ingredients until smooth. Drizzle the glaze over the cooled bars. Let the glaze set for about 15-20 minutes before slicing.
Step 9: Slice & Serve
Once the glaze is set, use the parchment paper overhang to lift the whole slab out of the pan onto a cutting board. Slice into your desired bar size – I usually get about 12 good-sized bars. Enjoy!
“New family favorite! This Oatmeal bars was so flavorful and ridiculously easy. Crowd-pleaser for sure.”
What to Serve It With
These oatmeal bars are wonderfully versatile, making them perfect for any time of day or any occasion. For breakfast, they’re a dream paired with a hot cup of coffee or a refreshing glass of milk. I love to pack one for my commute or have it alongside some fresh fruit for a balanced start. For brunch, they look lovely arranged on a platter with some fresh berries and maybe a dollop of yogurt. They feel a bit more elegant this way. As dessert, they hit the spot when you want something sweet but not overly heavy. They’re fantastic on their own, or perhaps with a small scoop of vanilla ice cream for a real treat. And for those cozy snack times, there’s nothing better than a warm drink (tea, hot chocolate, you name it!) and one of these chewy bars. My kids especially love them after school with a glass of chocolate milk – it’s their favorite reward. I’ve also found they pair beautifully with a mild herbal tea, like chamomile, which complements the fruitiness without overpowering it.
Top Tips for Perfecting Your Oatmeal Bars
I’ve made these oatmeal bars more times than I can count, and over the years, I’ve picked up a few tricks that make them even better. For the oats, I always, always use old-fashioned rolled oats. They give that signature chewy texture that just can’t be beaten. Instant oats will turn them into more of a mush, and steel-cut oats won’t soften properly. When it comes to mixing the batter, seriously, don’t overmix! It’s the number one mistake I see people make. Just mix until the dry ingredients are *barely* incorporated into the wet. A few streaks of flour are your friend here; they mean tender bars. For the filling, using a good quality jam is key. If your jam is very firm, I learned the hard way that it can be tough to spread, so loosening it up with a little liquid makes a world of difference. Don’t worry about perfectly smooth swirls; rustic is part of the charm! I’ve also experimented with different fruits and found that anything with a bit of tartness, like blackberry or even a mixed berry jam, works wonderfully to cut through the sweetness. For baking, ovens can be so different! If yours runs hot, keep an eye on them towards the end and pull them out a few minutes early if they’re browning too fast. The edges should be golden, and the center should feel set. And the cooling step? It’s non-negotiable! Trying to slice them while they’re warm is a recipe for a crumbly mess. Patience here truly pays off. If you want to switch things up, try adding a handful of chocolate chips or chopped nuts to the batter, or even a sprinkle of cinnamon for extra warmth. I once tried a swirl of caramel sauce instead of jam, and while decadent, it was a bit too sweet for my usual preference – jam is definitely the winner for me!
Storing and Reheating Tips
These oatmeal bars are wonderfully forgiving when it comes to storage, which is another reason I love them so much. At room temperature, they’ll keep beautifully for about 3-4 days. Just make sure they’re stored in an airtight container, like a cake keeper or a container with a tight-fitting lid. This helps keep them from drying out and maintains that lovely chewy texture. If you live in a warmer climate or your kitchen tends to be quite warm, I often opt for refrigerator storage, especially if I’m not going to eat them all within a couple of days. In the fridge, they’ll stay fresh for up to a week. I usually store them in an airtight container, and they’re perfectly delicious cold. If you prefer them warm, though, reheating is super simple! You can pop a bar in the microwave for about 10-15 seconds – just enough to warm it through. Or, for a slightly crisper edge, you can warm them gently in a toaster oven at a low temperature for a few minutes. If you’re making a big batch and know you won’t get through them quickly, freezing is your best friend. Wrap each bar individually in plastic wrap, then place them in a freezer-safe bag or container. They’ll last in the freezer for up to 2-3 months. To thaw, simply take them out of the freezer and let them sit at room temperature for a couple of hours, or pop them directly from the freezer into the toaster oven for a warm treat. If you’ve added the glaze, it generally holds up well to all storage methods. If you’re worried about the glaze getting too soft in the fridge or freezer, you can always add it *after* thawing or reheating the bars. Honestly, they’re so good, they rarely last long enough for me to worry too much about long-term storage!
Frequently Asked Questions
Final Thoughts
So there you have it – my absolute favorite recipe for chewy oatmeal bars. I truly believe this is a recipe that everyone should have in their arsenal. It’s comforting, incredibly easy, and consistently delicious. Whether you’re looking for a quick breakfast on a hectic morning, a satisfying afternoon snack, or a simple dessert that feels a little special, these bars deliver every single time. They’re the kind of food that brings people together, sparking smiles and happy chatter. If you love baking with oats and fruit, you might also want to check out my recipe for [link to another relevant recipe, e.g., “Rustic Apple Crumble Bars”], which has a similar comforting vibe. I can’t wait for you to try these oatmeal bars and experience the joy they bring. Please, let me know in the comments below how yours turn out, what jam you used, or any creative twists you’ve added! Your feedback means the world to me. Happy baking, everyone!

Oatmeal bars
Ingredients
Main Ingredients
- 2 cups rolled oats
- 0.5 cup all-purpose flour
- 0.5 teaspoon baking soda
- 0.25 teaspoon salt
- 0.75 cup brown sugar packed
- 0.5 cup unsalted butter melted
- 1 teaspoon vanilla extract
- 0.5 cup chocolate chips optional
Instructions
Preparation Steps
- Preheat oven to 350°F (175°C). Grease and flour a 8x8 inch baking pan.
- In a large bowl, whisk together oats, flour, baking soda, and salt.
- In a separate bowl, combine melted butter, brown sugar, and vanilla extract. Mix well.
- Pour the wet ingredients into the dry ingredients and mix until just combined.
- If using, stir in the chocolate chips.
- Press the mixture evenly into the prepared baking pan.
- Bake for 25-30 minutes, or until golden brown around the edges.
- Let cool completely in the pan before cutting into bars.


