There’s something about the smell of roasted peppers filling the kitchen that immediately takes me back to my grandmother’s house — a cozy, warm feeling wrapped in smoky, cheesy goodness. Rajas con Queso has been a family favorite for as long as I can remember. It’s one of those recipes that’s so simple yet endlessly satisfying, perfect for those nights when you want something comforting without spending hours in the kitchen. I’ve made this a dozen ways — with different cheeses, added a splash of cream, even switched out the peppers — and honestly, it’s never failed to bring smiles around the table. What I love most about this is how versatile it is; it’s great on its own, as a side, or even stuffed into tortillas for a quick brunch or snack. Plus, it’s a lifesaver on busy nights when I need a quick, flavorful bite that the kids always ask for. Trust me, once you give this a try, it’ll become a staple in your own home, too. Here’s everything you need to know to make the creamiest, most delicious Rajas con Queso ever!
Thank you for reading this post, don't forget to subscribe!What is Rajas con Queso?
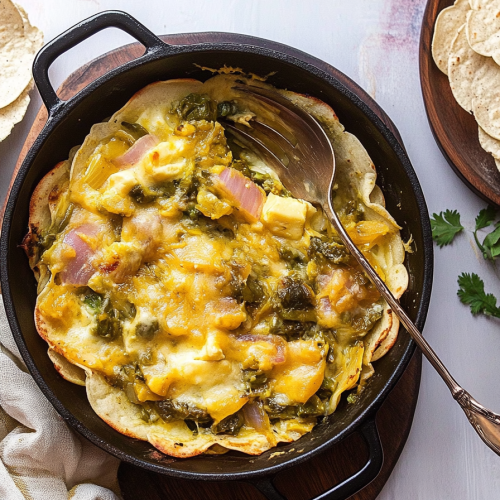
Rajas con Queso is a traditional Mexican dish that highlights the smoky flavor of roasted poblano peppers, sliced into strips called “rajas,” combined with gooey melted cheese. The word “rajas” literally means “slices” or “strips” in Spanish, which perfectly describes how these peppers are cut before being cooked with cheese. Think of it as a comforting, cheesy pepper medley that’s rich in flavor but simple to prepare. It’s essentially a celebration of two ingredients that work beautifully together: the sweet, smoky peppers and the creamy cheese. This dish originates from the Mexican culinary tradition of transforming everyday ingredients into something special — a sort of home-cooked Comfort Food that feels like a warm hug. It’s highly versatile, too — you can serve it as a side, a filling for tacos, or even as a simple main dish. My favorite way? On a chilly evening, just scooped up with warm tortillas, melted cheese stretching with every bite. It’s one of those recipes that tastes like a little slice of Mexico’s soul, made right in your own kitchen.
Why you’ll love this recipe?
What I love most about Rajas con Queso is how flavorful and straightforward it is — no complicated techniques or exotic ingredients required, just good, honest cooking. The smoky peppers lend a deep, rich flavor that’s balanced beautifully by the creamy cheese; it’s like comfort food on steroids but still feels light enough to enjoy any day. Plus, it’s super budget-friendly! Those peppers are often on sale or can be roasted ahead of time, and cheese is such an accessible ingredient that can turn a simple dish into something special. This dish is incredibly versatile — I’ve served it as a side alongside grilled chicken, tucked it into tortillas with scrambled eggs for a quick breakfast, and even spooned it over rice for a filling vegetarian lunch. My kids ask for this all the time because it feels fancy but is actually so easy, and the smell alone. . . oh, it’s intoxicating. It’s honestly one of those recipes I can whip up even on my busiest nights, and it never fails to bring everyone to the table with wide smiles. If you’re a cheese lover or a fan of smoky, spicy goodies, this one’s a guaranteed hit.
And let’s be honest — there’s a little nostalgia baked into every bite, a reminder of family gatherings and cozy evenings. It’s a dish I keep close because it feels like a warm Sunday afternoon, no matter what day of the week it is. Plus, it’s flexible in so many ways. Want to add a splash of cream for extra richness? Go ahead. Prefer a sharper cheese? Absolutely. The beauty is in making it your own, just like my tias and abuelas did for generations. Once you’ve made Rajas con Queso a couple of times, you’ll see how this humble dish can shine at your dinner table, and I promise, it’s one you’ll fall in love with all over again.
How do I make a Raja con Queso?
Quick Overview
OK, so here’s the scoop — making Rajas con Queso is way easier than you might think. First, you roast or char some poblano peppers until their skins are blistered and smoky, then peel away those blackened skins (trust me, this step makes all the difference in flavor). Next, slice the peppers into strips, toss them in a little oil, and cook until tender and fragrant. Meanwhile, you’ll melt your cheese — I love using a milder queso Oaxaca or mozzarella for that gooey stretch, but feel free to get creative with your favorites. Combine the peppers and cheese in a skillet, let everything melt together, and then, if you like, swirl in some cream or sprinkle fresh herbs on top. Simple, smoky, cheesy, and perfect for anyone craving a cozy, flavorful bite that punches up your regular routines.
Ingredients
For the Main Batter:
– 4 large poblano peppers (fresh or roasted, skin peeled and seeds removed)
– 2 tablespoons Olive oil
– Salt to taste
For the Filling:
– 1 ½ cups shredded cheese (queso Oaxaca, mozzarella, or Monterey Jack are my favorites)
– ¼ cup chopped fresh cilantro (optional but adds freshness)
– ½ teaspoon Black Pepper or a dash of smoked paprika for extra smoky flavor
“Made the How to Make Cheesy Rajas for Dinner tonight and wow — perfect weeknight dinner. Will definitely make again!”
For the Glaze (optional but delicious):
– ¼ cup Sour Cream or Mexican crema
– A squeeze of lime
– Additional chopped cilantro for garnish
Step-by-Step Instructions
Step 1: Preheat & Prep Pan
Start by preheating your oven to 400°F (200°C). If you’re roasting peppers directly over a flame, do that until charred, then place them in a plastic bag to sweat for 10 minutes, making skin removal easier. Alternatively, you can broil them on a baking sheet until blackened, turning occasionally. Once peeled, give the peppers a good rinse to remove any remaining char, then pat dry. Slice into strips and set aside. Prepare your skillet by heating it over medium heat — you want it hot enough to sizzle but not so hot that the cheese burns.
Step 2: Mix Dry Ingredients
In a small bowl, combine your shredded cheese with Black Pepper or smoked paprika. This just layers extra flavor into every bite. If you’re using any herbs or spices, toss them in now. Trust me, seasoned cheese makes all the difference here.
Step 3: Mix Wet Ingredients
If you’re adding cream or crema, have it ready. I like to keep it chilled until right before serving so that it stays cool and creamy, especially if I’m making this ahead. For the basic dish, no special wet ingredients are needed — just keep everything handy for a quick melt later.
Step 4: Combine
In your skillet, warm two tablespoons of olive oil over medium heat. Add the sliced peppers and cook until they’re tender and slightly caramelized, about 5-7 minutes. Then, add your cheese mixture and stir gently as it melts, creating a gooey, smoky combo. If the mixture seems too thick, stir in a splash of milk or cream to loosen it up. Don’t overmix, or you’ll break the cheese — just enough to incorporate everything evenly.
Step 5: Prepare Filling
While your peppers and cheese are melting together, you can prepare a quick cilantro garnish or squeeze some lime over the mixture at the end. For variation, consider adding sautéed onions, roasted corn, or even canned chipotle peppers for a smoky, spicy kick.
Step 6: Layer & Swirl
If you’re layering, pour a thin layer of the pepper-cheese mixture into your dish and then add more peppers on top, swirling a bit to create that marbled, beautiful effect. If you like, sprinkle some extra cheese on top for a golden crust. The swirl pattern is purely optional but adds a homemade, rustic charm.
Step 7: Bake
Pop the skillet into a preheated 375°F (190°C) oven and bake for about 10-15 minutes, or until everything is bubbling and golden on top. Keep an eye on it; you want that meltiness but not a burnt cheese taste. Ovens vary, so start checking at the 10-minute mark. If you’re using a toaster oven, just keep a close watch to prevent over-browning.
Step 8: Cool & Glaze
Let it sit for a few minutes after baking — this helps everything set up nicely. Just before serving, drizzle sour cream or crema over the top, squeeze a little lime, and sprinkle fresh cilantro. It brightens up the smoky richness in the best way.
“New family favorite! This How to Make Cheesy Rajas for Dinner was so flavorful and ridiculously easy. Crowd-pleaser for sure.”
Step 9: Slice & Serve
Use a sharp knife to cut into portions, revealing that tempting swirl of peppers and cheese. Serve hot with warm tortillas or crispy chips, and enjoy every bite. It’s especially good with a side of black beans or a simple green salad.
What to Serve It With
This comforting dish is so versatile—almost like a blank canvas that beautifully complements other flavors. For breakfast, I love wrapping it in a warm tortilla with scrambled eggs for a quick morning feast, so the cheesy goodness can be enjoyed on the go. It also makes a lovely brunch item—pair it with fresh fruit, a splash of sparkling water, and perhaps a shot of freshly brewed coffee. For dinner, serve it as a flavorful side to grilled chicken or fish, letting the smoky peppers shine alongside something simple and light. For a vegetarian main, top it over roasted sweet potatoes and add a fresh salad for crunch. And honestly, I’ve even packed leftovers in a thermos for a picnic—this dish rewarms beautifully. My family’s favorite is to scoop it onto tostadas with a sprinkle of crumbled queso fresco and fresh cilantro; it feels like a little fiesta in every bite. The smoky, cheesy aroma always gets everyone’s attention, and I don’t blame them—such a cozy, satisfying dish deserves to be shared and savored at any meal.
Top Tips for Perfecting Your Rajas con Queso
After making this dish countless times, I’ve picked up a few tricks that help it turn out just right each time. First, when roasting poblano peppers, don’t rush the process — the charring adds that unbeatable smoky flavor. I always do this over an open flame or broiler, turning every couple of minutes until they blister evenly. I’ve tested using different cheeses, and honestly, queso Oaxaca is the best for that silky stretch, but mozzarella or Monterey Jack work beautifully too. Down the line, I learned not to overmix once the cheese is melting because it can get greasy or stringy — gentle stirring is key. About the swirl pattern: I love making it look rustic but consistent, so I layer the peppers with cheese, giving a quick gentle swirl with a toothpick before baking. If you want extra smokiness, throw in a chipotle pepper or smoked paprika into the cheese mixture — it’s incredible! Trust me on this: preheating your skillet properly ensures everything melts evenly. If your cheese isn’t melting well, turn up the heat slightly, but watch closely. Also, if you’re short on time, roasting the peppers in advance and keeping them refrigerated makes assembly quicker. One thing I’ve experimented with is adding a splash of cream or sour cream right before serving, which elevates the richness—try it, you’ll be hooked. The best part? Every time I learn a little more — like how I tested almond milk once and it made the dish even creamier! Honestly, this dish has a way of adjusting to your vibe, so don’t be afraid to make it your own. It’s one of those recipes where the process is almost as enjoyable as the finished dish.
Storing and Reheating Tips
This dish keeps pretty well, so if you’re making extras, here’s the scoop: let it cool completely before storing. In the fridge, transfer leftovers to an airtight container — it’ll stay fresh for 3-4 days. I’ve reheated it gently on the stove over low heat, stirring often to prevent sticking or burning. microwaving works, too, just cover it with a damp paper towel to keep it from drying out. For longer storage, I pop leftovers in the freezer, wrapped tightly in plastic wrap and then foil — they’ll hold up for about a month. When reheating from frozen, it’s best to thaw in the fridge overnight, then warm gently on the stove or oven until bubbly again. If you’re planning to add a fresh layer of cheese or a drizzle of cream, do that after reheating for best texture. As for the glaze, I recommend adding the crema or sour cream right before serving to keep that fresh, creamy touch. I’ve learned that reheating with the cheese already melted tends to keep it gooey, but if it gets a little stringy, just stir in a splash of milk or water to loosen things up. The aroma alone will make it hard to resist coming back for seconds!
Frequently Asked Questions
Final Thoughts
Honestly, Rajas con Queso has become one of those recipes I turn to over and over — it’s just so satisfying, easy, and adaptable to whatever I have in the fridge. The smoky roasted peppers paired with the melting cheese create a flavor that feels indulgent yet simple enough to make on a weeknight. I love how the combination of textures and flavors can make even a humble dish feel like a little celebration. Plus, it’s a recipe that’s perfect for experimenting — try different cheeses, add corn or sautéed onions, or top it with a spicy salsa for extra punch. I can’t wait for you to try it out and see how your family reacts — mine always asks for seconds! So, gather your ingredients, fire up that stove, and enjoy the cozy, cheesy goodness of Rajas con Queso. And don’t forget to come back and tell me how it turned out — I’d love to hear your twists and tweaks! Happy cooking!
Rajas con Queso
Ingredients
Main Ingredients
- 4 pieces Poblano peppers
- 1 cup Shredded cheese preferably Chihuahua or Monterrey Jack
- 1 tbsp Vegetable oil
- 0.5 tsp Salt
- 0.25 tsp Black pepper
Instructions
Preparation Steps
- Roast the poblano peppers over an open flame or under the broiler until the skin blisters and chars.
- Place the roasted peppers in a plastic bag and let them steam for 10 minutes, then peel off the charred skin.
- Slice the peeled peppers into strips and sauté them in vegetable oil with salt and pepper for 5 minutes.
- Stuff the peppers with shredded cheese and serve warm.


