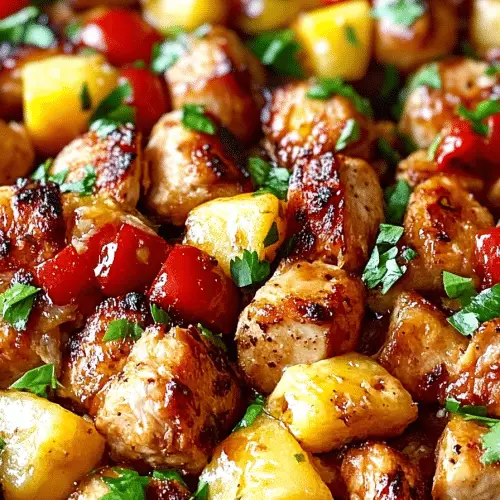
Oh, friends, let me tell you about a recipe that’s become an absolute legend in my kitchen. We’re talking about a Hawaiian chicken that isn’t just dinner; it’s a vacation on a plate. It’s that sweet, tangy, slightly savory perfection that instantly transports you to a breezy luau, even if you’re just in your backyard. I remember the first time I made this, my kids practically inhaled it. And honestly, if my picky eaters are begging for seconds (and thirds!), you know you’ve struck gold. It’s a little bit like the magic of a classic Pineapple upside-down cake, but in a savory, incredibly satisfying main dish form. If you’re looking for something that’s surprisingly easy but tastes like you spent hours slaving away, then this Hawaiian chicken is your new best friend. It’s the kind of meal that makes everyone around the table smile, and that’s what cooking is all about, right?
Thank you for reading this post, don't forget to subscribe!What is Hawaiian chicken?
So, what exactly *is* this glorious Hawaiian chicken that has everyone talking? Think of it as a deeply flavorful, tender chicken dish that’s coated in a luscious, caramelized sauce that balances sweet, tangy, and savory notes beautifully. The “Hawaiian” part comes from the signature tropical flavors – usually a delightful mix of pineapple, soy sauce, and often a touch of ginger and garlic, all coming together to create something truly special. It’s not quite a stir-fry, not quite a baked dish, but a harmonious blend that results in incredibly moist chicken with a sticky, irresistible coating. It’s essentially a flavor explosion that’s much more approachable than you might think, and it’s become my go-to when I want a crowd-pleaser that feels a little bit fancy but is a total breeze to pull off.
Why you’ll love this recipe?
Honestly, where do I even begin with why I adore this Hawaiian Chicken Recipe? First and foremost, the flavor is just out of this world. That sweet and savory glaze that clings to every piece of chicken? It’s pure magic. It’s got that delightful tang from pineapple and a hint of brown sugar sweetness that’s perfectly balanced by the umami of soy sauce and a little zing from ginger. It’s incredibly comforting, yet bright and exciting all at once. And the simplicity! This is truly a lifesaver on busy weeknights. You can have this on the table in under an hour, and most of that is hands-off baking time. Plus, it’s surprisingly budget-friendly. Chicken thighs are usually quite affordable, and the other pantry staples are things I almost always have on hand. What I love most about this is its versatility. It’s not just a main course; it’s fantastic served over fluffy rice, tucked into lettuce wraps, or even shredded into tacos if you’re feeling adventurous. It’s one of those rare dishes that truly satisfies on every level – taste, ease, and value. It’s leagues better than a bland, plain chicken breast, and honestly, it’s way more exciting than some of those more involved dishes I used to shy away from. This one’s a keeper!
How do I make Hawaiian chicken?
Quick Overview
The process for this Hawaiian chicken is wonderfully straightforward. You’ll marinate the chicken briefly, then nestle it into a baking dish with some delicious aromatics and pineapple. A simple, luscious sauce is poured over the top, and then it all bakes together until the chicken is tender and the sauce has thickened into a sticky, glorious glaze. It’s mostly about letting the oven do the work while you relax or prep your sides. This method ensures the chicken stays incredibly moist and infused with all those amazing tropical flavors.
Ingredients
For the Chicken & Marinade: For the Chicken & Marinade: For the Chicken & Marinade: For the Chicken & Marinade
1.5 lbs boneless, skinless chicken thighs, trimmed of excess fat. I swear by thighs for this recipe; they stay so juicy and flavorful. If you only have breasts, just be extra careful not to overcook them!
1/4 cup soy sauce (low sodium is great if you’re watching your salt)
2 tablespoons honey (or maple syrup for a slightly different sweetness)
1 tablespoon rice vinegar (adds that essential tang)
1 teaspoon grated fresh ginger (you can buy this pre-minced in a tube too!)
2 cloves garlic, minced
“Made the Hawaiian chicken tonight and wow — perfect weeknight dinner. Will definitely make again!”
For the Baking Dish:
1 (15-ounce) can pineapple chunks, drained (reserve the juice for the sauce!)
1/2 medium red onion, thinly sliced (adds a nice bite and sweetness when cooked)
1 red bell pepper, thinly sliced (for a pop of color and freshness)
For the Glaze:
Reserved pineapple juice from the can
2 tablespoons Brown Sugar (adds a lovely caramel note)
1 tablespoon cornstarch (to thicken that glorious sauce)
Optional: A pinch of Red Pepper flakes for a tiny bit of heat.
Step-by-Step Instructions
Step 1: Preheat & Prep Pan
First things first, get that oven preheating to 375°F (190°C). Grab a baking dish, something around 9×13 inches is usually perfect for this amount of chicken. I like to give mine a quick spray with cooking spray, just as an extra insurance policy against sticking, though it’s usually not strictly necessary with chicken thighs.
Step 2: Mix Dry Ingredients
Wait, there aren’t really “dry ingredients” to mix separately for the chicken itself in this recipe, but the marinade does involve combining the liquid flavorings. So let’s consider this the “flavor base” step!
Step 3: Mix Wet Ingredients (Marinade)
In a medium bowl, whisk together the soy sauce, honey, rice vinegar, grated ginger, and minced garlic. This is your flavor powerhouse! Give it a good stir to make sure the honey is fully incorporated. This marinade is what really infuses the chicken with all those amazing Hawaiian vibes.
Step 4: Combine
Add the chicken thighs to the bowl with the marinade. Give everything a good toss with your hands (or tongs, if you prefer!) to ensure each piece of chicken is well-coated. Let it marinate for at least 15-20 minutes at room temperature while you prep the other ingredients. If you have more time, you can pop it in the fridge for up to a couple of hours – even better flavor infusion!
Step 5: Prepare Filling & Glaze Base
While the chicken is marinating, grab your drained pineapple chunks and scatter them on the bottom of your prepared baking dish. Then, add the thinly sliced red onion and red bell pepper over the pineapple. In a small bowl or directly in the can you reserved the pineapple juice in (if it’s clean!), whisk together the reserved pineapple juice, Brown Sugar, and cornstarch until the cornstarch is completely dissolved and there are no lumps. If you’re adding red pepper flakes, stir them in now.
Step 6: Layer & Swirl (Arrange Chicken)
Arrange the marinated chicken thighs on top of the pineapple and vegetables in the baking dish. Try to give them a little space so they cook evenly, but it’s okay if they’re cozy. Pour the prepared glaze mixture evenly over the chicken and vegetables. You want to make sure everything gets a good coating of that lovely sauce.
“New family favorite! This Hawaiian chicken was so flavorful and ridiculously easy. Crowd-pleaser for sure.”
Step 7: Bake
Pop that beautiful dish into your preheated oven. Bake for about 30-40 minutes, or until the chicken is cooked through and tender, and the sauce has thickened and is bubbling around the edges. The exact time will depend on the thickness of your chicken thighs and your oven, so keep an eye on it. You’re looking for an internal temperature of 165°F (74°C) in the thickest part of the chicken.
Step 8: Cool & Glaze (Rest & Sauce Development)
Once it’s done, take the dish out of the oven. Let it rest for about 5-10 minutes. This is crucial! It allows the juices in the chicken to redistribute, making it extra tender. The sauce will also continue to thicken slightly as it cools. If you want an extra glossy finish, you can spoon some of the thickened sauce from the bottom of the pan over the chicken once it’s resting.
Step 9: Slice & Serve
Serve your glorious Hawaiian chicken warm! It’s absolutely divine over fluffy white rice, which soaks up all that delicious sauce. You can also serve it with brown rice, quinoa, or even some steamed broccoli or Green Beans for a lighter meal. Garnish with some fresh chopped cilantro or green onions if you like for a burst of freshness and color. Enjoy every single bite!
What to Serve It With
This Hawaiian chicken is so versatile, it truly shines with a variety of accompaniments. For a classic breakfast or brunch, imagine it alongside fluffy scrambled eggs or a simple frittata. The sweet and savory notes are a delightful contrast to the richness of eggs. If you’re serving this for a more elegant brunch, consider pairing it with some Roasted Sweet Potatoes and a vibrant fruit salad – maybe some mango and papaya to really lean into that tropical theme. As a dessert-like experience (hear me out!), though it’s savory, the sweet glaze makes it a treat. Think of serving it with a simple side like coconut rice, which complements the flavors beautifully. And for those cozy snack occasions, I’ve been known to just eat leftovers straight from the fridge with a fork, but it’s also fantastic tucked into warm tortillas for a deconstructed taco experience. My family absolutely loves it served over plain white rice, but we’ve also enjoyed it with a side of roasted Brussels sprouts for a nice contrast, or even stirred into a stir-fry with extra veggies. It’s really about what you’re craving!
Top Tips for Perfecting Your Hawaiian Chicken
Over the years, I’ve picked up a few tricks that really make this Hawaiian Chicken Recipe sing. First, and I can’t stress this enough: **use chicken thighs**. They have more fat and connective tissue, which means they stay incredibly moist and tender even when baked. Breasts can dry out so easily, so if you must use them, watch the cooking time like a hawk and maybe consider marinating them for a bit longer. For the pineapple, make sure to drain it well but definitely save that juice! It’s pure liquid gold for the glaze. When you’re mixing the glaze ingredients, make sure that cornstarch is fully dissolved before adding it to the heat. A common mistake is to have clumps of cornstarch, which can make your sauce lumpy instead of smooth and glossy. I learned that the hard way once! If your sauce isn’t thickening up as much as you’d like after baking, you can always carefully spoon out some of the excess liquid, whisk in another teaspoon of cornstarch slurry (cornstarch mixed with a tablespoon of cold water), and then pour it back over and bake for a few more minutes. For the onions and peppers, slicing them thinly ensures they soften and become sweet without being overwhelmingly raw. I sometimes like to add a few slivers of jalapeño to the mix if I want a little extra kick, but that’s totally optional! And when it comes to baking, don’t be afraid to let it get a little caramelized around the edges; that’s where a lot of the best flavor is. If the top starts to brown too quickly, you can always loosely tent it with foil. Trust me, these little things make a big difference in transforming a good dish into an absolutely unforgettable one.
Storing and Reheating Tips
This Hawaiian chicken is fantastic for leftovers, which is always a win in my book! For room temperature storage, it’s best to let it cool down completely after baking before covering it. It should be fine at room temperature for a couple of hours, especially if your kitchen isn’t too warm, but for longer storage, definitely move it to the fridge. In the refrigerator, I like to store it in an airtight container. It will keep well for about 3-4 days, and honestly, the flavor sometimes even deepens by the next day. If you plan to freeze it, make sure it’s completely cooled first. You can portion it into freezer-safe containers or bags. I often freeze it with the sauce so it stays extra moist. It should last in the freezer for up to 2-3 months. To reheat, the best way is usually in a skillet over medium-low heat, stirring occasionally, or in the oven at a moderate temperature (around 300°F or 150°C) until heated through. If it seems a little dry, a splash of water or chicken broth can help revive it. For the glaze, it tends to thicken considerably when cold. Just gently reheat it along with the chicken, and it should loosen up beautifully. Avoid microwaving it on high power for too long, as that can sometimes make the chicken a bit tough. Patience is key to bringing those delicious flavors back to life!
Frequently Asked Questions
Final Thoughts
So there you have it – my absolute favorite Hawaiian Chicken Recipe! I truly hope you give this one a try. It’s one of those dishes that brings a little sunshine into your day, and it’s so incredibly satisfying to make something this delicious with relative ease. The combination of tender chicken, sweet pineapple, and that perfectly balanced sticky glaze is just perfection. It’s the kind of meal that makes your house smell amazing and guarantees happy faces around the dinner table. If you love vibrant, tropical flavors and a touch of sweet and savory magic, this is for you. And if you end up loving this as much as my family does, you might also want to check out my recipe for Coconut Shrimp or my Teriyaki Salmon – they have a similar island vibe! I can’t wait to hear what you think, or if you have any fun twists you’ve added. Let me know in the comments below how yours turns out, and don’t forget to share your photos! Happy cooking, everyone!
Hawaiian Chicken
Ingredients
Main Ingredients
- 1.5 pound chicken breast cut into bite-sized pieces
- 1 cup pineapple chunks drained
- 0.5 cup teriyaki sauce
- 0.25 cup brown sugar
- 1 tablespoon soy sauce
- 1 teaspoon ginger grated fresh
- 2 cloves garlic minced
- 1 tablespoon olive oil
- 0.5 cup water
- 1 tablespoon cornstarch
Instructions
Preparation Steps
- In a bowl, combine chicken, teriyaki sauce, brown sugar, soy sauce, ginger, and garlic. Marinate for at least 15 minutes.
- Heat olive oil in a large skillet over medium-high heat. Add marinated chicken and cook until browned on all sides.
- Add pineapple chunks and water to the skillet. Bring to a simmer.
- In a small bowl, whisk together cornstarch and a little bit of cold water to create a slurry. Pour into the simmering sauce and stir until thickened.
- Serve hot over rice.


