
Have you ever stood in your kitchen craving something warm and comforting, but didn’t want to fuss with complicated recipes or piles of flour? That’s exactly how I felt one cold winter evening when I discovered this flourless bread. I actually made it on a whim, using whatever nuts and seeds I had lingering in the pantry. The smell alone brought everyone to the kitchen—something nutty, tangy, and just a little sweet. My kids asked if I’d baked a cake, but nope, it’s bread! And it’s honestly become a go-to for busy mornings or when I want something satisfying without the fuss. Plus, I love how versatile it is—you can toast it, top it with avocado, or even serve it alongside a hearty stew. It’s light, yet filling and so much healthier than regular bread. I always do this when I need a quick, nourishing snack or a little treat that’s better for me. Trust me on this—it’s a game changer! I hope you love it just as much as I do.
Thank you for reading this post, don't forget to subscribe!What is flourless bread?
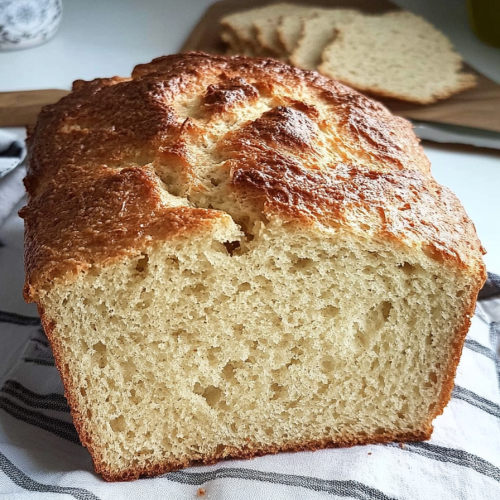
Think of flourless bread as a kind of hearty, rustic loaf that skips the typical wheat flour altogether. Its name sounds like it’s challenging gluten or something, but really, it’s just a bread made from nuts, seeds, and eggs—kind of like a bread meet seed cake. It’s essentially a dense, chewy slice that’s packed with flavor and nutrients, perfect for anyone following a gluten-free or low-carb diet. Sometimes called “seed bread” or “nut bread,” it’s a bit of a hybrid—more substantial than a quick bread but still light enough to enjoy at breakfast or alongside your favorite dip. Think of it as a “bread alternative” that’s really a little slice of heaven, especially if you love that nutty, earthy taste that comes from wholesome ingredients. The best part? No kneading, no rising—just mix, bake, and enjoy!
Why you’ll love this recipe?
What I love most about this flourless bread is how forgiving and adaptable it is. It’s kind of a magic recipe because you can customize the mix-ins and toppings according to what you have or what you’re craving. The flavor? Oh, it’s deep and nutty, with just enough chewiness to remind you of your favorite bakery bread—without the carbs or gluten. And best of all, it’s super simple. I’ve made this countless times, and honestly, the hardest part is waiting for it to bake. Plus, it’s budget-friendly because most of the ingredients are pantry staples—nuts, seeds, eggs, and a bit of baking soda. You can even make mini muffins or little rounds if you prefer to portion it out that way. What I love most is how versatile it is; I’ve served it for breakfast with avocado, toasted it with a smear of almond butter, and even sliced it as a side with stew. It’s hearty enough to fill you up but light enough to keep cravings in check.
This bread is a real lifesaver on busy nights when I need something nourishing and don’t want to stand over the stove. And, honestly, once you get the hang of it, you’ll find yourself swapping out ingredients—like using pumpkin seeds instead of sunflower, or adding a pinch of herbs for savory flair. It’s one of those recipes that becomes a staple because it’s just so darn good—and forgiving. Trust me, your family will ask for this all the time, and I bet you’ll get creative with it, too.
How do you make flourless bread?
Quick Overview
This flourless bread is one of those recipes where you just toss everything into a bowl, stir until it’s well combined, pour it into a plan, and bake. It’s so straightforward I always do this when I’m short on time but still want something wholesome. The beauty is in its simplicity—no kneading, no rising, no fuss. You’ll need a good mix of nuts and seeds, some eggs for binding, and a bit of baking soda or powder to give it a little lift. Once baked and cooled, it slices beautifully, and the texture is hearty yet tender—perfect for spreading or just tearing apart with your hands. Plus, the ingredients are flexible; swap in whatever nuts or seeds you like or happen to have on hand. This recipe is your blank canvas!
Ingredients
For the Main Batter:
– 1 cup mixed nuts (almonds, walnuts, or pecans are great, chopped or whole)
– ½ cup seeds (sunflower, pumpkin, or chia—whatever you like or have)
– 4 large eggs (preferably room temperature for better mixing)
– 2 tablespoons Olive oil or melted coconut oil
– ½ teaspoon baking soda or baking powder
– ½ teaspoon salt (adjust to taste)
– Optional: 1 tablespoon honey or maple syrup for a touch of sweetness
For the Filling:
– Optional: herbs, shredded cheese, or cooked veggies for savory versions
– Or fresh berries, chopped dates, or chocolate chips for a sweet twist
“Made the Easy Flourless Bread Recipe: A Simple Treat tonight and wow — perfect weeknight dinner. Will definitely make again!”
For the Glaze:
– Honey or maple syrup mixed with a squeeze of lemon or orange zest (for drizzling after baking)
– Or a dusting of powdered sugar or cocoa powder for finishing
Step-by-Step Instructions
Step 1: Preheat & Prep Pan
Set your oven to 350°F (180°C). Line a Loaf Pan with parchment paper or lightly grease it with butter or coconut oil. This step keeps your bread from sticking, which is always a small victory in my kitchen. Honestly, I do this first thing—before I start measuring—so that my batter is hot on the heels of mixing, and I don’t forget!
Step 2: Mix Dry Ingredients
In a large bowl, combine your nuts, seeds, baking soda, and salt. Mix that all up evenly. This ensures every bite is packed with flavor and prevents clumping. I like giving it a quick stir with a fork or spoon to distribute everything, then set it aside.
Step 3: Mix Wet Ingredients
In a separate bowl, whisk the eggs, oil, and sweetener if you’re using it. Once smooth and slightly frothy, pour it into your dry mix. The mixture will be thick, almost like Cookie Dough. The eggs help hold everything together, so don’t skip this step!
Step 4: Combine
Gently fold the wet into the dry until just combined—don’t overmix. You want it evenly distributed but still tender. If you overwork the batter, it can get tough. Think of it as gently coaxing everything together rather than stirring vigorously.
Step 5: Prepare Filling
If you’re adding extras like herbs, cheese, berries, or chocolate, fold them in now. For savory, fresh herbs and shredded cheese go in; for sweet, I love chopped dates or a handful of berries. Just make sure to sprinkle evenly so each slice gets a little of everything.
Step 6: Layer & Swirl
Pour half the batter into your prepared loaf pan. Then add your filling layer—spread it evenly—and top with the remaining batter. For a pretty swirl, take a knife and gently drag it through the batter in a swirling motion. No need for perfection here—just enough to create beautiful marbling when sliced!
Step 7: Bake
Pop it into your preheated oven and bake for about 35-45 minutes. You’ll know it’s done when the top is golden brown and a toothpick inserted in the center comes out clean. It might seem soft at first, but resist the urge to cut into it immediately. Let it cool in the pan for about 10 minutes, then transfer it to a wire rack to cool completely—this prevents it from getting soggy.
Step 8: Cool & Glaze
Once cooled, drizzle with honey or your favorite glaze. I like adding a bit of citrus zest for brightness. The cooling time really makes a difference—slice too early, and it might crumble. Trust me, patience pays off here!
“Packed with flavor and so simple. Exactly what I wanted from this Easy Flourless Bread Recipe: A Simple Treat!”
Step 9: Slice & Serve
Use a serrated bread knife to get clean cuts. Serve it sliced thick or thin, toasted with butter, or topped with avocado or jam. It’s also gorgeous sliced and stacked for a brunch platter or breakfast buffet. Honestly, I’ve eaten half a loaf on my own—don’t judge me!
What to Serve It With
This flourless bread is so adaptable, I always have a few ideas in my back pocket. For breakfast, I love slicing it warm and spreading with avocado, a sprinkle of Sea Salt, and a drizzle of olive oil. It’s also fantastic toasted with almond butter and sliced bananas—my kids ask for this all the time. If you’re hosting brunch, serve it alongside scrambled eggs, smoked salmon, or a fresh fruit platter. For dinner, I sometimes toast slices and serve with a hearty stew or chili—it’s like bread, but with a rustic, wholesome twist. And as a dessert? Oh, it’s perfect topped with mascarpone and a drizzle of honey or melted chocolate. I’ve even made mini muffins from this batter, which disappear in minutes at my house. Honestly, it’s one of those recipes that feels comforting and familiar but also kind of special—like a secret family favorite in the making.
Top Tips for Perfecting Your Flourless Bread
Here’s where I’ve learned some tricks over the years, just from messing around and tasting. First, when you’re chopping nuts, try to avoid overfining them—leave some chunks for texture. I once tried blending everything into a powder, and it lost its hearty bite. Second, if your batter feels too thick, a splash of water or more eggs can loosen it up. It should be scoopable but not runny. Third, don’t skip the resting step after mixing—letting it sit for about 10 minutes helps everything hydrate and settle, making for a better crumb. For swirl patterns, take your time and don’t be afraid to make designs—they look so pretty when sliced! You can swap in different nuts or seeds—trial and error is part of the fun. I tested adding a teaspoon of smoked paprika for a smoky twist, and wow, that was good. When baking, oven placement matters. I usually put my loaf on the middle rack to avoid over-browning. And honestly, I’ve learned to trust my nose—if it smells toasted and nutty, it’s probably ready. Lastly, for the glaze, I’ve experimented with everything from balsamic reduction to cinnamon honey—it all depends on your mood. The key is to have fun and make it your own!
Storing and Reheating Tips
To keep this bread fresh, I wrap individual slices in beeswax wraps or store the whole loaf in an airtight container. It stays good at room temperature for about 2 days, but I find it’s best enjoyed within that window, especially if it starts to harden. For longer storage, I pop it in the fridge, where it’ll last for about a week. Just reheat slices in a toaster or warm them gently in the oven—trust me, it tastes just as good the second day. If you want to make it last even longer, freezing slices wrapped in plastic or foil works great. Thaw at room temperature or pop directly into the toaster. Keep in mind, the texture might be slightly denser after freezing, but the flavor remains rich and nutty. As for the glaze or toppings, I usually add those right before serving, especially if it’s a sweet version. Doing so keeps everything fresh and vibrant. So, whether you’re prepping for a week of breakfasts or saving leftovers for a quick snack, this bread holds up beautifully—just a little love goes a long way.
Frequently Asked Questions
Final Thoughts
This flourless bread isn’t just a recipe—it’s a little hug from the kitchen. I love how it brings warmth and comfort, especially when I need something nourishing and delicious in a flash. Its rich nutty flavor, versatility, and simplicity keep me coming back for more—I honestly can’t imagine my pantry without it now! Plus, it’s a great way to sneak more seeds and nuts into the family’s diet without anyone realizing. If you’re craving something hearty but healthy, give this a try. I promise, it’ll become a new favorite in your home. And don’t forget—adapt it, tweak it, make it your own. I’d love to hear what variations you come up with! Drop a comment below, share your photos, and, most importantly, enjoy every crumb. Happy baking!
flourless bread
Ingredients
Main Ingredients
- 2 cups cottage cheese
- 1.5 cups rolled oats
- 4 eggs eggs
- 2 tablespoons olive oil
- 1 tablespoon baking powder
- 0.25 teaspoon salt
Instructions
Preparation Steps
- Preheat your oven to 350°F. Line a 9x5 inch loaf pan with parchment paper.
- Strain your cottage cheese of its liquid as best you can and discard the liquid.
- Add all the ingredients to your blender and pulse until mostly smooth. Pour the batter into your pan and bake for 35 minutes or until a toothpick comes out clean. Loosely cover with foil for the last 15 minutes if browning too quickly.
- Allow to set in the pan for 5 minutes, then transfer to a wire rack and cool for 10 minutes prior to slicing.


