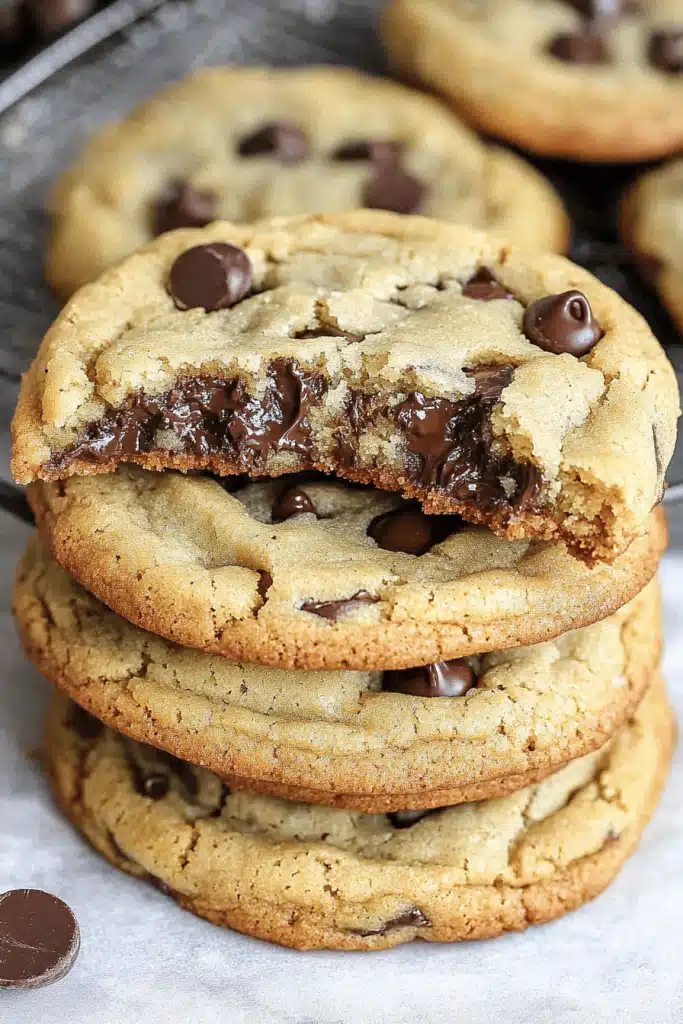
There’s something about the smell of freshly baked Chocolate Chip Cookies that instantly takes me back to lazy Sunday afternoons at my grandma’s house. The warm, buttery aroma filling the air, mingled with the sweet scent of melted chocolate—that’s pure comfort to me. Honestly, I’ve tried countless cookie recipes over the years, but nothing beats this one when I want a batch of cookies that’s soft, chewy in the center, and loaded with gooey chocolate. I always do this when I’m craving something sweet but don’t want to spend hours in the kitchen. Plus, this recipe’s simplicity makes it a hit even on those busy nights when I need a little sweetness fast. My kids ask for these all the time, and I swear, the smell alone disappears in minutes around here. Trust me, once you try making your own chocolate chip cookies, it’s hard to go back to store-bought. Smiles guaranteed, every single time!
Thank you for reading this post, don't forget to subscribe!What is chocolate chip cookie?
Think of Chocolate Chip Cookies as the classic American treat you’ll find in every bakery, school lunchbox, and family gathering. Basically, it’s a chewy, buttery cookie laden with tiny pockets of melted chocolate—think of it as the dessert equivalent of a warm hug. The name says it all: chocolate chips + cookies. It’s essentially a simple batter that comes together in minutes, then bakes into a luscious, golden-brown delight. My version is a little bit nostalgic, a little bit special, because I’ve tweaked it over the years to get that perfect balance of crispy edges and soft, chewy centers. It’s a recipe that’s versatile too—you can add nuts, swap out the chocolate, or even try gluten-free flour if you want to mix things up. Whatever you do, once you’ve got that first warm, melty bite, you’ll understand why everyone’s obsessed with these cookies. They’re the ultimate comfort food, no doubt about it.
Why you’ll love this recipe?
What I love most about this Chocolate Chip Cookies Recipe is how effortless it is. Seriously, you can have fresh cookies on your counter in under 30 minutes. It’s a lifesaver on busy nights when the kids ask, “Can we have cookies?” but you’re not about to turn on the oven for hours. Plus, this recipe is budget-friendly—most of the ingredients are staples you probably already have in your pantry: flour, sugar, butter, and, of course, chocolate chips. The flavor? Oh, it’s phenomenal. The buttery richness combined with the bursts of sweet chocolate makes every bite deeply satisfying. And the best part? These cookies are endlessly versatile. You can make them thick and chewy or thin and crispy—whatever your mood calls for. I’ve tested this with dark chocolate, milk chocolate, and even vegan chips—they all turn out amazing. Honestly, what I love most is how adaptable it is—you can play around with nuts, additives, or even sprinkle a tiny bit of sea salt on top for that perfect contrast.
And let’s be honest—there’s no better smell in the world than freshly baked cookies cooling on the rack. My whole house smells like happiness when I bake these, and I always get those curious kids and sneaky pets lingering in the kitchen, waiting for a taste. They’re also perfect for last-minute gifts, school parties, or just a cozy treat for yourself. Trust me, once you’ve baked them a few times, you’ll keep coming back to this recipe because it’s just too good and too easy to forget.
How do I make chocolate chip cookies?
Quick Overview
This recipe is straightforward and forgiving, making it perfect even if you’re new to baking. The process involves creaming butter and sugars, mixing in eggs and vanilla, then folding in flour, baking soda, and chocolate chips. The secret to perfect cookies? Don’t overmix the dough once you add the flour—this keeps them tender. After scooping the dough onto a baking sheet, a quick bake at 350°F (175°C) for about 10-12 minutes results in cookies that are golden around the edges with that irresistible chewy center. I love to slightly underbake mine for that soft, gooey texture—trust me on this, it makes all the difference. Once out of the oven, a few minutes of cooling on the sheet keeps them intact and allows the chocolate to set perfectly. You can tweak the size of your cookies, make mini bites, or go big and fat—whatever suits your fancy!
Ingredients
For the Main Batter:
- 2 1/4 cups (280g) all-purpose flour – I recommend unbleached flour for richer flavor.
- 1 teaspoon baking soda – helps the cookies rise just enough.
- 1/2 teaspoon salt – enhances all the flavors.
- 1 cup (226g) unsalted butter, softened – real butter makes a difference.
- 3/4 cup (150g) granulated sugar – for sweetness and browning.
- 3/4 cup (165g) packed brown sugar – adds moisture and depth.
- 2 large eggs – room temp works best.
- 2 teaspoons vanilla extract – classic and essential.
For the Filling:
“Made the Easy Chocolate Chip MM Cookies Recipe tonight and wow — perfect weeknight dinner. Will definitely make again!”
- 2 cups (about 340g) chocolate chips – I like semi-sweet, but dark or milk work, too.
- Optional: 1 cup chopped nuts (walnuts, pecans) – adds crunch if you like.
For the Glaze (Optional):
- 1/4 cup powdered sugar mixed with a splash of vanilla and milk – for that glossy finish.
- A sprinkle of sea salt – if you want that sweet-salty vibe.
Step-by-Step Instructions
Step 1: Preheat & Prep Pan
Set your oven to 350°F (175°C) and line a baking sheet with parchment paper or silicone baking mat. I always do this first—it keeps things clean and makes sure the cookies don’t stick. If you’re making big cookies, leave plenty of space between each one, around 2 inches. Refrigerating the dough for 30 minutes before baking helps the cookies spread less and develop better flavor, but if you’re in a rush, you can bake them directly after chilling.
Step 2: Mix Dry Ingredients
In a small bowl, whisk together the flour, baking soda, and salt. This step ensures your leavening agents are evenly distributed, which helps avoid weird bumps or uneven rising. I’ve learned this from experience—skipping this step can result in unevenly textured cookies.
Step 3: Mix Wet Ingredients
In a larger bowl, beat the softened butter, granulated sugar, and Brown Sugar until creamy and fluffy—about 2-3 minutes. I use a hand whisk or mixer on medium speed. Add eggs one at a time, mixing well after each, then stir in vanilla. The mixture should look smooth and glossy, almost like a rich caramel. The smell alone is irresistible during this step!
Step 4: Combine
Gradually add the dry ingredients into the wet mixture, mixing just until combined—overmixing can make the cookies tough. This might seem boring, but trust me, it’s worth it for that perfect chewy texture. Use a spatula or wooden spoon to fold the ingredients gently to avoid developing too much gluten.
Step 5: Prepare Filling
Stir in the chocolate chips and nuts if using. I love pressing a few extra chips on top of each Cookie Dough ball before baking—looks pretty, and it adds a few more melty bits to each bite.
Step 6: Layer & Swirl
Scoop generous tablespoons of dough onto your prepared baking sheet—two inches apart. For a marbled effect, I sometimes add a dollop of caramel or Peanut Butter in the center and swirl gently with a toothpick or skewer. Keep things playful and don’t worry about perfection; rustic is beautiful!
Step 7: Bake
Bake for about 10-12 minutes. Keep an eye on them—the edges should be golden, and the centers still look slightly soft. This is my secret for that fall-apart texture. The cookies will firm up as they cool, so don’t wait for them to look completely baked in the middle. Every oven is different, so start checking around the 10-minute mark.
Step 8: Cool & Glaze
Let the cookies rest on the baking sheet for 5 minutes—this helps them set. Then transfer them to a wire rack to cool completely before adding any glaze. If you plan to glaze, do it once the cookies are just cool enough to handle. I love drizzling a simple powdered sugar glaze over the top; it adds a shiny, sweet finish that makes the cookies feel special.
“The Easy Chocolate Chip MM Cookies Recipe turned out amazing. My kids asked for seconds. Saving this one!”
Step 9: Slice & Serve
These are best enjoyed warm, but they still taste incredible once cooled. Serve with a cold glass of milk or a hot cup of coffee. I actually find myself sneaking one, then another, because they’re that good. If you really want to spoil yourself, add a scoop of vanilla Ice Cream on the side—it’s divine!
What to Serve It With
These cookies are so versatile. For breakfast, pair one with a steaming cup of coffee or a glass of cold milk—who says you can’t start your day with a little sweet? For brunch, serve alongside fresh fruit and yogurt—it’s like the grown-up version of a cookie. At Family Dinners or parties, setting out a tray of these warm cookies with a drizzle of caramel sauce or a dusting of powdered sugar always disappears in minutes. And for those cozy nights, they make a perfect comfort snack, especially when you’re curled up on the sofa with a good book or your favorite movie. I love wrapping a few in parchment for quick housewarming gifts or school snack boxes. Honestly, there’s no wrong way to enjoy these—it’s just pure happiness in every bite.
Top Tips for Perfecting Your Chocolate Chip Cookies
Over the years, I’ve picked up a few tricks that make my cookies turn out just right every time. First, don’t skip chilling the dough—this step seriously makes a difference in texture and flavor. I tested this with melted butter vs. softened butter, and honestly, softened butter on the counter yields the best results because it creames evenly and helps the cookies spread just enough. When mixing, avoid overdoing it once you add the flour; overmixing develops gluten, which can make your cookies tough. Instead, fold gently until just combined. The pattern of your swirls and chips can be playful—try different arrangements to see what looks best! When it comes to baking, every oven is different, so keep an eye on your first batch—10 minutes might be enough or maybe a minute longer. If you love crispy edges, bake a bit longer, and if you want chewy centers, slightly underbake and don’t forget to cool them properly. And about the glaze—trust me, a simple vanilla icing or even a smear of melted chocolate transforms humble cookies into something a little more decadent. I’ve swapped out the chocolate chips for chunks of dark chocolate, added a dash of espresso powder, and even sprinkled Sea Salt on top—each tweak makes it uniquely yours. My biggest lesson? Sometimes, less is more—they’re perfect as-is, but customizing them can be fun and delicious!
Storing and Reheating Tips
Once you’ve baked these delightful cookies, you’ll want to keep them fresh for as long as possible. If you’re planning to enjoy them over the next day or two, store them in an airtight container at room temperature. I find that stacking with a sheet of parchment paper in between helps prevent sticking and keeps them soft. They’re good for about 3-4 days—if they last that long! If you want to keep them longer, pop the cookies into a freezer-safe bag or container, and they’ll keep well for up to 3 months. To reheat, microwave for about 10-15 seconds—you’ll get that just-baked warm feeling. I also recommend letting frozen cookies thaw at room temperature for a few minutes, so the chocolate doesn’t seize up. If you’re adding glaze or frosting, wait until the cookies are fully cooled to prevent melting and sogginess. These cookies are pretty hardy, but I’ve learned that proper storage keeps their texture and flavor at its best. Oh, and if you want to freshen up stale cookies, popping them in a warm oven for 2-3 minutes works wonders—trust me, the smell alone makes it worth it!
Frequently Asked Questions
Remember, experimenting is part of the fun—just take notes so you can tweak the recipe next time!
Final Thoughts
There’s just something magical about baking homemade Chocolate Chip Cookies. They remind me of weekends spent in the kitchen with loved ones, sharing stories and laughter while the oven works its magic. This recipe has been my go-to for years because it’s reliable, forgiving, and utterly delicious. Whether you’re baking for a family gathering or just need a little pick-me-up after a long day, these cookies never fail to bring smiles. I love how customizable they are—adding nuts, swapping chocolates, or even making them gluten-free—there’s room for your personality in every batch. I encourage you to give this recipe a try, play around with flavors, and make it your own. And don’t forget: the best part is sharing them with someone you care about. Happy baking! And I’d love to hear how yours turn out—drop a comment or share your variations. Now go grab a mixing bowl, and let’s get baking!
chocolate chip cookies
Ingredients
Main Ingredients
- 0.5 cup unsalted butter, melted
- 0.33 cup granulated sugar
- 0.5 cup light brown sugar, packed
- 1 large egg
- 0.005 cup vanilla extract
- 0.5 teaspoon baking soda
- 0.5 teaspoon salt
- 1.5 cups all-purpose flour
- 1.5 cups chocolate chips
Instructions
Preparation Steps
- Preheat oven to 350°F. Line baking sheets with parchment paper or silicone mats.
- In a large bowl, combine melted butter, granulated sugar, and brown sugar. Mix until smooth.
- Add in the egg and vanilla extract, and mix well.
- In a separate bowl, whisk together flour, baking soda, and salt.
- Gradually mix dry ingredients into wet ingredients until just combined.
- Fold in chocolate chips.
- Drop rounded tablespoons of dough onto prepared baking sheets, spacing about 2 inches apart.
- Bake for 12-15 minutes or until edges are golden.
- Remove from oven and let cool on baking sheet for 5 minutes before transferring to wire racks.


