There’s something about a warm, gooey Chicken Panini that just hits the spot, especially after a long day. I remember the first time I made this for my family—how the smell of toasted bread, melted cheese, and seasoned chicken wafted through the house and drew everyone to the kitchen like magnets. It’s honestly become my go-to when I want something quick, satisfying, and honestly a little nostalgic. My kids ask for this all the time, and I’ve learned a few tricks over the years to make it even better each time. Trust me, once you get the hang of it, it’s a recipe that’ll become a household favorite, just like it is at mine. It’s basically like a cozy hug between two slices of bread—crispy on the outside, tender and flavorful on the inside. And the best part? It’s so simple, you’ll want to make it every week. Ready to get started? Let’s do this!
Thank you for reading this post, don't forget to subscribe!What Is Chicken Panini?
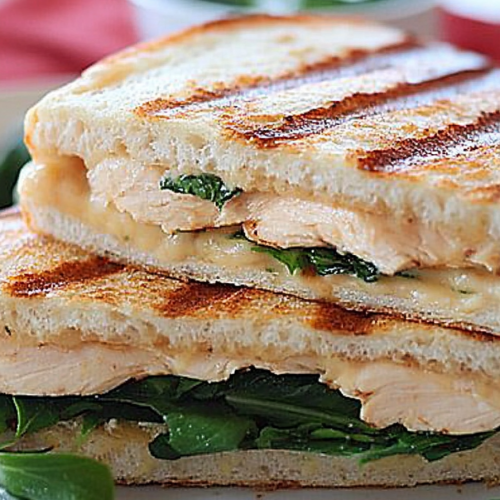
A Chicken Panini is essentially a grilled sandwich that’s packed with juicy, seasoned chicken, melted cheese, and often some fresh veggies or herbs. The term “panini” comes from Italy and means “small bread roll” or “pressed sandwich,” but in America, it’s come to refer to this beautifully toasted, pressed bread filled with savory ingredients. Think of it as a cross between a classic Grilled Cheese and a hearty, satisfying meal—you get all the melty goodness combined with tender chicken, crispy bread, and a burst of flavor in every bite. It’s perfect for lunch, dinner, or even a comforting weekend brunch. The beauty of a Chicken Panini is how versatile it is—you can jazz it up with different cheeses, add a splash of pesto, or throw in some freshly sliced tomatoes. It’s a warm, handheld treat that always leaves everyone asking for seconds.
Why you’
What I love most about this Chicken Panini is how ridiculously easy it is to whip up, even on my busiest weeknights. It feels fancy enough for guests but is totally foolproof for casual Family Dinners. I always keep cooked chicken on hand for busy nights, and this sandwich is a lifesaver on those days. Plus, it’s budget-friendly—I use simple ingredients I always have in my pantry and fridge. The flavor? Oh, it’s next level. The crispy bread, gooey cheese, and perfectly seasoned chicken combine into something that’s truly addictive. And the best part? You can customize it endlessly. My husband is a fan of adding a little spicy mustard, while my kids prefer it plain with just cheese and chicken. Whether you like it with a side salad or just straight from the pan, this meal has quickly become a family classic. It’s one of those recipes that’s comforting and satisfying without feeling heavy or complicated. Once you’ve made it, I bet you’ll find yourself craving it all the time!
How to Make Chicken Panini
Quick Overview
This Chicken Panini comes together in just a few simple steps. First, you gather your ingredients—cooked chicken, fresh bread, cheese, and any extras you love. Then, you assemble your sandwich, making sure to layer in all the flavors. The magic happens when you press it in a panini maker or grill pan until the bread is golden and crispy, and the cheese is all melty. The entire process takes about 15-20 minutes, and trust me, the result is totally worth it. It’s so satisfying, and once you get the hang of pressing and flipping, it’s foolproof. I love this method because it’s hands-on but doesn’t require any fancy equipment – just a good skillet or grill press. It’s perfect to make on a whim, and I promise, the smell alone will have everyone lining up for a taste!
Ingredients
For the Main Filling:
– 2 cups cooked chicken (shredded or sliced, leftovers work great!)
– 1 cup shredded cheese (cheddar, mozzarella, or a mix for gooey goodness)
– 1 tablespoon Olive oil or butter
– Salt and pepper to taste
– Optional: a splash of hot sauce or a sprinkle of Italian herbs for extra flavor
For the Sandwich:
– 4 slices crusty bread (ciabatta, sourdough, or baguette work beautifully)
– 1-2 tablespoons butter (for toasting)
– Additional toppings: sliced tomatoes, arugula, pesto, or sliced onions
For the Glaze (optional but adds extra shine and flavor):
– 1 beaten egg mixed with a teaspoon of water (for brushing)
“Packed with flavor and so simple. Exactly what I wanted from this Easy Chicken Panini Recipe with Arugula!”
Step-by-Step Instructions
Step 1: Preheat & Prep Pan
Set your panini press, grill pan, or skillet over medium heat. If you’re using a skillet, lightly grease it with a little butter or oil. I always do this to prevent sticking and get that perfect crispy crust. Make sure your bread and ingredients are ready to go—nothing beats the smell of fresh, toasted bread!
Step 2: Mix Dry Ingredients
If you’re adding herbs or seasoning to the chicken, do that now. I like tossing shredded chicken with a little Olive oil, salt, and pepper—I’ve tested it with lemon zest too, and it adds a bright twist. Keep your cheese shredded and ready; this part is all about assembly!
Step 3: Mix Wet Ingredients
If you want extra flavor, now’s the time to whisk together some pesto or a dash of hot sauce. Trust me, just a little swirl can transform the sandwich. I usually keep my pesto in the fridge and add a spoonful when I want an extra flavor punch.
Step 4: Combine
Lay out your slices of bread. Spread a little butter on one side of each slice (that side will face outward when grilled). Then, layer the chicken, cheese, and your optional extras on the unbuttered side. Top with the second slice, buttered side out. Press down gently—don’t squeeze too hard, or you’ll squeeze out the filling!
Step 5: Prepare Filling
If you’re using sliced tomatoes or arugula, keep those for after to prevent sogginess. But if you love a bit of moisture in your panini, feel free to add veggies inside. I’ve experimented with roasted peppers too, which adds a smoky flavor. Make sure your fillings are sliced thin for even toasting.
Step 6: Layer & Swirl
Place your assembled sandwich into the panini press or skillet. If you’re using a skillet, top with a heavy pan or a cast iron to press it down gently. This helps get that crispy, golden crust. If using a panini press, close the lid and let it do its magic. I usually let it cook for about 3-4 minutes on each side or until the bread is beautifully toasted and the cheese is melty.
Step 7: Bake
In the oven? No problem! Wrap your sandwich in foil, place it on a baking sheet, and bake at 375°F (190°C) for about 10 minutes. Flip halfway through to ensure even toasting. Just keep an eye on it so it doesn’t burn—we want crispy, not charred!
Step 8: Cool & Glaze
Once done, remove from the heat and let it sit for a minute. If you want that glossy, restaurant-like finish, brush with the beaten egg mixture before or right after baking. It adds a lovely shine and a little extra flavor, trust me.
“New family favorite! This Easy Chicken Panini Recipe with Arugula was so flavorful and ridiculously easy. Crowd-pleaser for sure.”
Step 9: Slice & Serve
Use a sharp serrated knife to cut your panini straight down the middle. Serve immediately with a side salad, chips, or just plain. My favorite way? With a little extra pesto on the side—dip and enjoy! The first cut should reveal that gorgeous melt of cheese and layers of chicken inside. Honestly, it’s almost too pretty to dip into salsa, but I do it anyway!
What to Serve It With
This Chicken Panini is so versatile, I could eat it for breakfast, lunch, or dinner. For breakfast, pair it with a hot cup of coffee and a fresh fruit salad—sweet, savory, and satisfying. During brunch, add a side of roasted potatoes or a colorful veggie medley. As a quick dinner, a simple mixed green salad with balsamic vinaigrette makes everything feel a little fancier. And truthfully, I often serve it with a crunchy pickle or a handful of your favorite chips—sometimes a dollop of sour cream if I’m feeling indulgent. If I want a touch of sweetness, I’ll serve it with some Apple Slices or fig jam on the side. This dish is like a blank canvas—you can make it as light or as loaded as you like. It’s one of those recipes that’s perfect when you want a cozy, satisfying hug without spending hours in the kitchen.
Top Tips for Perfecting Your Chicken Panini
Getting this just right took me a few tries, so here are some tricks I’ve learned over the years. First, always use good-quality bread—thick slices hold up better and give that perfect crunch. When I make my own bread, I like a chewy sourdough or rustic ciabatta; store-bought works fine too, just look for something sturdy. Second, don’t skimp on the cheese—go for something that melts beautifully like mozzarella or Gouda. The cheese is what makes each bite irresistibly gooey. When it comes to chicken, leftovers are a blessing—the shredded shoulder works better than sliced breast, which can get dry if overcooked. I’ve also experimented with pre-seasoned Rotisserie Chicken, and it saves so much time. For that perfectly golden crust, I’ve found that butter gives a richer flavor than oil, but a light brush of olive oil works too. One thing I always do is check the sandwich after a few minutes—every oven and pan is different, so I adjust my timing accordingly. And don’t rush the cooling—letting it sit for a minute keeps it from falling apart when you cut into it. As for the glaze, brushing it on before baking gives the sandwich a beautiful shine, but I’ve also done it after—both work well. Just remember, a little patience makes all the difference!
Storing and Reheating Tips
If you have leftovers—or you want to prep for the next day—storing tips will keep your panini fresh. If you’re eating it within a few hours, wrap it loosely in foil or parchment and keep it at room temperature. Just know it’s best enjoyed within 4 hours to prevent sogginess. To store in the fridge, wrap the cooled sandwich tightly in plastic wrap or place it in an airtight container—this way, it stays fresh for up to 24 hours. When reheating, the best method is to re-toast it in a toaster oven or oven at 350°F (175°C) for about 10 minutes—just until the cheese gets melty again and the bread crisp. If you don’t mind a slightly softer crust, microwave it for 30-60 seconds, but beware—it can get soggy if not careful. I do recommend re-buttering the bread before reheating for extra flavor, and if you have some leftover glaze, brushing it on before reheating adds a shiny finish. For best results, try to avoid stacking sandwiches in the fridge—layering causes moisture build-up and can spoil the crunch. And hey, if the cheese has hardened a bit, a quick blast in the microwave followed by a heat in the oven or paneri press does wonders!
Frequently Asked Questions
Final Thoughts
This Chicken Panini truly is one of those recipes you’ll find yourself making over and over again. It’s a perfect combination of textures and flavors that somehow feels like a little victory—something cozy, flavorful, and just so satisfying. Whether you’re feeding a quick lunch crowd or craving a comforting dinner, this sandwich never disappoints. Plus, it’s flexible: swap in different cheeses, add your favorite veggies, or spice it up how you like. My advice? Keep some cooked chicken in the fridge, stock up on good bread, and always have cheese on hand—you’ll be surprised how often you’ll turn to this. I love that it’s a dish that makes me feel like a pro chef but is honestly so simple. Can’t wait to hear how your version turns out! Drop a comment below, rate the recipe, or share your own tweaks—I love seeing how everyone makes it their own. Happy baking and savor every bite!
Grilled Chicken Panini with Basil Pesto
Ingredients
Main Ingredients
- 3 oz Grilled chicken breast slices
- 2 tbsp Basil pesto
- 2 slices Mozzarella cheese
- 2 slices Tomato
- 1 piece Ciabatta bread roll
- 1 tsp Olive oil
Instructions
Preparation Steps
- Preheat the panini press or grill skillet over medium heat.
- Slice the ciabatta roll in half and brush the insides with olive oil.
- Spread basil pesto on the bottom half of the bread.
- Layer grilled chicken slices, mozzarella cheese, and tomato slices over the pesto.
- Cover with the top half of the bread and press in panini maker or grill skillet until golden and cheese melts.
- Remove from heat, cut in half, and serve warm.


