Okay, so you know how sometimes you stumble upon a recipe that just *clicks*? It’s not just delicious, it’s also ridiculously easy, and suddenly it becomes your go-to for everything from a last-minute potluck to a quiet evening with a good book? Well, this cherry chex mix is exactly that for me. It’s a little bit sweet, a little bit salty, and has this wonderfully addictive crunch that just keeps you coming back for more. Honestly, I’ve lost count of how many times I’ve whipped this up. It’s my little secret weapon when I need something special without spending hours in the kitchen. It’s got that homemade charm, but it’s almost as quick as grabbing a bag of chips, only infinitely more satisfying. Forget those store-bought snack mixes that taste like cardboard and sadness; this is the real deal, and it’s going to be your new favorite too. I can practically smell it baking right now!
Thank you for reading this post, don't forget to subscribe!What is Cherry Chex Mix?
So, what exactly *is* this magical creation? Think of it as a gourmet twist on your childhood favorite snack mix, but with a flavor profile that’s way more grown-up and, dare I say, sophisticated. It’s essentially a mix of crunchy cereals, pretzels, and maybe some nuts, all coated in a sweet and slightly tangy glaze that has a hint of dried cherry goodness baked right in. The “Chex” part comes from using those classic Chex cereals, but you can totally play around with other shapes and textures. It’s not a complicated cake or a fussy cookie; it’s more of a delightful, snackable masterpiece. The name itself sounds a little fun, right? It hints at the classic cereal base and the star ingredient – those little pops of cherry flavor that make it truly unique. It’s the kind of thing that’s perfect for sharing, but I won’t judge if you decide to keep the whole pan to yourself. We’ve all been there!
Why you’ll love this recipe?
Honestly, there are so many reasons why this cherry chex mix has earned a permanent spot in my recipe binder, and I’m betting it’ll happen for you too. First off, the flavor is just out of this world. You get that satisfying salty crunch from the pretzels and cereal, but then there’s this subtle, fruity sweetness from the dried cherries and the glaze that’s not too overwhelming. It’s that perfect balance that makes you crave another handful. And let’s talk about simplicity, because who has time for complicated recipes these days? This is a lifesaver on busy weeknights or when you get unexpected guests. Seriously, the prep time is minimal, and most of it is hands-off baking. Plus, it’s incredibly budget-friendly. You probably already have most of the ingredients in your pantry, and the ones you might need to pick up are super affordable. Beyond that, the versatility is amazing. I’ll get to more ideas later, but you can easily tweak it to your liking. What I love most about this recipe, though, is the nostalgia it brings back. It reminds me of happy times, of sharing snacks with family, and it always brings a smile to my face. It’s more than just a snack; it’s a little bit of happiness baked into every bite.
How do I make a cherry chex mix?
Quick Overview
Get ready for the easiest, most delicious snack you’ll ever make! We’re going to combine your favorite crunchy cereals and pretzels, toss them with a dreamy, slightly sweet glaze infused with dried cherries, and then bake it until it’s perfectly toasted and irresistible. The whole process is super straightforward, involving just a few bowls and your oven. You’ll be amazed at how quickly this comes together, and the aroma that fills your kitchen is absolutely heavenly. It’s the kind of recipe that makes you feel like a culinary genius, even if you’re just starting out.
Ingredients
For the Main Batter:
You want a good mix of textures here. I usually go with about 9 cups total. My go-to combination is:
- 4 cups Chex cereal (I love a mix of Rice Chex and Corn Chex for variety!)
- 3 cups pretzels (mini twists are perfect for getting into all the nooks and crannies)
- 2 cups of something extra crunchy – this could be Cheerios, golden grahams, or even some chopped nuts like pecans or walnuts if you like them.
For the Filling:
This is where the magic starts to happen. It’s all about bringing that sweetness and tang:
- 1/2 cup dried cherries (tart ones are my favorite, but sweet work too!)
- 1/4 cup finely chopped pecans or walnuts (optional, but adds a lovely depth)
For the Glaze:
This is the glue that holds it all together and makes it shine:
“New family favorite! This Cherry Chex Mix How To Make It Delicious was so flavorful and ridiculously easy. Crowd-pleaser for sure.”
- 1/2 cup (1 stick) unsalted butter, melted
- 1/3 cup packed light brown sugar
- 2 tablespoons honey or maple syrup (honey gives a more classic flavor, but maple is a nice alternative)
- 1 teaspoon vanilla extract
- 1/2 teaspoon cinnamon
- 1/4 teaspoon salt
Step-by-Step Instructions
Step 1: Preheat & Prep Pan
First things first, get your oven preheating to 300°F (150°C). This lower temperature is key to getting it perfectly toasted without burning. Then, grab a large baking sheet – a rimmed one is best so nothing spills over. You don’t need to grease it, but I sometimes line it with parchment paper for super easy cleanup. It’s a little extra step, but trust me, it’s worth it when you’re done and don’t have sticky bits to scrub.
Step 2: Mix Dry Ingredients
In a really big bowl, combine your chosen cereals, pretzels, and any other crunchy bits you’re using. Give it a gentle stir to make sure everything is nicely distributed. You don’t want one corner to be all pretzels and another all cereal. A big spoon or even just your clean hands work perfectly here. The goal is just to get everything mixed together so the glaze can coat it evenly.
Step 3: Mix Wet Ingredients
In a separate, medium-sized bowl, whisk together the melted butter, Brown Sugar, honey (or maple syrup), vanilla extract, cinnamon, and salt. Whisk until it’s smooth and well combined. It should look glossy and smell amazing already! Make sure the brown sugar is fully incorporated so you don’t get little clumps of sugar in your glaze.
Step 4: Combine
Now, pour the wet glaze mixture over the dry ingredients in the big bowl. Gently fold everything together until all those crunchy bits are thoroughly coated. This is where you want to be careful not to mash everything up too much. You’re aiming for a lovely, even coating. It might look a little wet at first, but don’t worry, it bakes up beautifully.
Step 5: Prepare Filling
While the glaze is coating everything, take a moment to make sure your dried cherries are ready. If they’re really big, you might want to give them a quick chop. If you’re adding nuts, give them a rough chop too. You want them to be small enough to be distributed easily throughout the mix. I usually just scatter them over the coated cereal mixture right before it goes into the oven.
Step 6: Layer & Swirl
Spread the coated cereal mixture evenly onto your prepared baking sheet. Try to create a single layer as much as possible so everything bakes evenly. Then, sprinkle your dried cherries (and nuts, if using) over the top. I like to gently press some of them down into the mix so they don’t all bake on top and fall off. You can also give it a gentle swirl with your hands or a spatula to ensure everything is spread out nicely. The goal is an even distribution of all those delicious flavors.
Step 7: Bake
Pop the baking sheet into your preheated oven. Bake for about 20-25 minutes, stirring gently every 8-10 minutes. This stirring is crucial! It helps the mix toast evenly and prevents any one part from getting too brown. You’re looking for the mixture to be lightly golden and smell wonderfully fragrant. The glaze will be bubbly and sticky.
Step 8: Cool & Glaze
This is perhaps the hardest part: patience! Once it’s out of the oven, resist the urge to dive in immediately. Let the cherry chex mix cool completely on the baking sheet. As it cools, it will become wonderfully crisp and set. I usually leave it for at least 30-45 minutes, sometimes longer. Once it’s completely cool, you can break it apart into clusters or individual pieces. If you wanted an extra glaze drizzle, now would be the time, but I find the coating it gets from baking is perfect.
“The Cherry Chex Mix How To Make It Delicious turned out amazing. My kids asked for seconds. Saving this one!”
Step 9: Slice & Serve
Once cooled, break apart the larger clusters into bite-sized pieces. You can serve it right away in a big bowl or store it for later. It’s fantastic served at room temperature. For an extra special touch, you can arrange some of the prettier clusters on a platter. It looks impressive, but it’s so simple!
What to Serve It With
This cherry chex mix is so versatile, it’s almost ridiculous! I’ve found it’s a fantastic addition to almost any meal or occasion. For breakfast, it’s surprisingly good sprinkled over yogurt or even a simple bowl of oatmeal for some added crunch and sweetness. Imagine waking up to that! For a weekend brunch, I love to serve it in cute little individual ramekins alongside my favorite frittatas or quiches. It adds a lovely sweet contrast to savory dishes. Coffee pairings are a no-brainer, obviously. And as a dessert? Oh, it’s perfect when you’re craving something sweet at 10pm but don’t want to bake a whole cake. It’s lighter than most desserts but still incredibly satisfying. I often serve it with a dollop of whipped cream or a small scoop of vanilla Ice Cream on the side for an extra treat. And for cozy snacks, well, that’s its natural habitat! It’s the ultimate movie-night companion or the perfect treat to pack for a picnic. My kids especially love it just by the handful while they’re playing. It’s a flavor combination that just makes everyone happy.
Top Tips for Perfecting Your Cherry Chex Mix
I’ve made this cherry chex mix more times than I can count, and along the way, I’ve picked up a few tricks that make it even better. For the dried cherries, I’ve found that if they seem a bit dry or hard, you can soak them in a tablespoon of warm water for about 10 minutes before draining them thoroughly. This plumps them up nicely. When it comes to mixing, the key is gentle handling. Overmixing can turn your Chex into mush, and you want those lovely, distinct pieces. I always make sure to get everything coated evenly, but I do it with a light touch. For swirl customization, if you want more of the cherries to be on top, add them in the last 5 minutes of stirring before spreading on the pan. Ingredient swaps are totally fun! If you don’t have one type of Chex, use another, or swap pretzels for bagel chips or even some crispy Chow Mein noodles for a different texture. I once tried it with almond milk instead of regular milk in a variation, and while this recipe doesn’t use milk, it made me think about how flexible sweet glazes can be. For baking, keep an eye on it! Ovens can be so different. If you see it browning too quickly, you can loosely tent it with foil. The most important doneness test is the smell – when it smells toasted and amazing, it’s usually ready. I’ve learned that letting it cool completely is critical for that perfect crisp texture. If you try to eat it too soon, it’ll be soft and a bit greasy. Patience, my friends!
Storing and Reheating Tips
This cherry chex mix is best enjoyed fresh, but it does store surprisingly well, which is why it’s a fantastic make-ahead snack. For room temperature storage, once it’s completely cool, transfer it to an airtight container. It will stay nice and crisp for about 4-5 days. If your kitchen is particularly humid, or if you want to ensure maximum crispness, I sometimes add a food-safe silica gel packet to the container – it’s a lifesaver! Refrigerator storage isn’t usually necessary unless you live in a very hot climate, but if you do, it can extend the shelf life slightly to about a week, though the texture might soften a bit. For freezing, this recipe holds up remarkably well. Wrap it tightly in a couple of layers of plastic wrap, then tuck it into a freezer-safe bag or container. It can stay frozen for up to 3 months. To thaw, just take it out of the freezer and let it sit at room temperature for a few hours. You can even pop it in a low oven (around 200°F or 95°C) for about 10-15 minutes to re-crisp it after thawing if it lost some of its crunch. The glaze timing advice is simple: glaze and bake while it’s fresh, cool completely before storing. If you’re re-crisping, you don’t need to add anything new.
Frequently Asked Questions
Final Thoughts
So there you have it – my absolute favorite cherry chex mix! It’s more than just a snack; it’s a little bowl of joy that I’m so excited to share with you. It brings together all those satisfying flavors and textures in a way that’s just incredibly moreish. It’s the perfect balance of sweet and salty, with those delightful little bursts of cherry flavor that make it so unique. I really hope you give this a try, and I can’t wait to hear what you think! If you love this, you might also enjoy some of my other easy snack recipes, like my spiced nuts or my no-bake energy bites – they’re all about simple, delicious goodness. Don’t be afraid to play around with the ingredients; that’s part of the fun! Tag me in your photos if you make it, or share your own favorite variations in the comments below. Happy snacking, everyone!
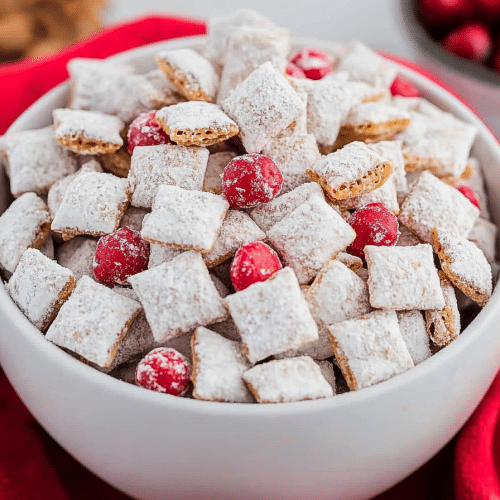
cherry chex mix
Ingredients
Main Ingredients
- 8 cups Rice Chex cereal
- 1 package Vanilla almond bark 16 ounce
- 1 package Sugar Free JELL-O cherry gelatin mix 0.3 ounce
- 1.75 cups powdered sugar
- as needed Sprinkles for decoration
Instructions
Preparation Steps
- In a microwave-safe dish, melt vanilla almond bark for 1 minute. Stir, then heat for an additional 30 seconds or until creamy. Mix in the cherry gelatin mix until well combined.
- In a large bowl, combine the Rice Chex cereal with the melted cherry vanilla mixture. Stir gently until the cereal is completely coated.
- Transfer the coated cereal to a large gallon-sized container or a large resealable bag with the powdered sugar. Seal and shake vigorously until the cereal is fully coated with sugar.
- Spread the Cherry Chex Mix onto a large baking sheet lined with parchment paper to cool and set. Add sprinkles immediately for decoration. Once set, store in an airtight container for up to two weeks. Enjoy!