I still remember the first night my family tasted this Teriyaki Chicken Stir-Fry. The kitchen filled with a caramel-sweet aroma, the sizzle of chicken meeting a hot pan, and that instant, comforting hug of home-cooked goodness. It’s basically the lovechild of a quick weeknight dinner and a takeout night that didn’t quite feel like cheating. This dish is incredible for how little time it takes and how big the flavor feels. I’ve compared it to basic Fried Rice many times, and this Teriyaki Chicken Stir-Fry consistently wins for depth and balance—sweet, salty, and a little tang that brightens the whole plate. It’s a lifesaver on busy nights, and the kids actually ask for seconds, which is the highest praise in my book.
Thank you for reading this post, don't forget to subscribe!What Is Teriyaki Chicken Stir-Fry?
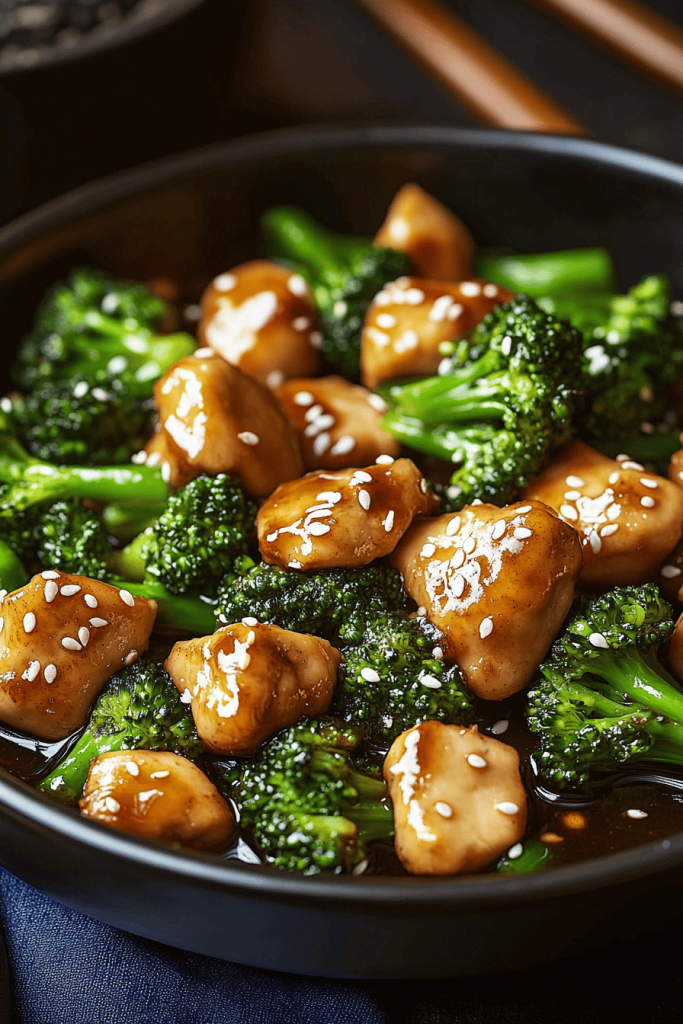
Think of Teriyaki Chicken Stir-Fry as a flexible, family-friendly one-pan dinner that marries glossy, lacquered chicken with crisp-tender vegetables in a glossy glaze. It’s essentially chicken that’s seared to caramelized edges, then swirled through a shimmering teriyaki sauce until every bite gets a kiss of savory-sweet goodness. The name Teriyaki comes from two Japanese words—teri, meaning shine or luster, and yaki, which means grilled or fried. Here, we’re not roasting over a fire pit or grilling over charcoal; we’re achieving that same gleaming finish in a hot skillet on a busy weeknight. The beauty is how adaptable it is: swap in your favorite veggies, adjust the sweetness, and serve it with rice, noodles, or even cauliflower rice for a low-carb twist. It’s a simple concept, but the result feels special enough for a family feast or a surprise date-night-in meal.
Why you’ll love this recipe?
What I love most about this Teriyaki Chicken Stir-Fry is the balance between speed and indulgence. First, the flavor—there’s a little bite from garlic and ginger, a kiss of sesame, and a glaze that clings to every piece of chicken with a glossy finish. The aroma alone is enough to draw everyone to the threshold. Then there’s the ease: this dish comes together in one skillet, with once-and-done prep that won’t nag you about measuring every splash. Budget-wise, it’s friendly too; soy sauce, honey or Brown Sugar, garlic, and a handful of vegetables go a long way. And the versatility is endless: you can switch proteins (to tofu or shrimp), swap vegetables with what’s in your crisper, or dial the glaze’s sweetness up or down to match your mood. This dish never feels fussy, yet it always feels like a treat. What I love most about it is how it fits into real life: I’ve got a hungry crew, I’ve got a clock ticking toward bedtime, and this Teriyaki Chicken Stir-Fry gets us fed with leftovers still tasting bright the next day. It’s unpretentious, reliable, and deeply satisfying.
How to Make Teriyaki Chicken Stir-Fry
Quick Overview
In a hot skillet, I sear bite-sized chicken until it’s nicely browned, giving it a little edge of crisp. While that happens, I whisk a glossy glaze—the kind that clings and shines. I toss in a handful of crisp vegetables so they stay vibrant, then I pour the glaze over everything and let it bubble for just a minute or two until the sauce thickens and coats each piece evenly. The result is a shimmering, savory-sweet dish with a brilliant aroma that makes the rice or noodles feel like a special side. The whole process takes about 20 minutes from start to finish, and if you’re cooking for a crowd, you can double the batch and still have quick leftovers that taste just as good the next day.
Ingredients
For the Main Batter:
– 1 lb boneless skinless chicken thighs, cut into 1-inch pieces (thumbs-up for thighs for juiciness; breasts work too, just watch the overcook).
– 1 teaspoon cornstarch (to help crisp the coating).
– 1/2 teaspoon kosher salt (to heighten flavor).
– 1 tablespoon neutral oil (grapeseed or canola) for coating the pan.
For the Filling:
– 2 cups mixed vegetables (bell peppers, broccoli florets, and snap peas are fantastic; you can also add sliced carrots or zucchini for variation).
– 1 small onion, sliced into thin strips (optional for extra savory aroma).
– 2 cloves garlic, minced
– 1 teaspoon grated fresh ginger
For the Glaze:
– 3 tablespoons soy sauce (or tamari for gluten-free).
– 2 tablespoons honey or light Brown Sugar (adjust to your sweetness preference).
– 1 tablespoon rice vinegar or apple cider vinegar for brightness.
– 1 teaspoon sesame oil (optional but wonderful for fragrance).
– 1/2 cup chicken stock or water (to loosen the glaze if needed).
– 1 teaspoon cornstarch whisked with 1 tablespoon water for a quick slurry (optional for extra gloss).
– 1 teaspoon grated fresh ginger and 1 clove garlic, minced (for the glaze, if you want a stronger punch).
Step-by-Step Instructions
Step 1: Preheat & Prep Pan
Heat a large skillet or wok over medium-high heat and swirl in a tablespoon of oil until it shimmers. While it’s heating, pat the chicken dry with paper towels—moisture is the enemy of browning. If you’ve got time, toss the chicken with a light dusting of cornstarch and salt; it gives you a crispier exterior as it sears. I always tell myself, the better the browning, the more flavorful the dish will be at the finish line.
Step 2: Mix Dry Ingredients
There’s not a lot to mix here, but a quick toss of the chicken with cornstarch, salt, and a touch of oil ensures the pieces brown evenly and grab onto the glaze like little magnets. Don’t overdo the cornstarch—the goal is a delicate crust, not a breading that’s dry or gummy. Think of it as a light dusting that helps with texture and color.
Step 3: Mix Wet Ingredients
Prepare your glaze in a small bowl: whisk together soy sauce, honey or sugar, vinegar, sesame oil, and the garlic-ginger duo. If you like a bit more zing, add a tiny splash of chili oil or ground pepper. The glaze should smell inviting and a touch sweet, with a hint of sharp brightness from the vinegar. If you want a glossy, thicker finish, whisk in a quick cornstarch slurry and let it simmer for a minute until it thickens a touch.
Step 4: Combine
Pour the glaze into the pan once the chicken has a deep amber crust and is just cooked through. Give it a quick toss so every piece gets that lacquered sheen, and let the sauce bubble for 1–2 minutes to thicken. If you added a slurry, it will coat the chicken in a glossy glaze. The aroma now should be a chorus of garlic, ginger, and sesame—the kind that makes you smile without realizing it.
Step 5: Prepare Filling
While the glaze thickens, get your vegetables prepped: rinse and cut the broccoli into bite-sized florets, slice peppers into thin strips, and have the onions ready to go. If you like your veggies crisper, add them to the pan in stages so you can control their texture. A quick tip I learned after a few kitchen mishaps: start with the vegetables that take longer to soften (broccoli, carrot sticks) and add quicker-cooking items (bell peppers, snow peas) toward the end. This keeps every bite vibrant and not mushy.
Step 6: Layer & Swirl
Push the chicken and glaze to one side of the pan and add the vegetables to the other side. If you’re using a thinner glaze, you can toss everything together to ensure even coating. Watch for that moment when the vegetables turn bright and glossy, but still snap when you bite into them. A gentle swirl of the pan helps distribute the sauce evenly, creating a uniform, restaurant-worthy sheen without overcooking.
“The Teriyaki Chicken Stir-Fry turned out amazing. My kids asked for seconds. Saving this one!”
Step 7: Bake
For those who’d rather bake than stir-fry on the stovetop (or if you’re meal-prepping for the week), you can finish this Teriyaki Chicken Stir-Fry in a hot oven. Preheat to 425°F (220°C). Spread the chicken and vegetables on a Sheet Pan in a single layer and bake for 10–12 minutes, until the chicken reaches 165°F and the veggies are tender-crisp. In the last 2 minutes of baking, spoon a bit more glaze over the mixture to re-mantle the pieces with shine. This is a great option if you’re cooking for a crowd or want hands-off cooking while you drink coffee and chat with a friend. Either method—stovetop or baking—delivers that same, crave-worthy Teriyaki chicken flavor.
Step 8: Cool & Glaze
If you’ve just finished on the stove, remove from heat and let it rest for a minute or two. This allows the glaze to settle and the chicken to stay juicy. If you baked it, you’ll want to spoon any remaining glaze over the hot pan again so every bite glistens. A final quick toss with a sprinkle of sesame seeds and a light shower of chopped green onions makes it feel complete, like you’ve plated a little piece of comfort.
Step 9: Slice & Serve
Slice the chicken into bite-sized portions or serve it straight from the pan—your choice, really. The dish shines when served with steamed jasmine rice, brown rice, or even a bed of cauliflower rice if you’re in a low-carb mood. A few extra sesame seeds and a pinch of chili flakes are optional, but I always appreciate the little kick they provide. The color contrast—deep auburn glaze against the bright greens and reds of the vegetables—looks as good as it tastes, which makes family dinner feel special even on a Tuesday.
What to Serve It With
This Teriyaki Chicken Stir-Fry is forgiving about sides, which is part of what makes it a weeknight hero. Here are a few serving ideas that have become family traditions in our kitchen:
For Breakfast: Reheat leftovers gently and serve over a fried egg with a scoop of warm rice. The savory glaze pairs beautifully with a runny yolk, and it wakes up a sleepy morning with big, comforting flavors. I’ve even folded a few spoonfuls into a breakfast burrito for a spicy, glossy twist that’s become a weekend favorite.
For Brunch: Create a bright, casual spread by pairing the stir-fry with a light Cucumber Salad and a bowl of miso-mango dressing. Serve over a fluffy bed of brown rice or in lettuce cups with a gentle drizzle of extra glaze. It’s surprising how well the sweet-salty balance translates to a late-m morning meal, and your guests will swear you’re a genius for turning a weeknight staple into a brunch-worthy dish.
As Dessert: Dessert might seem odd here, but hear me out: pineapple and teriyaki carry a surprisingly harmonious sweetness when caramelized. Grill pineapple rings until they’re honeyed and slightly smoky, then spoon a small amount of the glaze over and serve with vanilla Ice Cream or coconut yogurt. It’s a playful, tropical finish that echoes the glaze you already love and makes a fun, not-too-sweet after-dinner treat.
For Cozy Snacks: Turn the leftovers into quick lettuce wraps for snacking. Spoon warmed chicken and veggies into crisp lettuce leaves, drizzle with a touch more glaze, and top with chopped scallions and sesame seeds. It’s a snackable version of your favorite dish that feels special enough for guests but casual enough for weeknights.
One of my favorite things to do is plate it in bowls with a glossy swirl of glaze on top, a handful of fresh herbs, and a wedge of lime on the side. The lime brightens the glaze and makes the entire plate feel newly minted every time you pull up a chair at the table.
Top Tips for Perfecting Your Teriyaki Chicken Stir-Fry
Here are a few tricks I’ve learned after making this countless times. Each tip helps edge the dish closer to the restaurant-level gloss and keeps the texture just right.
Zucchini Prep: If you’re adding zucchini, slice it into half-moons and pat the pieces dry with a clean towel. Zucchini holds onto moisture, so you want to minimize any extra liquid before it hits the pan. A quick salt-sweat for a few minutes helps draw out moisture, which makes the zucchini crisp-tender instead of soggy. If you’d rather skip zucchini, you can double up on broccoli or add snap peas for crunch and color.
Mixing Advice: Don’t overmix the chicken once it hits the pan. You want those caramelized bits to stay intact and not turn to mush. If you crowd the pan, lift and sear in batches; the Maillard reaction (that browning) can’t happen if the surface is damp and crowded. Reserve a little glaze to finish off the dish at the very end for that shiny, saucy finish.
Swirl Customization: The glaze doesn’t have to be identical every time. If you’re craving a touch more sweetness, add a teaspoon of honey. If you want more tang, splash in a spoon of rice vinegar. A little ginger-forward glaze gives more warmth; a garlic-forward glaze leans savory. I’ve found that a gentle simmer with the slurry creates a silkier sauce that clings beautifully to the chicken pieces.
Ingredient Swaps: Tamari or coconut aminos can replace soy sauce for gluten-free or lower-sodium versions. If you’re out of honey, maple syrup works well, though it slightly alters the flavor. For a vegan twist, swap the chicken for extra-firm tofu and use a plant-based glaze, keeping the same ratios. I’ve even swapped in thinly sliced mushrooms for a different texture and found the glaze still sings.
Baking Tips: If you’re baking, line your Sheet Pan with parchment for easy cleanup. Space the chicken and vegetables so they roast rather than steam, which helps deepen the glaze’s sheen. Let the dish rest for a minute after baking so the sauce can thicken slightly before you serve. Oven finishing is fantastic for batch cooking; you’ll preserve those glossy surfaces and juicy interiors without turning the kitchen into a hot box.
Glaze Variations: You can play with a citrusy note by adding a teaspoon of orange or lime zest to the glaze. A sesame- or chili-oil finish adds a punch that audiences sometimes crave. If you want a richer result, whisk in a teaspoon of peanut butter to create a creamy, slightly nutty glaze with less sweetness. The glaze is where you can really personalize this dish to your family’s preferences.
“I don’t know if I’ve ever eaten a better Teriyaki Chicken Stir-Fry. The rub alone is wonderful, but the sauce??? Over the top!”
Lessons learned: the first time I tried a thicker glaze, the sauce clung too aggressively and overwhelmed the chicken. Now I aim for a glaze that’s glossy and lightly coats the meat—enough to make each bite a little burst of savory-sweet joy, but not so thick that it hides the chicken’s flavor. Balance is everything here, and this Teriyaki Chicken Stir-Fry rewards your attention with a dish that tastes like you spent more time on it than you did.
Storing and Reheating Tips
These leftovers are surprisingly forgiving, which is a big win for busy weeks. Proper storage helps you keep texture and flavor intact so you can enjoy it again without compromise.
Room Temperature: If you’re serving leftovers within a couple of hours of cooking, they’ll stay safe and flavorful on the countertop. I wouldn’t leave it out beyond two hours, especially in warmer kitchens, but a quick reheat in the microwave or on the stove will bring it back to life.
Refrigerator Storage: Transfer leftovers to an airtight container within two hours of cooking. The glaze can cling to the chicken, so a shallow container helps it cool evenly. Stored properly, Teriyaki Chicken Stir-Fry will stay fresh for 3–4 days in the fridge.
Freezer Instructions: This dish freezes well if you store the chicken and vegetables separate from the glaze to avoid textural breakage. Freeze for up to 2 months. Thaw overnight in the fridge, then reheat gently on the stove with a splash of stock or water to loosen the glaze. If you freeze with the glaze, it might become thicker when reheated; add a little water or stock to loosen to the desired consistency.
Glaze Timing Advice: If you’re reheating, consider re-warming the glaze separately and pouring it over the hot dish toward the end for a fresh, glossy finish. This keeps the sauce from breaking and maintains that vibrant sheen you love.
One of the joys of this dish is that it scales well. I often double the sauce so there’s more glaze to toss with leftovers, which makes the reheated meal feel almost as exciting as the first night.
Frequently Asked Questions
Final Thoughts
Teriyaki Chicken Stir-Fry has become one of those recipes I default to when life feels hectic but I still want dinner to feel joyful. It checks all the boxes: it’s quick, deeply flavorful, and forgiving enough to tailor to what I have in the fridge. The glaze has this magical gleam that makes every plate feel a little celebratory, and the vegetables stay crisp enough to give you that satisfying bite. The dish reminds me of family dinners where we’d pace the kitchen with music on and tell stories while the skillet did the heavy lifting. If you’re cooking for a crowd or just for your favorite people, I promise this Teriyaki Chicken Stir-Fry will deliver comfort and a sense of home in one glossy, fragrant pan. Let me know in the comments how you customize yours—what veggies did you love adding, and what glaze variation won you over? Happy cooking, friends, and I can’t wait to hear how your version turns out!
Share your twists, rate the recipe, and drop a note about who you cooked it for this week. The best part of cooking is the conversation it starts—the little moments you savor while the aroma fills the house. Enjoy this Teriyaki Chicken Stir-Fry, and here’s to many more cozy, flavorful nights in your kitchen.

Teriyaki Chicken Stir-Fry
Ingredients
Main Ingredients
- 1.5 pounds boneless, skinless chicken breasts cut into 1-inch pieces
- 2 cups broccoli florets
- 1 cup carrots peeled and thinly sliced
- 1 medium red bell pepper seeded and sliced
- 2 tablespoons sesame oil divided
- 2 cloves garlic minced
- 1 teaspoon fresh ginger grated
For the Teriyaki Sauce
- 0.5 cup low-sodium soy sauce
- 0.25 cup water
- 2 tablespoons honey or maple syrup
- 1 tablespoon rice vinegar
- 0.5 teaspoon red pepper flakes optional, for heat
- 1 tablespoon cornstarch
Instructions
Preparation Steps
- In a small bowl, whisk together all teriyaki sauce ingredients (soy sauce, water, honey, rice vinegar, red pepper flakes, and cornstarch) until smooth. Set aside.
- Heat 1 tablespoon of sesame oil in a large skillet or wok over medium-high heat. Add the chicken pieces and cook until browned on all sides and cooked through, about 5-7 minutes. Remove chicken from the skillet and set aside.
- Add the remaining 1 tablespoon of sesame oil to the skillet. Add the broccoli, carrots, and bell pepper. Stir-fry for 3-5 minutes, or until vegetables are crisp-tender.
- Add minced garlic and grated ginger to the vegetables and stir-fry for another minute until fragrant.
- Return the cooked chicken to the skillet with the vegetables. Give the teriyaki sauce a quick re-whisk and pour it over the chicken and vegetables. Bring to a simmer, stirring constantly, until the sauce thickens, about 1-2 minutes.
- Serve immediately over steamed rice, garnished with sesame seeds and chopped green onions if desired.


