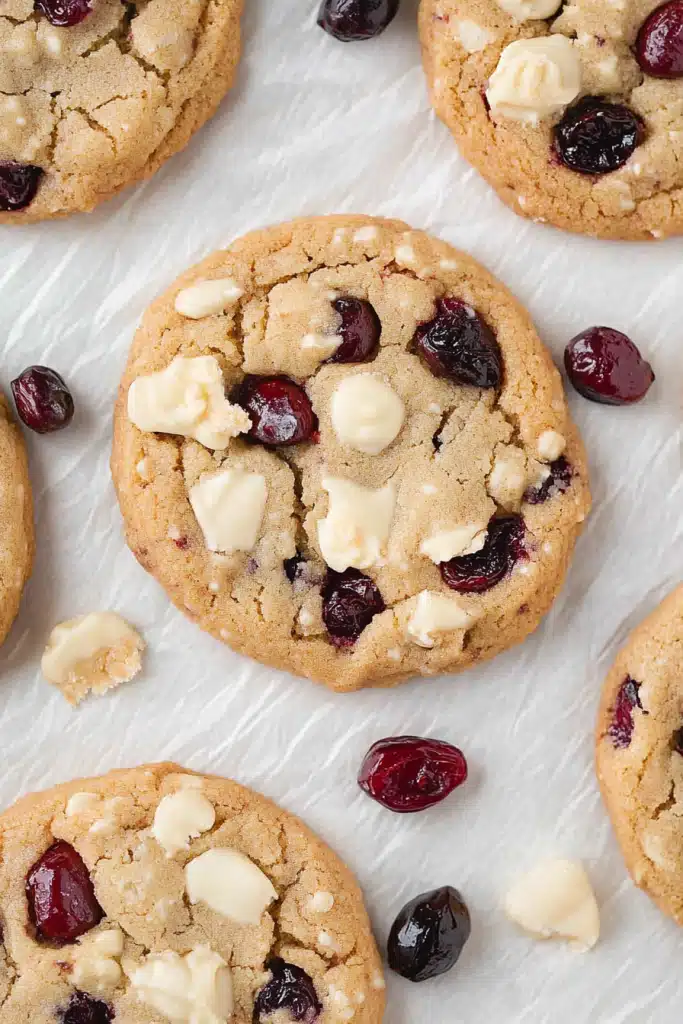
There’s something about the combination of white chocolate and cranberries that I just can’t resist. It’s like a little bite of nostalgia mixed with a splash of holiday cheer, but honestly, I find myself craving it any time of year. I remember my grandmother making cranberry bars around Thanksgiving, and the smell alone would fill the whole house with warmth and happiness. Over the years, I’ve tweaked her recipe to make it even more indulgent, and I swear, these White Chocolate Cranberry dream bars have become a family favorite—you know, the one everyone asks for at parties or just when they need a little sweet pick-me-up during the week. They’re incredibly simple to whip up, and trust me, once you try a square (or two), you’ll understand why my kids ask for these all the time. The creamy white chocolate paired with the tart cranberries? Honestly, it’s a match made in heaven—kind of like peanut butter and jelly, but more decadent. Perfect for those cozy nights when you want something sweet but don’t want to fuss too much. I always do this when I want a shortcut but still want a dessert that feels special—these bars never disappoint!
Thank you for reading this post, don't forget to subscribe!What is White Chocolate Cranberry Dream Bar?
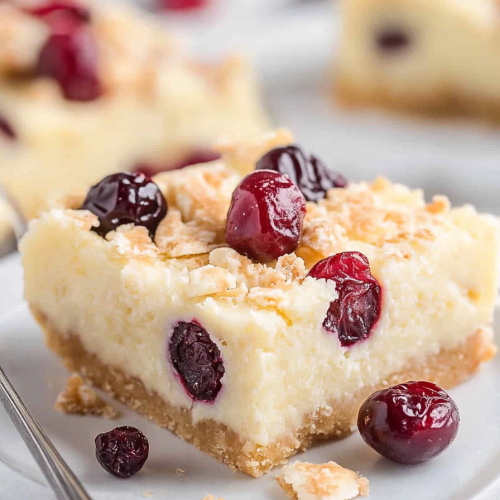
Think of these as a no-fuss, crowd-pleasing dessert that brings together the sweet, mellow richness of White Chocolate with the vibrant, tangy burst of cranberries. They’re essentially layered bars—crisp, buttery base topped with a luscious white chocolate and cranberry filling, then finished off with a drizzle of more white chocolate. The name “dream bars” is totally deserved because once you take a bite, it’s like a little slice of heaven melts in your mouth. I love that they’re not overly complicated; you just mix, layer, bake, and enjoy. I’ve also seen other similar bars pop up under different names, but trust me, the balance of flavors here is what makes these stand out. Plus, you can totally swap in dried cherries or even fresh berries if cranberries aren’t in season. It’s one of those recipes that’s flexible, forgiving, and impossible to mess up. Whether you’re making it for a holiday gathering or just a cozy weekend treat, these bars always seem to steal the show.
Why you’ll love this recipe?
What I love most about this is how effortlessly impressive they are. The flavor combination? Pure magic. The tartness of the cranberries plays perfectly against the sweetness of the White Chocolate, creating a balanced, addictive treat that everyone goes nuts over. This recipe’s simplicity is a lifesaver on busy nights—literally, I’ve thrown these together in less than an hour, and they taste like I’ve spent ages in the kitchen. If you’re on a budget, don’t worry—most of these ingredients are pantry staples or things you already keep around—plus, they’re super affordable. And the best part? They’re so versatile. Want to make vegan? Swap the white chocolate for dairy-free versions and use coconut oil instead of butter. Feeling a little more decadent? Add a sprinkle of sea salt on top before baking, or toss in some chopped nuts for crunch. I’ve made these with lemon zest, added a splash of vanilla, and even used almond extract—it’s like a blank canvas for your flavor experiments. Trust me, once you make these, they’ll be a staple in your recipe arsenal—I promise, they disappear in minutes at my house!
How do I make White Chocolate Cranberry Dream Bars?
Quick Overview
These bars come together in a few simple steps. You start with a buttery, crumbly crust baked until golden, then layer on a gooey mixture of White Chocolate and cranberries. After a short bake to set everything, I love to drizzle extra melted white chocolate on top for that beautiful, picture-perfect finish. The best part? You don’t need any fancy equipment—just a mixing bowl, a spoon, and a trusty baking pan. My secret to success is not overmixing the crust, so it stays crumbly and melts-in-your-mouth good. Once baked and cooled, slicing into perfect squares is a breeze—plus, this recipe makes enough to share over coffee or pack into lunchboxes. It’s honestly one of those recipes I make on lazy weekends when I want to treat myself without fussing over complicated steps. And because they’re so straightforward, I always keep the ingredients stocked—you never know when a craving will hit!
Ingredients
For the main battery (crust):
• 1 and 1/2 cups all-purpose flour — I always use unbleached for a richer flavor.
• 1/2 cup granulated sugar — keeps things sweet without being cloying.
• 1/2 teaspoon salt — essential to balance the sweetness.
• 1/2 cup unsalted butter, cold — cut into small pieces, and I always pop it in the fridge first.
• 1 teaspoon vanilla extract — adds depth to the crust.
For the Filling:
• 1 cup dried cranberries — I like to chop some in half for more bite.
• 1 cup white chocolate chips — quality matters here; I prefer a creamy, sweet variety.
• 1/4 cup heavy cream or Coconut Cream — optional, but it makes the filling extra luscious.
• 1 teaspoon vanilla extract — again, flavor, flavor, flavor!
For the Glaze
• 1/2 cup white chocolate chips — melted and smooth.
• A pinch of sea salt or a sprinkle of Vanil’s sea salt flakes — for that dreamy salty-sweet combo.
Step-by-Step Instructions
Step 1: Preheat & Prep Pan
I always start by preheating my oven to 350°F (175°C). Grab a 9×13-inch baking pan, line it with parchment paper—this is a game-changer because getting the bars out is so much cleaner. Give the pan a quick butter and flour coating if you prefer, but honestly, parchment does the trick for me.
Step 2: Mix Dry Ingredients
In a medium bowl, whisk together the flour, sugar, and salt. I like this step because it evenly distributes everything. It may look dry at first, but don’t worry—once you add the butter, it comes together quickly.
“New family favorite! This Sweet White Chocolate Cranberry Bars Recipe was so flavorful and ridiculously easy. Crowd-pleaser for sure.”
Step 3: Mix Wet Ingredients
Take the cold butter and cut it into small chunks. Then, using your fingers or a pastry cutter, mix until you get coarse, pea-sized crumbs. I’ve learned that a crumbly texture is key here—this will give you that perfect, buttery crust. Mix in vanilla last.
Step 4: Combine
Press the crumb mixture into the prepared pan, making sure to tamp it down evenly. Bake for about 15 minutes or until the edges turn a soft golden. This is your base for all the flavor and crunch.
Step 5: Prepare Filling
Meanwhile, chop the cranberries if they’re large; this gives a better balance with the white chocolate. In a microwave-safe bowl, melt the white chocolate chips with the cream, stirring until silky smooth. I like to do this in short bursts so it doesn’t seize. Add vanilla here for extra richness.
Step 6: Layer & Swirl
Pour the white chocolate mixture over the warm crust, then sprinkle with cranberries and more white chocolate chips. For that beautiful marbled look, I use a toothpick or a skewer to swirl the cranberries into the white chocolate gently—don’t overdo it, just enough for pretty streaks.
Step 7: Bake
Pop it back into the oven for another 15-20 minutes, until the filling is set—you want it just firm but not dry. Keep an eye on it because ovens vary; if the top starts to brown too much, loosely cover with foil.
Step 8: Cool & Glaze
Let the bars cool completely in the pan—if you cut into them too early, they’ll fall apart. Once cooled, melt additional white chocolate for the glaze and drizzle generously. Sprinkle a little sea salt if you’re feeling fancy—this balances the sweetness perfectly.
Step 9: Slice & Serve
Using a sharp serrated knife, slice into squares or rectangles. For cleaner cuts, wipe the knife between slices. Serve at room temperature with a cup of tea or a glass of milk. These are also fabulous chilled—just cover and pop in the fridge for a bit before serving. My kids love them straight from the fridge; the chocolate is so firm and satisfying!
What to Serve It With
If I’m making these for brunch or a weekend treat, I love serving them alongside a fresh fruit platter or a tangy yogurt dip. They’re fantastic with a cup of spiced chai or even a light sparkling wine if you’re feeling fancy. I often wrap a few in parchment for picnics—super portable and no-fuss. For a cozy night in, I pair them with a hot cup of coffee, and the crispy crust with gooey filling just hits the spot. Sometimes, I sprinkle extra cranberries on top just before serving for an extra pop of color and tartness. These bars are so versatile—they round out a breakfast spread, elevate a holiday dessert table, or just make a rainy day feel extra special. My family often requests at least a batch a week, and I rarely have leftovers—trust me, they disappear in minutes! They also make thoughtful homemade gifts—just box them up nicely, and everyone will think you bought them at the bakery.
Top Tips for Perfecting Your White Chocolate Cranberry Dream Bars
Over the years, I’ve learned plenty of tricks to make these bars turn out just right every time:
Zucchini Prep: Just kidding—no zucchini here! But when I use cranberries, I always chop them. Whole cranberries can be a little tart and too big for perfect bites. I chop some in half for texture and toss the rest on top. If they look a little dry or shriveled, I toss them in a tiny bit of flour beforehand—prevents sticking together and ensures even distribution.
Mixing Advice: Don’t overmix the crust once you add the butter—coat it just enough, so it’s crumbly, not doughy. For the filling, I gently swirl rather than stir too much—this creates those beautiful marbled effects that make the bars look just as delicious as they taste.
Swirl Customization: To get pretty patterns, I recommend starting in the center and zigzagging outward, then using a skewer or toothpick to drag through the layers. Experimenting with different swirling patterns can give each batch a unique look.
“I don’t know if I’ve ever eaten a better Sweet White Chocolate Cranberry Bars Recipe. The rub alone is wonderful, but the sauce??? Over the top!”
Ingredient Swaps: Want a nutty crunch? Toss in chopped almonds or pecans. Looking to make it vegan? Use coconut oil instead of butter, and dairy-free white chocolate. I’ve tested these swaps, and honestly, they work beautifully—just adjust baking time slightly since they might bake faster or slower.
Baking Tips: My oven’s hot spots are notorious, so I always rotate the pan halfway through baking. To test doneness, gently shake the pan—if the middle jiggles less than the edges, it’s ready. Or insert a toothpick in the center; it should come out with moist crumbs, not wet batter.
Glaze Variations: Feeling adventurous? Mix a little vanilla or peppermint extract into the melted white chocolate. Want a festive touch? Add a sprinkle of crushed peppermint candies on top before the glaze sets. This adds both flavor and visual flair.
Honestly, I’ve made these so many times that I’ve learned to trust my instincts—if I think it looks good, it probably is! And if not? Well, worse comes to worst, you’ve learned what to tweak for next time. That’s the beauty of baking at home—you’re never truly off the hook, and each batch gets better and better.
Storing and Reheating Tips
These bars stay fresh longer than you’d think. Keep any leftovers in an airtight container at room temperature for up to three days—cover with foil or plastic wrap to keep the topping from drying out. If it’s hot and humid outside, a quick trip to the fridge can help the chocolate from melting—just be sure to bring them back to room temp before serving so the flavors are just right. For longer storage, wrap individual bars tightly with plastic wrap, then pop them into a freezer-safe bag or container. They keep beautifully for up to a month! To reheat, just microwave for 10-15 seconds or let them sit at room temp until soft. I find that eating them slightly chilled also works perfectly—you get a firmer bite and the chocolate stays intact. If you want to add the glaze fresh, do that right before serving, especially after refrigeration. The key is to keep everything sealed tightly so they stay moist and delicious—goodbye stale dessert!
Frequently Asked Questions
Final Thoughts
If you’re looking for a dessert that feels fancy but is actually super easy, these white chocolate cranberry dream bars are my go-to. They remind me of cozy family gatherings, lazy weekends, and holiday cheer—all in one perfect bite. Plus, they’re endlessly adaptable: add a splash of orange zest, sprinkle some toasted coconut on top, or swap the cranberries for fresh raspberries when in season. Honestly, once you make these once, they’ll be your new kitchen standby. I love how each batch feels personal—just the right balance of buttery crust, sweet white chocolate, and tart cranberries. They disappear faster than I can blink, which is proof enough of how much everyone loves them. I can’t wait to see how you tweak and enjoy them! Drop me a comment or share your photos—happy baking, and here’s to sweet, happy moments in your kitchen!
white chocolate cranberry
Ingredients
Main Ingredients
- 2 cups all-purpose flour
- 0.5 cup sugar
- 0.5 tsp salt
- 0.5 cup vegetable oil
- 16 oz cream cheese softened
- 0.5 cup sugar
- 0.25 cup whipping cream (heavy cream)
- 2 tsp vanilla extract
- 2 large eggs beaten
- 1 cup white chocolate chips
- 0.5 cup dried cranberries
- 0.25 cup sliced almonds
Instructions
Preparation Steps
- Pre-heat oven to 375º F and grease a 9-inch square baking pan.
- In a large mixing bowl, combine flour, sugar, and salt. Add oil and stir until crumbly. Reserve 1/3 cup of mixture for topping. Press remaining into baking pan and bake for 25 minutes.
- For the filling, beat cream cheese, sugar, whipping cream, and vanilla until smooth. Add eggs and mix well. Pour over baked crust.
- Sprinkle half of the white chocolate chips and cranberries over the filling. Pour remaining mixture, then sprinkle with remaining chips and cranberries.
- Mix reserved almond mixture with almonds and spread evenly on top. Bake for 30 minutes until slightly jiggly. Cool and chill before serving.


