Every year when December rolls around, I find myself craving that rush of nostalgia—think twinkling lights, the smell of cinnamon and fresh pine, and those little holiday treats that make the season feel truly magical. Among all the festive sweets, *Candy Christmas Trees* have a special place in my heart. They’re whimsical, adorable, and surprisingly easy to whip up, even on those hectic nights when I need a little sprinkle of holiday joy without spending hours in the kitchen. Honestly, this recipe’s a lifesaver on busy nights or when I want something sweet that’s not a full-blown cake. Plus, my kids ask for these all the time—they love helping me stick on the candies and watch the magic happen. Trust me, once you make them, they’ll become a holiday tradition in your house, just like they are in mine. The best part? They taste as good as they look—bright, crunchy, a little bit sweet, and full of that festive cheer that makes every bite feel like a Christmas hug.
Thank you for reading this post, don't forget to subscribe!What is candy Christmas tree?
Think of Candy Christmas Trees as edible, celebratory little confections that resemble tiny decorated pine trees—kind of like the sweet, vibrant, and fun cousin of a cookie. It’s essentially a creative candy display, built layer by layer, using simple ingredients like green frosting, pretzels, candies, and sprinkles. The name is pretty straightforward because, well, these little treats look like miniature Christmas trees, complete with colorful ornaments. It’s a playful take on holiday baking that’s perfect for kids’ parties, potlucks, or even a festive family activity. What I love most about Candy Christmas Trees is that they’re super adaptable—some folks go all out with edible glitter and themed candies, while others keep it simple with just a handful of ingredients. Think of it as a fun DIY project that’s as delicious as it is adorable, and it’s guaranteed to bring out your inner kiddo—the one who always loved decorating the tree or sneaking candies from the jar.
Why you’ll love this recipe?
What I love most about Candy Christmas Trees is how easy they are to make—and how they instantly turn a boring dessert into a festive centerpiece. They’re a great way to get the whole family involved, whether it’s your kids helping decorate or friends gathering around the table. The flavor? Bright, sweet, and just a little crunchy—the perfect combination for satisfying that holiday craving without feeling stuffed. Plus, these little trees are budget-friendly; most of the ingredients you probably already have in your pantry or can pick up cheaply at the store. They’re also incredibly versatile. Want to add a dash of coconut for a snowy effect? Go for it. Prefer colorful M&Ms to mimic ornaments? Absolutely. I’ve made these for Christmas parties, school events, and even just lazy Sunday afternoons when I want a little festive cheer. What makes this recipe special isn’t just how adorable they look—it’s how comforting they feel. The smell of chocolate and mint, the sparkle of colorful candies, and the joyful process of assembling these mini trees—that’s what’s kept me making them year after year.
How do I make candy Christmas trees?
Quick Overview
This recipe is practically foolproof. It involves layering pretzels, frosting, and candies to resemble tiny Christmas trees, topped with a touch of sprinkles or miniature ornaments. The best part? No baking required! You’ll start by creating a sturdy “base” with pretzels and frosting, then build your layers upward, finishing off with colorful decorations. It’s a clever assembly project that feels more like crafting than cooking—and the result is a delightful, crunchy, sweet tree that everyone will want seconds of. Once you get the hang of stacking and decorating, it’s just a matter of personal flair. These little conifers look adorable on a plate or as part of your holiday table centerpiece. Trust me, they disappear faster than you can say “merry Christmas.”
Ingredients
For the main structure:
- 24 small pretzel rods — the “trunks” of your trees, preferably salted for flavor
- 1 cup butter or cream cheese frosting — creamy and thick, for sticking everything together
- Green food coloring — a few drops to make the frosting look like pine needles
- 1 teaspoon vanilla extract — adds depth to your frosting base
For the Decorations:
- Colorful candies or M&Ms — for ornaments
- Mini chocolate chips or crushed cookies — mimicking evergreen texture
- Red and white sprinkles — as “baubles” and snow effects
- Optional: tiny edible stars, peppermint candies, or holiday-themed chocolates for extra flair
For the Glaze (optional):
“The Sweet Holiday Trees A Simple Treat turned out amazing. My kids asked for seconds. Saving this one!”
- White chocolate or candy melts — melted for a drizzle or snowy effect
- Sprinkles or edible glitter — for finishing touches
Step-by-Step Instructions
Step 1: Preheat & Prep Pan
Okay, here’s the first tip I learned after a few tries—no actual preheating required, but make sure your workspace is ready. Line a tray with parchment paper or wax paper. This makes the assembly so much easier, and you’ll thank yourself when it’s time to clean up!
Step 2: Mix Dry Ingredients
Nothing fancy here, just gather your candies and sprinkles. No mixing involved yet, but keep those at arm’s reach. If you’re using chocolate chips or crushed cookies for texture, set those aside so they’re ready to sprinkle on later.
Step 3: Mix Wet Ingredients
Take your frosting, and if it’s store-bought, just add a few drops of green food coloring and vanilla. Mix well until the color is vibrant and uniform. Trust me, a bright green makes the trees more festive! If you’re making your own frosting from scratch, a classic buttercream works beautifully—rich, creamy, and easy to tint.
Step 4: Combine
Spread your colored frosting on a plate or in a small bowl. Using a spoon or spatula, keep the consistency thick but spreadable—if it’s too runny, add a bit more frosting or powdered sugar; if too stiff, a tiny splash of milk or cream helps loosen it. This frosting is what will hold your pretzels together and create that “pine needle” look.
Step 5: Prepare Filling
Now, if you’re feeling fancy, you can mix crushed candies or tiny cookies into your frosting for extra texture. Personally, I skip this step for simplicity, but it’s a fun way to add some personalized flair. Just mix the candies into a small bowl, ready to sprinkle or press onto the trees later.
Step 6: Layer & Swirl
Start by spreading a thin layer of frosting on the Pretzel Rods—these are your tree trunks. Next, carefully dip or spread more frosting on top, stacking candies, sprinkles, and decorative touches in layers. Use a small spatula or the back of a spoon for neatness, or just go wild with your design! A quick swirl of frosting creates the illusion of pine branches, and the colorful candies look like ornaments hanging from every branch.
Step 7: Bake
Here’s a confession—I don’t actually bake these trees! They’re assembled at room temperature. If you want the frosting to set firm, pop the assembled trees in the fridge for about 30 minutes. No need to bake, but if you’re adding melted chocolate for that snowy effect, melt it carefully in short bursts and drizzle over the trees once they’re cooled or set.
Step 8: Cool & Glaze
If you’ve added melted chocolate or candy melts, let everything firm up in the fridge. For an extra snowy look, melt some White Chocolate and drizzle it over the trees—this adds a lovely shimmer and mimics freshly fallen snow. Sprinkle on a dash of glitter or more tiny candies before the chocolate hardens for a truly festive sparkle.
“New family favorite! This Sweet Holiday Trees A Simple Treat was so flavorful and ridiculously easy. Crowd-pleaser for sure.”
Step 9: Slice & Serve
These are best served as whole little trees, but if you want to cut them into smaller pieces for sharing, use a sharp knife. They’re quite crunchy, so a gentle sawing motion works best. Plate them on a holiday-themed platter, add a few sprigs of fresh pine, and enjoy the smiles all around!
What to Serve It With
These Candy Christmas Trees are pretty versatile in how you enjoy them. For breakfast, imagine a plate of these alongside your morning coffee or hot cocoa—sweet, crunchy, and a little nostalgic. If you’re planning a brunch, serve them with muffins and fruit, and maybe a peppermint latte to keep the festive spirit going. After dinner, they make delightful treats on a dessert platter, especially paired with peppermint ice cream or a crisp apple cider. And, honestly, these are perfect for just cozying up on the sofa with a blanket and a mug of hot chocolate—the kind that melts marshmallows in a cloud of cocoa goodness. In my house, we’ve always had a tradition of stacking these trees around the nativity scene or the Christmas Tree, and the kids love reaching for their favorite “ornaments”—the candies! They’re a hit at holiday parties, especially because everyone gets to participate in decorating, which makes every bite taste a little sweeter.
Top Tips for Perfecting Your Candy Christmas Trees
Over the years, I’ve learned a few tricks to make these little trees even more impressive—and foolproof. First, when preparing your pretzels, I always do this when I want a tidier look: I gently shake off excess salt after dipping them in frosting, so the decorations stick better. Trust me, a dry pretzel takes frosting and candies much more easily. As for the frosting, I tested various recipes, but I find that mixing in a tiny bit of shortening helps keep the green color vibrant and the texture nice and firm—especially if you’re working in a warm room. When swirling the frosting onto the pretzels, I suggest starting from the top and working your way down, to get that layered, textured look you see in pictures. Personal favorite tip—adding a pinch of cinnamon or peppermint extract into your frosting gives these trees a cozy, spicy aroma that makes your home smell just like Christmas. Also, don’t be afraid to experiment with different candies; I’ve tried mini marshmallows as snow “fluffs,” and it looks adorable. If you want a more rustic look, crush up some Gingerbread Cookies into the frosting for added flavor and texture. One thing I learned is that melting chocolate for the snowy drips is easiest in short bursts in the microwave—stir often and don’t rush it. Applying the chocolate with a spoon or piping bag gives a nice drip effect. Lastly, a sprinkle of edible glitter or shimmer dust just before serving can make these little trees sparkle, no matter how plain your decorating was. A balance of creativity and technique makes all the difference.
Storing and Reheating Tips
These Candy Christmas Trees are best enjoyed fresh, but if you need to save some for later, here’s how I do it. If you’re not planning to serve them immediately, I recommend keeping them in an airtight container at room temperature for up to two days—covering loosely so they don’t get squished. If it’s humid outside, pop them into the fridge, but do be aware that the frosting might get a little fudgier and candies a tad softer. For longer storage, I wrap each tree individually in plastic wrap and toss them into the freezer—yep, they freeze beautifully! Just let them thaw at room temperature for about 20 minutes before serving. If you’ve added a chocolate glaze or melted candy drizzle, best to do that right before serving to keep the shine and crunch intact. A quick tip I learned? If your trees lose their crunch after refrigeration, pop them into a 200°F oven for 5 minutes—you’ll crisp them right back up. The key is keeping them sealed tight and away from moisture, so they stay as festive and fresh as the day you made them.
Frequently Asked Questions
Final Thoughts
If you’re looking for a charming, fuss-free way to add some extra cheer to your holiday table, these Candy Christmas Trees are the ticket. Not only are they visually delightful, but they’re also a wonderful way to bring family and friends together—kids especially love decorating their little trees with candies and sprinkles. Over the years, I’ve played with different candies and frosting shades, and I’ve found that the little imperfections—like a crooked branch or a somewhat lopsided tree—make them all the more lovable. That’s part of the magic, isn’t it? No matter how you decorate, the joy and warmth they bring to your home are what truly matter. I hope you try making your own mini Christmas forests—trust me, they’ll disappear in minutes at my house, and I bet yours too! If you give this recipe a shot, I’d love to hear about your creative twists or see your festive photos. Happy baking, and here’s to a season filled with sweetness, laughter, and lots of holiday cheer!
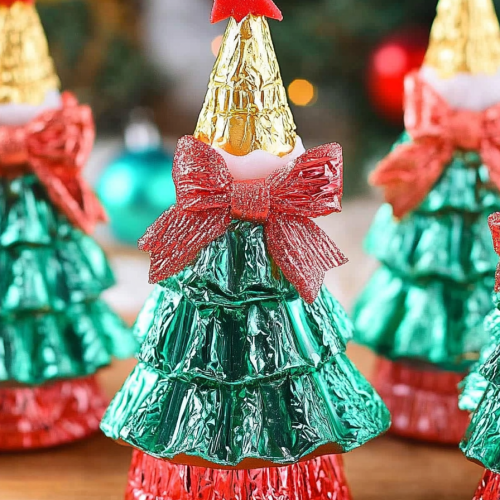
Candy Christmas Trees
Ingredients
Main Ingredients
- 20 pieces green individually wrapped mini Reese’s Cups
- 10 pieces individually wrapped Rolos (gold foil)
- 10 pieces green Hershey’s Kisses
Instructions
Preparation Steps
- Preheat your hot glue gun.
- Place a Rolo on a flat surface and put a small dab of hot glue on the flat end.
- Immediately press a mini Reese’s Cup onto the glue, with the flat side up. Hold until set.
- Repeat stacking Reese’s Cups on top of the Rolo to form a small tree, securing each layer with glue.
- Finish the top of the tree with a Hershey’s Kiss, gluing it in place.
- Optionally, add small bows at the base for decoration.


