There’s just something about golden, crispy popcorn coated in rich, buttery caramel that instantly transports me back to childhood movie nights on the sofa, giggling as the smell of fresh popcorn wafts through the house. If you’re like me, you probably have a soft spot for that perfect crunch, with just a touch of sweetness and a caramel flavor that’s both deep and buttery. Trust me, homemade caramel popcorn is one of those recipes that’s surprisingly simple but feels fancy enough to serve at parties or as a special treat when you’re craving something sweet and salty. I always do this when I want to indulge without overdoing it — it’s a lifesaver on busy nights or when friends drop by unexpectedly. Plus, it’s endlessly customizable: you can add Sea Salt, sprinkle some nuts, or even drizzle a little chocolate on top. Once you master this caramel popcorn, you’ll never want the store-bought kind again—trust me on this one! It’s irresistibly addictive, and I swear my kids ask for it every single week. Ready to get crunchy, sweet, and a little bit nostalgic? Let’s dive in!
Thank you for reading this post, don't forget to subscribe!What is caramel popcorn?
Think of caramel popcorn as that perfect marriage between fluffy, crispy popcorn and a glossy, buttery caramel coating. It’s essentially popcorn baked or set in a caramel syrup until everything clings together in sweet, sticky goodness. The name is pretty self-explanatory — “caramel” being that luscious, rich sugar syrup, and “popcorn,” the snack that’s been a family favorite for generations. What I love about it is how versatile it is—one batch can be light and crunchy or chewy, depending on your preference. The caramel is made from simple ingredients like sugar, butter, and a touch of vanilla, but when combined with popcorn, it creates this addictive combo that’s both sweet and salty with a satisfying crunch. It’s a classic in the snack world, but I think making it at home just takes it to a whole new level of fresh and flavorful. Plus, it’s a fun kitchen project that your kids or friends can help with—score!
Why you’ll love this recipe?
Honestly, once you try making your own caramel popcorn, there’s no going back to the store-bought stuff. What I love most about this recipe is how it fills the house with that warm, inviting smell of caramel baking—it’s like a hug from the kitchen! The flavor is absolutely addictive; it’s deeply sweet but balanced with just a hint of saltiness, making every bite feel like a little explosion of toasty, buttery goodness. And the best part? It’s shockingly simple to make, requiring only a handful of ingredients that are probably sitting in your pantry right now. Plus, it’s pretty budget-friendly—no fancy holiday ingredients or special gadgets needed. Another reason I keep coming back to this recipe is its versatility: you can jazz it up with chopped nuts or drizzle some chocolate for an extra special treat. I’ve made this countless times, and every batch turns out perfect — crispy, chewy, and sticky in all the right places. Whether I’m craving a quick sweet snack or making a gift for friends, caramel popcorn always wins that nostalgic, cozy vibe. It’s honestly become my go-to for everything from movie nights to gifts, and I know once you try it, you’ll see why!
How do you make caramel popcorn?
Quick Overview
This caramel popcorn comes together in just a few simple steps— you bake the popcorn with a homemade caramel sauce that clings beautifully. The secret is in making a rich, smooth caramel on the stovetop and tossing it with freshly popped popcorn while still warm so everything gets coated evenly. Once it cools, it firms up into that irresistible crispy, chewy texture we all love. No fancy equipment here—just a whisk, a baking sheet, and a little patience. You’ll love how it fills the house with that irresistible aroma, and trust me, once you taste how much better it is than anything store-bought, you’ll be hooked for life!
Ingredients
For the Popcorn:
– 1/2 cup (about 125g) popcorn kernels — I like organic, but any good quality popcorn works
For the Caramel Sauce:
– 1 cup (200g) packed light Brown Sugar — I sometimes squeeze a bit of molasses in for deeper flavor
– 6 tbsp (90g) unsalted butter — real butter makes all the difference
– 1/4 cup (60ml) heavy cream or whole milk — I tested with almond milk and it actually made it even creamier!
– 1/2 tsp sea salt — for that perfect balance
– 1 tsp vanilla extract — pure vanilla is best
“New family favorite! This Sweet Caramel Popcorn Balls A Simple Treat was so flavorful and ridiculously easy. Crowd-pleaser for sure.”
Optional Add-Ins:
– Chopped nuts, like pecans or almonds
– A drizzle of melted chocolate or caramel for extra gooey goodness
– Flaky sea salt sprinkled on top before cooling
Step-by-Step Instructions
Step 1: Preheat & Prepare your Baking Sheet
Set your oven to 250°F (120°C). Line a large baking sheet with parchment paper or lightly grease it—this helps prevent sticking and makes cleanup a breeze. I always do this first thing so I don’t forget. It sounds simple, but I’ve learned the hard way that a prepared sheet makes all the difference when it’s time to toss and cool the popcorn.
Step 2: Pop the Corn
Pop your popcorn kernels either on the stovetop using a big pot with a lid or in an air popper. I prefer stovetop because I can control the heat and get those fluffy, tender kernels without any added oils I don’t want. Once popped, transfer the popcorn to a large bowl, removing any unpopped kernels. You want evenly popped popcorn so every piece gets coated with caramel later. Spread it across the prepared baking sheet in a single layer—this keeps things from clumping when baking.
Step 3: Make the Caramel
In a heavy-bottomed saucepan, melt the butter over medium heat. Once melted, stir in the Brown Sugar and salt. Keep stirring until the mixture comes to a gentle boil—don’t walk away, because sugar can burn quickly! Let it boil for about 4-5 minutes, stirring constantly. Then, remove from heat and carefully stir in the heavy cream and vanilla—be cautious, as it bubbles up quite a bit. Keep stirring until smooth. The caramel should be shiny, thick, and pourable but not too runny.
Step 4: Coat the Popcorn
Pour the hot caramel evenly over the popcorn. I like to really drizzle and then use a spatula to help spread it out. Toss everything together gently so every piece gets coated. If you’re adding nuts or other goodies, sprinkle them in now and mix again. This is the moment where magic happens—watch the caramel work its way into every nook and cranny of those fluffy kernels.
Step 5: Bake & Crisp
Transfer the caramel-coated popcorn to your prepared baking sheet. Bake for 45-60 minutes, stirring every 15 minutes. This baking process helps the caramel set and become crunchy. It’s like giving it a little spa treatment for that perfect crispness. When finished, take out the sheet and let it cool completely—this is super important for that snap and chewiness combo.
Step 6: Cool & Glaze
Allow the popcorn to cool on the baking sheet until firm. If you want to add an extra touch, melt some chocolate or caramel and drizzle over the cooled popcorn for a fancy finish. Once cooled, break into clusters and enjoy! Honestly, I sometimes place it in a big bowl and can’t resist stealing a handful before it even hits the table.
Step 7: Serve & Enjoy
This caramel popcorn is best served fresh but will keep well in an airtight container for about a week. Just keep it in a cool spot—no fridge needed, or it can get too sticky. My kids ask for this all the time, and it disappears in minutes at my house. Whether it’s a movie night classic or a gift bag surprise, it’s always a hit.
“Packed with flavor and so simple. Exactly what I wanted from this Sweet Caramel Popcorn Balls A Simple Treat!”
What to Serve It With
If you’re wondering how to elevate your caramel popcorn, I have plenty of ideas. For a fun breakfast twist, toss a handful into Greek yogurt with fresh berries and a drizzle of honey—trust me, it’s like your day’s sweetest start. For brunch, serve it alongside flaky croissants and coffee; the salty-sweet combo makes everything taste better. As a dessert, pile it into a pretty glass jar, sprinkle some extra sea salt or cocoa powder on top, and voilà—homemade holiday gift! And honestly, it’s such a comforting snack on cozy evenings—the crunch, the caramel aroma, it’s pure happiness in every bite.
Top Tips for Perfecting Your Caramel Popcorn
Over the years, I’ve learned a few tricks that make this recipe foolproof. First, be mindful of the caramel’s temperature—boiling for exactly 4-5 minutes is key to getting the right thickness. If it’s too thin, the coat won’t set well; if it’s too thick, it’ll be too chewy. When tossing the caramel with the popcorn, do it quickly while it’s still hot—waiting too long makes it harder to evenly coat. The baking step is crucial for crunch; don’t skip it! I’ve also experimented with different sugars—using dark Brown Sugar gives a richer flavor, but light works just fine. If you want a slightly saltier kick, sprinkle extra sea salt just before cooling. Trust me, I’ve had some batches turn a little too caramelized or uneven, but practicing makes perfect. If you’re feeling adventurous, add a pinch of cinnamon or a splash of bourbon to the caramel for a fun twist. Also, for a glossy finish, you can brush a little extra vanilla over the cooled popcorn before serving—just like a bakery treat! The biggest lesson I’ve learned? Patience is key—let the caramel set fully before breaking it apart, or you’ll end up with sticky clumps instead of crisp clusters.
Storing and Reheating Tips
To keep your caramel popcorn fresh and crispy, store it in an airtight container at room temperature. It’ll stay good for about a week—if it lasts that long! I prefer glass jars or resealable bags—less cling wrap mess, and it keeps that crunch intact. If it starts to lose its crispness after a few days, pop it in a preheated oven at 250°F for about 10 minutes and let it cool. For longer storage, you can freeze it—just seal it tightly, and it will keep for up to a month. When ready to eat, let it thaw at room temperature to restore some of that freshness. When it comes to glazing, I recommend adding extra chocolate or caramel after reheating only if you’re planning to enjoy it the same day, as they tend to melt or become sticky if stored together. Always check the texture: if it’s still sticky or soft, give it a quick warm-up in the oven and let it cool on a wire rack. This way, every batch feels as fresh as the day you made it!
Frequently Asked Questions
Final Thoughts
This homemade caramel popcorn isn’t just a snack—it’s a cozy, nostalgic experience that brings smiles all around. Every batch reminds me of lazy weekends, family movie nights, and the simple joy of sharing something homemade and delicious. The best part? You get crispy, sweet, buttery popcorn in under an hour, and it costs a fraction of what you’d pay at the store. Plus, once you’ve mastered the caramel sauce, you can customize it endlessly—think fancy sea salt, crunchy nuts, or even a drizzle of Dark Chocolate for a more decadent twist. Honestly, I encourage you to experiment—make it your own, and let me know how it turns out! My only advice is to bake it until crispy, don’t skimp on the cool-down, and enjoy every crunchy, caramelized bite. Happy baking, friends! And don’t forget to share your creations—I’d love to see your variations or hear your stories of caramel popcorn bliss. Now go ahead, indulge a little—you deserve it!
caramel popcorn
Ingredients
Main Ingredients
- 14 cups popped plain popcorn
- 0.5 pounds caramel candies
- 4 tablespoons butter
Instructions
Preparation Steps
- Pop the popcorn according to the package instructions and set aside.
- Melt the caramel candies with butter in a medium saucepan over medium-low heat until smooth.
- Pour the melted caramel over the popcorn and mix well to coat evenly. Allow it to cool for a few minutes.
- Melt the chocolate chips in a microwave or double boiler until smooth.
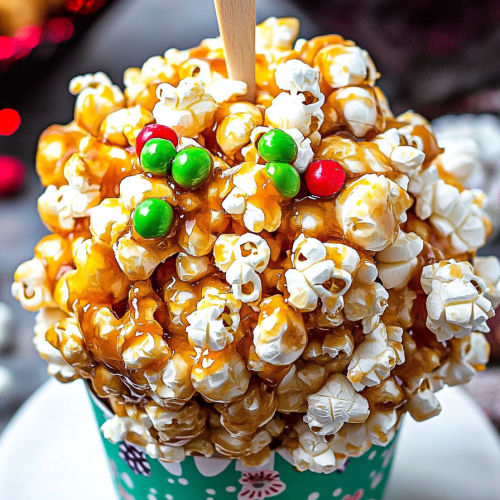
- Shape the coated popcorn into balls using greased hands.
- Insert a popsicle stick into each popcorn ball, dip into melted chocolate, then sprinkle as desired. Place on wax paper and let set.


