If you’re anything like me, you probably have a stash of overripe bananas sitting on your kitchen counter right now—looking a little sad, maybe a bit spotted, but oh so fragrant and perfect for a magic trick in the kitchen. I always do this when I see those darkened bananas—transform them into the most comforting, delicious Banana Bread you’ve ever tasted. Honestly, there’s something about the smell of baking bananas that instantly makes the house feel warmer and cozier. My kids ask for this all the time, especially on lazy Sunday mornings. Plus, it’s a lifesaver on busy nights when I want something sweet but don’t want to bake a fuss-filled cake. Trust me, if you’ve got overripe bananas, you’re halfway to a batch of the best banana bread—no fancy ingredients needed, just a little love and a pinch of patience.
Thank you for reading this post, don't forget to subscribe!What is banana bread?
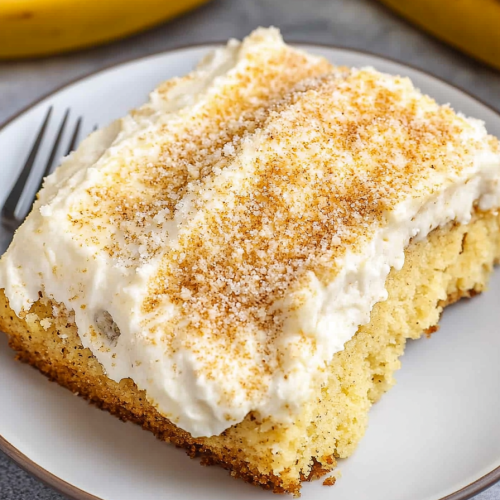
Banana Bread is this cozy little loaf of heaven that combines mashed overripe bananas with flour, eggs, butter, and sugar—pretty simple. Think of it as a way to give new life to those bananas that might’ve been forgotten in the fruit bowl. It’s essentially a moist, sweet bread with a tender crumb and a subtle banana flavor that’s just enough to make you smile with every bite. The name’s pretty straightforward: it’s banana + bread, a kind of hybrid treat that’s perfect for breakfast, snack time, or dessert. I love how versatile it is—some folks toss in walnuts or chocolate chips for extra fun, but honestly, the bananas are the real star here. It’s a classic for a reason—simple, forgiving, and endlessly comforting.
Why you’ll love this recipe?
What I love most about this Banana Bread is how forgiving it is—really, anyone can make it, even if you’re not a seasoned baker. The ingredient list is short, the steps are simple, and it’s almost impossible to mess up. Plus, the smell alone will lure everyone to the kitchen—think warm bananas mingling with toasted nuts and cinnamon if you go that route. The best part? The flavor, of course. It’s sweet but not too sweet, with a rich, buttery undertone that hits the spot. Budget-wise, it’s a win too; you probably already have everything you need in your pantry. And the versatility is endless. Want add-ins? Toss in some chopped walnuts, chocolate chips, or even dried fruit. Prefer it gluten-free? I’ve played around with gluten-free flour blends, and honestly, it works beautifully—trust me on this one. This banana bread is a real lifesaver—perfect for when you want something homemade without all the fuss. It’s a cozy, comforting, all-around crowd-pleaser that my family asks for time and time again.
How do you make banana bread?
Quick Overview
This Banana Bread Recipe is as easy as mashing up those overripe bananas, mixing a few simple ingredients, and then baking it to golden perfection. The trick is in gently folding the wet and dry ingredients—a little patience here gives you that moist, tender crumb. The process takes about 10 minutes of prep, then just pop it into a preheated oven and wait—your kitchen will fill with that irresistible banana aroma. You can bake this in a loaf pan or even make mini muffins for quick snacks. And honestly, once you’ve got the hang of it, it’s so forgiving—you can tweak the ingredients a bit, add your own personal touch, and still end up with the best banana bread ever.
Ingredients
For the Main Batter:
- 3 to 4 overripe bananas, mashed (the blacker, the better! They’re sweeter and easier to mash.)
- 1/2 cup melted unsalted butter (or oil if you prefer)
- 1 cup granulated sugar (or brown sugar for rich flavor)
- 2 large eggs
- 1 teaspoon vanilla extract
- 1 1/2 cups all-purpose flour (or gluten-free blend)
- 1 teaspoon baking soda
- Pinch of salt
For the Filling (Optional):
- Chopped walnuts or chocolate chips—whatever makes you smile!
For the Glaze (Optional):
- 1/2 cup powdered sugar mixed with a splash of milk or lemon juice
- A sprinkle of cinnamon or cocoa powder for flavor
Step-by-Step Instructions
Step 1: Preheat & Prep Pan
Set your oven to 350°F (175°C). Grease your Loaf Pan with butter or line it with parchment paper—makes life so much easier when it’s time to serve. Having everything nearby helps, so gather your ingredients first.
Step 2: Mix Dry Ingredients
In a small bowl, whisk together the flour, baking soda, and salt. This step ensures your leavening agents spread evenly, giving you that perfect rise. Trust me, I’ve made the mistake of forgetting this step—no fun to end up with flat bread!
Step 3: Mix Wet Ingredients
In a large bowl, mash your bananas until smooth—use the back of a fork or a potato masher. Then, stir in the melted butter, sugar, eggs, and vanilla. Mix until creamy and silky. This is the flavorful part—you’ll want to sniff around the bowl while you do this. It smells like warm banana cake already.
Step 4: Combine
Gently fold the dry ingredients into the wet mixture—don’t overmix! Overworking the batter can make it dense instead of tender. Mix just until the flour disappears—lumps are okay here.
Step 5: Prepare Filling
If you’re using nuts or chocolate chips, fold them into the batter now. I always add a handful of walnuts—I love that crunch, but it’s totally optional.
“New family favorite! This Spotlight on Mushy Bananas Simple Treats was so flavorful and ridiculously easy. Crowd-pleaser for sure.”
Step 6: Layer & Swirl
Pour half the batter into your prepared pan, add a spoonful of filling (if using), then top with the rest of the batter. For a pretty swirl, gently drag a knife through the batter—this creates a marbled effect that’s as beautiful as it is tasty.
Step 7: Bake
Pop your loaf in the oven and bake for about 60-70 minutes. Check for doneness with a toothpick inserted into the center—if it comes out clean, you’re all set. Oven times can vary, so start checking around that hour mark. You want a golden crust and that lovely banana aroma.
Step 8: Cool & Glaze
Let the bread cool in the pan for 10-15 minutes, then transfer to a wire rack. If you’re glazing, this is the time—drizzle on that sweet glaze while the bread is still warm, so it soaks in just right.
Step 9: Slice & Serve
Use a serrated knife for tidy slices. Serve warm with butter or a smear of cream cheese if you feel fancy. This banana bread is irresistible on its own, but I love serving it with a side of fresh berries or a hot cup of coffee.
What to Serve It With
My favorites change with the season, but here are some tried-and-true combos:
For Breakfast: A dollop of Greek yogurt and a drizzle of honey—fresh, creamy, and just perfect to start the day.
For Brunch: Serve slices with a side of scrambled eggs and fresh fruit. Add a mimosa if you’re celebrating!
As Dessert: Warm slices topped with vanilla ice cream or whipped cream make it feel special. For an adult twist, a splash of caramel or bourbon syrup is divine.
For Cozy Snacks: Simply slice, butter, and enjoy on chilly days with a cup of tea or hot cocoa. My kids ask for this all the time—truth be told, I never say no to a slice myself.
Honestly, this banana bread is such a comfort—I can’t think of a better way to use those overripe bananas. And because it’s so versatile, I often sneak in some extra goodies or change up the toppings depending on my mood. It’s one of those recipes that feels like a warm hug, no matter when or where you make it.
Top Tips for Perfecting Your Banana Bread
Over the years, I’ve picked up a few tricks that help me turn out bakery-quality banana bread every single time:
Zucchini Prep: Okay, I didn’t mean zucchini, but I do use the same moisture control trick with bananas—make sure to mash them very well and remove excess moisture if they’re extra juicy. It keeps the bread from turning soggy.
Mixing Advice: Gentle folds are the key. Overmixing wrecks the delicate crumb. I usually mix until ingredients are just combined and stop as soon as I see no dry flour.
Swirl Customization: For that beautiful marbling, I love swirling the batter with a skewer or chopstick—don’t overdo it, or the swirl disappears. Practice makes perfect!
Ingredient Swaps: I’ve tested coconut oil in place of butter, which adds a slight tropical flavor, and maple syrup instead of sugar for a more natural sweetness. Both work great, just adjust the liquids a bit and expect a slightly different texture.
“Packed with flavor and so simple. Exactly what I wanted from this Spotlight on Mushy Bananas Simple Treats!”
Baking Tips: Always check your oven’s calibration—mine runs hot sometimes! And a toothpick isn’t just for testing cake; it’s your best friend here. Insert it into the center—if it’s clean, it’s ready.
Glaze Variations: For a more decadent touch, mix cocoa powder into the glaze or sprinkle some chopped nuts on top before baking. The key is balancing the sweetness so it complements the bread, not overwhelms it.
Honestly, I’ve made this so many times, I’ve learned to adapt on the fly. Sometimes I add a splash of espresso for a mocha twist, other times a handful of dried cranberries for some tartness. The flexibility is what makes this recipe a staple in my kitchen.
Storing and Reheating Tips
This bread stays fresh for a couple of days if stored properly. I usually wrap it tightly in plastic wrap or keep it in an airtight container. At room temperature, it’s good for about 2-3 days—just make sure to keep it out of direct sunlight.
If you want to keep it longer, pop it into the refrigerator—again, wrapped well, for up to a week. The cold makes the flavors deepen and the texture more dense, but honestly, I prefer it warm or at room temp.
Want to freeze leftovers? Wrap slices individually in plastic, then put them in a freezer bag. They’ll last up to 3 months. Thaw at room temperature or give it a quick microwave zap—just don’t overdo it, or it gets rubbery.
As for the glaze—if you made one, keep it separate until serving, or reheat the bread gently, then drizzle fresh glaze for that just-baked feel. The glaze does tend to get a little melty in the fridge, but a quick re-shine in the microwave solves it.
Frequently Asked Questions
Final Thoughts
There’s something endlessly satisfying about turning those overripe bananas—the ones that might’ve been destined for the trash—into something so delicious. This banana bread has been my go-to comfort food, weekend brunch treat, and after-school snack for years. It’s simple enough to whip up when friends drop by unexpectedly, yet special enough that I never get tired of it. Every time I bake this, I remember my grandma’s kitchen and how she’d sneak me a warm slice with a pat of butter melting in. It’s funny how a humble loaf of banana bread can carry so many memories, but I think that’s part of what makes it so special. I hope you try it, customize it, and love it as much as I do. Happy baking—and don’t forget to share your creations in the comments!
overripe bananas
Ingredients
Main Ingredients
- 3 large overripe bananas
- 2 cups all-purpose flour
- 1 cup granulated sugar
- 0.5 cups unsalted butter melted
- 2 large eggs
- 1 tsp vanilla extract
Instructions
Preparation Steps
- Preheat your oven to 350°F (175°C). Grease a loaf pan or line it with parchment paper.
- In a large bowl, mash the overripe bananas until smooth.
- Add melted butter, eggs, and vanilla extract to the mashed bananas and mix well.
- In a separate bowl, whisk together flour and sugar.
- Gradually add the dry ingredients to the wet ingredients, mixing until just combined.
- Pour the batter into the prepared loaf pan and bake for 40 minutes or until a toothpick inserted in the center comes out clean.
- Allow to cool before slicing and serving.


