I still remember the first time I pressed a warm tortilla into a sizzling skillet and watched the cheese melt slowly into that creamy, emerald filling. It felt like magic in a weeknight moment—comfort, but with a little spark. This dish is the delicious lovechild of my favorite dips and a cozy cheese quesadilla. Spinach artichoke quesadillas aren’t just lunch or dinner; they’re a memory you can hold onto in a bite. The aroma alone—garlic, melty cheese, spinach softened just so, a kiss of artichoke—could headline a scent memory for me. This one’s a lifesaver on busy nights, and my kids actually ask for seconds (and thirds) more often than I’d like to admit. If you’ve ever tucked into a creamy Spinach Dip with warm crust, you already know the feeling—only this time, it’s handheld and perfect for dipping into salsa, sour cream, or guac. Spinach artichoke quesadillas are the cozy, crowd-pleasing winner you’ll reach for again and again.
Thank you for reading this post, don't forget to subscribe!What is Spinach Artichoke Quesadilla?
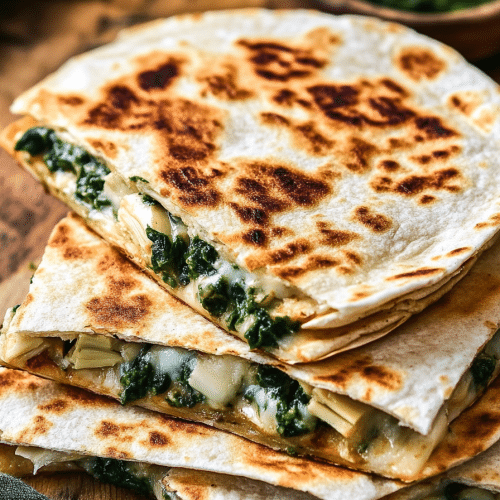
Think of Spinach Artichoke quesadillas as a cheesed-up bridge between creamy spinach-artichoke dip and a golden, crispy quesadilla. It’s essentially a tortilla folded around a lush, cheesy spinach-artichoke filling, then toasted until the outside is crisp and the inside stays wonderfully gooey. The name is exactly what it sounds like—a simple, honest description of what you’ll taste: spinach, artichokes, and cheese all hugged inside a toasty tortilla. I love the way the greens stay vibrant and the artichokes pop with tang, while the cheese ties everything together in a warm, comforting hug. It’s approachable enough for a weeknight, fancy enough to serve at a casual gathering, and flexible enough to adapt to what you’ve got in the fridge. Spinach artichoke quesadillas are basically your favorite dip, but portable and a whole lot more exciting to eat with your hands.
Why you’ll love this recipe?
What I love most about this spinach artichoke quesadillas recipe is how it brings a crowd-pleasing dip texture into a handheld meal without losing the dip’s charm. The moment you bite in, you get that creamy, tangy filling with a little bite from the artichokes and a bright lemon lift. The balance of mozzarella’s melt, Parmesan’s sharp bite, and the spinach’s fresh greens makes every bite feel both indulgent and light. It’s incredibly simple to pull together—no fancy equipment required, just a skillet, a spatula, and a little patience for that crisping golden edge. And it’s kind to your wallet; you’re mostly marrying pantry staples with a few fresh greens. Version after version, I’ve found this to be incredibly versatile: switch the cheeses, swap in a touch of sun-dried tomato for brightness, or add a pinch of crushed red pepper for a cozy kick. If you’ve ever wanted a weeknight meal that feels special but isn’t fussy, this is it. This spinach artichoke quesadillas dish walks that line beautifully and never disappoints. It’s the kind of recipe that earns a permanent spot on my meal plan rotation, especially when I’m feeding a hungry crew after a busy day.
How do you make Spinach Artichoke Quesadillas?
Quick Overview
Here’s the quick version: whisk together a creamy base, fold in your chopped spinach and artichokes, then layer generous amounts of cheese on tortillas, spread the filling, and cook in a hot skillet until the cheese is molten and the tortilla is toasty. Finish with a little glaze drizzle for brightness, slice into wedges, and serve with a simple salsa or crema. It sounds simple, and it is—but when you lift that first bite, you’ll taste how thoughtfully every component plays with the next. Preparation is forgiving, so you can tweak the fillings to your taste and what you have on hand, which is exactly the kind of weeknight win I crave.
Ingredients
For the Main Batter:
– 4 oz cream cheese, softened
– 1/4 cup sour cream
– 1 tablespoon mayonnaise
– 1 garlic clove, minced
– 1/4 teaspoon salt
– 1/4 teaspoon Black Pepper
– 1/4 teaspoon dried oregano
For the Filling:
– 2 cups fresh spinach, chopped (or 1 cup frozen, thawed and squeezed dry)
– 1 cup Artichoke Hearts, chopped
– 1 cup shredded mozzarella
– 1/2 cup grated Parmesan
– 1 teaspoon lemon juice
– Salt and pepper to taste
– Optional: pinch of red pepper flakes for a gentle heat
For the Glaze:
– 2 tablespoons Sour Cream or Greek yogurt
– 1 teaspoon lime juice
– 1/4 teaspoon lime zest
– Pinch of salt
– Optional: a few chopped cilantro leaves for brightness
Step-by-Step Instructions
Step 1: Preheat & Prep Pan
Set a large cast-iron skillet or nonstick skillet over medium heat. You want a steady sizzle, not a loud shout. Lightly brush or spray the pan with oil; you’re aiming for a thin sheen, not a pool. Heat should be steady so the tortilla crisps evenly and the filling warms through without steaming. If you’re team butter, you can rub a tiny amount on the tortilla as it hits the pan for extra gloss and flavor. I always do this on busy weeknights—little ritual, big payoff.
Step 2: Mix Dry Ingredients
In a small bowl, whisk together the salt, pepper, oregano, and a pinch of crushed garlic powder if you like. This is your seasoning baseline; it’s what makes the filling taste intentionally seasoned rather than one-note. The goal here is even distribution—no clumps, no lonely grains. I’ve learned that a quick whisk is all you need to get the flavor balance right before the wet ingredients join the party.
Step 3: Mix Wet Ingredients
In another bowl, beat the softened Cream Cheese with the sour cream and mayonnaise until smooth. The mixture should be creamy but still thick enough to hold its shape as you spread it on the tortilla. Add the minced garlic, lemon juice, and a touch more pepper if you’re craving brightness. I’ve found that letting this sit for a few minutes helps the flavors marry; the cream cheese loosens up slightly and becomes easier to spread without tearing the tortilla.
Step 4: Combine
Fold the wet mixture into the dry ingredients gently. You’re aiming for a lush, spreadable base that isn’t too runny. If you find it a touch thick, a teaspoon or two of water or milk can loosen it; if it’s too loose, add a little more Cream Cheese. The idea is a creamy, even layer that will cling to the tortilla without oozing everywhere when you fold the quesadilla.
Step 5: Prepare Filling
Blot any excess moisture from the thawed spinach (or if using fresh, wilt it briefly in the pan and cool). Toss with chopped artichokes, mozzarella, Parmesan, lemon juice, and a pinch of salt and pepper. The tang from the artichokes and lemon brightens the filling, while the cheese gives that signature melt. If you like a little kick, sprinkle in Red Pepper flakes. Taste as you go—you want a balanced bite where the greens sing but cheese remains the star.
Step 6: Layer & Swirl
Lay a tortilla on the warm pan. Spread a generous spoonful of the creamy base, then layer with a thick, even layer of the spinach-artichoke filling. Top with another light dusting of mozzarella so the final bite feels extra indulgent. If you’re feeling fancy, you can drizzle a tiny bit of the glaze over the filling before adding the cheese layer, then swirl gently with the back of a spatula to create pockets of brightness throughout. The key is even distribution—you want every slice to carry the same comforting flavor.
Step 7: Bake
Fold the tortilla in half and press gently with a spatula. Let it cook for 2–3 minutes, then flip carefully and cook another 2–3 minutes, until the outside is golden brown and crisp and the cheese inside is bubbly. If you’re after extra crispness, finish under a very hot broiler for 1–2 minutes, watching closely so you don’t burn. The aim is a tortilla that crackles at the edges while the center remains melt-in-your-mouth creamy.
“Packed with flavor and so simple. Exactly what I wanted from this Spinach Artichoke Quesadillas: 7 Delicious Bites!!”
Step 8: Cool & Glaze
Transfer the quesadilla to a cutting board and let it rest for 1–2 minutes. This short rest helps the cheese set a touch, making slicing less squishy. Drizzle the lime-y glaze in a quick zigzag or tiny loops over the top for a fresh, zippy finish. The glaze is optional but I love how the acidity brightens every bite. If you’re serving this to kids who aren’t fans of lime, you can skip it and rely on the natural brightness from the lemon in the filling instead.
Step 9: Slice & Serve
Slice the quesadilla into wedges or triangles, whichever shape your knife desires that day. Garnish with a little chopped cilantro if you’re feeling leafy, or a scoop of pico de gallo on the side for color and crunch. Serve warm with a dollop of sour cream or a cool, tangy avocado crema. My family tends to hover around the cutting board, tasting the edges first—the crispy corn tortillas with that creamy interior are addictive. It’s a texture party in every bite.
What to Serve It With
Spinach Artichoke quesadillas shine with a few bright accompaniments. Here are ideas that fit different moments and moods:
For Breakfast: A light tomato-cucumber salsa, a soft fried egg on the side, and plenty of hot sauce for those who like a little zing. A strong cup of coffee or a creamy latte balances the richness and keeps the morning feeling cheerful. I love starting a weekend with a plate of warm quesadillas alongside fresh fruit and yogurt spears—it’s a gentle, satisfying wake-up call.
For Brunch: Pair with a sparkling beverage or a pitcher of fruity iced tea. A crisp green salad with lemon vinaigrette or a mango salsa elevates the dish and makes it feel extra brunch-y. Serve the quesadillas cut into wedges with a little crema on the side for dipping—this is the kind of dish that invites lingering conversations and relaxed meals.
As Dinner: A quick side of black bean salad or sautéed corn with lime adds texture and brightness. A simple side of arroz verde or cilantro-lime rice rounds out the plate. If you’re feeding a crowd, double the batch and bake the extra quesadillas in the oven to keep everyone happy without standing at the stove.
For Cozy Snacks: They’re perfect as an after-school treat or game-night bite. A dollop of guacamole and a squeeze of lime make the whole tray feel vibrant and fresh. Leftovers—if there are any—fold easily into a lunch tortilla with a few extra greens for an extra shoot of brightness.
My family traditions here are simple: I always double the filling on weekends when friends come over, because nothing says “sit down, let’s catch up” like a tray of hot, golden quesadillas with a bowl of salsa and a bowl of cool sour cream. I’ve learned to keep the glaze optional but the results undeniably memorable. If you’re after a comforting crowd-pleaser that’s still light on its feet, this is your dish.
Top Tips for Perfecting Your Spinach Artichoke Quesadillas
Here are practical refinements that come from testing this recipe in my own kitchen time and again:
Spinach Prep: Thoroughly squeeze out moisture from thawed spinach or spin-dry fresh spinach to avoid a soggy filling. A dry filling yields crisper quesadillas and a cleaner slice. If you skip this step, you’ll notice a wetter inside and a slower melting cheese action, which isn’t ideal.
Moisture Management: Artichoke hearts can be briny. Rinse and pat dry if you’re using marinated pieces, or drain well if you’re using canned artichokes. A little moisture is fine, but too much dilutes the filling’s flavor and can steam your tortilla instead of crisping it.
Mixing Technique: When you combine the wet and dry components, mix just until combined. Overmixing can make the filling denser and less creamy, which is not what we want for a dreamily gooey center. A few gentle folds is all you need.
Swirl Customization: If you want a prettier marbled effect, consider brushing a small amount of the creamy base directly onto the tortilla before adding the filling, then layering the spinach-artichoke mixture. This creates more intricate pockets of flavor and a nicer visual when you slice.
Ingredient Swaps: Swap in mozzarella di bufala for an extra-tresh melt, or use provolone or a three-cheese blend if you don’t have mozzarella on hand. A dollop of ricotta can lighten the filling, too, but reduce the sour cream a touch to keep the texture balanced. Try adding roasted red peppers for sweetness or a hint of artichoke brine to heighten tanginess.
Baking Tips: If you’re cooking on the stove, keep the heat at medium-low after you flip to allow the filling to heat through without burning the tortilla. If you bake, 425°F (220°C) for 7–9 minutes, flipping halfway, will crisp the crust nicely while staying creamy inside.
Glaze Variations: You can switch in lime zest for brightness or use a splash of hot sauce in the glaze for a gentle kick. A cilantro-lime crema or a simple avocado crema makes a gorgeous, cool contrast to the warm filling. If you’re short on lime, a squeeze of lemon can still brighten the dish pleasantly.
“The Spinach Artichoke Quesadillas: 7 Delicious Bites! turned out amazing. My kids asked for seconds. Saving this one!”
Lessons learned: a little patience while the cheese melts pays off in a perfectly cohesive finish. I’ve burned a few batches by rushing the browning, and I’ve also missed the mark by under-searing, which leaves the tortillas pale and the filling a touch loose. The sweet spot is that crisp exterior with a thoroughly heated, creamy interior. Trust me on this one—practice makes perfect, and soon you’ll instinctively know just how long to let each side get golden.
Storing and Reheating Tips
These quesadillas store well in the fridge and even freezer with a little care. Here’s how I handle them so they stay tasty and vibrant:
Room Temperature: Best enjoyed fresh, but if you need to hold for a bit, wrap in a clean kitchen towel or parchment and place in a warm spot for up to 1 hour. The tortilla loses some of its initial crispness, but the filling remains delightful.
Refrigerator Storage: Cool completely, then store in an airtight container for up to 3 days. Reheat gently in a dry skillet over medium heat, flipping occasionally, until the exterior is crisp and the center is hot. If you want extra crispness, brush with a tiny bit of oil before rewarming.
Freezer Instructions: Freeze the assembled quesadillas on a parchment-lined tray, then wrap individually in foil or place in a freezer-safe bag. They’ll keep for 1–2 months. To reheat, bake directly from frozen at 400°F (200°C) for 12–15 minutes, flipping halfway. Expect a slightly longer time to reach the same crisp exterior.
Glaze Timing Advice: If you’re freezing, skip applying the glaze until after reheating. A fresh drizzle right before serving keeps it bright and prevents texture from dulling with time.
In my kitchen, these guidelines keep the spinach artichoke quesadillas tasting almost as good as day one, even when I’m juggling kids, work, and a hundred other to-dos. They reheat surprisingly well, and the texture remains inviting—the same balance of crisp exterior and creamy center that drew me to this recipe in the first place.
Frequently Asked Questions
Final Thoughts
There’s something about spinach artichoke quesadillas that makes the kitchen feel both familiar and exciting—the way the filling stays creamy while the tortilla becomes perfectly crisp at the edges. It’s a dish that travels well from weeknights to casual gatherings and still feels like a little celebration. The simple base, the bright lemon, the tang from the artichokes, and the melty cheese—all of it works in harmony, and it’s ready in a flash when you’re short on time but craving something comforting. If you’re new to this spin on an old favorite, give it a whirl and see how it quickly becomes a family staple. And if you’ve got tweaks or a secret ingredient that makes your version even more memorable, I’d love to hear about it in the comments. Happy baking, sharing, and savoring. Can’t wait to hear how yours turns out!
If you enjoyed this, you might also love trying my creamy spinach dip with crostini or my quick cheddar-jalapeño quesadillas for a spicy twist. And if you’re chasing more weeknight winners, I’ve got a handful of similar recipes that balance speed, flavor, and heart. Share your variations below, rate the recipe, and tell me what you swapped in or swapped out to make it your own. Your tweaks could become the next family favorite in my kitchen too.
Until next time, gather your ingredients, turn on your favorite playlist, and let the skillet do the talking. Spinach artichoke quesadillas are ready to become your new comfort meal—soft, cheesy, vibrant, and deeply satisfying in every bite. Enjoy the journey, friend.
spinach artichoke quesadillas
Ingredients
Main Ingredients
- 0.25 tablespoon oil
- 8 ounces artichoke hearts drained and chopped
- 6 ounces baby spinach leaves
- 4 ounces cream cheese
- 1 cup shredded mozzarella cheese
- 0.25 cup shredded Parmesan cheese
- 8 count flour tortillas 7 or 8 inch
- to taste salt
- to taste pepper
Instructions
Make Spinach Mixture
- Heat the oil in a large pot over medium-high heat. Add in the chopped artichoke pieces and cook for one minute. Reduce heat to medium, add in the baby spinach, and cook until wilted, turning often.
- Mix in the cream cheese, shredded mozzarella, and shredded Parmesan cheeses, and let them melt entirely while stirring. Season the mixture with salt and pepper to taste. Remove from heat.
Assemble Quesadillas
- Spread about 0.25 cup of the spinach artichoke mixture evenly over four of the flour tortillas. Top each spread tortilla with a second tortilla to create four full quesadillas.
Cook Quesadillas
- Heat a large skillet or griddle over medium heat. Place one quesadilla in the hot skillet and cook for 1-2 minutes per side, until crisp and golden brown; be careful not to burn them.
- Remove the cooked quesadilla from the skillet and repeat the process for the remaining quesadillas. Once all quesadillas are cooked, cut each into 4ths and serve immediately.


