You know those moments when a serious craving hits, the kind that demands something decadent and utterly satisfying, but the thought of turning on the oven feels like a marathon? Yeah, me too. It happens more often than I’d like to admit, especially when that late-night sweet tooth kicks in. This is precisely why I’m so thrilled to share my absolute favorite treat with you today: Skrewball whiskey balls. They’re like little bites of pure joy, packing a punch of Creamy Peanut Butter and that distinct, delightful Skrewball whiskey flavor. Honestly, these little no-bake wonders are a lifesaver. They’re so incredibly easy to whip up, and they disappear faster than you can say “more, please!” Forget complicated baking projects; these Skrewball whiskey balls are your new best friend when you need a quick, impressive, and ridiculously delicious dessert. They remind me a bit of classic no-bake cookies, but with a sophisticated grown-up twist that makes them feel extra special.
Thank you for reading this post, don't forget to subscribe!What is a skewball whiskey ball?
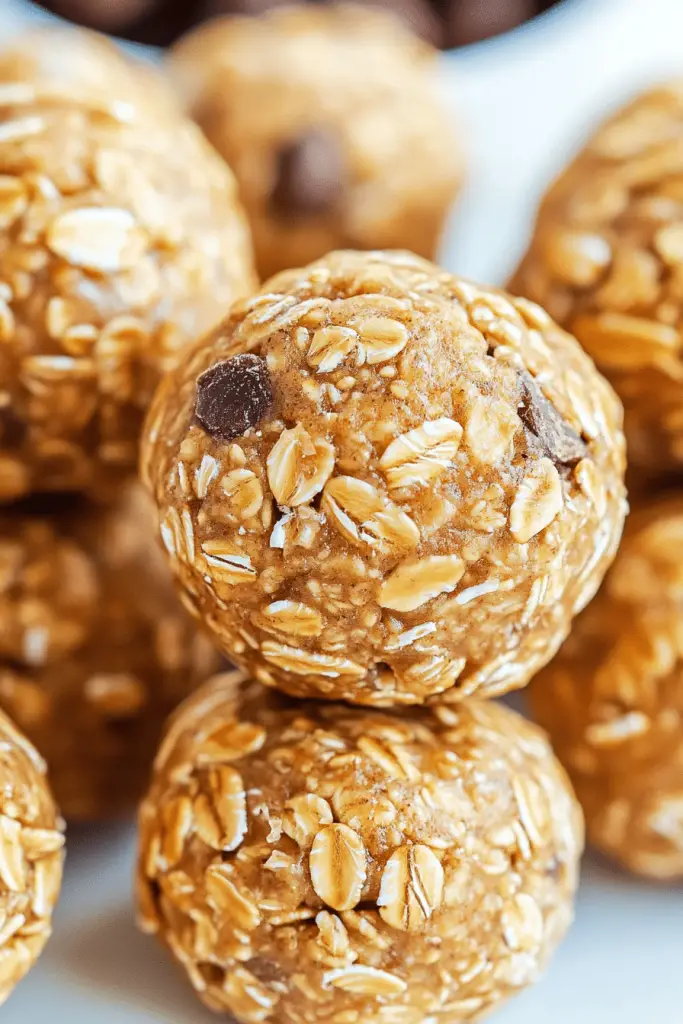
So, what exactly are these magical Skrewball whiskey balls? Think of them as the easiest, most delicious no-bake cookie you’ll ever make, with a secret ingredient that’s anything but ordinary. They’re essentially a no-bake confection that combines a creamy, rich base with the unique, unmistakable flavor of Skrewball Peanut Butter Whiskey. The name itself is pretty descriptive, right? We’re talking about little spheres of deliciousness infused with that signature blend of peanut butter and whiskey. It’s not overly boozy, mind you; the alcohol is there to enhance the flavors and add a sophisticated warmth, rather than overpowering the delightful peanut butter. It’s essentially a dessert for grown-ups, a little indulgence that’s perfect for sharing (or not, I won’t judge!). The concept is simple: take a beloved dessert format and elevate it with a trending, crowd-pleasing spirit. It’s a match made in foodie heaven, and I’ve been hooked ever since the first bite.
Why you’ll love this recipe?
There are so many reasons why I’m completely obsessed with these Skrewball whiskey balls, and I just know you’re going to fall in love with them too. First and foremost, let’s talk about the **flavor**. Oh, the flavor! That creamy, dreamy Peanut Butter base is already a winner, but when you add the Skrewball whiskey? It’s a game-changer. It adds this subtle, warm, slightly sweet, and nutty undertone that’s just divine. It’s not just sweet; it’s got depth and complexity that will have everyone asking, “What’s in these?!”
Then there’s the **simplicity**. Honestly, if you can stir ingredients together, you can make these Skrewball Whiskey Balls. There’s no baking involved, no fussing with oven temperatures, and no waiting around for cakes to rise. You literally mix, roll, and chill. It’s the perfect recipe for those busy weeknights when you want something special without the stress. My kids, believe it or not, even love helping me roll these; they think it’s a fun “cooking project.”
And the **cost-efficiency**? Fantastic! Most of the ingredients are pantry staples, and while Skrewball whiskey is a specialty item, a bottle goes a long way, especially for a recipe like this where you only need a moderate amount. You get a gourmet-tasting treat without breaking the bank.
What I love most about these Skrewball whiskey balls, though, is their sheer **versatility**. They’re perfect for potlucks, holiday gatherings, or just an impromptu treat. They look impressive, but they’re secretly so easy. They’re fantastic alongside a cup of coffee in the morning (don’t judge!), a delightful after-dinner indulgence, or even as a surprise for a friend. They’re a wonderful alternative to traditional cookies or brownies, and they always get rave reviews. I’ve even experimented by adding a touch of cinnamon or a pinch of Sea Salt on top, and both were hits! They’re just so adaptable and always turn out wonderfully.
How do I make a skewball whiskey ball?
Quick Overview
Making these Skrewball Whiskey Balls is ridiculously straightforward. You’ll basically combine your dry ingredients, then mix in your wet ingredients until a dough forms. From there, you’ll roll the dough into little balls and let them firm up in the fridge. The whole process takes about 20 minutes of active time, with most of the rest being chilling time. It’s so simple, it almost feels like cheating, but trust me, the results are anything but! This is the kind of recipe that makes you feel like a baking pro without any of the actual effort.
Ingredients
For the Main Batter:
Here’s what you’ll need to get that fantastic base going:
- 1 cup (2 sticks) unsalted butter, softened: Make sure your butter is truly softened, not melted. This is crucial for getting that smooth, creamy texture without any lumps.
- 1 cup creamy peanut butter: I prefer a classic, smooth peanut butter. Natural peanut butter can sometimes make the mixture a bit too oily, so a standard Jif or Skippy works best here for consistency.
- 1 cup granulated sugar: This provides sweetness and structure.
- 1/2 cup packed light brown sugar: The brown sugar adds a lovely moisture and a hint of caramel flavor that complements the peanut butter beautifully.
- 1/4 cup Skrewball Peanut Butter Whiskey: This is the star! You don’t need a ton, just enough to infuse that signature flavor. If you don’t have Skrewball, a good quality peanut butter whiskey will work, but Skrewball is really something special.
- 1 teaspoon vanilla extract: A classic flavor enhancer that rounds out the sweetness.
- 3 cups all-purpose flour: The base that holds everything together.
- 1/2 teaspoon salt: Balances the sweetness and brings out the flavors.
For the Optional Coating:
These are optional but add a lovely finishing touch!
- Powdered sugar, for rolling: A classic and easy coating.
- Crushed pretzels or chopped peanuts: For a little crunch and extra flavor.
- Cocoa powder: For a darker, richer look and taste.
Step-by-Step Instructions
Step 1: Cream the Butter and Peanut Butter
In a large bowl, cream together the softened unsalted butter and Creamy Peanut Butter. I like to use an electric mixer for this, starting on low speed and gradually increasing it. You want it to be super smooth and well combined, with no streaks of butter or peanut butter left. This step is key to a creamy texture, so take your time and scrape down the sides of the bowl a few times. I always do this when I’m feeling a bit stressed; it’s strangely therapeutic!
Step 2: Add Sugars and Wet Ingredients
Once your butter and peanut butter are perfectly blended, add in the granulated sugar and packed light brown sugar. Mix on medium speed until the mixture is light and fluffy. This is where the sweetness starts to come in. Now, it’s time for the magic! Pour in the Skrewball Peanut Butter Whiskey and the vanilla extract. Mix again until everything is thoroughly combined. You’ll start to smell that wonderful peanut butter and whiskey aroma – it’s intoxicating!
Step 3: Incorporate Dry Ingredients
In a separate medium bowl, whisk together the all-purpose flour and salt. Gradually add the dry ingredients to the wet ingredients, mixing on low speed until just combined. Be careful not to overmix! Overmixing at this stage can lead to tough whiskey balls. You want to mix until you no longer see streaks of flour. The dough will be thick and a bit sticky, which is exactly what you’re looking for.
Step 4: Chill the Dough
The dough will be quite soft at this point, making it difficult to roll into balls. To fix this, cover the bowl tightly with plastic wrap and refrigerate for at least 30 minutes, or until firm enough to handle. This chilling step is essential; it makes the dough much easier to work with and prevents the whiskey balls from spreading too much when you serve them. I usually pop it in the fridge while I clean up the kitchen.
“New family favorite! This Skrewball Peanut Butter Whiskey Treats was so flavorful and ridiculously easy. Crowd-pleaser for sure.”
Step 5: Roll into Balls
Once the dough is firm enough, scoop out portions using a small cookie scoop or a tablespoon. Roll each portion between your palms to form smooth, even balls, about 1 inch in diameter. Place the rolled balls on a baking sheet lined with parchment paper. If the dough starts to get too soft as you work, just pop it back into the fridge for a few minutes to firm up again.
Step 6: Coat (Optional)
This is where you can get creative! For a classic finish, you can gently roll the balls in powdered sugar until well coated. If you want more texture, try rolling them in crushed pretzels for a salty-sweet crunch, or in finely chopped peanuts for an extra peanutty kick. For a more dramatic look, you can dust them with cocoa powder. I usually make a few different kinds to offer variety!
Step 7: Chill to Set
Arrange the coated whiskey balls on the parchment-lined baking sheet. You can even add a drizzle of melted chocolate or a tiny swirl of extra Skrewball whiskey on top if you’re feeling fancy. Once they’re all rolled and coated (or left plain!), place the baking sheet back into the refrigerator for at least another 30 minutes to an hour. This step is crucial for them to set properly and hold their shape. I find they’re best when they’re nice and firm.
Step 8: Serve and Enjoy!
Your Skrewball whiskey balls are ready to be devoured! Serve them chilled. They’re perfect for dessert, an afternoon pick-me-up, or even as part of a festive appetizer spread. The combination of creamy Peanut Butter and the unique Skrewball flavor is truly addictive. Trust me, they won’t last long!
What to Serve It With
These Skrewball whiskey balls are so incredibly versatile, they fit into almost any occasion! I love them for their “no-bake” status, which makes them a go-to for so many things.
For Breakfast: Okay, hear me out. While they might seem like a dessert, a single Skrewball whiskey ball with my morning coffee is pure bliss on a weekend. It’s like a little treat to start the day. I’ll often make a small batch just for myself to enjoy with my first cup of joe. They also look surprisingly elegant on a brunch spread alongside fruit platters and other pastries.
For Brunch: These are a fantastic addition to any brunch menu. They add a touch of sophistication and a unique flavor profile that guests will rave about. I like to arrange them on a nice platter with some fresh berries or a sprinkle of edible flowers for a beautiful presentation. They pair wonderfully with mimosas or a rich coffee.
As Dessert: This is their most obvious role, and they excel at it! Serve them after a hearty meal. They’re perfect alongside a scoop of vanilla Ice Cream or a rich chocolate mousse. They’re also a hit at parties; I’ve served them on a dessert charcuterie board, and they were gone in minutes. People love trying new flavor combinations, and these definitely deliver.
For Cozy Snacks: My kids, even though they’re not drinking the whiskey, love the peanut butter aspect and will happily eat these plain versions. They’re perfect for a cozy afternoon tea or a movie night. They’re just so comforting and satisfying. I often pack a few in a small container for a special after-school treat for them, or for myself when I need a little pick-me-up. They are so much better than a store-bought cookie, and I know exactly what goes into them.
Top Tips for Perfecting Your Skrewball Whiskey Balls
I’ve made these Skrewball whiskey balls countless times, and through the years, I’ve picked up a few tricks that really make a difference. Here are my best tips to ensure your whiskey balls are absolutely perfect every single time.
Butter & Peanut Butter Harmony: The key to that super smooth, melt-in-your-mouth texture is ensuring your butter and peanut butter are perfectly creamed. Make sure your butter is genuinely softened – not melted or fridge-cold. I usually leave my butter out on the counter for at least an hour. When you cream them together, take your time and scrape down the sides of the bowl. This ensures no butter pockets or unmixed peanut butter, which can lead to a greasy or crumbly texture.
Don’t Overmix the Flour: This is a common pitfall with no-bake recipes that use flour. Once you add the flour, mix on the lowest speed possible, and stop as soon as you don’t see any dry streaks. Overmixing develops the gluten in the flour, which can make your whiskey balls tough or dry instead of delightfully chewy and soft. I learned this lesson the hard way after a batch turned out a bit too crumbly for my liking.
Chilling is Crucial: I cannot stress this enough – chill the dough! The dough will be quite soft and sticky right after mixing. If you try to roll it immediately, you’ll have a mess on your hands and the balls might not hold their shape. Chilling the dough in the refrigerator for at least 30 minutes firms it up considerably, making it easy to scoop and roll. If it starts to get too soft again as you’re working, just pop it back in the fridge for another 10-15 minutes. The second chill after rolling and coating is also essential for them to set properly.
Ingredient Swaps: While Skrewball is ideal, if you can’t find it, any good quality peanut butter whiskey will do. The flavor profile will be slightly different, but still delicious. For the peanut butter, I strongly recommend a smooth, creamy variety. Natural peanut butter can sometimes be a bit oily and might affect the texture, so stick with a classic if you can for best results. If you’re feeling adventurous and want to try a different nut butter, almond butter could work, but it will change the flavor profile considerably.
Coating Variations: Don’t feel limited to powdered sugar! I love experimenting with coatings. Crushed pretzels add a fantastic salty-sweet contrast. Finely chopped roasted peanuts give an extra nutty boost. Even a light dusting of cocoa powder can give them a richer, more sophisticated look and taste. For a truly decadent treat, a drizzle of melted dark or milk chocolate over the top takes them to a whole new level. Just make sure whatever you use is finely crushed or chopped so it adheres well.
“Packed with flavor and so simple. Exactly what I wanted from this Skrewball Peanut Butter Whiskey Treats!”
Humidity and Temperature: Be mindful of your kitchen’s humidity and temperature. On a very warm or humid day, your dough might be softer and require a little extra chilling time. Conversely, on a cooler day, it might firm up more quickly. Adjust your chilling times as needed. The goal is a dough that’s firm but still pliable enough to roll without cracking.
Storing and Reheating Tips
One of the best things about these Skrewball whiskey balls is how well they store. They maintain their delicious texture and flavor for quite some time, making them perfect for making ahead.
Room Temperature Storage: If you plan to enjoy them within a day or two, you can store them in an airtight container at room temperature. They tend to be a little softer at room temp, which some people actually prefer. Make sure the container is truly airtight to prevent them from drying out or absorbing any unwanted odors from your kitchen. I usually find they’re still lovely for up to 3 days stored this way, especially if they’re coated in powdered sugar, which helps them maintain their moisture.
Refrigerator Storage: For longer storage, or if you prefer them to be firmer, the refrigerator is your best friend. Store them in an airtight container in the fridge for up to a week. They’ll stay nice and firm, and the flavors can meld even further. When you take them out of the fridge, they might be quite hard, so I usually let them sit at room temperature for about 15-20 minutes before serving to soften them up slightly, unless you like them super chilled and firm.
Freezer Instructions: These Skrewball whiskey balls freeze beautifully! This is my secret weapon for having them on hand whenever a craving strikes. Place the rolled and coated balls in a single layer on a baking sheet and freeze until solid (about 1-2 hours). Then, transfer them to a heavy-duty freezer bag or an airtight container, separating layers with parchment paper. They can be stored in the freezer for up to 2-3 months. To thaw, simply transfer them from the freezer to the refrigerator overnight. You can also enjoy them straight from frozen if you like a very firm, almost icy treat!
Glaze Timing Advice: If you’re planning to add a chocolate drizzle or any other kind of glaze that needs to set, I recommend doing that just before serving or storing them in the refrigerator. If you freeze them with a chocolate drizzle, the chocolate can sometimes bloom or crack if it’s not applied when the balls are already firm and chilled. For powdered sugar coatings, they’re perfectly fine to be coated before any storage method.
Frequently Asked Questions
- Powdered Sugar: The classic, simple choice.
- Crushed Pretzels: For a salty-sweet kick and great texture.
- Chopped Peanuts: Extra nutty flavor and crunch.
- Cocoa Powder: For a richer, darker appearance and taste.
- Shredded Coconut: Toasted or untoasted, adds a lovely chew.
- Sprinkles: For a fun, festive look!
- Plain: They’re delicious even with no coating at all!
I often like to do a mix of a couple of coatings on one batch for visual appeal and variety.
Final Thoughts
So there you have it, my friends! My go-to recipe for Skrewball whiskey balls. I truly hope you give these a try. They’re more than just a treat; they’re a little bit of simple joy, a quick indulgence that always hits the spot. They’re proof that you don’t need hours in the kitchen or fancy equipment to create something truly delicious and impressive. The way the creamy peanut butter melds with that unique Skrewball flavor is just pure magic, and the fact that they require zero baking makes them an absolute dream for busy home cooks like us. They’re the perfect thing to have on hand for unexpected guests, a sudden craving, or just because you deserve a little something special. If you love this recipe, you might also enjoy my recipe for [link to a related recipe, e.g., Peanut Butter Fudge Bites] or my [link to another related recipe, e.g., Easy Chocolate Truffles]. I can’t wait to hear what you think of these Skrewball whiskey balls! Please leave a comment below with your thoughts, any variations you try, or how quickly they disappeared in your house. Happy baking – or should I say, happy no-baking!
Skrewball whiskey balls
Ingredients
Main Ingredients
- 10 ounces shortbread cookies
- 0.75 cup powdered sugar
- 8 ounces cream cheese softened to room temperature
- 0.25 cup Skrewball peanut butter whiskey
- 16 ounces milk chocolate melting discs
- 4 ounces peanut butter baking chips
- 1 teaspoon coconut oil
Instructions
Preparation Steps
- Line 2 baking sheets with parchment paper or silicone mat, and set aside.
- In the container of a food processor, add the shortbread cookies and powdered sugar. Pulse for 30 seconds to 1 minute or until you have fine crumbs.
- Add the softened cream cheese and Skrewball peanut butter-flavored whiskey to the food processor and pulse for an additional 20-30 seconds or until the mixture is smooth and all the cream cheese has been fully incorporated.
- Using a 1.5-inch (1.5 tablespoon) cookie scoop, scoop out a level scoop of the whiskey ball mixture and place it onto one of the prepared baking sheets. Repeat until all the cream cheese mixture has been scooped.
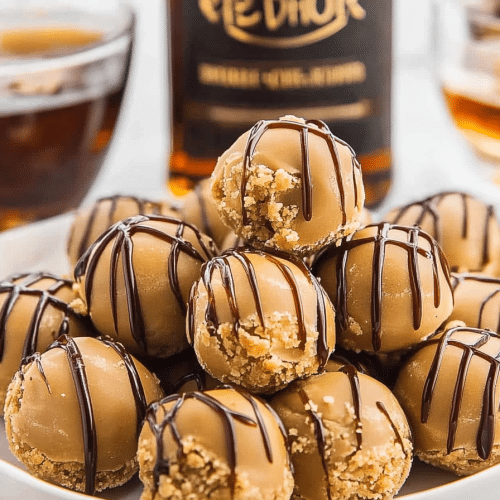
- Place the baking tray into the refrigerator for about 5 hours to allow the whiskey balls to firm up enough to be rolled and dipped into chocolate.
- Once the whiskey balls have firmed up, roll each ball in the palm of your hand to make smooth balls for dipping. You can place your tray of smooth whiskey balls back into the refrigerator to stay cold while you melt your chocolate.
- In a microwave-safe bowl, add the milk chocolate melting discs and microwave on high for 1 minute, stir, then melt in 30-second intervals until the chocolate discs are fully melted. Be sure to stir the chocolate between each time in the microwave. Do not overheat your chocolate. Stir until smooth. Allow the melted chocolate to cool slightly before dipping your whiskey balls into it. Tip: Keep the chocolate warm/melted by putting the bowl over a pot of hot water.
- Place a whiskey ball onto a fork and dip the ball into the melted chocolate. Once the ball is fully coated with chocolate, lift the fork out of the chocolate and tap it onto the edge of the bowl to allow any excess melted chocolate to drip off the bottom of the chocolate-coated whiskey ball. Tips: Only take a few of the balls out of the fridge at a time. Dip them and then get a few more balls out to be dipped. Keeping them cold makes it easier to dip.
- Using a toothpick or separate fork, gently slide the coated whiskey ball off the fork and onto the second parchment-lined baking tray. Repeat until all the whiskey balls are coated in the milk chocolate.
- Add the peanut butter chips and coconut oil to a small microwave bowl to make the peanut butter drizzle. Heat for 1 minute at (50-60% power), stir, then heat again in 30-second intervals until the chips are melted. Be sure to stir between each 30-second burst. Stir until smooth.
- Transfer the melted peanut butter chips to a piping bag with a small amount of the tip snipped off. Pipe a drizzle of the melted peanut butter chips in a decorative pattern over the tops of all the chocolate-coated whiskey balls.
- Place the tray of whiskey balls back into the refrigerator for 15 minutes to allow the chocolate and peanut butter to firm up before serving.


