There are some smells that just instantly transport me back to my grandmother’s kitchen. The scent of yeasty dough rising, the gentle hum of the oven, and then, that unmistakable fragrance of fresh rosemary hitting the heat… pure magic. This rosemary focaccia bread recipe is my absolute go-to when I want something that feels special but is surprisingly simple. It’s like a hug in bread form, perfect for dipping into olive oil, piling with antipasti, or just tearing off a warm, chewy piece. Honestly, it’s become a bit of a legend in my family, and I’ve lost count of how many times my kids have asked for “that amazing rosemary bread” when friends are over. If you’ve ever been intimidated by baking bread, this is your stepping stone. It’s far more forgiving than a crusty baguette and yields results that will make you feel like a baking superstar.
Thank you for reading this post, don't forget to subscribe!What is Rosemary Focaccia Bread?
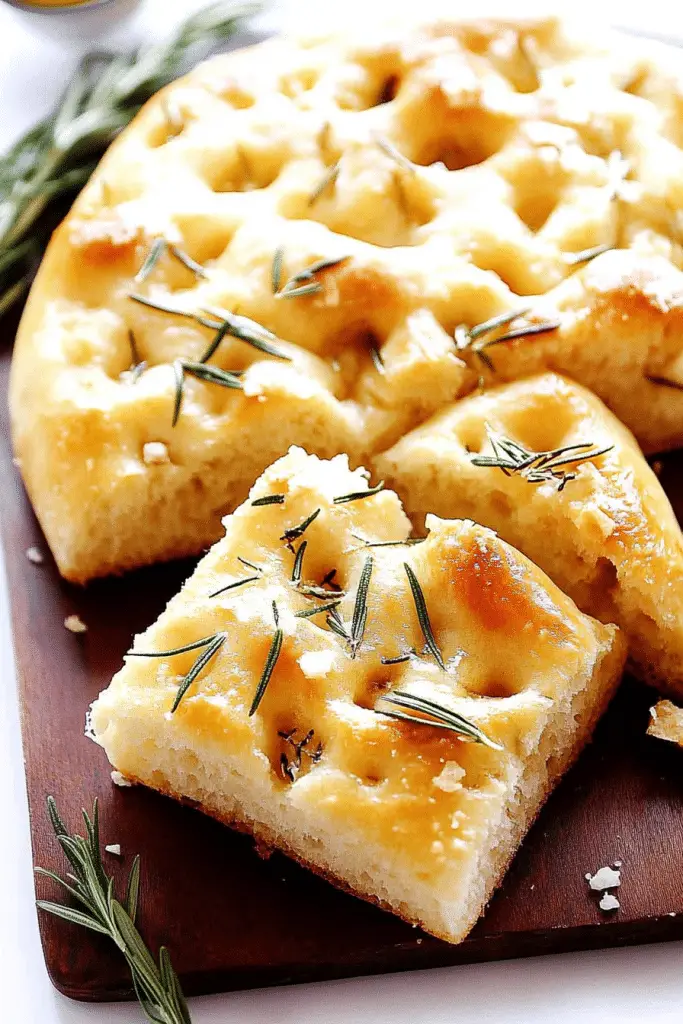
So, what exactly is this heavenly creation? Think of focaccia bread as the Italian cousin of a flatbread, but with so much more character. It’s a rustic, yeasted bread that’s typically baked in a flat pan, giving it that signature thick, airy interior and a gloriously crisp crust. The “rosemary” part is where the real magic happens for me. We stud the dough with fresh rosemary, and then drizzle it generously with olive oil and a sprinkle of Sea Salt before baking. This infuses every bite with that incredible, piney aroma and a burst of herbaceous flavor. It’s not fussy; it’s meant to be a little uneven, a little rustic, and utterly delicious. It’s the kind of bread that doesn’t need much to shine, but oh boy, does it shine!
Why you’ll love this recipe?
Honestly, where do I even begin? This Rosemary Focaccia bread recipe is a total winner for so many reasons, and I can’t wait for you to experience it. First off, the flavor. Oh, the flavor! That combination of fragrant rosemary, rich olive oil, and coarse sea salt is just *chef’s kiss*. It’s savory, a little herbal, and incredibly satisfying. It makes your whole kitchen smell like a trattoria on a Sunday afternoon. And the texture? It’s got that perfect balance of a slightly chewy crumb and a crisp, golden-brown exterior that’s just divine when you bite into it.
Then there’s the simplicity. I know “bread” can sound daunting, but this recipe is incredibly forgiving. Even if you’re a complete beginner, you’ll find it surprisingly manageable. The dough is wet and sticky, which is exactly what you want for that airy texture. You don’t need a stand mixer for this one either; your hands are perfectly capable! I often make this on a busy Saturday morning, and it’s ready to be devoured by lunch.
Cost-efficiency is another huge plus. Flour, yeast, water, salt, and Olive oil are pantry staples, and fresh rosemary is usually pretty affordable. You get restaurant-quality bread for a fraction of the price. Plus, it’s so versatile! Serve it warm with your favorite pasta dishes, alongside a big salad, as part of an appetizer board, or even just slathered with butter. It’s truly a lifesaver when you need something delicious to round out a meal or impress guests without breaking a sweat.
How do I make Rosemary Focaccia Bread?
Quick Overview
This recipe is all about patience and good olive oil! We’ll mix a simple dough, let it rise until it’s beautifully puffy, dimple it generously with our fingertips, and then bake it to golden perfection. The key is to not rush the rising process and to use plenty of good quality olive oil. It’s a hands-on but incredibly rewarding process that results in a loaf that’s both rustic and elegant.
Ingredients
For the Main Dough:
* Warm Water (about 105-115°F): 2 cups. You want it warm enough to wake up the yeast, but not so hot that it kills it. Think comfortable bathwater! Using filtered water is ideal if your tap water is heavily chlorinated, as chlorine can sometimes interfere with yeast activity. I always have a little extra water on hand just in case the flour needs it.
* Active Dry Yeast: 2 ¼ teaspoons (one standard packet). This is the magic stuff that makes our bread rise. Make sure it’s not expired! If it looks clumpy, it’s probably past its prime.
* All-Purpose Flour: 4 cups, plus more for dusting. I usually use a good quality all-purpose flour. Bread flour will give you a slightly chewier texture, which is also lovely, but AP works beautifully here.
* Salt: 1 ½ teaspoons. This is crucial for flavor and also helps control the yeast activity. Don’t skip it!
* Extra Virgin Olive Oil: ¼ cup for the dough, plus more for greasing and drizzling. This is NOT the place to skimp! A good quality, flavorful olive oil makes all the difference in focaccia. It’s what gives it that signature richness and helps create that amazing crust.
For the Topping:
* Fresh Rosemary Sprigs: 2-3 tablespoons, finely chopped. Fresh is non-negotiable here! The dried stuff just doesn’t have the same punch. I love to get a couple of fresh sprigs from the grocery store or my garden if I’m lucky enough to have one.
* Flaky Sea Salt: 1-2 teaspoons, or to taste. This is for finishing and adds a wonderful salty crunch. Maldon is my favorite, but any flaky sea salt will do.
Step-by-Step Instructions
Step 1: Preheat & Prep Pan
First things first, let’s get our pan ready. I love using a 9×13 inch baking pan for this recipe. It gives the focaccia nice even thickness. Generously grease the pan with about 2 tablespoons of olive oil. Make sure you get all the corners and sides! This prevents sticking and also helps create that wonderfully crisp bottom crust. Some people like to warm their pan slightly in the oven, but I usually just go with room temperature. It all works out!
Step 2: Mix Dry Ingredients
In a large mixing bowl, whisk together the 4 cups of all-purpose flour and 1 ½ teaspoons of salt. Just a quick whisk to combine everything evenly. It’s a simple step, but it ensures your salt is distributed throughout the dough, which is important for flavor and yeast regulation.
Step 3: Mix Wet Ingredients
In a separate medium bowl or a large liquid measuring cup, combine the warm water and the active dry yeast. Give it a gentle stir. Let it sit for about 5-10 minutes. You’re looking for it to get foamy and bubbly. If it doesn’t get foamy, your yeast might be dead, or your water wasn’t the right temperature, and you’ll need to start over with new yeast. Once it’s foamy, stir in the ¼ cup of extra virgin olive oil.
Step 4: Combine
Now for the fun part! Pour the wet ingredients into the bowl with the dry ingredients. Using a sturdy spatula or your hands, mix until just combined. The dough will be very wet and shaggy, and quite sticky. Don’t worry, this is exactly what we want! Resist the urge to add more flour; the stickiness is what gives focaccia its airy texture. Mix just until there are no dry pockets of flour remaining. Cover the bowl tightly with plastic wrap or a damp kitchen towel and let it rise in a warm place for 1 to 1 ½ hours, or until doubled in size. This is where the flavor really starts to develop!
“Packed with flavor and so simple. Exactly what I wanted from this rosemary focaccia bread!”
Step 5: Prepare Filling
While the dough is rising, finely chop your fresh rosemary. Have your flaky sea salt ready to go. This is the simplest “filling” ever, but it’s packed with flavor!
Step 6: Layer & Swirl
Once the dough has doubled, gently punch it down to release some of the air. Scrape the dough into your prepared, oiled baking pan. It will be sticky, so use oiled hands or a spatula to help coax it into the pan. Gently stretch and spread it to fill the pan as much as possible. Don’t force it; if it resists, let it rest for 5-10 minutes, then try stretching again. Now, this is the signature focaccia move: dimple the dough! Dip your oiled fingertips into the dough and press down firmly, creating little indentations all over the surface. This is where the olive oil and salt will pool. Drizzle another 2-3 tablespoons of olive oil evenly over the top, making sure some gets into those dimples. Sprinkle the chopped rosemary and flaky sea salt all over the surface. Let it rest, uncovered, for another 20-30 minutes while your oven finishes preheating.
Step 7: Bake
Preheat your oven to 425°F (220°C). Once the dough has rested and your oven is hot, place the pan in the oven. Bake for 20-25 minutes, or until the focaccia is golden brown and has a beautiful, crisp crust. The bottom should sound hollow when tapped. Keep an eye on it during the last few minutes; ovens can be so different!
Step 8: Cool & Glaze
Once baked, carefully remove the pan from the oven. If you like a little extra sheen and flavor, you can drizzle a tablespoon or two of olive oil over the hot focaccia immediately after it comes out. This makes it extra glossy and enhances the olive oil flavor. Let the focaccia cool in the pan for about 10-15 minutes before transferring it to a wire rack to cool completely. This is the hardest part – waiting!
Step 9: Slice & Serve
Once it’s cooled enough to handle (but still warm is best!), slice the rosemary Focaccia Bread into squares or rectangles using a sharp knife or a pizza cutter. You can serve it immediately, or at room temperature. The crust will be at its crispiest when it’s still warm.
What to Serve It With
This rosemary focaccia bread is incredibly versatile, making it a fantastic addition to almost any meal. It’s not just a side; it can honestly be the star of the show!
For Breakfast: Imagine tearing off a warm piece, still slightly soft in the middle, and dipping it into a perfectly brewed cup of coffee. You can even toast slices lightly and top them with a poached egg and a sprinkle of chili flakes for a simple yet elegant start to your day. It’s a far cry from your average toast!
For Brunch: This is where it truly shines! Serve it alongside your favorite brunch spread. It’s perfect for soaking up runny egg yolks, pairing with savory bacon and sausage, or accompanying a beautiful avocado toast. I like to arrange slices on a platter with some fresh fruit and a small bowl of good olive oil for dipping.
As Dessert: Don’t knock it till you try it! While it’s savory, a slightly cooled piece of focaccia, especially if you’ve added a touch of honey to the dough, can be surprisingly lovely as a light dessert. Try it with a drizzle of honey or a dollop of mascarpone cheese. It’s an unexpected but delightful way to end a meal.
For Cozy Snacks: This is probably how we eat it most often at my house. A warm slice, fresh from the oven, with a generous smear of butter or dipped in good quality olive oil and balsamic vinegar is pure comfort. It’s also fantastic for making mini pizzas; just add your favorite toppings and pop it back in the oven for a few minutes. My kids often request it as an after-school snack, and it never disappoints.
Top Tips for Perfecting Your Rosemary Focaccia Bread
Over the years, I’ve learned a few tricks that have made my focaccia consistently amazing. These little nuggets of wisdom will help you achieve that perfect texture and flavor every single time.
Zucchini Prep: Wait, did I mention zucchini? Oh my goodness, I got so carried away talking about rosemary, I completely forgot one of my favorite additions! If you want to add an extra layer of moisture and subtle sweetness, you can add about 1 cup of grated zucchini to the dough along with the flour. The trick is to squeeze out as much moisture as possible from the grated zucchini first. Use paper towels or a clean kitchen towel to wring out every last drop. This prevents your dough from becoming too wet and ensures a better crumb structure. It adds a beautiful tenderness and a hint of green!
Mixing Advice: The key to a light and airy focaccia is a wet dough and not overmixing. When you combine the wet and dry ingredients, mix just until no dry flour remains. The dough should be shaggy and sticky. Resist the urge to add more flour, even if it seems too wet. This stickiness is what creates those glorious air pockets. When you’re dimpling, don’t be afraid to really press down; this creates those lovely wells for the olive oil and salt.
Swirl Customization: While the rosemary is classic, don’t be afraid to experiment! You can add a pinch of red pepper flakes to the olive oil drizzle for a little heat, or even some thinly sliced garlic. For a sweeter note, a tiny drizzle of honey over the rosemary before baking is lovely. The important thing is to distribute your toppings evenly across the surface so you get flavor in every bite.
Ingredient Swaps: While all-purpose flour works beautifully, if you want a chewier texture, try using bread flour. It has a higher protein content, which develops more gluten. For the olive oil, use the best quality extra virgin olive oil you can find. It really does make a difference in flavor. If you can’t find flaky sea salt, regular fine sea salt will work, but use it a little more sparingly, as it’s easier to over-salt.
“I don’t know if I’ve ever eaten a better rosemary focaccia bread. The rub alone is wonderful, but the sauce??? Over the top!”
Baking Tips: Make sure your oven is fully preheated. A hot oven is crucial for getting that initial puff and creating a crispy crust. If your oven tends to bake unevenly, you might want to rotate the pan halfway through baking. When testing for doneness, the top should be golden brown and the bottom should sound hollow when tapped. If the top is browning too quickly, you can always loosely tent it with foil.
Glaze Variations: I love the extra drizzle of olive oil right after baking, but you can also skip it if you prefer a less oily finish. Some people like to brush it with a little melted butter for a richer flavor, though I find the olive oil is more traditional and complements the rosemary beautifully. Just be sure to do this while the bread is still hot!
Storing and Reheating Tips
Proper storage is key to keeping your delicious rosemary focaccia bread tasting its best. Since it’s best served fresh, I always try to aim for that! But if you have leftovers, here’s what I do:
Room Temperature: Once the focaccia has cooled completely, I like to store it at room temperature in an airtight container or wrapped tightly in plastic wrap, and then in a resealable bag if you want extra protection. It’s usually best consumed within 1-2 days. After that, the crust can start to soften a bit, and it’s not quite as glorious.
Refrigerator Storage: If you live in a particularly warm or humid climate, or if you need to store it for a bit longer (up to 3-4 days), the refrigerator is your best bet. Wrap it tightly in plastic wrap, and then place it in an airtight container. The texture might change slightly, becoming a bit denser, but it’s still perfectly good. I often find myself toasting it to bring back some of that crispness.
Freezer Instructions: For longer storage, freezing is a fantastic option! Once the focaccia is completely cool, wrap individual slices or the whole loaf very tightly in plastic wrap, then in aluminum foil. You can also place the wrapped bread in a freezer-safe bag. It should stay good in the freezer for up to 2-3 months. To thaw, simply unwrap it and let it come to room temperature. For a crispier texture, you can pop it in a low oven for a few minutes.
Glaze Timing Advice: If you plan on storing your focaccia for more than a day, I’d recommend skipping the extra olive oil drizzle immediately after baking and just letting it cool as is. You can always add a little fresh olive oil and a sprinkle of salt when you reheat it. This helps maintain the crispness of the crust.
Frequently Asked Questions
Final Thoughts
There you have it – my beloved rosemary focaccia bread recipe! It’s one of those recipes that I keep coming back to, not just because it’s delicious and impressive, but because it always brings a little warmth and joy to my table. The aroma that fills your home while it bakes is truly something special, and the taste… well, the taste speaks for itself. It’s rustic, it’s flavorful, and it’s surprisingly easy to achieve those incredible results.
If you’re looking for other wonderful bread recipes, you might also enjoy my easy sourdough starter guide or my no-knead artisan bread. Both offer a different but equally rewarding baking experience. I truly hope you give this rosemary focaccia bread a try. Don’t be intimidated by the dough; embrace its stickiness and let it work its magic. I can’t wait to hear how yours turns out! Please leave a comment below with your thoughts, any variations you tried, or even just to say hello. Happy baking!

Rosemary Focaccia Bread
Ingredients
Main Ingredients
- 3.5 cups all-purpose flour
- 1.5 teaspoons instant yeast
- 1.5 teaspoons salt
- 1.25 cups warm water around 105-115°F (40-46°C)
- 4 tablespoons olive oil plus more for greasing
- 2 tablespoons fresh rosemary chopped
- 1 teaspoon flaky sea salt for topping
Instructions
Preparation Steps
- In a large bowl, whisk together the flour, yeast, and salt.
- Add the warm water and 2 tablespoons of olive oil. Mix with a wooden spoon or your hands until a shaggy dough forms.
- Turn the dough out onto a lightly floured surface and knead for 5-7 minutes, or until smooth and elastic. If the dough is too sticky, add a little more flour, a tablespoon at a time.
- Lightly grease a clean bowl with olive oil. Place the dough in the bowl, turning to coat. Cover with plastic wrap or a damp kitchen towel and let rise in a warm place for 1 to 1.5 hours, or until doubled in size.
- Grease a 9x13 inch baking pan with 2 tablespoons of olive oil. Gently punch down the dough and press it into the prepared pan, stretching it to fill the corners.
- Cover the pan and let the dough rise for another 30 minutes.
- Preheat oven to 400°F (200°C).
- Drizzle the remaining 2 tablespoons of olive oil over the dough. Use your fingertips to make dimples all over the surface of the dough.
- Sprinkle the chopped rosemary and flaky sea salt over the top.
- Bake for 20-25 minutes, or until golden brown and cooked through.
- Let cool in the pan for a few minutes before transferring to a wire rack to cool completely, or serve warm.


