Oh, you guys. I’ve been practically vibrating with excitement to share this recipe with you all. It’s one of those recipes that feels like a warm hug, a sweet memory, and pure magic all rolled into one. If you’ve ever caught the scent of something utterly divine wafting from a kitchen and thought, “That smells like pure happiness,” then this is that smell. My Grandma’s Raspberry Swirl Cookies! Honestly, if I had to pick just one cookie to have on hand for any occasion, these would be it. They’re like a soft, slightly chewy sugar cookie that’s been kissed by sunshine and drizzled with a vibrant raspberry ribbon. They’re not as fussy as a shortbread, not as crumbly as a biscotti, and definitely not as dense as a chocolate chip cookie (though I love those too!). These raspberry swirl cookies are just…perfect. They’re the cookies I sneak into my own kids’ lunchboxes, the ones I bring to neighborhood potlucks, and the ones that magically disappear the fastest. If you’ve ever tried my Lemon Ricotta Cookies, these have a similar tender crumb, but with that incredible fruity zing. Get ready, because your cookie jar is about to get a whole lot happier!
Thank you for reading this post, don't forget to subscribe!What are Raspberry Swirl Cookies?
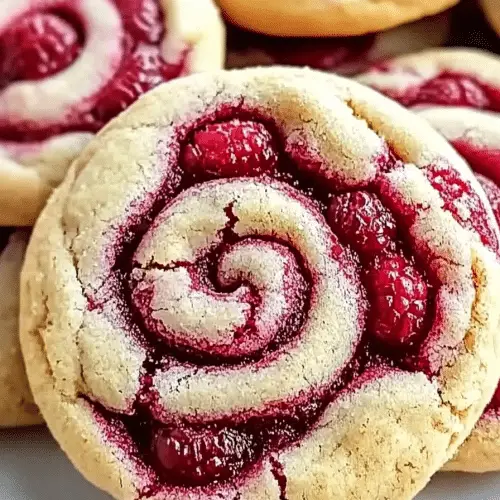
So, what exactly are these little wonders? Think of them as a delightful mashup. At their heart, they’re a soft, tender cookie base that’s subtly sweet. But the real showstopper is the swirl of bright, tangy raspberry filling that weaves its way through each cookie. It’s not just a topping; it’s integrated, creating these gorgeous marble-like patterns that make each cookie a tiny piece of art. The name itself, “Raspberry Swirl Cookies,” perfectly captures their essence. It’s all about that beautiful contrast – the mellow, comforting sweetness of the cookie dough meeting the punchy, slightly tart burst of raspberry. It’s simple, really. It’s essentially a really good Sugar Cookie recipe that gets a whole lot more interesting with a vibrant fruit swirl. It’s the kind of cookie that makes you close your eyes for a second with the first bite. It’s uncomplicated joy in cookie form.
Why you’ll love this recipe?
There are so many reasons why I know you’re going to fall head-over-heels for these raspberry Swirl Cookies, just like I have. First off, the flavor is just out of this world. You get that comforting, buttery sweetness from the cookie base, and then BAM! A little burst of bright, slightly tart raspberry cuts through it perfectly. It’s a flavor combination that just sings. It’s not too sweet, which I really appreciate, and the raspberry adds this fantastic dimension that keeps you coming back for more.
Then there’s the simplicity. I know sometimes baking can feel like a huge undertaking, but honestly, this recipe is surprisingly straightforward. The dough comes together quickly, and the swirling is more fun than complicated. It’s the kind of recipe that’s perfect for a lazy weekend afternoon, but it’s also manageable on a slightly busier weeknight if you’re craving something homemade and delicious. And let’s talk about the cost! The ingredients are all pretty standard pantry staples – flour, sugar, butter, eggs, and some jam. You probably have most of them already! It’s a wonderfully budget-friendly way to create something truly special that tastes like it came from a fancy bakery.
What I love most about these raspberry swirl cookies, though, is their versatility. They’re fantastic on their own, of course, but they also pair beautifully with a glass of milk, a hot cup of coffee, or even a dollop of Whipped Cream if you’re feeling extra indulgent. They’re elegant enough for a special occasion but comforting enough for a Tuesday afternoon. They’re also incredibly forgiving! I’ve made them a million times, and they always turn out wonderfully. They’re just one of those recipes that feels like a guaranteed win. If you’ve enjoyed my classic butter cookies or my jam thumbprints, you’re going to adore these. They offer that familiar comfort with a delightful twist!
How do I make Raspberry Swirl Cookies?
Quick Overview
Here’s the gist of how these beauties come together: you’ll cream your butter and sugar, mix in your wet ingredients, then gently combine with your dry. Separately, you’ll whip up a quick, vibrant raspberry filling. Then, it’s all about layering that dough and filling, giving it a gentle swirl, and baking until they’re golden and fragrant. The beauty of this method is that it creates those stunning swirls without any fuss. It’s designed for maximum flavor and visual appeal with minimal effort, ensuring you get those perfect raspberry ribbons every time.
Ingredients
For the Main Batter:
2 ½ cups all-purpose flour, plus more for dusting: I always use a good quality all-purpose flour. Make sure it’s not self-rising! If you can measure it by weight, even better, but spooning it into your measuring cup and leveling it off works perfectly fine.
1 teaspoon baking powder: This gives our cookies just a little lift, keeping them tender and not too dense.
½ teaspoon salt: Crucial for balancing sweetness and bringing out all the other flavors.
1 cup (2 sticks) unsalted butter, softened: Make sure it’s properly softened – not melted, but yielding to the touch. This is key for a creamy, well-emulsified dough. I prefer unsalted so I can control the salt level myself.
1 cup granulated sugar: For that classic cookie sweetness. Don’t be tempted to skimp here; it contributes to texture too!
1 large egg: Room temperature eggs incorporate better into the batter, so take it out of the fridge about 30 minutes before you start.
1 teaspoon pure vanilla extract: The backbone of most sweet baked goods. Use the real stuff!
For the Filling:
1 cup fresh or frozen raspberries: If using frozen, no need to thaw! They’ll break down beautifully as they cook.
¼ cup granulated sugar: Adjust this slightly depending on how sweet your raspberries are.
1 tablespoon cornstarch: This is our thickening agent, making sure the Raspberry Swirl stays put and doesn’t run everywhere when baking.
“I don’t know if I’ve ever eaten a better Raspberry swirl cookies. The rub alone is wonderful, but the sauce??? Over the top!”
1 teaspoon fresh lemon juice: A little zing to brighten up the raspberry flavor. It really makes a difference!
For the Glaze (Optional, but highly recommended!):
1 cup powdered sugar: Sifted to avoid lumps.
2-3 tablespoons milk or cream: Milk works great, but cream makes it extra luscious. Start with 2 tablespoons and add more until you reach your desired drizzling consistency.
½ teaspoon pure vanilla extract: For a hint of extra flavor.
Step-by-Step Instructions
Step 1: Preheat & Prep Pan
First things first, let’s get our oven ready. Preheat it to 350°F (175°C). While the oven heats up, line a couple of baking sheets with parchment paper. This is a total game-changer for easy cleanup and preventing cookies from sticking. You can also lightly grease your pans if you don’t have parchment, but parchment is really my go-to. Make sure your baking sheets are cool before you start placing the cookies on them; a warm sheet can start melting the dough before it even hits the oven.
Step 2: Mix Dry Ingredients
In a medium bowl, whisk together your all-purpose flour, baking powder, and salt. Give it a good whisk to ensure everything is evenly distributed. This prevents pockets of salt or baking powder in your cookies, which nobody wants! I usually do this first so it’s all ready to go when we need it.
Step 3: Mix Wet Ingredients
In a large bowl, beat the softened unsalted butter and granulated sugar together until the mixture is light, fluffy, and pale in color. This usually takes about 3-5 minutes with an electric mixer. This creaming process is super important because it incorporates air, which makes for a tender cookie. Then, beat in the room-temperature egg and the vanilla extract until just combined. Don’t overmix at this stage; we just want everything incorporated smoothly.
Step 4: Combine
Gradually add the dry ingredients to the wet ingredients, mixing on low speed (or by hand with a spatula) until just combined. Stop mixing as soon as you no longer see streaks of flour. Overmixing at this stage can develop the gluten too much, resulting in tough cookies, and we definitely don’t want that! The dough should be soft but hold its shape.
Step 5: Prepare Filling
While the dough rests for a moment, let’s make that glorious raspberry filling. In a small saucepan, combine the raspberries (fresh or frozen), sugar, cornstarch, and lemon juice. Cook over medium heat, stirring constantly, until the mixture thickens and the raspberries have broken down into a lovely jam-like consistency. This should take about 5-8 minutes. Once it’s thickened, remove it from the heat and let it cool completely. It will thicken up even more as it cools.
Step 6: Layer & Swirl
Now for the fun part! Divide the cookie dough in half. On a lightly floured surface, roll out one half of the dough into a rectangle, roughly 10×8 inches and about ¼ inch thick. Spread half of the cooled raspberry filling evenly over the dough, leaving a small border (about ½ inch) along one of the long edges. Carefully roll up the dough like a jelly roll, starting from the long edge opposite the one you left bare. Pinch the seam to seal it. Repeat with the other half of the dough and the remaining raspberry filling. You’ll now have two raspberry-filled dough logs. Wrap each log tightly in plastic wrap and chill in the refrigerator for at least 30 minutes (or up to 2 days). This chilling step is crucial; it firms up the dough, making it much easier to slice cleanly.
Step 7: Bake
Once the dough logs are well-chilled, unwrap them. Using a sharp knife, slice each log into ½-inch thick cookies. Place the sliced cookies onto your prepared baking sheets, leaving about 2 inches between them as they will spread slightly. Bake for 12-15 minutes, or until the edges are lightly golden and the centers look set. The exact time will depend on your oven, so keep an eye on them! You want them tender, not crisp.
Step 8: Cool & Glaze
Let the cookies cool on the baking sheets for about 5 minutes before transferring them to a wire rack to cool completely. While they’re cooling, you can whip up the optional glaze if you’re using it. Whisk together the sifted powdered sugar, vanilla extract, and 2 tablespoons of milk or cream. Add more liquid, a teaspoon at a time, until it reaches a drizzling consistency. Once the cookies are completely cool, drizzle the glaze over them in a pretty pattern. Let the glaze set before serving or storing.
Step 9: Slice & Serve
These raspberry swirl cookies are absolutely divine when they’re still slightly warm, with that gooey center and slightly firm edge. However, they’re also fantastic once they’ve cooled and the glaze has set. I usually slice them with a sharp knife, but if you find they’re a bit soft, a serrated knife works wonders. Serve them on a pretty platter, with a glass of cold milk, or alongside your afternoon tea. They look so inviting with those beautiful swirls!
What to Serve It With
These raspberry swirl cookies are pretty spectacular on their own, but they also play well with a variety of beverages and other treats, depending on the occasion.
For Breakfast: Honestly, these are a treat any time of day, but they make a lovely addition to a leisurely weekend breakfast or brunch. Pair them with a steaming mug of your favorite coffee or a refreshing glass of orange juice. They’re a little sweet indulgence that feels special without being over the top.
For Brunch: Elevate your brunch spread by arranging these on a tiered stand alongside fruit salads, pastries, and quiches. A mimosa or a delicate herbal tea would be a perfect beverage companion. Their pretty swirls add a touch of elegance to any table.
As Dessert: If you’re looking for a lighter dessert after a hearty meal, these are perfect. They’re lovely served with a scoop of vanilla bean ice cream or a dollop of lightly sweetened whipped cream. A small plate of these with a cup of espresso or a dessert wine is just divine.
For Cozy Snacks: My personal favorite! These are the ultimate comfort food cookie. They’re perfect for an afternoon pick-me-up with a tall glass of cold milk. They’re also fantastic for a late-night craving when you want something sweet but don’t want to bake a whole cake. My kids adore them after school with their milk, and I have to admit, I often snag one (or two!) myself.
My family tradition is to have these with hot chocolate on a snowy day, or with lemonade on a warm summer afternoon. They truly fit any mood and any season.
Top Tips for Perfecting Your Raspberry Swirl Cookies
After making these countless times, I’ve picked up a few little tricks that I think will help you achieve cookie perfection. These aren’t complicated secrets, just little bits of wisdom learned along the way!
Raspberry Prep: If you’re using frozen raspberries for the filling, don’t be tempted to thaw them first. They’ll break down much better when cooked directly from frozen, helping to create that lovely thick jam consistency without needing extra cooking time. Also, don’t skip the cornstarch! It’s the secret to a filling that stays put and creates those beautiful, defined swirls, rather than a runny mess.
“Packed with flavor and so simple. Exactly what I wanted from this Raspberry swirl cookies!”
Mixing Advice: The key to a tender cookie is not to overmix the dough once you add the flour. Mix until just combined, meaning you no longer see dry streaks of flour. Overmixing develops gluten, which can make your cookies tough and chewy in a less-than-ideal way. A slightly shaggy dough is better than a completely smooth, overworked one at this stage.
Swirl Customization: When you’re rolling up the dough logs, don’t worry about making perfectly uniform layers. A little variation in the filling thickness is actually what creates the most interesting and beautiful swirl patterns. For a more dramatic swirl, you can gently twist the log a bit before wrapping and chilling, but be careful not to overwork it. Pressing the seam of the jelly roll gently with your fingers helps ensure it stays sealed during baking.
Ingredient Swaps: If you don’t have raspberries, other berries like strawberries or even a good quality fruit jam (like apricot or cherry) can work for the filling. Just be mindful that different fruits have different moisture and sugar content, so you might need to adjust the cornstarch or sugar slightly. For the glaze, if you’re not a fan of milk or cream, water works in a pinch, but the texture won’t be quite as rich. For a dairy-free option, a good plant-based milk like almond or oat milk works wonderfully!
Baking Tips: Keep an eye on your cookies during the last few minutes of baking. Ovens can vary so much, and you want to pull them out when the edges are just starting to turn golden. The centers should look set but still soft. They will continue to bake a little on the hot baking sheet after you remove them from the oven. I always rotate my baking sheets halfway through the baking time to ensure even cooking, especially if my oven tends to have hot spots.
Glaze Variations: If you want a less sweet glaze, you can use less powdered sugar or even just a tiny bit of lemon juice mixed with powdered sugar for a tangy finish. For a pop of color, a tiny drop of food coloring can be added to the glaze, but I personally love the natural look of the white glaze against the raspberry swirl.
Storing and Reheating Tips
These raspberry swirl cookies are wonderful fresh, but they also store beautifully, which makes them perfect for making ahead of time.
Room Temperature: Once the cookies are completely cooled and any glaze has set, you can store them in an airtight container at room temperature. They’ll stay fresh and delicious for about 3-4 days. I like to place a piece of parchment paper between layers if I’m stacking them to prevent them from sticking, especially if you’ve used a glaze. Just make sure the container is truly airtight to keep them from drying out.
Refrigerator Storage: If your kitchen is particularly warm or humid, or if you want to extend their freshness a bit longer, you can store them in the refrigerator. They should last for about 5-7 days this way. Again, an airtight container is key. They are wonderfully refreshing when eaten straight from the fridge, especially on a hot day. The texture becomes a bit firmer.
Freezer Instructions: These cookies freeze exceptionally well! Once completely cooled (and glazed, if using), you can freeze them for up to 2-3 months. The best way to freeze them is to place them in a single layer on a baking sheet and freeze until firm, then transfer them to a freezer-safe airtight container or a heavy-duty freezer bag. This prevents them from sticking together. To thaw, simply remove them from the freezer and let them come to room temperature on a wire rack. If they seem a little dry after thawing, you can gently warm them for a few seconds in the microwave or toast them lightly in a toaster oven.
Glaze Timing Advice: If you plan to store your cookies for more than a day or two, I recommend glazing them just before serving or when you’re ready to enjoy them. Glaze can sometimes become sticky or start to weep if stored for extended periods, especially in humid conditions. If freezing, it’s usually best to freeze the cookies plain and add the glaze after they’ve thawed.
Frequently Asked Questions
Final Thoughts
There you have it – my Grandma’s famous raspberry swirl cookies! I truly hope you give these a try. They’re more than just a recipe to me; they’re a connection to my childhood, a source of joy, and proof that simple ingredients can create something truly magical. The way the soft cookie dough mingles with that vibrant raspberry swirl is just pure bliss. They’re not too sweet, perfectly tender, and always a crowd-pleaser. They’re the kind of cookies that make people ask for the recipe, and that’s the best compliment a baker can get, right?
If you enjoy these raspberry swirl cookies, you might also like my other fruit-filled bakes, like my classic Apple Crumble or my Strawberry Rhubarb Pie. They share that same focus on fresh, bright flavors and comforting textures.
I can’t wait to hear what you think! Please leave a comment below with your thoughts, any variations you tried, or just to say hello. And if you snap a picture of your beautiful raspberry swirl cookies, be sure to tag me on social media – I’d absolutely love to see them! Happy baking, everyone!
Raspberry swirl cookies
Ingredients
Main Ingredients
- 2.5 cup all-purpose flour
- 0.5 teaspoon baking soda
- 0.25 teaspoon salt
- 1 cup unsalted butter, softened
- 1 cup granulated sugar
- 0.5 teaspoon vanilla extract
- 1 large egg
- 0.5 cup raspberry jam or preserves
Instructions
Preparation Steps
- In a medium bowl, whisk together flour, baking soda, and salt.
- In a large bowl, cream together the softened butter and granulated sugar until light and fluffy.
- Beat in the vanilla extract and the egg until well combined.
- Gradually add the dry ingredients to the wet ingredients, mixing until just combined. Do not overmix.
- Divide the dough in half. Flatten each half into a disc, wrap in plastic wrap, and chill in the refrigerator for at least 30 minutes.
- Preheat your oven to 350°F (175°C). Line baking sheets with parchment paper.
- On a lightly floured surface, roll out one disc of dough into a rectangle, about 1/4 inch thick.
- Spread half of the raspberry jam evenly over the surface of the dough, leaving a small border.
- Carefully roll up the dough from the long edge to create a log. Repeat with the second disc of dough and the remaining jam.
- Slice the logs into 1/4-inch thick rounds. Place the cookies on the prepared baking sheets.
- Bake for 10-12 minutes, or until the edges are lightly golden brown.
- Let the cookies cool on the baking sheets for a few minutes before transferring them to a wire rack to cool completely.


