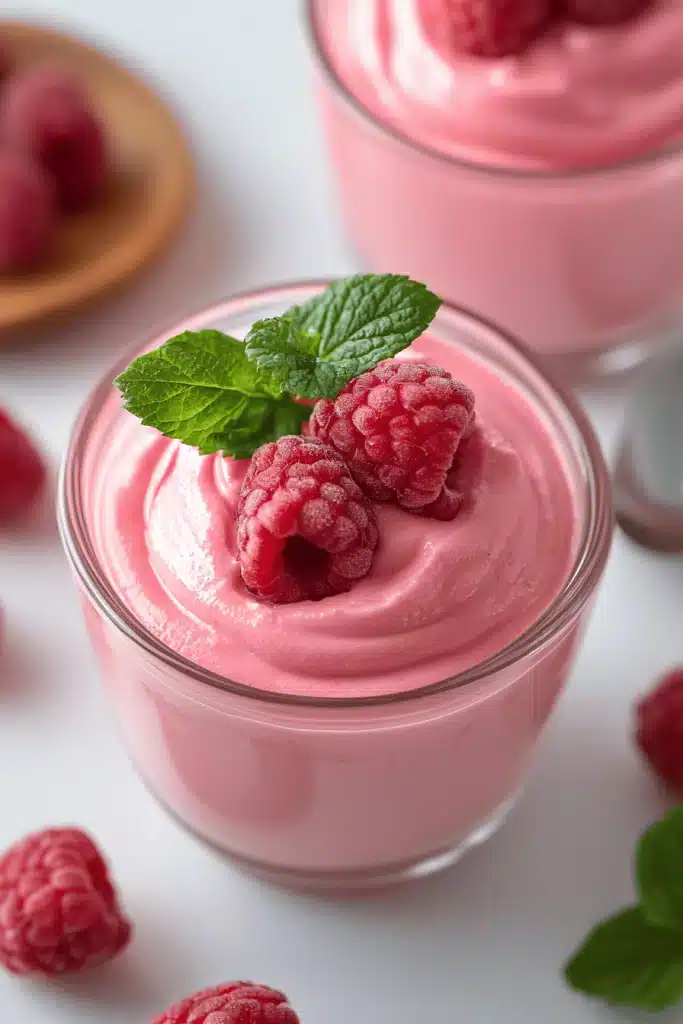
There are some flavors that just transport you back in time, aren’t there? For me, the smell of simmering raspberries is pure magic. It takes me straight back to my grandma’s kitchen, a tiny, sun-drenched room where she’d spend hours on summer afternoons turning baskets overflowing with ruby-red berries into the most incredible Raspberry Jam. This wasn’t just jam; it was liquid sunshine, a little jar of pure joy. I remember sneaking spoonfuls when she wasn’t looking, the sweet-tart explosion on my tongue. Now, every time I make this raspberry jam recipe, I feel like she’s right there with me, guiding my hands. It’s so much more than just a recipe; it’s a legacy of love. If you’ve ever found yourself staring at a beautiful bounty of raspberries and wondered what to do with them, or if you’re just craving that classic, homemade taste that store-bought just can’t replicate, then you’ve come to the right place. This raspberry jam recipe is my absolute favorite, and I can’t wait to share it with you.
Thank you for reading this post, don't forget to subscribe!What is raspberry jam?
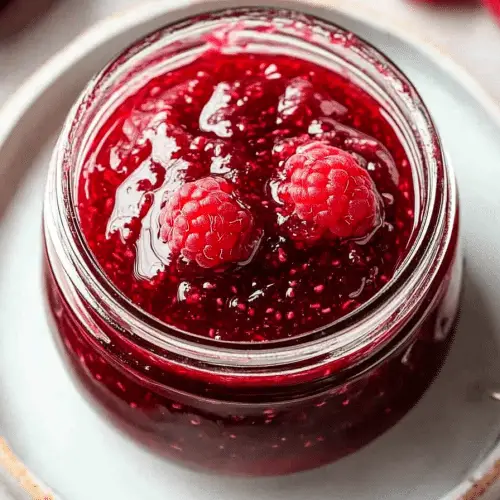
So, what exactly is this glorious concoction we’re talking about? At its heart, raspberry jam is a simple preserve made from fresh raspberries, sugar, and usually a touch of pectin or lemon juice to help it set. Think of it as the quintessential sweet spread that’s been gracing breakfast tables and dessert plates for generations. It’s that thick, ruby-red, jewel-like spread that’s just begging to be slathered on toast, swirled into yogurt, or dolloped on scones. The name itself, “Raspberry Jam,” is so straightforward, yet it conjures up images of sunshine, summer gardens, and the comforting aroma of fruit bubbling away on the stovetop. It’s essentially the soul of the raspberry, concentrated and preserved, ready to bring a burst of fruity goodness to anything it touches. It’s a classic for a reason, and this recipe just amplifies that classic charm.
Why you’ll love this recipe?
Oh, where do I even begin with why this raspberry jam recipe is so special? Let me count the ways! First and foremost, the FLAVOR. It’s an absolute explosion of pure raspberry goodness. It’s not overly sweet, which I really appreciate, allowing the natural tartness and vibrant fruitiness of the raspberries to truly shine through. It’s that perfect balance that makes you reach for just “one more bite.” Then there’s the SIMPLICITY. Honestly, I used to be intimidated by making jam, thinking it was some complex culinary art. But this recipe? It’s surprisingly straightforward. Once you get the hang of it, it’s incredibly rewarding and far easier than you might imagine. The ingredients are minimal, which leads me to my next point: COST-EFFICIENCY. Using fresh, seasonal raspberries and basic pantry staples like sugar makes this an incredibly budget-friendly way to enjoy a gourmet-tasting treat. And VERSATILITY! This isn’t a jam that just lives in your pantry. It’s perfect on warm, crusty bread, of course, but I also love swirling it into my morning oatmeal, topping pancakes or waffles, using it as a filling for cakes or tarts, or even pairing it with a sharp cheese board. It’s truly a kitchen chameleon! What I love most about this particular raspberry jam recipe, though, is the sentimental value. It connects me to my grandma and the joy she found in simple, homemade things. It’s a little bit of history in every spoonful. If you enjoyed my Strawberry Rhubarb Pie recipe.What are some of the best fruit jams?
How to Make Raspberry Jam
Quick Overview
Making this raspberry Jam Recipe is a beautifully simple process that transforms fresh berries into a spreadable delight. You’ll start by gently cooking down the raspberries with sugar and a touch of lemon juice to help activate the natural pectin in the fruit and enhance its flavor. The key is to cook it until it reaches that perfect, thick consistency that coats the back of a spoon. We’ll then transfer it to sterilized jars, seal them up, and have delicious homemade raspberry jam ready to enjoy or preserve for later. It’s a surprisingly quick process, and the aroma that fills your kitchen is simply intoxicating!
Ingredients
For the Main Jam:
4 cups fresh raspberries (about 2 pints) – Make sure they’re ripe but not mushy. If you can find local berries, even better! Their flavor is unbeatable.
2 cups granulated sugar – Standard white sugar is best here for a clean flavor and good set. You can experiment with less if you prefer it tarter, but don’t go too low or it might not set properly.
2 tablespoons fresh lemon juice – This isn’t just for flavor; it helps the pectin do its job and brightens up the berry taste.
Step-by-Step Instructions
Step 1: Prepare the Berries & Pot
First things first, gently rinse your raspberries and pick out any leaves or stems. If they’re a little dirty, a gentle rinse under cool water is all they need. Pat them dry carefully with a paper towel. Grab your largest, heaviest-bottomed saucepan or pot. A wide, shallow pot is actually ideal because it allows for faster evaporation, meaning less cooking time and brighter flavor. I always use my trusty Le Creuset pot for this; it distributes heat so evenly.
“I don’t know if I’ve ever eaten a better Raspberry Jam Recipe. The rub alone is wonderful, but the sauce??? Over the top!”
Step 2: Combine Berries and Sugar
In your prepared pot, combine the 4 cups of fresh raspberries and the 2 cups of granulated sugar. Give it a gentle stir to coat the berries. Now, here’s a little tip from my grandma: let this mixture sit for about 15-30 minutes. This time allows the sugar to start drawing out the juices from the raspberries, creating a lovely syrupy base before you even turn on the heat.
Step 3: Cook the Mixture
Place the pot over medium-high heat. Stir occasionally as the mixture heats up. You’ll see the sugar dissolving and the raspberries starting to break down. Bring it to a rolling boil. Once it’s boiling vigorously, reduce the heat slightly to a strong simmer, but keep it bubbling away. This is where the magic really happens. Stir more frequently now to prevent scorching.
Step 4: Add Lemon Juice and Skim
After about 10-15 minutes of simmering, add the 2 tablespoons of fresh lemon juice. Stir it in well. You’ll notice a foamy layer forming on the surface of the jam. This is called scum, and it’s perfectly normal. Use a spoon or a fine-mesh skimmer to gently remove and discard as much of this foam as you can. This step helps give your jam a clearer, more polished appearance. It also helps with the final texture.
Step 5: Cook to Setting Point
Continue to simmer and stir, stirring more frequently as the jam thickens. This is the most crucial part. You’re looking for the jam to reach the “setting point.” How do you know? There are a couple of tricks. One is the “wrinkle test”: put a small plate in the freezer before you start cooking. When you think the jam is ready, spoon a tiny bit onto the cold plate, wait 30 seconds, then push it gently with your finger. If it wrinkles, it’s set! Another visual cue is the way the jam drips off the spoon. It should be thick and syrupy, forming a thick ribbon that slowly breaks apart rather than running off in a thin stream. This usually takes another 15-25 minutes, but can vary. Be patient here!
Step 6: Test Consistency
I always do this when the jam looks thick enough, maybe around the 20-minute mark after adding the lemon juice. The cold plate test is my go-to. I’ve ruined batches by taking them off too early, only to have runny jam, and I’ve certainly overcooked it once or twice, ending up with something closer to candy! So, trust me on this one – the cold plate method is your friend. You want it thick enough to hold its shape but still spreadable when warm.
Step 7: Sterilize Jars
While the jam is cooking, it’s essential to have your jars sterilized. Wash your jars and lids thoroughly in hot, soapy water and rinse well. Place them in a pot of boiling water for at least 10 minutes, or run them through the sanitize cycle in your dishwasher. Keep them warm until you’re ready to fill them. This is crucial for preventing spoilage and ensuring your jam lasts.
Step 8: Fill and Seal Jars
Once your jam has reached the setting point, carefully ladle the hot jam into your warm, sterilized jars. Leave about a quarter-inch of headspace at the top. Wipe the rims clean with a damp cloth – this ensures a good seal. Place the lids on, screwing the bands on until they are fingertip tight. Don’t overtighten. As the jam cools, the lids should “pop” down, indicating a vacuum seal. If a lid doesn’t seal within 24 hours, just pop that jar in the fridge and enjoy it first!
Step 9: Cool and Store
Let the jars cool completely on the counter. You’ll hear those satisfying little pops as the lids seal. Once cooled, you can either store them in the refrigerator for immediate use (it will last about 3-4 weeks) or process them in a water bath canner for longer shelf stability (following proper canning guidelines, of course). I usually make two batches, so I can keep one jar out and seal the other for later.
“Packed with flavor and so simple. Exactly what I wanted from this Raspberry Jam Recipe!”
What to Serve It With
This homemade raspberry jam recipe is truly a kitchen superhero, ready to elevate so many meals and snacks. For BREAKFAST, it’s an absolute dream. Imagine a slice of toasted sourdough or a warm English Muffin, slathered generously with this vibrant jam. It’s also divine dolloped over fluffy pancakes or light, airy waffles. If you’re feeling fancy, try swirling it into Greek yogurt with a sprinkle of granola for a beautiful and delicious start to your day. When it comes to BRUNCH, this raspberry jam really shines. It’s the perfect accompaniment to homemade scones or biscuits, adding a burst of fruity sweetness. Serve it alongside a cheese board with some mild or sharp cheeses; the contrast is divine. It also makes an elegant filling for crepes! As a DESSERT, it’s surprisingly versatile. It can be used as a simple yet stunning filling for a classic Victoria sponge cake, or spooned over vanilla ice cream or panna cotta. It’s also fantastic on shortbread cookies. For those COZY SNACKS, especially on a chilly afternoon, there’s nothing quite like a warm piece of toast with this jam. It’s comforting, familiar, and utterly delicious. My kids also love it spread on rice cakes, which is a nice, lighter option when they’re asking for something sweet at 10 pm but I don’t want them filling up on cookies.
Top Tips for Perfecting Your Raspberry Jam
I’ve made this raspberry Jam Recipe more times than I can count, and through a few early mishaps (hello, runny jam!), I’ve picked up some valuable tricks that make all the difference. First, ZUCCHINI PREP, oh wait, wrong recipe! Haha! Let’s talk RASPBERRY PREP: The most important thing is using ripe, good-quality berries. If your berries are a bit watery, giving them a gentle pat dry after washing is key. Don’t overwork them, though; we want them to break down nicely. For MIXING ADVICE, the biggest takeaway is to avoid over-stirring once it starts to thicken. This can actually prevent it from setting properly. Stir just enough to prevent sticking. For SWIRL CUSTOMIZATION, if you’re making a more decorative dessert, you can reserve some whole or slightly mashed raspberries and swirl them in right before filling the jars for a more rustic look, but for a classic smooth jam, just let it cook down. INGREDIENT SWAPS are mostly a no-go for classic jam, as the sugar ratio is crucial for preservation and setting. However, if you’re adventurous, you could try a small batch with a little less sugar, but be prepared for a softer set and shorter shelf life. For BAKING TIPS, not baking in this case, but for COOKING TIPS: Use a wide pot! This is probably my number one tip for jam making because it helps the liquid evaporate faster, meaning less cooking time and a brighter, fresher berry flavor. Don’t rush the setting point; patience is rewarded! For GLAZE VARIATIONS, there isn’t a glaze in this recipe, but if you were making something like a tart, a simple sugar glaze or even a dusting of powdered sugar would be lovely. Remember, consistency is key, so keep testing that set! I learned the cold plate trick after one too many jars of “raspberry syrup.”
Storing and Reheating Tips
Proper storage is essential to keep your beautiful homemade raspberry jam tasting its best. If you’ve sealed your jars properly using the water bath method, they can be stored in a cool, dark pantry for up to a year. That said, the flavor is usually optimal within the first 6-8 months. Once opened, always refrigerate your jam. A refrigerator jar will stay fresh and delicious for about 3 to 4 weeks. Make sure to always use a clean spoon when dipping into the jar to avoid introducing any bacteria that could spoil it. If you’ve opted not to seal your jars for long-term storage, then the jars should go straight into the refrigerator as soon as they have cooled completely, and will last about 3 weeks. For FREEZER INSTRUCTIONS, if you have a lot of jam and want to store it longer than refrigeration allows, you can freeze it. Transfer the jam into freezer-safe containers, leaving about half an inch of headspace, as it will expand. It should keep well in the freezer for up to 6 months. Thawing is simple: just transfer the frozen jam to the refrigerator and let it thaw completely. The GLAZE TIMING ADVICE for this particular recipe is to ensure the jam has set before attempting any kind of sealing or long-term storage. Applying a glaze (if you were using one) would typically happen after the jam has cooled and sealed, or just before serving.
Frequently Asked Questions
Final Thoughts
There you have it – my cherished Grandma’s Raspberry Jam recipe! I truly hope this brings a little bit of that homemade magic into your kitchen. It’s more than just a recipe; it’s a tangible connection to simple joys, to seasons changing, and to the comforting sweetness of family traditions. The vibrant color, the irresistible aroma, and, of course, that perfect sweet-tart flavor make this raspberry jam an absolute keeper. It’s incredibly satisfying to make something so delicious from scratch, and even better when it’s this easy. If you enjoy the bright, fresh flavors of fruit preserves, you might also want to check out my Homemade Blueberry Sauce recipe, which is another fantastic way to capture summer’s bounty. I can’t wait to hear how your raspberry jam turns out! Please leave a comment below with your thoughts, any variations you tried, or just to say hello. Sharing your creations and experiences makes this all the more special. Happy jamming!
Raspberry Jam Recipe
Ingredients
Main Ingredients
- 4 cup raspberries fresh or frozen
- 2 cup granulated sugar
- 0.5 cup lemon juice freshly squeezed
Instructions
Preparation Steps
- Combine raspberries, sugar, and lemon juice in a large, heavy-bottomed saucepan.
- Bring the mixture to a boil over medium-high heat, stirring occasionally.
- Reduce heat to medium and simmer, stirring frequently, until the jam thickens. This usually takes about 15-20 minutes. You can test for doneness by placing a small spoonful of jam on a chilled plate. If it wrinkles when pushed, it's ready.
- Remove from heat and skim off any foam from the surface.
- Carefully ladle the hot jam into sterilized jars, leaving about 0.25 inch of headspace. Wipe rims clean, place lids on, and screw bands on tightly.
- Process jars in a boiling water bath for 10 minutes (adjust for altitude if necessary).
- Remove jars from the water bath and let them cool undisturbed for 12-24 hours.


