The moment the kitchen smells like sun-warmed berries and citrus, I’m instantly transported back to my grandmother’s counters and a bright red bowl buzzing with laughter. Raspberry Jam has always felt like a little hug you can open and share. It’s got that perfect balance—bright, tart raspberries dancing with just enough sweetness, a whisper of lemon to wake every flavor, and a texture that’s shyly rustic rather than perfectly smooth. This one’s a lifesaver on busy nights: smear it on toast, swirl into yogurt, or tuck a spoonful into morning muffins for a burst of sunshine. I’ve been making this for years, and every batch reminds me of early mornings in our sunlit kitchen, my kids begging for seconds, and the way the house smells like berry candy as it cools. If you’ve ever wished you could bottle summer, you’ve found your jar. Raspberry Jam is simple, forgiving, and utterly comforting, especially when you want something sweet that doesn’t require turning on the oven. It’s amazing how such a small thing can feel like a warm welcome to the day.
Thank you for reading this post, don't forget to subscribe!What is raspberry jam?
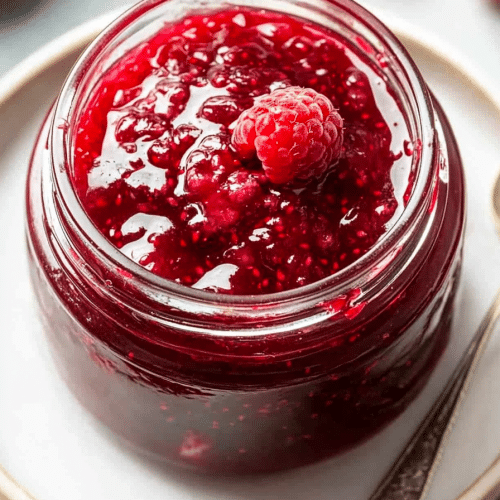
Raspberry Jam is essentially fruit, sugar, and a touch of acid cooked down until the raspberries break into a thick, spreadable treasure. Think of it as the quintessential fruit preservation that honors the berry’s bright acidity while letting its floral sweetness shine through. The name comes from the native color and scent that make it feel like a summer treasure you can keep in your pantry. It’s essentially a simple, classic conserve—no fancy technique required, just a patient simmer and a little bit of patience while it thickens. This jam relies on the natural pectin from raspberries (and a splash of lemon juice) to set, but I’ve learned you can tweak it with or without added pectin depending on how you like your texture. It’s not fragile; it’s forgiving, which makes it perfect for beginners and seasoned home cooks alike.
Why you’ll love this recipe?
What I love most about Raspberry Jam is how quickly it comes to life on a busy afternoon, and how it tastes like a memory you can taste. Here are the big reasons this recipe sticks around the family cookbook:
- Flavor:Raspberry Jam is bright, tangy, and perfectly fruity. The lemon juice sharpens the berries’ natural zing, and the aroma
- Simplicity: This isn’t a project with a long ladder of steps. It’s a straightforward simmer, a quick test, and you’re done. I love how it rewards patience with a glossy finish and a jammy texture that’s easy to spread.
- Cost-efficiency: What is the best way to measure cost-efficiency? Rely on seasonal raspberries and a modest amount of sugar. A few minutes of prep and a couple of jars can yield several cups of jam—great for gifting or stocking the pantry.
- Versatility: On toast, stirred into overnight oats, tucked into thumbprint cookies, or swirled into cream cheese for a quick cheesecake topping—this Raspberry Jam travels well in flavor and occasion.
What I’ve discovered over the years is that this jam isn’t just for breakfasts. It’s a quick way to elevate a Grilled Cheese, a simple drizzle on pork tenderloin during weeknight dinners, or a playful topping for vanilla yogurt at the end of a long day. The aroma alone tends to draw everyone to the kitchen, which is exactly the kind of joy I chase when I’m testing a recipe for the blog. And yes, you can tweak it for a softer set if you prefer a looser jam or go firmer with a touch more simmer time. Trust me on this one: the first jar you open fills the room with a memory you’ll want to repeat month after month.
How to Make Raspberry Jam
Quick Overview
Raspberry Jam comes together in a single pot with a gentle simmer, a good mash of berries, and enough heat to coax out their natural pectin. You’ll taste and adjust as you go, then seal the batch in hot jars for pantry longevity. The beauty is in the balance: you want the raspberries to stay recognizably berry-forward, with a glossy glaze that clings to a warm spoon. The trick I rely on most is keeping the simmer gentle enough to avoid burning, and giving the jam a final test with a cold spoon to see how it sets. It’s a tiny science and a lot of heart, all in one jar.
Ingredients
For the Raspberry Mixture:
- 4 cups fresh raspberries (about 2 pounds) or frozen, thawed and lightly drained
- 1 to 1 1/2 cups granulated sugar (adjust based on fruit sweetness and your taste)
- 2 tablespoons fresh lemon juice (about 1 lemon)
- Pinch of fine salt
For the Pectin & Sweetener (optional):
- 1 to 2 tablespoons no-sugar pectin (optional, helps set), or an extra 1/4 cup sugar if you’re not using pectin
For the Glaze (optional):
- 1 tablespoon lemon juice
- 1 teaspoon water
- Finely grated lemon zest (optional, for aroma)

Note: If you’re aiming for a classic, bright red jam, start with the higher end of sugar and adjust to taste as you simmer. If you want a sharper, more-tart finish, dial back on sugar a touch and lean into the lemon juice for balance. I often start with 1 cup of sugar and add more after tasting puckers of the raspberries, especially if the fruit is exceptionally ripe this season.
Step-by-Step Instructions
Step 1: Preheat & Prep Pan
Pick a wide, heavy-bottomed pot—2-quart min. A shallow, wide pan helps the berries break down evenly, and a stable surface prevents scorching. Rinse the raspberries gently if they’re fresh, then pat dry. Don’t worry about removing every stem; a few imperfections just add character. Have jars heating in a low oven or a hot water bath ready so you’re not scrambling later. A clean surface is your friend here, because you’ll be skimming foam and keeping the heat steady.
Step 2: Mash & Announce the Aroma
Place the raspberries in the pot and start on a medium-low flame. I like to smash a portion with a wooden spoon to release the juices, leaving some berries mostly intact for texture. The scent of warming berries is intoxicating—who knew that simple fruit could smell so comforting? If you’re using frozen raspberries, don’t worry about dissolving every ice crystal; a gentle cook will do the trick.
Step 3: Add Sugar & Lemon
Stir in sugar gradually, allowing it to dissolve as the mixture warms. A splash of lemon juice wakes up the fruit’s natural brightness and helps the jam set. Add a pinch of salt to brighten the flavors—trust me, it makes the raspberry flavor pop without tasting salty. Keep the heat steady and avoid a rolling boil; you’re aiming for a gentle simmer that thickens slowly.
Step 4: Bring to a Simmer & Test
Let the mixture simmer, stirring occasionally to prevent sticking. After about 15–20 minutes, give it a quick test: dip a chilled spoon into the jam and drag a line across the back of the spoon. If it’s smooth and coats the spoon with a glossy sheen, you’re close. If it’s still quite loose, keep simmering a few minutes longer. If you’re using pectin, stir it in when the jam is simmering and continue to cook for 1–2 minutes to activate it.
“I don’t know if I’ve ever eaten a better Raspberry Jam. The rub alone is wonderful, but the sauce??? Over the top!”
Step 5: Prepare Filling (Texture & Adjustments)
As the jam thickens, you can push a portion through a fine mesh if you prefer a smoother finish. If you like chunks, leave it a bit chunkier, which is how I prefer it—more rustic, more personality. Taste and adjust sweetness if needed; a splash more lemon juice can brighten the flavor without tipping the balance too far.
Step 6: Layer & Swirl
You don’t need to swirl here, but a tiny ripple of jam on a turned-out pan or glass can be pretty for a glossy finish on jars. If you’re filling tart shells or pastries, leave a little headspace to accommodate expansion during storage.
Step 7: Bake (Optional) & Seal
For long-term storage, you’ll want to seal the jars properly. If you’re canning, work quickly: ladle hot jam into hot jars, wipe rims, apply lids, and process in a boiling water bath according to your altitude. If you’re just refrigerating, skip the bath and simply seal with clean lids. The jam will set further as it cools.
Step 8: Cool & Glaze
Let the jars rest undisturbed on a towel, lid-side up, for 12–24 hours. If you’re glazing, whisk your glaze ingredients and brush a thin coat onto the surface while the jam is still warm. This creates a delicate, glassy finish and a little extra brightness to the top layer of the jars.
Step 9: Slice & Serve
When you crack open a jar, the aroma should envelop the room. Slice into a warm piece of toast or swirl into yogurt for a breakfast that tastes like a holiday morning. A small dollop on a cheese plate—soft goat cheese or brie—turns ordinary crackers into something special. And yes, my kids actually ask for seconds on the Raspberry Jam spoon; I swear it’s the most cooperative condiment we own.
What to Serve It With
Raspberry Jam isn’t shy; it shines in a lot of contexts. Here are a few ways I love to pair it, organized by occasion:
For Breakfast: Toasted sourdough smeared with jam, a generous dollop of creamy ricotta, and a crack of Black Pepper. It sounds odd, but the pepper somehow makes the jam taste even more vibrant. Serve with a strong cup of coffee or a creamy latte to wake up those morning senses. If you’re feeling indulgent, swirl a spoonful into plain Greek yogurt and sprinkle with toasted almonds for crunch.
For Brunch: A little jam on almond croissants, a spoonful tucked into a fluffy pancake, or as part of a herbs-and-cheese board with herby goat cheese crostini. A splash of lemon zest over the top adds a pop that carries into late morning conversation.
As Dessert: Layer jam between vanilla sponge cake slices, or mix it into a quick cheesecake swirl. A warm strawberry-raspberry-poached pear dessert gains depth with a ribbon of Raspberry Jam. Serve with lightly whipped cream or vanilla Ice Cream for a soft, comforting finish that still feels special.
For Cozy Snacks: Warm jam spooned over a small wheel of brie and baked for a few minutes until melty—serve with crisp crackers for a quick, crowd-pleasing starter. It’s especially lovely when the weather turns chilly and you need a little glow in your kitchen at night.
One of my tiny rituals: I always set aside a taste of the jam with a teeny bowl of yogurt and a sprinkle of crushed pistachios for the kids after school. They come back from the door, and you can practically hear a chorus of happy sighs. It’s not fancy, but that’s the point—Raspberry Jam is about everyday moments charged with a little sweetness and love.
Top Tips for Perfecting Your Raspberry Jam
These tips come from years of tweaking, tasting, and arguing with the timer in the kitchen—all in the name of good jam. Here’s what I wish I knew sooner, organized by technique:
Raspberry Prep: If you’re using fresh berries, pick the ripest ones you can find. Deep red, fragrant berries yield the best color and flavor. Rinse them gently and pat dry. Don’t over-mash; you want some berry texture to stay intact—the jam should feel alive when you bite into it, not like a paste.
Sugar & Pectin: I’ve learned that you can adapt sugar to taste and fruit ripeness. If your raspberries are particularly ripe and sweet, go lighter on sugar. If you’re using pectin, follow the package directions for timing and stirring so it activates properly. If you skip pectin, just simmer a little longer until the jam coats the back of a spoon nicely.
Swirl Customization: For a more marbled look in your final jam, reserve a few spoonfuls of raspberries and fold them in at the end. A gentle swirl looks gorgeous in a jar and makes every scoop feel handmade.
Ingredient Swaps: Try a splash of vanilla extract or a pinch of cinnamon for a cozy twist. A teaspoon of orange zest adds brightness that plays well with the raspberry’s tart notes. If you’re aiming for a lighter flavor, replace part of the sugar with a touch of honey for a floral nuance.
“The Raspberry Jam turned out amazing. My kids asked for seconds. Saving this one!”
Baking Tips: If you’re canning, you’ll want a steady boil and consistent temperatures. Position jars in a boiling water bath with at least 1 inch of water above the lids. Process time will vary by altitude—check your local guidelines. For short-term fridge storage, simply seal, label, and refrigerate; the jam is ready to enjoy the moment you close the lid.
Glaze Variations: If you’re glazing, keep it light. A citrus glaze made from lemon juice and a touch of water is enough to gloss the surface without overwhelming the jam’s flavor. A quick drizzle of maple syrup or a pinch of sugar can also help thin a thick glaze to the right consistency for brushing over warm pastries.
One lesson I learned the hard way: don’t rush the simmer. A little patience at the stove yields a jam that sets beautifully and tastes better—the way the berry flavor blooms after a few extra minutes of gentle heat is something you’ll notice in every bite. If you’re unsure about texture, test with a chilled spoon and compare to a tin of store-bought jam you’ve enjoyed—the real thing should feel bright, not syrupy, and should hold its shape in a soft, glossy way.
Storing and Reheating Tips
Storage can feel almost as important as the jam itself. Here’s how I handle Raspberry Jam so it stays vibrant and delicious for as long as possible.
Room Temperature: If you’ve canned it properly using a water bath, you can store sealed jars in a pantry for up to a year. Once opened, use within 3–4 weeks for best flavor and texture. Keep jars away from direct sunlight to preserve color and aroma.
Refrigerator Storage: For quick, everyday use, refrigerate after opening. Use a clean spoon every time to minimize contamination and keep the surface of the jam clear of air exposure. The jam will thicken a bit in the fridge, which can actually enhance the spreadability for toast and pastries.
Freezer Instructions: You can freeze Raspberry Jam in freezer-safe jars for up to 1 year. Leave 1/2 inch headspace to allow for expansion. Thaw in the fridge or at room temperature and give it a quick stir before using. Freezing can mellow flavors slightly but is a great option for bulk purchases of berries in peak season.
Glaze Timing Advice: If you plan to glaze pastries or use jam as a topping after storage, apply a glaze only to the surface just before serving when possible. If you glaze in advance, the extra moisture can slightly soften cookies or pastries, so plan accordingly and refresh the glaze when needed.
Personally, I like to label jars with the date and a short note if I’ve added a twist—vanilla, orange zest, or even a cinnamon stick. It’s a small ritual that makes the stale pantry feel festive again, and it helps me remember what I did differently each season.
Frequently Asked Questions
Final Thoughts
This Raspberry Jam has earned a permanent place in my kitchen because it’s dependable, joyful, and almost medicine for a homesick soul. The berries smell like summer when they simmer, the color is a glossy confession of sunshine, and the texture carries both a smooth and a playful berry bite. It’s the kind of recipe that travels through generations—small jars tucked into gift baskets, bright mornings, and cozy evenings alike. If you’re chasing a moment of comfort that you can share with friends and family, you’ve found it here. I can’t wait to hear which twist you try—vanilla? orange zest? a cinnamon note?—and how your kitchen fills with the scent of Raspberry Jam. Happy canning, friend, and may your jars be merry and bright. And don’t forget to drop a comment with your favorite way to enjoy this jam and any variations you loved.
Raspberry Jam
Ingredients
Main Ingredients
- 17.5 oz fresh raspberries See Note 1
- 2 cups white granulated sugar See Note 2
- 2 tbsp lemon juice freshly squeezed (See Notes 3 and 4)
Instructions
To Sterilise the Jars
- Sterilise the jars you'll be using to store the jam. Choose glass jars with an airtight, metal lid and ensure they have been washed by hand in hot soapy water then rinsed well. Check that the metal lids do not have rubber inserts – if they do, allow them to air dry, instead of placing in the oven. Preheat the oven to 270 F (130 C) and place the jars in the oven for 15-20 minutes. Keep the jars warm. See Note 5.
To make the Raspberry Jam
- Place two small saucers or plates in the freezer. See Note 6.
- Gently wash the raspberries in a colander. Turn them stem side down onto some paper towel to allow them to dry. Add the raspberries, sugar and lemon juice to a large saucepan and mix well with a long-handled wooden spoon.
- Turn the heat on low and stir until the sugar dissolves. (This can take 5-8 minutes) If sugar crystals get caught on the side of the saucepan, scrape down with a spatula.
- Once the sugar is dissolved, increase the heat to a rolling boil. Boil for 5 minutes, stirring frequently. After 5 minutes, begin to check for the setting point. Your jam will likely take between 5-8 minutes, but it will depend on the width of your saucepan and how rapidly the jam is boiling.
- Turn off heat and spoon a little of the jam onto one of your chilled saucers. Let it stand for 30 seconds to cool, and then run your finger through it. If it wrinkles, even slightly, it is ready. If it is still quite liquid, put it back on the heat and boil for a further 1-2 minutes, and retest until ready. Alternatively, you could use a candy thermometer. Setting point is reached when the thermometer reaches 220 F (105 C).
- Skim any scum off the top of the jam with a spoon.
- Allow the jam to sit for 5 minutes to allow the fruit to disperse evenly.
- Carefully ladle your jam into your hot jars and put the lids on immediately. Allow the jam to cool completely. Wipe the jars to remove any spills, and store the jam in a cool, dark place.


