Several summers ago, I stood at my kitchen counter with a jar of bright red chillies and a bottle of Olive oil that smelled like sunshine. My grandmother’s voice drifted in from memories of her stove, whispering that simple things can change a meal in an instant. Ever since, preserved chillies in oil have lived in my fridge like a tiny flame you can spark at a moment’s notice. They’re incredibly forgiving, incredibly bold, and they turn a weeknight pasta into something memorable with just a drizzle. I always reach for preserved chillies in oil when I want a little heat, a lot of personality, and zero fuss. This is my favorite version — some days I use it as a finishing flourish, other days I spoon it straight into soup for a quick, cozy lift. It’s basically a pantry locksmith: it unlocks flavor with minimal effort, leaving you free to focus on the people around the table and the stories you share over coffee.
Thank you for reading this post, don't forget to subscribe!What are the benefits of chillies in oil?
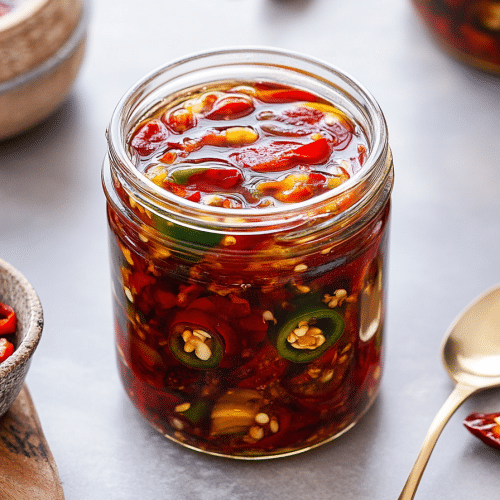
Think of preserved chillies in oil as a gentle chili infusion that’s already done most of the heavy lifting for you. It’s essentially fresh chillies preserved in a bottle of oil (and sometimes a splash of vinegar or citrus) so you can pull a jar off the shelf and season a dish in seconds. The name is simple, but the effect is magical: a bright, peppery bite, a glossy sheen, and a heat level that’s friendly enough to pour straight from the jar. The cool part is that you control the flavor, not the other way around — you can go smoky with smoked paprika, garlicky with extra garlic cloves, or herby with a handful of oregano. My kids actually ask for seconds when I pull out a jar of preserved chillies in oil, which tells you everything you need to know about its everyday appeal. It’s a little jar of mood-lifting magic that makes weeknights feel special without turning the stove into a battleground.
Why you’ll love this recipe?
What I love most about preserved chillies in oil is how they transform ordinary meals into something you’d happily serve guests, even when you’re short on time. This isn’t a complicated project; it’s a patient, practical ritual that pays off all week long. The flavor profile is a bright kick of chili with a smooth, glossy oil that clings to pasta, eggs, and roasted vegetables. The oil acts like a flavor umbrella, carrying heat, garlic, and citrus notes to every bite. It’s incredibly simple to make, and once you’ve got a jar going, you’ll keep it stocked. It’s cost-efficient too: you’re repurposing fresh peppers and basic pantry items into something that lasts, so you get more value per spoonful than you’d expect. Versatility is the star here — drizzle over pizza for a sharp spark, fold into vinaigrettes, or swirl into Mashed Potatoes for a creamy, peppery finish. What I love most about preserved chillies in oil is that it’s a tiny recipe with colossal payoff. It’s the kind of thing that makes me say, “Trust me on this one,” because I’ve used it across a million weeknight dinners, and it never disappoints. This one’s a lifesaver on busy nights, and a small ritual I look forward to—seeing the jars glistening in the fridge always makes me smile. If you’re craving a pop of heat without hunting for a sriracha bottle, this is your go-to.
How do I make chillies in oil?
Quick Overview
Preserved chillies in oil comes together in a handful of straightforward steps: you sterilize the jars, prepare a bright oil infusion with a few flavor boosters, simmer gently to meld everything, and then seal the jars so the heat and aroma are locked in. The magic happens in the layering — you want the peppers, garlic, and aromatics evenly coated with a warm, glossy oil. The result is a jar that’s ready to illuminate pasta, Grilled Cheese, or a simple avocado toast. It’s effortless yet deeply satisfying, and yes, the patience you show in letting the flavors mingle is worth it. If you’ve never done a proper hot-oil preservation before, this method is forgiving and yields a bright, versatile product you’ll reach for all year long. With preserved chillies in oil, you’re never more than a minute away from bold flavor.
Ingredients
For the Main Batter:
– 2 cups extra-virgin olive oil (or a neutral oil if you prefer a lighter note)
– 8–12 fresh red chilies, sliced into rings (or whole small peppers for a rustic look)
– 4 garlic cloves, lightly crushed
– 1 teaspoon kosher salt (adjust to taste)
– 1 tablespoon White Wine vinegar or lemon juice (optional, for brightness)
– 1 teaspoon dried oregano or thyme (optional, for depth)
– a pinch of sugar (optional, to balance acidity)
For the Filling:
– Optional aromatics to layer in the jar: fresh oregano, a few lemon zest ribbons, or thin-sliced shallots
For the Glaze:
– Extra oil from the jar (the infused oil itself)
– Optional citrus oil or a teaspoon of chili flake for a finishing drizzle
Step-by-Step Instructions
Step 1: Preheat & Prep Pan
First things first: we’re sterilizing jars so our preserved chillies in oil stay bright and safe. Preheat your oven to 225°F (110°C) or bring a large pot of water to a rolling boil. If you’re using the oven method, scrub two clean jars and their lids, then pop them in the oven for 10 minutes. If you prefer the stove, set a pot of water on to boil and submerge the jars after cleaning. While the jars heat up, wash and slice the peppers, and smash the garlic lightly to release its perfume. This is the moment I always pause to take a deep breath—the kitchen should smell of all the spice and warmth you’re about to bottle.
Step 2: Mix Dry Ingredients
Here we’re building the backbone of heat and brightness. In a small bowl, mix the salt with the dried oregano or thyme if you’re using them. This step matters because the salt helps draw out aromatic oils from the chiles, and the herbs add a familiar, comforting edge that makes preserved chillies in oil feel like a family recipe rather than a science project. I like to crush a pinch of coriander seeds into the mix for a fleeting citrusy note, but you can skip it if you want a cleaner chili bite.
Step 3: Mix Wet Ingredients
In a wide, heatproof measuring cup, combine the oil, garlic, and optional vinegar or lemon juice. If you’re using lemon zest, add it at this stage too. Warm the oil gently on the stove until you can just feel the garlic releasing its perfume, then remove from heat. You don’t want to fry the garlic; you want scent and softness, a gentle warmth that helps the flavors mingle without turning bitter. This is where preserved chillies in oil start to sing—the oil needs to be warm enough to coax everything together but not so hot it scorches the aromatics.
“Packed with flavor and so simple. Exactly what I wanted from this preserved chillies in oil!”
Step 4: Combine
Pour the warm oil over the sliced chillies and garlic, giving it a gentle stir. You should see the peppers begin to glisten, their color bright against the oil. If you’re using the optional sweetness balance, add a tiny pinch of sugar now and whisk to dissolve. The oil should look inviting and glossy, like liquid ruby. This is the moment when I smell the kitchen and think, yes, this is going to taste like a hug in a jar.
Step 5: Prepare Filling
If you’re layering aromatics or zest into the jars, have them ready now. A few thin lemon zest ribbons or a small sprig of oregano tucked into each jar adds a whisper of complexity that elevates preserved chillies in oil. This is also a good time to taste the oil with a peppered bite—if it needs a touch more salt, add a pinch more and swirl. The filling is where you customize: I often add a clove of garlic per jar or a tiny piece of rosemary to chase the heat with evergreen notes. Remember, you’re building flavor that will intensify as the oil rests, so balance now with the long view in mind.
Step 6: Layer & Swirl
Pour a bit of your warmed oil into each sterilized jar, then layer in the peppers, garlic, and any herbs you’re using. Repeat the layering until the jar is nearly full, finishing with a top layer of oil. Gently tilt and swirl the jar to release any trapped air bubbles. The top should be glossy and the peppers fully submerged. This little swirl is important; it ensures every piece of pepper has access to that fragrant oil. I usually leave a little headspace in each jar so there’s room for the oil to bloom once it sits on the shelf.
Step 7: Bake
Now we seal. You can opt for a hot-water bath or bake the jars to set the seal. For the oven method, either method is common: place the filled jars on a baking sheet and bake at a low temperature (around 250°F/120°C) for 15–20 minutes to help the seal form and the contents stay vibrant. If you’re using a water bath, carefully lower the jars into a pot of boiling water and simmer for 10–15 minutes. Remove with tongs and let them rest on a towel, undisturbed, as the lids pop and seal. This is the moment when your kitchen fills with that comforting simmer and the sense that you’ve created something lasting. If you hear a soft ping, you know you’ve preserved chillies in oil successfully.
Step 8: Cool & Glaze
Let the jars cool completely on a rack. As they settle, you’ll notice a shallow gloss on the surface of the oil. If you like, you can top off with a final drizzle of the oil you already harvested from the batch to “glaze” the top just before sealing the lids permanently. This isn’t required, but I love the extra shine and the assurance that every jar holds a robust perfume of garlic and peppers. Once cooled, wipe the rims clean and apply the lids. Label with the date, and tuck the jars into the fridge or a cool, dark corner for storage.
Step 9: Slice & Serve
After a short rest (a day or two if you can wait, but a week is even better), your preserved chillies in oil are ready to meet the plate. When you first open a jar, you’ll smell peppery heat, garlic, and the faint citrus brightness that wakes up your senses. Slice a piece of crusty bread, rub with a clove of garlic you reserved, and drizzle a spoonful of your preserved chillies in oil over the bread. The combination is a tiny celebration: hot, fragrant, and deeply comforting. You’ll find that a little goes a long way, and that the flavor deepens as the oil and peppers mingle. It’s perfect tossed through warm pasta, folded into Grilled Cheese, or stirred into a quick tomato sauce to bring warmth and a kiss of spice to the dish.
What to Serve It With
Preserved chillies in oil aren’t shy, so they shine best when you pair them with simple, comforting foods that let the heat take the lead. Here are ideas that have become family favorites in my kitchen:
For Breakfast: Try a soft scrambled egg topped with preserved chillies in oil and a few shavings of Parmesan. A slice of sourdough brushed with the infused oil before toasting is a game changer. The aroma alone makes coffee taste better. It’s a little glamorous in the morning and totally doable on weekdays.
For Brunch: Spread the oil over a grilled tomato and mozzarella slice, drizzle with preserved chillies in oil, and pile onto a warm crostini. Serve with a light green salad and a glass of sparkling water with lemon. The heat lifts the brightness of eggs and tomatoes in a way that feels celebratory without being fussy.
As Dessert: Yes, dessert—believe it or not, a touch of preserved chillies in oil can work with chocolate. A tiny drizzle into a chocolate ganache or over a dark chocolate bark with Sea Salt creates a surprising, addictive contrast. It’s not every day you incorporate heat into dessert, but when you do, this jar makes it effortless and balanced. If you’re hesitant, keep the drizzle light and let the chocolate do the talking.
For Cozy Snacks: Warm up a skillet with a little oil, drop in sliced baguette rounds, and finish with a crack of sea salt and a generous spoon of preserved chillies in oil. The bread becomes a velvet-hot bite that’s perfect for chilly evenings and movie nights. A dollop of goat cheese or ricotta beneath the chili oil brings an extra layer of creaminess that the kids adore, and adults keep coming back for seconds.
Top Tips for Perfecting Your Preserved Chillies in Oil
These tips come from years of tinkering, tasting, and sneaking spoonfuls straight from jars when I should have been cooking. Trust me, a few small tweaks can elevate the entire batch:
- Chilli Prep: Slice peppers evenly so they infuse at the same rate. If you prefer milder heat, seed the peppers; for more kick, leave the seeds. I’ve learned that a mix of thinly sliced fresh peppers and a few dried chili flakes gives a bright, layered heat that’s hard to beat.
- Oil Choice: Use a good quality olive oil if you want a fruity, rounded finish; a neutral oil keeps the chili’s heat front and center. I rotate based on what I’m cooking next—the olive oil is fantastic with pasta, while a neutral oil shines in egg dishes.
- Salt & Acidity: Salt is not the enemy here; it’s the structure. A pinch more salt can heighten the garlic and pepper notes, while a splash of vinegar or lemon juice brightens the finish. Taste as you go and adjust in small increments.
- Herb & Citrus Play: A strip of lemon zest or a few thyme sprigs in the jar adds a whisper of brightness that lingers long after the jar is opened. Don’t overdo it—these are light notes that should compliment, not overpower, the chili heat.
- Seasoning Variations: If you love a smoky edge, add a pinch of smoked paprika or chipotle. If you want a more garlicky profile, increase the number of garlic cloves. You’ll find that small changes create new personality for preserved chillies in oil.
- Avoid Overheating: Keep the oil warm, not boiling. Overheating can dull the pepper’s vibrancy or burn the garlic, which creates bitterness. A gentle warmth is all you need to coax the flavors out.
- Storage Mindset: Store in a cool, dark place or the fridge for maximum longevity. The oil will thicken slightly when cold, but that’s normal. Bring a jar to room temperature before using for the best aroma release.
- Substitution Guidance: If you don’t have oregano, try thyme or a bay leaf for a different aromatic profile. If you’re avoiding garlic, omit it, but remember that garlic is a big part of the signature aroma of preserved chillies in oil.
Over the years I’ve learned that patience matters here. This isn’t a one-and-done sauce; it’s a living condiment that grows with time. The longer the preserved chillies in oil sit, the more harmonious the flavors become. I’ve tested this with almond milk and it actually made it even creamier in a quick skillet pasta, which surprised me in the best possible way. And on those late evenings when I crave something quick, this jar is my go-to lifeline. The aroma itself is a comforting hug, and the taste never fails to spark memories of family kitchens bustling with life.
“New family favorite! This preserved chillies in oil was so flavorful and ridiculously easy. Crowd-pleaser for sure.”
Storing and Reheating Tips
Proper storage makes all the difference in keeping preserved chillies in oil vibrant and safe to enjoy. Here’s how I keep them at their best:
Room Temperature: If you’ve properly sterilized the jars and sealed them, you can store preserved chillies in oil in a cool, dark cupboard for a few weeks. I still refrigerate most jars after opening to preserve brightness and prevent any risk of spoilage. Always check for a firm seal and a pleasant aroma when you open a jar—if something smells off, discard it.
Refrigerator Storage: Once opened, the jars live in the fridge. They’ll stay flavorful for up to 6–8 weeks, sometimes longer if you keep the vegetables fully submerged and use clean utensils to retrieve them. There’s nothing sadder than a jar wasted because of a used utensil; keep a clean pair of tongs or a dedicated spoon for dipping to avoid introducing extra moisture.
Freezer Instructions: I don’t typically freeze preserved chillies in oil; the texture of the peppers can change, and I prefer the immediate bit of bite they offer when refrigerated. If you must, freeze in small portions and thaw gently in the fridge to minimize texture loss. A quick warm drizzle when using them again will revive some of that silky feel in the oil.
Glaze Timing Advice: If you’re experimenting with a glaze finish, do so when you’re about to serve. The glaze can crystallize a touch in the fridge, but a fresh drizzle of the infused oil before serving revitalizes the color and aroma. It’s a tiny flourish that makes a big impact, especially when you’re plating something simple and want a professional touch.
All told, preserved chillies in oil are a pantry hero you’ll reach for again and again. They store well, taste bright, and deliver a confident heat that can be tailored to your mood or the season. It’s a small ritual that pays off in everyday joy, turning ordinary meals into little celebrations with every spoonful.
Frequently Asked Questions
Final Thoughts
Preserved chillies in oil aren’t just a condiment; they’re a memory-woven shortcut to comfort and excitement. I’ve watched friends who claim they “don’t cook” become confident dinner makers because this jar sits within arm’s reach, ready to spark a meal. The aroma alone — peppery, garlicky, and just a hint of citrus — invites conversation and appetite. If you haven’t yet, try pairing it with a simple skillet pasta and a handful of grated parmesan. The first bite will feel like a small party in your mouth, and you’ll wonder how you ever cooked without it. I’ve learned a lot from this recipe: trust your senses, keep your jars clean, and remember that the Best Flavor often arrives with a little patience. If you try it, I’d love to hear which peppers you used, what herbs you added, and how your family reacted when you opened that first jar. Happy cooking!
preserved chillies in oil
Ingredients
Main Ingredients
- 7 ounces long red (cayenne) chillies Select firm, brightly colored, fresh chillies with shiny skins.
- 1.5 tablespoons coarse cooking salt Not fine table salt
- 1.5 cups white vinegar (5% acidity)
- 1 cup extra virgin olive oil Or enough to cover chillies completely
Instructions
To Sterilize the Jars
- Choose glass jars with an airtight, metal lid and ensure they have been washed in the dishwasher or by hand in hot soapy water then rinsed well. Check that the metal lids do not have rubber inserts - if they do, allow them to air dry instead of placing in the oven. Preheat the oven to 270 F (130 C). Place the jars and lids on a baking tray. Heat in the oven for at least 20 minutes, then remove and allow to cool before filling.
To Prepare the Chillies
- To begin, carefully wash and thoroughly dry the chillies. Then, remove the stalks and finely slice the chillies, seeds included. Do not use any which have blemishes or bruises.
- I recommend that you wear food-safe, disposable gloves when handling the chillies. Avoid touching your face or eyes as the active ingredient, capsaicin, can irritate the skin and cause burning. After cutting the chillies, discard your used gloves and carefully wash your cutting board and knife.
- In a non-reactive glass or ceramic bowl, prepare a vinegar and salt brine. Combine the two ingredients and stir them well. Add the chillies along with their seeds. Ensure that they are covered with the brine, adding more if necessary, using a ratio of 1 tablespoon of salt for each cup of vinegar.
- Stir the chillies then cover them with cling wrap and set them aside in their vinegar and salt bath for a minimum of 24 hours. Stir once or twice during this time. This process removes some of their moisture, increases acidity and assists with the preservation.
- After that time, drain the chillies well in a fine sieve, discard the vinegar, pack the chillies into the sterilised jar and completely cover with olive oil. There will be some air pockets; wait until the oil has settled, you may need to add a little extra.
- Store the chillies in a cool, dark place. The chillies will last for about 3 months, but are best consumed within the first 2 as they soften in texture the longer they sit in the oil. Alternatively, you may prefer to store them in the refrigerator. The olive oil will solidify and become cloudy but will become liquid again when the chillies return to room temperature. Always use clean utensils when removing the chillies from the oil.


