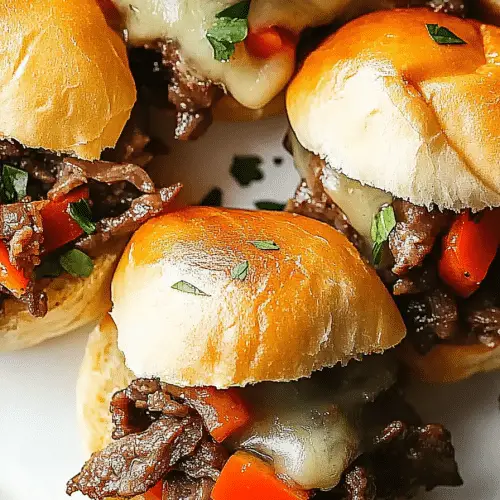
Oh, you guys, I am SO excited to share this recipe with you today. Seriously, the smell of these Philly Cheesesteak Sliders baking makes my whole house feel like home. It’s that nostalgic, comforting aroma that just wraps you up like a warm hug. We’re talking about juicy, savory steak, gooey melted cheese, and those sweet caramelized onions, all snuggled up in soft slider buns. It’s like taking a bite out of the classic Philadelphia cheesesteak, but in these perfectly portioned, ridiculously easy slider form. My family devours these, and they’re an absolute lifesaver on busy weeknights or when we have people over last minute. Forget fancy appetizers; these sliders are the real crowd-pleaser. If you love a good cheesesteak, but maybe find making the full-sized version a bit of a production, then get ready, because these Philly Cheesesteak Sliders are about to become your new best friend. They’re honestly so good, they rival my grandma’s legendary meatloaf – and that’s saying something!
Thank you for reading this post, don't forget to subscribe!What are Philly Cheesesteak Sliders?
So, what exactly *are* Philly Cheesesteak Sliders? Think of them as your favorite Philly cheesesteak sandwich, but miniaturized and baked into one glorious, shareable dish. Instead of individual rolls, we’re using those cute little slider buns, and instead of assembling each one separately, we bake them all together in a casserole dish. The magic happens when the steak, onions, peppers (if you like ‘em!), and heaps of cheese melt and meld into this incredible, cohesive filling that oozes out when you cut into it. It’s essentially all the deliciousness of a classic cheesesteak, but with the ease of a baked casserole and the fun, portable nature of a slider. It’s a concept that’s so simple, yet so brilliant, and trust me, the flavor explosion is anything but simple!
Why you’ll love this recipe?
Honestly, where do I even begin with why you’ll adore these Philly Cheesesteak Sliders? Let’s start with the FLAVOR. It’s pure comfort food bliss. You get that savory, slightly sweet, umami-rich goodness from the steak and onions, perfectly balanced by the creamy, melty cheese. It’s the kind of flavor that makes you close your eyes and just savor every bite. Then there’s the SIMPLICITY. I know, I know, it sounds like a lot with the steak and all, but I promise you, this recipe is surprisingly straightforward. The baking method means less fuss and more flavor fusion. It’s way easier than making individual sandwiches for a crowd, and it’s a lifesaver when you’re short on time but still want to serve something impressive. And let’s talk COST-EFFICIENCY. Cheesesteaks can get pricey, but by using slider buns and a good amount of steak, you get that satisfying cheesesteak experience without breaking the bank. Plus, these are SO VERSATILE. Serve them as an appetizer, make them a main course with a side salad, or pile them high for a game day feast. What I love most about this recipe is that it takes a beloved classic and makes it even more accessible and fun for home cooks. It’s a guaranteed hit, every single time.
How do you make Philly Cheesesteak Sliders?
Quick Overview
This recipe is all about layering incredible flavors and then letting the oven do the hard work. We’ll sauté some onions and steak until they’re perfectly tender and caramelized, then tuck them into buttery slider buns, load them up with your favorite cheese, and bake until everything is melty and golden. It’s incredibly straightforward, meaning you can get this on the table without a huge fuss, even on a busy weeknight. The best part? It’s all done in One Pan, which means less cleanup – always a win in my book!
Ingredients
For the Main Batter:
This is where the magic starts! We’re talking about the foundation of our delicious sliders.
– 12 Slider Buns: Hawaiian SWEET ROLLS are my absolute favorite here because they add a touch of sweetness that complements the savory filling beautifully. If you can’t find them, regular slider buns work too, just maybe brush them with a little melted butter before baking for extra flavor and a golden crust.
– 1/4 cup (4 tablespoons) Unsalted Butter, melted: This is for brushing the buns and getting them beautifully golden. Don’t skip this step; it adds so much flavor and that irresistible crispness on top.
For the Filling:
This is the heart and soul of our Philly Cheesesteak Sliders. Quality ingredients here really make a difference!
– 1 pound Ribeye Steak: I know ribeye can be a splurge, but it’s the absolute best for Philly cheesesteaks because of its marbling and tenderness. Thinly sliced is key – ask your butcher to do it for you, or pop the steak in the freezer for about 30 minutes and slice it yourself. You want those super thin, almost shreddable pieces.
– 2 medium Yellow Onions: Sliced thinly. I love the sweetness that yellow onions develop when they caramelize. You can also throw in a green bell pepper if you’re a traditionalist, but I usually keep mine simple with just onions.
– 2 tablespoons Olive Oil: For sautéing our onions and steak.
– 1 teaspoon Salt: Or to taste. Seasoning is crucial!
– 1/2 teaspoon Black Pepper: Freshly ground is always best.
– 1/2 teaspoon Garlic Powder: For an extra punch of flavor.
– 8 ounces Provolone Cheese, thinly sliced: This is the classic cheesesteak cheese, and it melts like a dream. You can also use a mix of provolone and mozzarella if you like, or even some white American cheese for extra creaminess. Shredded cheese works too, but slicing gives you those lovely, gooey pockets.
– 1/4 cup Beef Broth: This helps create a bit of steam and moisture as everything bakes, keeping the filling juicy.
For the Glaze:
This is my secret weapon for making these sliders extra irresistible. It’s simple but adds a whole other layer of flavor.
– 2 tablespoons Unsalted Butter, melted: For that rich, buttery goodness.
– 1 teaspoon Worcestershire Sauce: This adds a fantastic depth of savory flavor.
– 1/4 teaspoon Garlic Powder: Enhances that savory profile.
– Pinch of Salt and Pepper: To balance the flavors.
Step-by-Step Instructions
Step 1: Preheat & Prep Pan
First things first, let’s get our oven preheated to 375 degrees Fahrenheit (190 degrees Celsius). While that’s heating up, grab a 9×13 inch baking dish. This is where all the magic is going to happen. If your slider buns aren’t already cut in half, now’s the time to carefully slice them horizontally. Keep the tops and bottoms together in their little connected squares as much as possible – this helps them bake evenly and hold all that delicious filling!
Step 2: Mix Dry Ingredients
In a small bowl, we’re going to combine the seasonings for our steak and onions. Whisk together the salt, black pepper, and garlic powder. Having this mixed up beforehand makes adding it to the pan so much easier, and ensures everything is evenly distributed. Trust me, seasoned steak is happy steak!
Step 3: Mix Wet Ingredients
In another small bowl, melt your 1/4 cup of butter. Once it’s melted and smooth, stir in the Worcestershire sauce, another 1/4 teaspoon of garlic powder, and a little pinch of salt and pepper. This is going to be our glorious glaze that we’ll brush over the tops of the buns towards the end of baking. It makes them perfectly golden and adds an extra layer of savory goodness. It’s a simple step that makes a HUGE difference.
Step 4: Combine
Now it’s time to bring everything together. Grab a large skillet and heat the 2 tablespoons of olive oil over medium-high heat. Add your thinly sliced onions and cook them, stirring occasionally, until they start to soften and caramelize, about 5-7 minutes. Then, add your thinly sliced ribeye steak to the skillet. You might need to do this in batches if your skillet isn’t huge, to avoid crowding the pan. Crowding will steam the meat instead of searing it, and we want those nice little browned bits! Cook the steak, stirring it with the onions, until it’s browned and no longer pink. Sprinkle your pre-mixed dry seasonings over the steak and onions and stir well to coat everything. Cook for another minute or two, allowing the seasonings to bloom. Once everything is cooked and beautifully fragrant, stir in the 1/4 cup of beef broth. Let it simmer for about a minute until the liquid has mostly evaporated, leaving you with a wonderfully moist and flavorful filling. Turn off the heat.
Step 5: Prepare Filling
This step is super simple, but crucial! Once your steak and onion mixture is cooked and seasoned beautifully, it’s ready to go. Make sure it’s spread out relatively evenly in the pan so you can easily scoop it into the buns later. The beef broth you added should have cooked down, leaving the filling moist but not overly saucy, which is exactly what we want.
“The Philly Cheesesteak Sliders turned out amazing. My kids asked for seconds. Saving this one!”
Step 6: Layer & Swirl
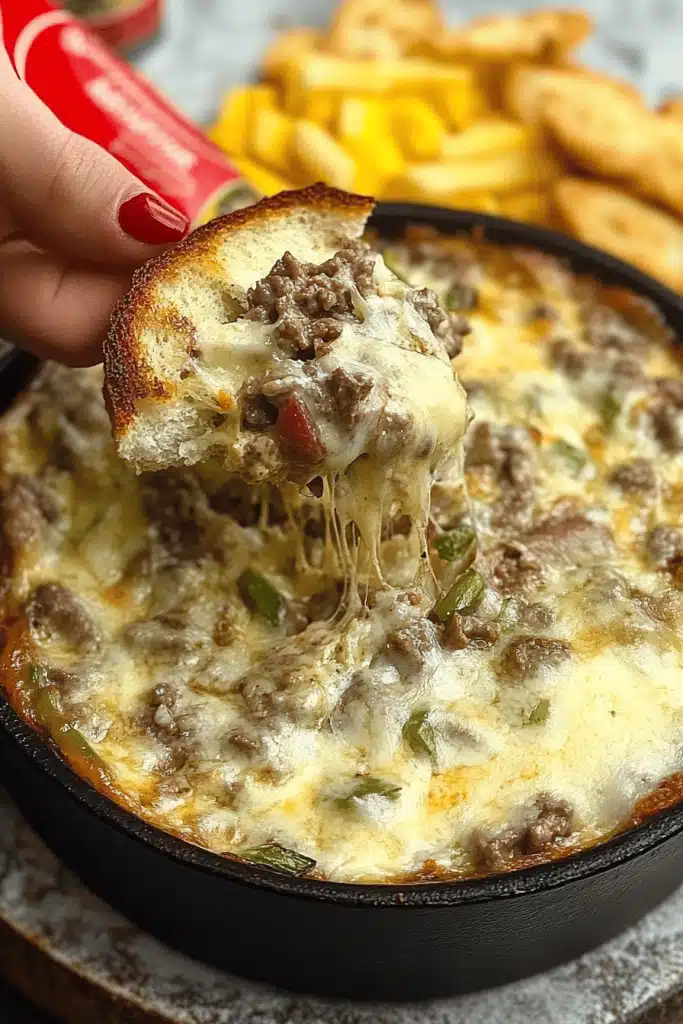
This is where the fun really begins! Arrange your slider bun bottoms in the prepared baking dish, leaving a little space between them if possible. Spoon the cooked steak and onion mixture generously over each bun bottom, making sure to distribute it evenly. Don’t be shy – pack them full! Now, place a slice or two of provolone cheese (or your cheese of choice) over the steak and onion mixture on each slider. It’s going to get all melty and gooey and delicious. Finally, place the tops of the slider buns over the cheese. You can gently press them down to help everything settle.
Step 7: Bake
Brush the tops of all the slider buns generously with the melted butter and Worcestershire glaze you prepared earlier. This is going to give them that gorgeous golden-brown color and extra flavor. Pop the baking dish into your preheated oven. Bake for 15-20 minutes, or until the buns are golden brown and the cheese is perfectly melted and bubbly. You want to see that cheese just starting to ooze out the sides – that’s the sign of pure deliciousness!
Step 8: Cool & Glaze
Once they’re out of the oven, let the sliders rest in the baking dish for about 5 minutes. This is important! It allows everything to set up just a little bit, making them easier to handle and ensuring that delicious cheese doesn’t just melt onto the pan. During this resting time, you can even brush them with a little more of that buttery glaze if you like an extra shiny, flavorful finish. It smells amazing at this point, I can barely wait!
Step 9: Slice & Serve
Now for the best part! Carefully lift the sliders out of the baking dish. You can serve them individually, or if you want to get that classic slider stack look, use a sharp knife to cut through the entire connected section of buns. Serve them immediately while they’re hot and the cheese is wonderfully gooey. They are just perfect for dipping into a little extra ketchup or mustard if you like, but honestly, they’re so flavorful on their own, you might not even need them.
What to Serve It With
These Philly Cheesesteak Sliders are so incredibly versatile, they’re not just for game day! We love them for so many occasions.
For Breakfast: Yes, you read that right! They’re a fantastic savory breakfast option, especially on the weekend. Serve them with a perfectly fried egg on top of each slider and a side of crispy hash browns. A strong cup of coffee is a must to accompany this hearty start to the day.
For Brunch: Elevate them for a brunch spread! Plate them nicely and pair them with a fresh fruit salad and maybe some avocado slices. For drinks, a mimosa or a Bloody Mary would be divine. The rich, savory sliders are a perfect counterpoint to lighter brunch fare.
As Dessert: Okay, hear me out! While they’re savory, their satisfying nature makes them a great “starter” dessert, especially if you’re having a casual get-together. Serve them with a light, zesty coleslaw and maybe some sweet potato fries. It’s a comfort food feast that everyone will remember.
For Cozy Snacks: This is probably their most popular role in my house! When we’re having a movie night or just a relaxed evening, a platter of these sliders is pure happiness. I love serving them with a big bowl of seasoned potato chips or some crunchy dill pickles. It’s the ultimate comfort snack, perfect for sharing (or not!). My family always requests these when we’re just hanging out, and they disappear in minutes!
Top Tips for Perfecting Your Philly Cheesesteak Sliders
I’ve made these Philly Cheesesteak Sliders more times than I can count, and over the years, I’ve picked up a few tricks that really make them shine. I want you to have the absolute best experience with this recipe, so here are my top tips!
Ribeye Steak Prep: For the best texture, don’t skip freezing the steak slightly before slicing. About 30-40 minutes in the freezer is usually enough to firm it up without making it solid. This makes it SO much easier to get those super thin slices. If you’re buying pre-sliced steak, make sure it’s thinly cut. The thinness is key for that classic cheesesteak feel and ensures it cooks quickly and evenly.
Onion Caramelization: Don’t rush this step! Letting the onions caramelize slowly over medium heat brings out their natural sweetness and depth of flavor. You’re looking for a beautiful golden-brown color, not just soft, translucent onions. If they start to brown too quickly, turn the heat down slightly. A little patience here makes a world of difference in the final taste.
Cheese Melty Magic: Provolone is traditional and fantastic, but don’t be afraid to experiment. I’ve had great success using a mix of provolone and mozzarella for extra stretchiness, or even a touch of sharp cheddar for a different flavor profile. Shredded cheese melts a bit faster, but sliced cheese gives you those distinct gooey pockets that are so satisfying. Just make sure the cheese is covering most of the steak and onion mixture before baking.
Bun Brushing: Brushing the tops of the buns with the melted butter and Worcestershire mixture is non-negotiable for me. It not only adds incredible flavor but also ensures that beautiful golden, slightly crispy crust. If you want to take it up a notch, try adding a little finely minced fresh parsley or chives to the butter mixture for a pop of freshness and color.
Baking Adjustments: Ovens can be finicky! Keep an eye on your sliders during the last 5-10 minutes of baking. If the tops are browning too quickly but the cheese isn’t fully melted, you can loosely tent the dish with foil. Conversely, if they’re not browning enough, you can turn the broiler on for a minute or two at the very end, watching them constantly to prevent burning.
“I don’t know if I’ve ever eaten a better Philly Cheesesteak Sliders. The rub alone is wonderful, but the sauce??? Over the top!”
Serving Temperature: While these are best served fresh and hot, they’re still pretty darn good at room temperature, making them perfect for parties where you want to keep food out. Just be aware that the cheese will firm up a bit as they cool.
Filling Consistency: The goal is moist, not soupy. The beef broth is essential for keeping the filling from drying out during baking, but you don’t want so much liquid that it makes the buns soggy. If your steak and onion mixture seems a bit too wet after cooking, let it simmer for an extra minute or two to let some of the excess moisture evaporate before filling the buns.
Storing and Reheating Tips
These Philly Cheesesteak Sliders are so delicious, you might actually have leftovers – though I wouldn’t count on it! But if you do, here’s how to keep them tasting great.
Room Temperature: If you’ve got a party going and don’t finish them all, they can safely sit out for about 2 hours. After that, it’s best to get them into the fridge to prevent any spoilage. They’re still tasty at room temp, but that fresh-from-the-oven gooeyness is hard to beat.
Refrigerator Storage: Once they’ve cooled down completely, store any leftovers in an airtight container or wrap the baking dish tightly with plastic wrap or foil. They’ll keep well in the refrigerator for up to 3 days. I find that wrapping them individually in foil or parchment paper before putting them in a container works really well to keep them from getting too squished and helps maintain their integrity.
Freezer Instructions: If you want to make a big batch and freeze them for later, that’s totally doable! Let the baked sliders cool completely. Then, wrap each individual slider very tightly in plastic wrap, followed by a layer of aluminum foil. You can also place them in a freezer-safe container or bag. They’ll stay good in the freezer for about 1-2 months. Thaw them overnight in the refrigerator before reheating.
Glaze Timing Advice: If you plan on reheating sliders that have been in the fridge, I usually give them another little brush of melted butter or a light spray of cooking oil before reheating. For frozen sliders, reheat them directly from frozen, applying the glaze after they’ve heated through for the best results and to prevent the glaze from burning too early.
Reheating: The best way to reheat these is in a preheated oven at around 300-325 degrees Fahrenheit (150-160 degrees Celsius) for about 10-15 minutes, or until heated through and the cheese is melty again. You can also pop them in a toaster oven or even microwave them carefully (though the buns might get a little softer this way). I find the oven method gives you the closest result to freshly baked!
Frequently Asked Questions
Final Thoughts
Seriously, you guys, I just love these Philly Cheesesteak Sliders so much. They are the perfect blend of classic comfort food and easy entertaining. They’re satisfying, incredibly flavorful, and just plain fun to eat. Whether you’re looking for an appetizer that will disappear in minutes, a crowd-pleasing main for a casual dinner, or just a seriously delicious snack, these sliders deliver. They remind me of cozy evenings with my family, big game days, and the simple joy of sharing good food. I really hope you give them a try and love them as much as we do. If you do make them, please come back and let me know how they turned out in the comments below! I’d love to hear your variations or any funny stories that happen in your kitchen while making them. And if you enjoyed these sliders, you might also like my recipe for Mini Meatball Subs or my Loaded Nacho Platter – they’re other favorites for feeding a crowd! Happy baking and happy eating!
Philly Cheesesteak Sliders
Ingredients
Main Ingredients
- 1.5 pounds ribeye steak thinly sliced
- 1 large onion thinly sliced
- 0.5 cup Provolone cheese sliced
- 0.5 cup Cheez Whiz
- 1 dozen slider buns
- 2 tablespoons olive oil
- 1 teaspoon salt
- 0.5 teaspoon black pepper
Instructions
Preparation Steps
- Heat olive oil in a large skillet over medium-high heat. Add the sliced onion and bell pepper and cook until softened, about 5-7 minutes.
- Add the thinly sliced ribeye steak to the skillet with the vegetables. Season with salt and pepper. Cook, stirring occasionally, until the steak is browned and cooked through.
- Stir in the Cheez Whiz until melted and well combined with the steak and vegetables.
- Slice the slider buns in half horizontally.
- Place the bottom halves of the slider buns on a baking sheet. Spoon the cheesesteak mixture evenly over the buns.
- Top each slider with slices of Provolone cheese.
- Place the top halves of the slider buns over the cheese.
- Broil for 1-2 minutes, or until the cheese is melted and bubbly and the buns are lightly toasted.
- Serve immediately.


