I’ve burned cream and burned out a few cookies trying to chase that perfect bite, and somehow these Peanut Butter Chocolate bars became the safe, warm hug I reach for every time I need a sweet fix. The scent of toasted crumbs, glossy chocolate, and peanut butter mingling in the kitchen takes me straight back to weekend afternoons at grandma’s house—the radio humming, a mug half-full of coffee, and a plate of something fudgy cooling on the counter. This is the kind of treat that travels from a busy school night to a lazy Sunday, and it somehow tastes like both. The beauty lies in how simple it is: you mix, you bake (or chill), you glaze, you slice, and suddenly you’ve got dessert that feels both nostalgic and new. If you’ve ever compared a classic butter shortbread to a chewy no-bake bar, you know the thrill of a recipe that hits different textures in one bite. And yes, this peanut butter chocolate bars version is the one I reach for when I want something homey, comforting, and a little bit indulgent—without needing a long guest list or a fancy apron. I always do this when I’m testing a recipe: I write down the tiny tweaks I notice along the way, so you don’t have to guess. Trust me on this one: a quick base, a creamy filling, and a glossy glaze make every bite feel like dessert and a little bit of a hug.
Thank you for reading this post, don't forget to subscribe!What is peanut butter chocolate bars?
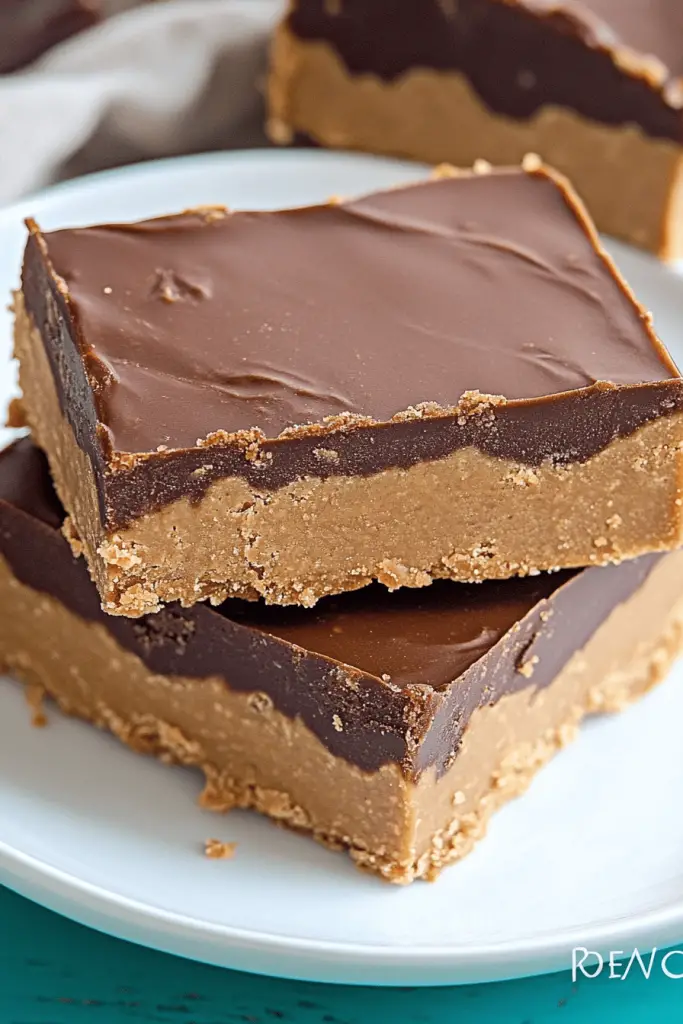
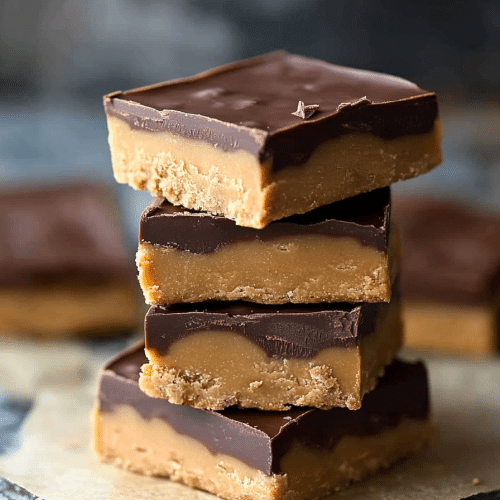
Think of Peanut Butter chocolate bars as a three-layer love affair in a pan. The base is a buttery, crumbly crust that bakes into a gentle, sturdy foundation. The middle, a smooth peanut-butter filling, is essentially comfort in spoonfuls—creamy, a touch sweet, and perfectly % peanut-y. The top glaze is where the magic happens: glossy chocolate that crackles ever so slightly as you bite, with that salt-kissed finish that makes the flavors pop. It’s essentially a mature version of a kid-friendly treat—sophisticated enough for grown-ups, easy enough for weeknights. The name itself is straightforward: a bar that’s all about peanut butter and chocolate, coming together in a bar form for easy sharing. This is my go-to when I need something that looks put-together but I can make with pantry staples and a simple bake or chill. It’s the kind of recipe that travels well, slices cleanly, and disappears quickly at gatherings. If you’ve got a soft spot for chocolate-drenched peanut butter goodness, you’re in for a treat.
Why you’ll love this recipe?
What I love most about these Peanut Butter chocolate bars is the way they feel at once comforting and celebratory. They’re not fussy, but they deliver big in flavor and texture, which is everything I look for in a dessert that I’ll hand to friends and family with a grin. Here’s what makes them stand out:
- Flavor: The crust carries a gentle toasty note, the filling is luxuriously creamy, and the glaze seals the deal with a satin-smooth chocolate finish. The peanut butter shines through without overpowering the chocolate, so you get a balanced, addictive bite every time. I’ve joked that this bar might secretly be a fudge-adjacent cousin—the texture is that fudgy, that luscious.
- Simplicity: This recipe uses straightforward ingredients and a method you can trust. It’s a no-fuss setup, a quick bake or chill, and you’re slicing into something beautiful. I’ve made these with friends during busy weeks, and the bar always comes through as a confident, crowd-pleasing dessert.
- Cost-efficiency: What is the best way to measure cost-efficiency? You’re likely stocking many of the items already—peanut butter, chocolate, a crumb base—so you don’t need fancy components. It’s the kind of recipe that makes you feel smart about your pantry when you see how all the pieces come together in one pan.
- Versatility: This base is a springboard. Swap in almond butter, use dark or milk chocolate, add a pinch of espresso powder to the glaze for a coffee kick, or sprinkle flaky salt on top for a salt-and-sweet finish. My kids actually ask for seconds, and the adults love the subtle tweaks that let you tailor it to the moment.
There are other peanut butter dessert options out there, sure, but this one’s a lifesaver on busy nights and a reliable favorite for gatherings. If you’ve ever made a Chocolate Peanut Butter cup and thought, “I wish this were a little easier to share,” you’ll feel right at home with these bars. I’ve tested them with different brands of peanut butter and a few chocolate chips, and the result remains consistently satisfying: a sturdy crust, a creamy center, and a gleaming top that makes you feel like you did something special without slaving in the kitchen.
How do I make peanut butter chocolate bars?
Quick Overview
These Peanut Butter chocolate bars come together in two simple phases: first, you bake or press a crumb crust that forms a sturdy base; second, you whisk a creamy peanut butter filling and spread it over the warm crust so it sets into a velvety layer. Then you drizzle or pour a glossy chocolate glaze over the top and let everything chill until firm. The result is a sliceable, shareable dessert that tastes like a dream, with a texture that travels well from pan to plate. The method is forgiving: if your crust is a touch crumbly, you can press it a little firmer or add a splash of extra butter to help it hold together. If your filling is too stiff, a tiny dab of milk or cream will loosen it just enough. And if you want the glaze thicker, give it a little longer to set; for a splashier, more dramatic look, swirl peanut butter into the chocolate before it sets.
Ingredients
For the Main Batter:
– 2 cups graham cracker crumbs or cookie crumbs (about 250 g), finely crushed
– 1/2 cup (115 g) unsalted butter, melted
– 1/4 cup (50 g) granulated sugar or brown sugar for a little extra depth
For the Filling:
– 1 cup creamy peanut butter, at room temperature
– 1/4 cup (30 g) powdered sugar, sifted
– 2 tbsp unsalted butter, softened
– 1 tsp vanilla extract (optional but nice)
For the Glaze:
– 1 cup semisweet chocolate chips or chopped dark chocolate (170 g)
– 2 tbsp unsalted butter, melted
– A tiny pinch of salt (to balance the sweetness)
– Optional: flaky sea salt for finishing
Step-by-Step Instructions
Step 1: Preheat & Prep Pan
Preheat your oven to 350°F (175°C). Line a 9×9-inch square baking pan with parchment paper or foil, leaving a bit of overhang for easy lifting. If you don’t have parchment, you can go for light greasing, but parchment is the dream here—easy removal and cleaner edges make all the difference when you’re slicing later. I always do this because the last thing you want is a crust that sticks to the pan and crashes your presentation.
Step 2: Mix Dry Ingredients
In a bowl, combine the graham crumbs with the sugar. Use a fork or your fingers to break up any big lumps so you get a uniform texture. This step matters because a well-distributed crumb layer bakes into a cohesive base instead of crumbling apart on your first bite. If you’re using a mix of graham and crushed cookies, aim for roughly two-thirds graham to one-third cookie for a balanced flavor.
Step 3: Mix Wet Ingredients
Whisk the melted butter into the dry mixture until it looks like damp sand and starts to clump together when you press it. You want it to hold its shape when you press it into the pan, but not be so wet that it pools. If your crumbs drink up the butter too quickly, add another tablespoon (or two) until it’s cohesive. The aroma when the butter hits the crumbs is one of those “mom’s kitchen” moments you’ll recognize in a heartbeat.
Step 4: Combine
Press the crumb mixture into the bottom of the prepared pan. Use the bottom of a flat glass or measuring cup to press it firmly and evenly, building a compact crust about 1/4 inch thick. Don’t worry about perfection here—slight unevenness will vanish under the filling as it bakes and sets. Bake the crust for about 8-10 minutes, just until it smells warm and toasty; you don’t want to overbake it or it’ll be hard as a brick once cooled.
Step 5: Prepare Filling
While the crust bakes, stir together the peanut butter, powdered sugar, softened butter, and vanilla until you’ve got a smooth, spoonable filling. If you’re using natural peanut butter with a little oil separation, give it a vigorous whisk to emulsify. You want a creamy texture that’s easy to spread and holds its shape when you layer it on top of the warm crust. If the filling seems too loose, drop in a pinch more powdered sugar; if it’s too stiff, a tiny splash of cream or milk will do the trick.
“Packed with flavor and so simple. Exactly what I wanted from this peanut butter chocolate bars!”
Step 6: Layer & Swirl
When the crust is still slightly warm but not hot, spread the peanut butter filling evenly over the surface. For a classic look, smooth it with a spatula. If you love a bit of marbling, lightly drop small dots of melted peanut butter over the filling and swirl with a knife for a pretty, homemade pattern. If you prefer a more kid-friendly, even surface, skip the swirls and go for a clean top instead. Either way, aim for a 1/2-inch to 3/4-inch layer—enough to feel substantial but not so thick that the bars won’t set properly.
Step 7: Bake
Return the pan to the oven and bake for another 8-10 minutes, just until the filling is set and the edges pull away slightly from the sides of the pan. If your oven runs hot, start checking at minute 7 so you don’t overcook. You’re not aiming for a fully baked cake here; the goal is a firm, cohesive bar that will slice cleanly once it cools. If the top looks cooked but the center jiggles slightly, don’t panic—the glaze will bring everything together and aid in slicing once cooled.
Step 8: Cool & Glaze
Let the pan cool completely on a rack. This is the moment where patience pays off: a warm bar asks to be cut, and a fully cooled bar slices like a dream. While it’s cooling, melt the chocolate chips with the butter in short bursts in the microwave or over a gentle double boiler, stirring until silky. Add a pinch of salt if you like, and pour the glaze over the cooled crust. Use a spatula to spread it into an even, glossy layer, then tilt the pan to help the glaze settle into the corners. If you want extra sheen, you can refrigerate the pan for 10-15 minutes to set the glaze quickly. A light sprinkling of flaky salt on top is a salt-and-sweet magic trick that my friends always notice first—the kind of detail that makes them say, “You really thought this through.”
Step 9: Slice & Serve
Once the glaze is set, lift the bars from the pan using the parchment overhang. Place on a cutting board and slice into even squares or neat rectangles, depending on your preference. Wipe your knife between cuts for clean edges. If you’re bringing these to a potluck or school event, arrange them on a pretty platter with a few extra chocolate shards as garnish. I love chilling the bars for 15-20 minutes before slicing on warmer days; the chocolate sets faster and the center stays perfectly sliceable even after refrigeration. Serve with cold milk or a hot cup of coffee for the full indulgent experience. This peanut butter chocolate bars combination never fails to disappear in minutes at my house.
What to Serve It With
These bars are versatile enough to pair with different occasions and flavors. Here are a few ideas that keep the vibe casual and cozy.
For Breakfast: A morning coffee or a glass of cold milk alongside a small square makes for a satisfyingly sweet start without going overboard. You can crumble a bar on yogurt with a sprinkle of chopped nuts for extra texture, or serve a thin, crisp slice with a hot mug of espresso for a grown-up twist.
For Brunch: Slice into slim rectangles and arrange on a board with fresh berries and a dollop of whipped cream. The sweetness of the peanut butter chocolate bars complements tangy fruit and a light, airy beverage like a vanilla latte or a cold brew.
As Dessert: Plate with a scoop of vanilla ice cream or a swirl of whipped cream. A sprinkle of crushed peanuts or a drizzle of caramel can turn these bars into a restaurant-style finish without much extra effort. The contrast of cold ice cream and warm chocolate is something I’ll never tire of.
For Cozy Snacks: Warm, soft bars with a cup of tea or a mug of hot cocoa are the best late-night comfort. If you’ve got kids after school, this is the perfect way to reward a good homework session with something they’ll actually eat and ask for again tomorrow.
In my kitchen, these peanut butter chocolate bars became a family favorite because they’re inherently shareable. My sister texted from across the country to say they tasted like a memory she didn’t know she’d lost—serious proof that a simple bar can carry big feelings. Try them, and you’ll see what I mean: it’s not just a dessert; it’s a connection in a pan.
Top Tips for Perfecting Your Peanut Butter Chocolate Bars
Over the years I’ve learned a few tricks that take this recipe from good to genuinely great. These aren’t big changes, just small adjustments that make a difference with every batch.
Crumb Prep: If your crumbs feel too coarse, pulse them a bit more in a processor or give them another quick whisk. Finer crumbs bake into a sturdier base and hold together better when you cut the bars. You want a texture that’s crumbly but cohesive, not powdery or sandy.
Mixing Advice: When you’re mixing the filling, keep the peanut butter at room temperature and whisk until it’s silky. Avoid overmixing; you want a smooth, scoopable texture, not a glossy, greasy finish. If you’ve got oil separation in natural peanut butter, stir well first and maybe add a touch more powdered sugar to balance.
Swirl Customization: For a more dramatic marbled look, drizzle a little melted peanut butter over the filled crust and swirl with a knife. You can also drop a few teaspoons of espresso powder into the glaze for a coffee-kissed chocolate finish—this is a personal favorite for late-night baking sessions when I want something that feels a touch grown-up.
Ingredient Swaps: Want to experiment? Use almond butter for a nuttier tone, swap milk chocolate for a richer dark chocolate top, or use coconut sugar in place of granulated sugar for a deeper caramel note. These swaps alter the flavor profile but keep the structure intact, so you can tailor the bars to your pantry and your cravings.
Baking Tips: If your oven tends to run hot, reduce the bake time for the crust by a minute or two and keep a close eye on the edges. Oven variability is real, and you want a crust that’s just set, not dry. Let the crust rest briefly before spreading the filling to prevent it from shrinking away from the sides.
“The peanut butter chocolate bars turned out amazing. My kids asked for seconds. Saving this one!”
Glaze Variations: If you love a super glossy top, add a teaspoon of corn syrup to the glaze and microwave in short bursts, stirring until smooth. For a saltier bite, finish with a light dusting of flaky sea salt. If you’re short on chocolate, you can melt dark chocolate chips with a tablespoon of cocoa butter or coconut oil to loosen the glaze and extend the shine.
I’ve learned to keep the base fairly simple: a sturdy, well-baked crust makes the rest of the process feel effortless. The filling should be creamy enough to spread, but not so soft that it oozes. The glaze is the showstopper—when it shines, you know you’ve earned those big, happy smiles around the table. My personal note: I test variations with almond milk in the glaze to see if it behaves differently; sometimes it makes the glaze a touch silkier, other times it’s hardly noticeable, but it’s worth testing if you like experimenting in small ways. This is the kind of recipe I keep tweaking in tiny ways because the core is so sturdy and forgiving.
Storing and Reheating Tips
Storage is where these peanut butter chocolate bars truly shine. They’re resilient, they travel well, and they stay delicious for days when kept properly sealed and cool.
Room Temperature: Store in an airtight container for up to 3-4 days. If your house is warm, you’ll want to chill them after a few hours to prevent the glaze from turning soft or runny. They slice best when they’re a bit firm, so a light chill can help with clean cuts.
Refrigerator Storage: In the fridge, these bars stay fresh for about 1 week. Layer with parchment between slices if you’re stacking bars to prevent sticking. This is my go-to arrangement for a quick weeknight dessert that doesn’t fall apart upon serving.
Freezer Instructions: Wrap individual bars tightly in plastic wrap and freeze for up to 2-3 months. Thaw overnight in the fridge or at room temperature for a quick treat. The crust can hold up to freezing, and the glaze often re-crisps beautifully once thawed, though a quick re-warm in a low oven can bring back that glossy finish.
Glaze Timing Advice: If you’re freezing, consider applying the glaze after thawing to maintain that pristine shine. If you store in the fridge and you want a glossy top, give the bars a 10-minute rest on the counter before serving to help the glaze set to a nice sheen.
Frequently Asked Questions
Final Thoughts
If you’re on the hunt for something that feels like a warm hug but comes together with pantry staples, these peanut butter chocolate bars are the answer. They’re sturdy, sliceable, and perfectly shareable—great for school lunches, after-dinner cravings, or a quick “hello, I baked this” text to a friend. The crust gives you a satisfying bite, the middle is smooth and comforting, and the top glaze is glossy enough to make you grin. I’ve recommended these to neighbors who swear they don’t bake, and they’ve come back asking for the recipe in their own handwriting. That’s the sign of a good recipe: it teaches rather than intimidates, it looks impressive but is totally doable, and it leaves you with a little extra joy in your kitchen. If you try one of the tweaks from Top Tips, you’ll hear that familiar, happy sigh from your family—the one that says, “This is staying in our rotation.” So go ahead and bake a pan; then sit with someone you love, cut a square, and let the chocolate do its magic. Happy baking!
If you gave this peanut butter chocolate bars recipe a try, I’d love to hear how you personalized it. Share your variations in the comments, rate the recipe, or post a photo. My kitchen loves seeing your twists—the best part of cooking together is discovering new favorites you didn’t even know you needed. Celebrate the simple joy of a bar that tastes like a warm memory and a little bit of celebration in every bite. Enjoy, and may your kitchen be forever filled with the sweet scent of peanut butter and chocolate as you bake.
peanut butter chocolate bars
Ingredients
Main Ingredients
- 1.5 cups creamy peanut butter
- 0.75 cups unsalted butter, melted
- 2 cups powdered sugar
- 1.5 teaspoons vanilla extract
- 2 cups semisweet chocolate chips
- 2 tablespoons coconut oil
Instructions
Preparation Steps
- Line an 8x8-inch baking dish with parchment paper, leaving overhang on two sides for easy removal.
- In a large bowl, mix the peanut butter, melted butter, powdered sugar, and vanilla extract until smooth and creamy.
- Press the peanut butter mixture evenly into the prepared baking dish.
- In a microwave-safe bowl, combine the chocolate chips and coconut oil. Heat in 30-second intervals, stirring between each, until fully melted and smooth.
- Pour the melted chocolate mixture over the peanut butter layer, spreading it into an even layer with a spatula.
- Refrigerate for at least 2 hours, or until set.
- Use the parchment paper to lift the bars out of the pan. Cut into 16 squares and serve.


