
Oh, you guys, I’ve been holding out on you! I know we all love a good onion ring, right? That satisfying crunch, that sweet onion bite… it’s Comfort Food at its finest. But lately, I’ve been tinkering, experimenting, and I’ve stumbled upon something truly magical. Something that takes a classic favorite and elevates it to a whole new level of deliciousness. I’m talking about What are some good mozzarella onion rings?. Yes, you heard me right! Imagine that perfect golden-brown crunch, but with a molten, stretchy, cheesy surprise waiting inside. It sounds a little decadent, maybe even a bit extra, but trust me, it’s the kind of extra that makes your taste buds sing. This recipe has become a weekend favorite for my family, and honestly, it’s surprisingly simple to pull off. It’s the perfect appetizer for game night, a fun addition to any BBQ, or, dare I say it, a delightful treat to whip up when you’re just craving something incredibly satisfying. Forget those soggy, bland rings you’ve had elsewhere; this is the real deal.
Thank you for reading this post, don't forget to subscribe!What are Mozzarella onion rings?
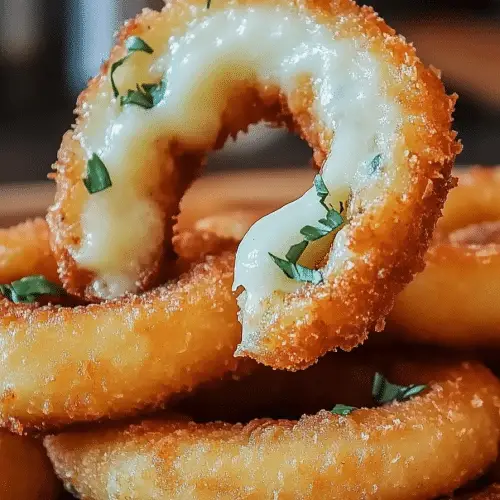
So, what exactly are these glorious little things? Think of them as the love child of a classic onion ring and a mozzarella stick. We start with thick, juicy slices of Sweet Onion, just like you would for regular onion rings. But here’s where the magic happens: we’re going to hollow out a bit of the center of each onion ring and stuff it with a generous amount of melty mozzarella cheese. Then, we’ll coat the whole glorious package in a crispy, seasoned batter and fry it to golden perfection. The result is a delightful duality – the sweet, tender onion paired with that gooey, stretchy cheese, all enveloped in a beautifully crisp exterior. It’s an explosion of textures and flavors that’s unlike anything you’ve probably had before. It’s less about just a fried onion and more about creating a little cheesy parcel of joy. It’s the kind of appetizer that disappears the second you put it down, and everyone will be asking for the recipe!
Why you’ll love this recipe?
Where do I begin? There are so many reasons why I am here.mozzarella onion rings recipe has landed itself squarely in my recipe hall of fame. First and foremost, the flavor is just out of this world. You get that signature sweetness from the onion, which is beautifully balanced by the creamy, mild mozzarella. Then there’s the crunch of the perfectly fried coating – it’s addictive! And the texture combination? Pure bliss. Tender onion, gooey cheese, crispy shell… it’s a symphony in your mouth.
But it’s not just about the taste, although that’s a huge part of it! What I absolutely adore about this recipe is its surprising simplicity. Despite the fancy-sounding name and the incredibly impressive result, it’s actually quite straightforward to make. You don’t need any super-special techniques or ingredients. And when I say simple, I mean it. I’ve made these on busy weeknights when the kids were clamoring for something special, and they were on the table faster than you’d think.
Plus, let’s talk about cost-effectiveness. Onions and mozzarella are generally budget-friendly staples, which means you can create a show-stopping appetizer without breaking the bank. It’s a far more economical option than ordering fancy appetizers when you go out.
And the versatility! While they’re phenomenal on their own, you can totally mix up the cheese inside – think a little cheddar blend or even some pepper jack for a kick. You can also play around with the spices in the batter. I love these for so many reasons, but the fact that they bring smiles to everyone’s faces without requiring hours in the kitchen? That’s what makes this recipe a total winner in my book. It’s a crowd-pleaser, a family favorite, and a guaranteed hit every single time.
How to Make Mozzarella Onion Rings
Quick Overview
This recipe is all about layering flavors and textures for that ultimate bite. We’ll be preparing thick onion rings, carefully stuffing them with mozzarella, coating them in a seasoned batter, and frying them until golden and crispy. The key is in the prep – ensuring the onions are the right thickness and the cheese is well-sealed. It’s a straightforward process that yields incredibly rewarding results. You’ll be amazed at how quickly these come together, making them perfect for spontaneous cravings or planned gatherings.
Ingredients
For the Main Batter:
1 cup all-purpose flour. I always use a good quality unbleached flour for the best texture. If you’re going gluten-free, a 1:1 baking blend works wonders here. Just make sure it’s one you trust!
1/2 cup cornstarch. This is crucial for that extra crispy coating. Don’t skip it!
1 teaspoon baking powder. This helps create a lighter, airier batter.
1 teaspoon salt. For seasoning the coating itself.
1/2 teaspoon Black Pepper. Freshly ground, if you have it, makes a difference!
1/4 teaspoon paprika. For a hint of color and subtle warmth.
Pinch of cayenne pepper (optional). If you like a little warmth, this is your cue!
For the Filling:
1 large sweet onion, like Vidalia or Walla Walla. We want a nice, big onion for substantial rings.
8 ounces mozzarella cheese, cut into sticks or chunks. Low-moisture mozzarella works best as it melts beautifully without making the batter soggy. You can also use shredded, but sticks are easier to manage inside the onion.
For the Glaze:
1/2 cup powdered sugar. For that classic sweet finish.
2-3 tablespoons milk (or water). Start with 2 tablespoons and add more until you reach your desired drizzling consistency. I sometimes use almond milk for a slightly different flavor.
Step-by-Step Instructions
Step 1: Preheat & Prep Pan
First things first, let’s get our frying situation ready. You’ll need a heavy-bottomed pot or Dutch oven for frying. Fill it with about 2-3 inches of vegetable oil, canola oil, or any high-heat oil you prefer. We’re going to heat this oil up to about 350°F (175°C). If you don’t have a thermometer, don’t worry! A good test is to drop a tiny bit of batter into the oil – if it sizzles and floats immediately, you’re good to go. Make sure you have a wire rack set over a baking sheet nearby for draining the fried rings. This is key to keeping them crispy!
Step 2: Mix Dry Ingredients
In a medium-sized bowl, whisk together the all-purpose flour, cornstarch, baking powder, salt, Black Pepper, paprika, and cayenne pepper (if you’re using it). Give it a really good whisk to make sure everything is evenly distributed. This dry mix is what gives our onion rings that fantastic, crunchy coating. I always make sure to get rid of any lumps from the flour and cornstarch!
“Made the mozzarella onion rings tonight and wow — perfect weeknight dinner. Will definitely make again!”
Step 3: Mix Wet Ingredients
Now, in a separate bowl, we’ll prepare our wet ingredients. You’ll need about 1 to 1 1/4 cups of cold water. The colder the water, the crispier your batter will be! You can also use cold beer or milk for a slightly different flavor profile, but water is my go-to for reliability. Whisk the water into the dry ingredients until you have a smooth, relatively thick batter. It should be thick enough to coat the back of a spoon but still pourable. If it’s too thick, add a tablespoon more water at a time; if it’s too thin, add a tablespoon more flour and cornstarch.
Step 4: Combine
This is where we bring it all together. Once your batter is mixed, we’re going to start assembling the rings. Take your thick onion slices. You want them about 1/2 inch thick. If they’re too thin, they’ll fall apart. If they’re too thick, they might not cook through. Gently separate the rings, making sure you have some nice, sturdy ones for stuffing. Place a piece of mozzarella cheese inside the cavity of each onion ring. You want a good amount, but don’t overstuff them, or the cheese might ooze out too much during frying. Once you have a few stuffed, carefully dip each one into the batter, ensuring it’s fully coated. Let any excess batter drip off for a second before carefully placing it into the hot oil. Don’t overcrowd the pot; fry in batches!
Step 5: Prepare Filling
While your oil is heating, let’s get the filling ready. Take your large sweet onion and slice it into thick rings, about half an inch thick. You want sturdy rings that can hold their shape and the cheesy goodness. Carefully separate the rings. For each ring, you’ll want to hollow out the center just a tiny bit more to make room for the cheese. You can do this with a small paring knife or even the tip of a spoon. Aim to create a little pocket. Now, take your mozzarella cheese and cut it into sticks or chunks that will fit snugly inside the hollowed-out onion rings. You want enough cheese to be generous but not so much that it’ll all melt out during frying. This step is all about creating that perfect cheesy surprise.
Step 6: Layer & Swirl
Now for the fun part! Take one of your prepared onion rings with the mozzarella stuffed inside. Gently dip it into the batter, making sure it’s fully coated on all sides. Let any excess batter drip off for a moment. Carefully slide the battered ring into the hot oil. You want to fry these in batches so they don’t stick together and the oil temperature stays consistent. As they fry, they’ll puff up and turn a beautiful golden brown. Keep an eye on them, and gently turn them with tongs or a slotted spoon to ensure even cooking and browning. They usually take about 3-4 minutes per side, depending on your oil temperature and the thickness of the rings.
Step 7: Bake
Oops! We’re actually frying these, not baking! My apologies, sometimes my brain gets ahead of my typing. So, after you’ve coated your mozzarella-stuffed onion rings, carefully place them into the hot oil. Fry in batches, about 3-4 minutes per side, until they are a beautiful, deep golden brown and the batter is crispy. Use a slotted spoon or spider strainer to remove them from the oil and place them on the prepared wire rack over the baking sheet to drain. This is crucial for maintaining that incredible crispiness. You don’t want them sitting in excess oil!
Step 8: Cool & Glaze
Once your mozzarella onion rings are beautifully golden and drained on the wire rack, let them cool for just a few minutes. We want them warm enough for the cheese to be perfectly gooey, but not so hot that they’re impossible to handle. While they’re cooling slightly, whisk together the powdered sugar and 2 tablespoons of milk (or water) in a small bowl. Add more liquid, a teaspoon at a time, until you get a consistency that’s easy to drizzle but not too runny. Once the rings have cooled slightly, drizzle the glaze generously over the top. This sweet glaze is the perfect counterpoint to the savory onion and cheese. It’s totally optional, but I highly recommend it!
Step 9: Slice & Serve
The moment of truth! Serve your delicious mozzarella onion rings immediately while they’re still warm and the cheese is at its peak gooeyness. If you’ve added the glaze, it will set up just slightly as they cool. They are absolutely divine on their own, but they also pair wonderfully with a side of marinara sauce for dipping, or even a spicy aioli. Be prepared for everyone to dive in!
What to Serve It With
These mozzarella onion rings are so versatile, they can honestly be the star of the show or a fantastic supporting player. For breakfast? I know, it sounds wild, but hear me out! A couple of these alongside some scrambled eggs and a perfectly ripe avocado can be a surprisingly satisfying start to the day. The savory cheese and onion are a fun twist on breakfast. For brunch, they elevate any spread. Imagine them nestled alongside some mini quiches, a fresh Fruit Salad, and maybe some mimosas. They add a touch of indulgence and fun.
As a dessert? Okay, this might be the most unconventional, but I’ve actually served them as a fun, savory “dessert course” after a lighter meal, especially for a themed party. The sweet glaze helps bridge that gap, and it’s definitely a conversation starter. People are usually amused and then delighted by the combination.
But my favorite way to serve them is as a cozy snack. Picture this: a rainy afternoon, a good book, and a plate of these warm, cheesy, crispy rings. Maybe a cup of hot cocoa or a calming herbal tea. It’s pure comfort. They’re also fantastic for game nights! Serve them in a big bowl with a selection of dipping sauces – ranch, marinara, a spicy mayo. My kids have declared them the official “Game Day snack” at our house. I’ve also found they pair wonderfully with a simple side salad to balance out the richness, making it a more complete light meal.
Top Tips for Perfecting Your Mozzarella Onion Rings
I’ve made these mozzarella onion rings more times than I can count, and along the way, I’ve picked up a few tricks that I think make all the difference. First, when you’re preparing your onion rings, don’t be afraid to give them a good squeeze after you grate or chop them (if you were going to do something like zucchini fritters, which is where I learned this trick!). For these onion rings, the key is selecting the right onion and cutting it to the perfect thickness. About half an inch is my sweet spot – thick enough to hold together, thin enough to cook through. If your onion slices are too thin, they might disintegrate, and if they’re too thick, the onion might not get tender.
When it comes to mixing your batter, remember the colder the liquid, the crispier the batter. I’ve even thrown a few ice cubes into my water when making the batter on a warm day. And resist the urge to overmix! A few small lumps are totally fine. Overmixing develops the gluten in the flour, which can lead to tough rings instead of wonderfully light and crispy ones. You want just enough to combine everything into a smooth, but not perfectly smooth, consistency.
For the filling, it’s all about that cheese seal. Make sure the mozzarella is tucked in well. If it starts to ooze out during frying, it’s not the end of the world, but a good seal means more cheesy goodness stays inside. You can even gently press the edges of the onion ring around the cheese to help hold it in place before battering.
When it comes to ingredient swaps, I’ve played around quite a bit. For a different flavor profile in the batter, I’ve used a light beer instead of water – it adds a subtle malty note that’s delicious. For the cheese, while mozzarella is classic, a blend of mozzarella and provolone can add a bit more depth. I’ve also experimented with adding a pinch of garlic powder to the batter mix, which is lovely.
And baking versus frying? We’re definitely frying these for that ultimate crisp! The key to perfect frying is maintaining the oil temperature. If it’s too low, the rings will absorb too much oil and become greasy. If it’s too high, the outside will burn before the inside cooks. My best advice is to fry in small batches so the oil temperature doesn’t drop too drastically. And as I mentioned, draining them on a wire rack is non-negotiable for crispiness. I learned that the hard way after one too many batches sitting sadly in a pool of their own oil!
“Packed with flavor and so simple. Exactly what I wanted from this mozzarella onion rings!”
Storing and Reheating Tips
Okay, so the Absolute Best way to enjoy these mozzarella onion rings is fresh out of the fryer. That glorious crunch and the perfectly molten cheese? It’s a fleeting moment of perfection! However, life happens, and sometimes you have leftovers. If you do have any that survive, storing them properly is key. At room temperature, I’d say they’re best eaten within a couple of hours. After that, the batter can start to lose some of its crispness. Make sure to keep them in a single layer on paper towels or a plate loosely covered with foil, not tightly sealed, to prevent steaming.
For refrigerator storage, they’ll last about 2-3 days. The trick here is to let them cool completely before sealing them in an airtight container or a zip-top bag. Again, I like to put them in a single layer if possible or use parchment paper between layers to prevent them from sticking too much. They might lose a bit of their crispness in the fridge, but they’ll still be delicious!
Freezing these is a bit trickier because of the cheese, but it’s doable! For the best results, I recommend flash-freezing them. Arrange the cooled rings in a single layer on a baking sheet and freeze until solid, about 1-2 hours. Then, transfer them to a freezer-safe bag or container. They can be stored in the freezer for up to 2 months. When you’re ready to reheat, the best method is in the oven or an Air Fryer. Preheat your oven to around 375°F (190°C) or your air fryer to 350°F (175°C). Place the frozen rings on a baking sheet or in the air fryer basket in a single layer. Bake or air fry for about 8-12 minutes, or until heated through and crispy again. This method really helps revive that crunch. Avoid the microwave if you can; it tends to make them soggy.
And if you’ve added the glaze, I’d recommend adding it *after* reheating if you plan to store them. Glaze can get sticky and a bit weird when frozen and reheated, so a fresh drizzle after they’re warm and crispy is always best.
Frequently Asked Questions
Final Thoughts
So there you have it – my go-to recipe for the most incredible mozzarella onion rings. I truly believe that simple ingredients, prepared with a little bit of love and attention, can create something truly spectacular. This recipe embodies that for me. It’s a reminder that sometimes the most ordinary ingredients can be transformed into something extraordinary, bringing joy and deliciousness to any table. The combination of that sweet, tender onion, the unbelievably gooey mozzarella, and that perfectly crispy coating is just a match made in culinary heaven.
If you’re a fan of classic onion rings and can’t resist the lure of melted cheese, you’re going to absolutely adore these. They’re more than just an appetizer; they’re an experience! They’re the kind of food that sparks conversation, encourages second helpings, and leaves everyone asking for the recipe.
I really hope you give these a try. I’m so excited for you to experience the magic! If you do make them, please, please, please let me know how they turn out in the comments below! I’d love to hear your thoughts, any variations you tried, or how quickly they disappeared from your plate. And if you loved this recipe, you might also want to check out my Crispy Zucchini Fritters or my Ultimate cheesy garlic breadsticks – they’re other family favorites that are perfect for sharing!
Happy cooking, everyone! Can’t wait to hear all about your mozzarella onion ring creations!
mozzarella onion rings
Ingredients
Main Ingredients
- 2 large onions sliced into rings
- 1 cup all-purpose flour
- 2 large eggs beaten
- 1.5 cup panko breadcrumbs
- 1 teaspoon salt
- 0.5 teaspoon black pepper
- 250 grams mozzarella cheese cut into rings, about 1cm thick
- 3 cups vegetable oil for frying
Instructions
Preparation Steps
- Peel and slice the onions into rings. Separate the rings.
- Prepare three shallow dishes. In the first, place the flour. In the second, whisk the eggs. In the third, combine the panko breadcrumbs, salt, and pepper.
- Take a mozzarella ring, dredge it in flour, dip it in the beaten eggs, and then coat it generously with the panko breadcrumb mixture. Repeat with all mozzarella rings.
- In a deep pan or pot, heat the vegetable oil over medium-high heat until it reaches about 180°C (350°F).
- Carefully fry the coated mozzarella rings in batches for 2-3 minutes per side, until golden brown and the cheese is melted and gooey.
- Remove the fried rings with a slotted spoon and place them on a paper towel-lined plate to drain excess oil.
- Serve immediately with your favorite dipping sauce.


