There are some recipes that just feel like home, aren’t there? This Italian Lemon jam is one of those for me. It’s not just a preserve; it’s a little jar of sunshine, a burst of pure, unadulterated citrus happiness that I find myself reaching for year-round. I remember my Nonna making this every spring, the entire house perfumed with the most incredible, bright lemon scent. It was always a special occasion, a sign that warmer days were finally on their way. Honestly, if you’ve ever tasted a truly magnificent lemon cake or a perfectly balanced lemon tart, this jam is that essence, captured and ready to elevate anything you pair it with. It’s surprisingly straightforward, too, which is always a win in my book, especially when you’re craving something special but don’t have hours to spend in the kitchen. Think of it as sunshine you can spread on toast!
Thank you for reading this post, don't forget to subscribe!What is Italian Lemon Jam?
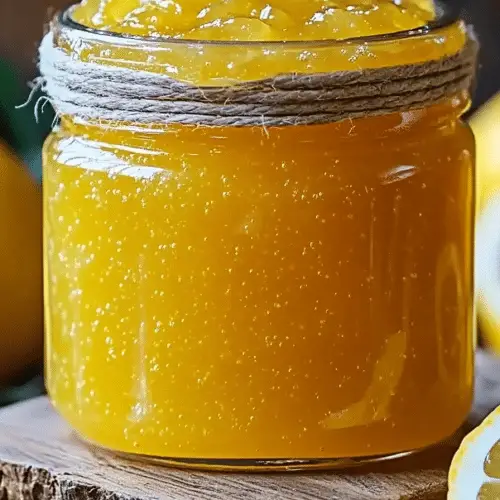
So, what exactly is Italian lemon jam? At its heart, it’s a simple yet elegant preserve made primarily from lemons, sugar, and a touch of pectin or just the natural setting power of cooked fruit. Unlike marmalade, which often includes the pith and peel for a more bitter, complex flavor, this Italian version tends to be smoother and focuses on that wonderfully bright, sweet-tart lemon flavor. It’s less about the chew of candied peel and more about the pure, vibrant juice and zest. Think of it as the soul of a lemon, concentrated and sweetened just enough to bring out its best qualities. It’s the kind of spread that makes a simple piece of toast feel like a gourmet experience, or adds a sophisticated zing to your morning yogurt. It’s essentially sunshine bottled, with a little bit of magic from the kitchen.
Why you’ll love this recipe?
There are so many reasons why this Italian lemon jam has become an absolute staple in my pantry, and I just know you’re going to fall in love with it too. First off, let’s talk about the flavor. It’s that perfect balance of sweet and tart that just sings. It’s not cloyingly sweet like some jams can be, and it has that wonderful, bright citrus punch that wakes up your taste buds. It’s like a little bit of Mediterranean sunshine right on your spoon. Then there’s the simplicity of it all. Honestly, I was a bit intimidated by making jam for the first time, but this recipe is so forgiving and straightforward. You don’t need fancy equipment or a whole afternoon. You can whip up a batch in under an hour, and the results are just phenomenal. Plus, it’s incredibly cost-effective! Lemons and sugar are pantry staples, making this a budget-friendly way to create something truly special. What I love most, though, is its sheer versatility. I’ll get to more ideas in a bit, but you can use this jam in so many ways – on your morning toast, swirled into yogurt, as a glaze for chicken or fish, or even as a secret ingredient in your baked goods. It’s also a fantastic alternative if you’re looking for something lighter than a heavy cake or pie when that sweet craving hits. It feels so much lighter and fresher, a real lift for the senses. It truly stands out because it captures that pure, unadulterated lemon essence in a way that few other things can.
How do I make Italian lemon jam?
Quick Overview
Making this Italian lemon jam is a surprisingly simple process that mainly involves simmering lemons with sugar until they reach a jammy consistency. You’ll extract the juice and zest, combine it with sugar, and then cook it down gently. The key is to achieve that perfect, spreadable texture without overcooking or undercooking. It’s a foolproof method that delivers incredibly bright, tangy-sweet results every single time, and it really doesn’t take all day. You’ll have a beautiful, homemade preserve ready to enjoy or gift in no time.
Ingredients
For the Main Jam: What are the rules?
You’ll need about 6-8 large, fresh lemons for this. I always try to get organic if I can, just so I don’t have to worry about any waxy coatings on the peel when I’m zesting. You’ll want about 1.5 to 2 cups of fresh lemon juice, so it’s good to have a few extra lemons on hand. As for sugar, I typically use granulated white sugar, about 3 cups. This helps with the setting process and balances the tartness beautifully. Some people like to add a bit of lemon zest (from about 2 lemons) for an extra punch of that fragrant lemon oil – I absolutely do this! It adds such an amazing aroma while it cooks.
For Setting (Optional but recommended for a firmer set):
While natural pectin from the lemons *can* set the jam, I often add a little something extra for a guaranteed perfect texture. You can use about 1-2 tablespoons of pectin powder, or even a tablespoon of cornstarch mixed with a little water to make a slurry. This ensures that lovely thick, spreadable consistency without needing to cook it for hours and hours, which can sometimes dull the bright lemon flavor. If you’re using cornstarch, it’s important to add it towards the end of the cooking process.
Optional Flavor Boosters:
Sometimes, I like to add a tiny splash of limoncello towards the end of cooking for an extra layer of lemon intensity, or even a small sprig of rosemary or a vanilla bean pod while it simmers for a more complex flavor profile. These are totally optional, but they can take your Italian lemon jam to a whole new level!
“New family favorite! This Italian Lemon Jam was so flavorful and ridiculously easy. Crowd-pleaser for sure.”
Step-by-Step Instructions
Step 1: Prepare the Lemons
First things first, we need to get our lemons ready. Wash them really well, especially if you aren’t using organic. Then, you’re going to zest about 2 of the lemons. Be careful to only get the yellow part, the zest, and avoid the bitter white pith underneath. Finely mince the zest. Next, juice all your lemons until you have about 1.5 to 2 cups of fresh juice. You can strain out any seeds, but I usually leave a little pulp in there – it adds character! I find that using a citrus reamer and then a fork to squeeze out the last bits of juice is the most efficient way to get every last drop.
Step 2: Combine Ingredients in the Pot
Grab a medium-sized, heavy-bottomed saucepan. This is important because it helps distribute the heat evenly and prevents scorching. Pour in your fresh lemon juice, the finely minced zest, and your sugar. If you’re using pectin, you’ll often add it now with the sugar according to the pectin package instructions. If you’re going the cornstarch route, we’ll add that later. Stir everything together until the sugar is mostly dissolved.
Step 3: Bring to a Simmer
Place the saucepan over medium heat. Stir frequently as the mixture heats up, ensuring all the sugar dissolves completely. Once it starts to get warm, you’ll see it begin to break down. Keep stirring until it reaches a gentle simmer. Don’t let it boil vigorously at this stage; we’re just getting things started.
Step 4: Cook and Thicken
Once simmering, reduce the heat to low or medium-low. You want a gentle, steady simmer, not a rolling boil. Stir almost constantly. This is where the magic happens! The mixture will start to thicken. This process usually takes about 20-30 minutes, sometimes a bit longer, depending on your stove and the exact sugar/juice ratio. If you’re using cornstarch, this is the time to add your slurry (cornstarch mixed with a tablespoon or two of cold water). Whisk it in immediately, and continue to stir as the jam thickens. You’re looking for a consistency that coats the back of a spoon and when you run your finger through it, the line holds for a moment before slowly closing.
Step 5: Test for Set
This is the crucial part of jam-making! To test if it’s ready, I always do the “cold plate test.” Before you start cooking, put a few small plates in your freezer. When you think the jam is getting close, spoon a little bit onto one of the cold plates. Let it sit for about a minute, then gently push the edge of the jam with your finger. If the surface wrinkles, it’s ready! If it’s still very liquidy, let it cook for a few more minutes and test again. Don’t rush this step – it’s better to cook it a little longer than to have a runny jam!
Step 6: Add Optional Flavorings (if using)
If you’re adding any optional ingredients like limoncello or herbs, stir them in during the last few minutes of cooking, just before you do your final set test. This helps preserve their delicate flavors.
Step 7: Jar and Cool
Once your jam has reached the desired consistency, carefully ladle it into clean, sterilized jars. Leave about a 1/4 inch of headspace at the top. Wipe the rims of the jars clean to ensure a good seal. Let the jars cool on your counter for at least 12-24 hours. You’ll hear that satisfying ‘pop’ as they seal. If a jar doesn’t seal, just pop it in the fridge and use it first!
Step 8: Store Your Jam
Once sealed, store your Italian lemon jam in a cool, dark place like your pantry. It will keep beautifully for up to a year. Once opened, always refrigerate and enjoy within a few weeks.
“Packed with flavor and so simple. Exactly what I wanted from this Italian Lemon Jam!”
What to Serve It With
Oh, this is where the fun really begins! My Italian lemon jam is incredibly versatile, so don’t be shy about experimenting. For breakfast, it’s absolutely divine spread on warm, crusty bread, a croissant, or even swirled into a bowl of plain Greek yogurt with a sprinkle of granola. The tangy sweetness is the perfect wake-up call. For a more leisurely brunch, it’s fantastic dolloped onto pancakes or waffles, or even as part of a cheese board – the sharp citrus pairs beautifully with creamy cheeses like brie or goat cheese. As a dessert, it’s a secret weapon! Drizzle it over vanilla ice cream, use it as a filling for simple shortbread cookies, or even swirl it into a quick Pound Cake batter before baking. It adds this lovely brightness that cuts through richness. And for those cozy, late-night snack cravings, a simple spoonful straight from the jar (don’t tell anyone!) or spread on a few plain crackers is pure comfort. My kids especially love it on homemade scones. It’s a little taste of summer, no matter the season.
Top Tips for Perfecting Your Italian Lemon Jam
After making this countless times, I’ve picked up a few tricks that I think make all the difference in getting that perfect jar of Italian lemon jam every time. When zesting your lemons, really pay attention to avoiding that bitter white pith. It’s the zest that holds all that beautiful fragrant oil, and you want that bright flavor without any bitterness. A good microplane grater is your best friend here! For sweetness, I’ve found that using granulated sugar is best for setting, but if you’re feeling adventurous, you can experiment with a mix of granulated and a bit of raw cane sugar for a slightly deeper flavor, though it might affect the color slightly. When it comes to cooking the jam, patience is key! Don’t rush the simmering process. Stirring constantly is non-negotiable, especially as it thickens, to prevent it from sticking to the bottom of the pan and burning – nobody wants burnt lemon jam! The cold plate test is your Absolute Best friend for checking the set. I’ve learned the hard way that trying to guess can lead to either runny jam or jam so stiff it’s almost candy. If you’re worried about it setting, adding a tablespoon of cornstarch slurry in the last 5-10 minutes of cooking is a lifesaver. It thickens beautifully without adding a starchy taste. For a smoother jam, you can always pass the cooked mixture through a fine-mesh sieve before jarring, but I personally love a little bit of pulp for texture. If you’re looking to mix things up, a tiny pinch of cardamom or a sprig of thyme added during the last 10 minutes of cooking can create a wonderfully complex flavor profile. And remember to always sterilize your jars properly; it’s crucial for ensuring the jam lasts and stays fresh for as long as possible.
Storing and Reheating Tips
Proper storage is key to enjoying your delicious homemade Italian lemon jam for as long as possible. Once your jars have cooled and you’ve confirmed they’ve sealed (that little pop is so satisfying!), you can store them in a cool, dark pantry for up to a year. Think of it like fine wine – it’s best kept away from direct sunlight and heat. If a jar doesn’t seal, don’t fret! Just pop it into the refrigerator. It will still be perfectly delicious, but it’s best to consume it within a few weeks. Once you’ve opened a jar, it definitely needs to live in the fridge. Keep it tightly covered with its lid, and it should stay fresh and delightful for about 3-4 weeks. You’ll know it’s still good if it looks and smells fresh, with no signs of mold or off-odors. Reheating isn’t really a thing for jam itself, as it’s meant to be eaten cold or at room temperature. However, if you’re using it as a glaze for something, you might want to gently warm it up. Just a few seconds in a small saucepan over low heat, or even a quick zap in the microwave (in a microwave-safe dish, of course!), should do the trick to make it more pourable. Remember, the glaze is best applied when the jam is still a bit warm for optimal spreadability before it starts to set.
Frequently Asked Questions
Final Thoughts
I really hope you give this Italian lemon jam a try. It’s one of those recipes that brings me so much joy, not just in the making, but in all the ways I get to use it. It’s simple, it’s bright, and it’s packed with that wonderful, fresh lemon flavor that just makes everything a little bit better. Whether you’re spreading it on your morning toast, using it to elevate a simple dessert, or even gifting a jar to a friend, I promise it will be a hit. It’s a little reminder that sometimes, the most delicious things come from the simplest ingredients and a bit of love. If you’re already a fan of citrusy bakes, you might also enjoy my recipe for a [Classic Lemon Pound Cake] or perhaps some [Zesty Lemon Shortbread Cookies]. I can’t wait to hear how your Italian lemon jam turns out and how you decide to enjoy it! Let me know in the comments below, and don’t be shy about sharing your own tips or variations!
Italian Lemon Jam
Ingredients
Main Ingredients
- 4 large lemons zested and juiced
- 2 cups granulated sugar
- 0.5 cup water
Instructions
Preparation Steps
- In a saucepan, combine the lemon zest, lemon juice, granulated sugar, and water. Stir well to dissolve the sugar.
- Bring the mixture to a boil over medium-high heat, then reduce the heat to low and simmer for about 25-30 minutes, stirring occasionally, until the jam has thickened. It should coat the back of a spoon.
- Pour the hot jam into sterilized jars and seal them tightly. Let cool completely before storing in the refrigerator.