There’s just something about a good, old-fashioned cake that hits all the right notes—comfort, nostalgia, and that sweet, irresistible aroma that makes everyone’s mouth water. But when you add a twist of Cherry Dr Pepper into the mix, it’s like taking that comfort food to a whole new level. I remember discovering this recipe a few years back when I was in a rush, craving something sweet but didn’t want to fuss over complicated ingredients. The first bite was pure magic—the cherry and cola flavors blend so beautifully, and the scent alone will fill your whole kitchen with happiness. My kids ask for this all the time, especially on special weekends, and it’s become a family favorite to share at potlucks or just whenever we’re craving a little sweet treat without fuss. Honestly, this one’s a lifesaver on busy nights or when I want to surprise someone with something that tastes way more decadent than it really is. And trust me—once you make it, it’s going to be hard to go back to regular cake. Get ready to fall in love!
Thank you for reading this post, don't forget to subscribe!What is a Cherry Dr Pepper Cake?
Think of Cherry Dr Pepper Cake as a fun and flavorful twist on your classic SHEET CAKE—think super moist, fluffy, and bursting with a flavor combo that’s equal parts nostalgic and downright delicious. The name might sound fancy, but it’s really just a simple cake made with a splash of Cherry Dr Pepper soda, which makes the batter insanely moist and gives it that unique cherry-cola flavor that’s both sweet and a little tangy. It’s essentially a soda-infused vanilla cake with a little cherry boost—kind of like those childhood memories of sipping fizzy Cherry Dr Pepper on a hot summer day. The best part? It’s so easy to pull together, even if you’re not a seasoned baker. No fancy frosting skills needed—just a simple glaze or dusting of powdered sugar, and you’re good to go. It’s a playful, crowd-pleasing dessert that’s perfect for gatherings, casual family dinners, or when you just want to treat yourself to something sweet with a kick of flavor.
Why you’ll love this recipe?
What I love most about this Cherry Dr Pepper Cake is how it combines a lot of good things—moisture, flavor, and a touch of nostalgia—all in one slice. The flavor profile is unbelievable; that cherry hint paired with the cola caramel undertones create this irresistible taste that’s hard to put down. And if you’re like me, you’ll appreciate how easy it is to make. This cake seriously comes together in about 10 minutes of prep—no fancy techniques, just simple mixing and pouring. Plus, it’s budget-friendly. The ingredients are staples most of us have on hand, and the soda does all the heavy lifting in keeping it tender and flavorful. I’ve tested this with different sodas, and honestly, Cherry Dr Pepper is the star—it’s like a flavor punch that makes every bite special. I’ve served it at everything from backyard barbecues to cozy family brunches, and it always disappears in minutes! The versatility here is key—serve it as a casual snack, a party centerpiece, or even a fancy dessert with whipped cream or Ice Cream on the side. It’s genuinely a crowd-pleaser, and my personal favorite for when I want a quick, guaranteed hit of sweetness.
How do I make a Cherry Dr Pepper Cake?
Quick Overview
This cake couldn’t be simpler. Basically, you mix your dry ingredients in one bowl, whisk your wet ingredients in another, then combine them without overmixing—that’s where good texture comes from. Once your batter’s ready, pour half into your pan, dollop a generous layer of cherry filling, swirl it in, then top with the remaining batter. Pop it in the oven, and in about 35-40 minutes, you’ve got a beautifully bubbling, fragrant cake full of cherry cola goodness. The magic really happens during baking when the soda helps the cake stay Super Moist and fluffy. Finish it off with a quick glaze or just dust it with powdered sugar, and let the aroma do the rest of the work. It’s forgiving, flexible, and everyone’s going to ask for seconds.
Ingredients
For the Main Batter:
- 2 cups all-purpose flour (I like organic, unbleached if I can find it)
- 1 ½ cups granulated sugar (trust me, the sugar balances the soda’s tang)
- 1 teaspoon baking powder
- ½ teaspoon baking soda
- ½ teaspoon salt (brings out the flavor)
- 1 cup vegetable oil (or melted unsalted butter, if you’re feeling fancy)
- 4 large eggs (at room temp, for best rise)
- 1 ½ cups Cherry Dr Pepper soda (the key ingredient!)
- 1 teaspoon vanilla extract (for depth)
For the Filling:
- 1 cup cherry pie filling (or make your own with fresh cherries!)
- Optional: a splash of cherry liqueur or extract for extra punch
For the Glaze:
“I don’t know if I’ve ever eaten a better How to Bake a Fizzy Cherry Soda Cake. The rub alone is wonderful, but the sauce??? Over the top!”
- 1 cup powdered sugar
- 2-3 tablespoons Cherry Dr Pepper soda (adjust for thinning)
- Optional: a few drops of vanilla or almond extract
Step-by-Step Instructions
Step 1: Preheat & Prep Pan
Set your oven to 350°F (175°C). Grease a 9-inch round cake pan or line it with parchment paper—trust me, this makes life easier when you’re trying to get the cake out! A quick coating of butter and a sprinkle of flour works perfectly. Get everything ready; this cake comes together fast once you start mixing.
Step 2: Mix Dry Ingredients
In a big bowl, whisk together the flour, sugar, baking powder, baking soda, and salt. Mixing these well ensures an even rise and a light crumb—something I’ve learned after a few dense cakes. Set this aside but keep it handy.
Step 3: Mix Wet Ingredients
In another bowl, beat the eggs, then add the oil, vanilla, and Cherry Dr Pepper. I always do this in stages—makes for a smoother batter. The soda should be at room temperature so it blends nicely and creates that lovely fizz in the batter.
Step 4: Combine
Pour the wet into the dry slowly, folding gently—don’t overmix! Overmixing can make the cake rubbery, and no one wants that. Just stir until everything’s combined and you see no streaks of flour. The batter will be somewhat thin, and that’s okay—it’s supposed to be!
Step 5: Prepare Filling
While the batter is resting, scoop out the Cherry Pie filling into a bowl. If you want more cherry flavor, feel free to add a splash of cherry extract or liqueur here.
Step 6: Layer & Swirl
Pour half of the batter into your prepared pan. Dollop the cherry filling over the top, then swirl it in with a knife or skewer, creating beautiful marbled streaks. If you’re feeling playful, add some fresh cherries or mini chocolate chips for extra surprise bites.
Step 7: Bake
Pop it into your preheated oven and bake for 35-40 minutes. Check doneness with a toothpick inserted in the center—if it comes out clean, you’re good. The edges should be golden, and the top slightly cracked—classic sign it’s baked through. Watch your oven times, because every oven’s a little different!
Step 8: Cool & Glaze
Let the cake cool in the pan for about 15 minutes, then transfer to a wire rack. Once cooled, pour your glaze over—just enough to drizzle down the sides. I often make extra glaze because I love that sticky, shiny finish that elevates it from good to extraordinary.
“New family favorite! This How to Bake a Fizzy Cherry Soda Cake was so flavorful and ridiculously easy. Crowd-pleaser for sure.”
Step 9: Slice & Serve
Use a sharp serrated knife to cut neat slices—patience is key so it doesn’t snag. Serve it at room temperature or chilled—either way, it’s a winner. Pair it with a scoop of vanilla ice cream or a dollop of whipped cream for extra decadence. Sometimes I sprinkle a little extra cherry on top, just because.
What to Serve It With
This cake is basically a blank canvas—great on its own, but even better with a few special touches. For breakfast, I love serving a warm slice with a steaming cup of coffee or a glass of cold milk—you know, the kind of morning chat where everyone’s still in pajamas. At brunch, it’s fantastic alongside a fresh fruit salad or yogurt parfait, dressed up with some mint leaves or a dusting of powdered sugar. When I’ve got friends over for dinner, I’ll slice it up and serve with a drizzle of caramel or chocolate sauce, maybe even crowned with a dollop of whipped cream and a cherry—because why not? And on cozy nights, it’s perfect with just a cup of hot tea or ice-cold milk. Honestly, I’ve served this at countless family gatherings, and each time it disappears faster than I can say ‘delicious’! It’s comfort, fun, and a little bit nostalgic—the ultimate crowd-pleaser that feels special but is dead simple to make.
Top Tips for Perfecting Your Cherry Dr Pepper Cake
Over the years, I’ve picked up a few tricks to make this cake consistently amazing. First, don’t skip the drain on the cherry pie filling if it’s extra juicy—too much liquid can make the batter runny or cause uneven baking. I learned this the hard way when my first batch turned out a little wet on top. Instead, I drain or even pat the cherries dry with paper towels before spooning them in. For the batter, I’ve tested with different brands of soda, but Cherry Dr Pepper really is the star—it’s got that balanced cherry and cola flavor that makes all the difference. When mixing, I always fold gently rather than beat vigorously—less chance of dense, tough crumbs. For the swirl, I like to use a skewer or toothpick to draw fun patterns—try zigzags, spirals, or even initials. It’s a tiny detail but totally worth it for that eye-catching effect. If you want a richer flavor, add a bit of chopped dark chocolate or toasted almonds into the batter—totally optional, but I love experimenting! Baking at the right temperature and performing the toothpick test is the key to perfectly moist yet cooked-through cake. Lastly, a good glaze can elevate any cake—play around with ingredients like cream cheese or mascarpone for a tangy twist or keep it classic with powdered sugar. Trust me, I’ve tried it all, and simplicity often wins. Just remember—don’t overmix, watch your bake time, and have fun customizing the toppings.
Storing and Reheating Tips
This cake tastes just as good the next day—sometimes better, because the flavors have had a chance to meld. Wrap it tightly with plastic wrap or store in an airtight container at room temperature for up to two days. Keep in mind, if your kitchen is humid, it’s better to refrigerate after the first day, especially if you’ve added a cream cheese glaze or whipped toppings. In the fridge, it’ll last about 3-4 days; just bring it back to room temp or give it a quick warm-up in the microwave for a few seconds before slicing. If you want to freeze it—absolutely! Wrap the cooled cake tightly in plastic wrap and aluminum foil, and it’ll keep well for up to 3 months. Thaw overnight in the fridge or at room temp, then glaze or serve straight from the fridge if you like it chilled. When reheating, avoid the microwave on high for too long, as you don’t want it to dry out; a short blast on 50% power usually does the trick. As for the glaze, I recommend adding it just before serving—if you’re storing overnight, keep it separate and add fresh on the day you serve. That shiny, sticky finish keeps the cake looking and tasting its best and makes the slices so appealing.
Frequently Asked Questions
Final Thoughts
If you’re looking for a cake that’s fun, flavorful, and just a little bit nostalgic, I honestly think you’ll love this Cherry Dr Pepper Cake. It’s like a party in every bite, with that bright cherry pop and the smooth cola undertone that’s both childish and gourmet at the same time. It’s perfect for family dinners, casual get-togethers, or even just when you’re craving a cozy nightcap dessert that doesn’t take hours to prepare. Over the years, I’ve tried different tweaks—from adding a splash of vanilla to mixing in some chopped nuts—and I’ve never been disappointed. This cake’s one of those recipes I keep coming back to because it’s proven to be reliable, delicious, and a real conversation starter. I hope you have as much fun making it as I did, and I’d love to hear your favorite variations or tricks! Don’t forget to snap some photos—because I can tell you, it looks as good as it tastes. Happy baking—and enjoy every sweet, fizzy, cherry-dr peppery bite!
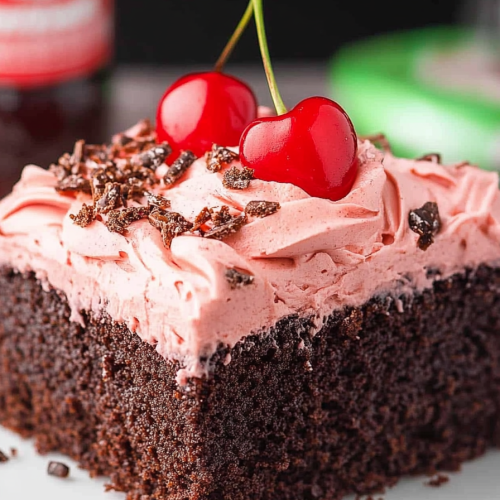
Cherry Dr Pepper Cake
Ingredients
Main Ingredients
- 1 box devil's food chocolate cake mix
- 1.5 cups cherry Dr. Pepper
- 10 oz maraschino cherries Remove stems from 15, slice in half
- 2 sticks butter Softened
- 3 cups powdered sugar Plus 1/2 cup extra if needed
- 0.25 cup chocolate shavings Store-bought or homemade
Instructions
Preparation Steps
- Preheat the oven to 350 degrees Fahrenheit.
- Spray a 9x13 baking dish with non-stick spray.
- Remove cherries from jar, reserving liquid. Slice 15 stems in half and keep remaining cherries for garnish.
- In a large bowl, mix the cake mix and Cherry Dr. Pepper until just combined.
- Stir in sliced cherries with a large spoon.
- Pour batter into prepared dish and bake for 28 minutes. Allow to cool completely.
- Using a mixer, cream softened butter with reserved cherry juice until smooth.
- Gradually add powdered sugar, mixing until frosting reaches a firm but spreadable consistency.
- Spread frosting evenly over cooled cake.
- Gently score the cake into serving pieces and garnish each with a stemmed cherry.
- Chill in the refrigerator for 30 minutes to set frosting.
- Sprinkle chocolate shavings on top before serving.


