Oh, friends, let me tell you about a dish that has saved my sanity more times than I can count. It’s the Honey Garlic Shrimp Bowls, and honestly, if you’re looking for something that tastes like a million bucks but comes together in a flash, this is it. I remember the first time I whipped this up. It was one of *those* Tuesdays – you know, the ones where you’re juggling work calls, the laundry pile seems to be staging a rebellion, and the thought of cooking anything complicated makes you want to just order pizza. I had some shrimp in the freezer, a few odds and ends in the pantry, and a desperate need for flavor. This recipe was born out of pure necessity and a little bit of pantry magic, and it quickly became a staple. It’s got that perfect sweet and savory kick, the shrimp are plump and juicy, and it all just melts together into this glorious bowl of deliciousness. It’s like my go-to comfort food, but somehow, it feels fancy enough for company. Seriously, it’s a game-changer!
Thank you for reading this post, don't forget to subscribe!What is Honey Garlic Shrimp Bowl?
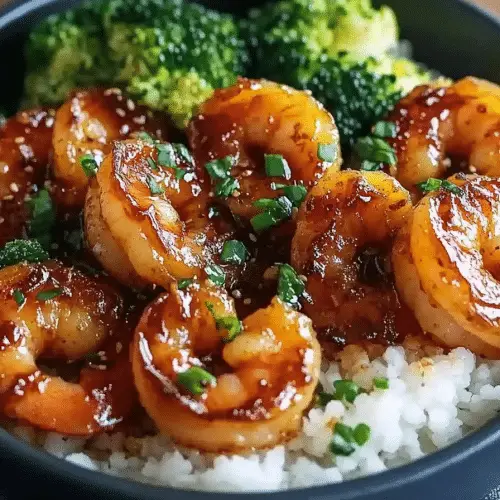
So, what exactly are these magical Honey Garlic Shrimp Bowls? Think of it as the ultimate weeknight hug in a bowl. At its heart, it’s simply succulent shrimp bathed in a luscious, glossy sauce made from honey, garlic, and a few other pantry staples that you probably already have. We serve this glorious mixture over a bed of fluffy rice, but honestly, you can get creative with your base. It’s all about that irresistible sweet-and-savory glaze that coats everything beautifully. The “bowls” part just means it’s a complete, satisfying meal served in one go. It’s not fussy, it doesn’t require a culinary degree, and it’s incredibly forgiving. It’s essentially my shortcut to feeling like a gourmet chef without actually breaking a sweat. It’s the kind of dish that makes your kitchen smell amazing and your family come running to the table, begging for more.
Why you’ll love this recipe?
There are so many reasons why this Honey Garlic Shrimp Bowl recipe has earned a permanent spot in my weekly rotation, and I just know you’re going to fall in love with it too. First off, the FLAVOR. Oh my goodness, the flavor! It’s this incredible dance between the sweetness of the honey and the pungent, aromatic punch of fresh garlic. It’s perfectly balanced – not too sweet, not too garlicky, just right. And when you get a bite with a juicy shrimp swimming in that glossy sauce? Pure bliss.
Then there’s the SIMPLICITY. This is where it truly shines for me. I’m talking about a meal that’s ready from start to finish in under 30 minutes. Seriously! It’s a lifesaver on those nights when you’re exhausted but still want something wholesome and delicious. No complicated techniques, no obscure ingredients. It’s just straightforward cooking that delivers big on taste.
And let’s talk COST-EFFICIENCY. Shrimp can sometimes feel like a splurge, but when you compare the cost of this homemade meal to ordering takeout with similar flavors, it’s a no-brainer. Using pantry staples like honey, soy sauce, and garlic makes it incredibly budget-friendly. Plus, you can easily stretch it further by adding extra veggies or serving it with rice, which is always a budget-friendly staple.
What I also adore about this recipe is its VERSATILITY. While it’s fantastic as is, it’s also a brilliant canvas for customization. I’ll often toss in some broccoli florets, snap peas, or bell peppers towards the end of cooking the shrimp to sneak in some extra veggies. You can serve it over rice, quinoa, noodles, or even a bed of crisp lettuce for a lighter take. It’s a dish that adapts to what you have on hand and what your family is craving. Honestly, it’s a recipe that just keeps on giving. It’s no wonder my kids ask for this all the time!
How do I make Honey Garlic Shrimp Bowl
Quick Overview
This recipe is all about building layers of flavor quickly and efficiently. We’ll start by getting our shrimp ready, then whip up a quick, vibrant sauce, and finally bring it all together in one glorious pan for a beautiful glaze. The beauty of this method is that it minimizes cleanup and maximizes flavor development in just minutes. It’s the perfect example of how simple ingredients can transform into something truly spectacular with a little heat and love. You’ll be amazed at how easy it is to achieve that restaurant-quality taste right in your own kitchen.
Ingredients
For the Shrimp: What is the best way to
1.5 pounds large shrimp, peeled and deveined. (I always look for wild-caught if I can, but any good quality shrimp will do. Make sure they’re thawed properly if using frozen. Patting them super dry is key to getting a nice sear!)
1 tablespoon olive oil or avocado oil. (Something with a high smoke point is best here.)
Salt and freshly ground Black Pepper, to taste. (Don’t be shy with the seasoning!)
For the honey garlic Sauce:
1/2 cup honey. (Use a good quality honey; it really makes a difference! Clover, wildflower, or even a more robust buckwheat honey works well.)
1/4 cup soy sauce or tamari (for gluten-free). (I prefer low-sodium so I can control the saltiness. Tamari is a great swap if you’re avoiding gluten.)
4 cloves garlic, minced. (Please, please use fresh garlic! Garlic powder just won’t give you that pungent, beautiful aroma and flavor.)
1 tablespoon rice vinegar. (This adds a lovely tang that cuts through the sweetness and richness.)
1 teaspoon grated fresh ginger. (Optional, but highly recommended for an extra layer of warmth and zing!)
1 tablespoon cornstarch or arrowroot powder, mixed with 2 tablespoons cold water (this is our slurry for thickening). (Arrowroot powder is a great alternative if you want to keep it paleo or AIP-friendly.)
For Serving:
Cooked rice (white, brown, jasmine, or cauliflower rice work great).
Optional garnishes: toasted sesame seeds, chopped green onions, Red Pepper flakes.
Step-by-Step Instructions
Step 1: Preheat & Prep Pan
First things first, let’s get our pan ready. Grab a large skillet or wok and place it over medium-high heat. Add the 1 tablespoon of Olive oil and let it shimmer. While the pan is heating up, make sure your shrimp are thoroughly patted dry with paper towels. This is super important, folks! If the shrimp are wet, they’ll steam instead of sear, and we want those lovely little browned bits of flavor. Season the dried shrimp generously with salt and pepper right before they hit the pan.
Step 2: Mix Dry Ingredients
This step is actually for the sauce, and it’s about combining the liquid ingredients. In a small bowl, whisk together the honey, soy sauce (or tamari), minced garlic, rice vinegar, and grated ginger (if using). Just give it a good whisk until everything is well combined and the honey has dissolved into the other liquids. This is where all that amazing flavor is going to come from!
Step 3: Mix Wet Ingredients
For the sauce, the wet ingredients are already combined in Step 2. However, for the thickening agent, we’ll create a “slurry.” In a separate tiny bowl, whisk together the cornstarch (or arrowroot powder) with 2 tablespoons of cold water until it forms a smooth, lump-free liquid. This slurry is what will give our sauce that beautiful, glossy sheen and clingy texture. It’s a simple trick, but it makes all the difference!
“The Honey Garlic Shrimp Bowls turned out amazing. My kids asked for seconds. Saving this one!”
Step 4: Combine
Now for the magic! Add the seasoned, dried shrimp to the hot skillet in a single layer. Let them cook for about 1-2 minutes per side, just until they start to turn pink and are about halfway cooked through. Don’t overcrowd the pan; cook in batches if necessary. Once the shrimp are lightly cooked, push them to the side of the pan or remove them temporarily to a plate. Pour the prepared Honey Garlic sauce into the empty part of the skillet. Let it bubble for about 30 seconds, then whisk in the cornstarch slurry. Stir constantly until the sauce thickens to a syrupy consistency. Once thickened, return the shrimp to the pan (if you removed them) and toss everything together to coat the shrimp beautifully in that gorgeous glaze. Cook for another minute or two until the shrimp are fully cooked through and coated. Be careful not to overcook the shrimp, or they’ll get tough!
Step 5: Prepare Filling
In this particular recipe, the “filling” is essentially the shrimp and sauce mixture itself. There aren’t separate components to prepare beforehand in the traditional sense. The preparation happens in the pan as described in Step 4. The key is to ensure your shrimp are properly prepped (peeled, deveined, and dried) and your sauce ingredients are all measured out and ready to go before you start cooking the shrimp. This makes the whole process incredibly smooth and fast.
Step 6: Layer & Swirl
This step is more about assembly. Once your Honey Garlic shrimp are perfectly glazed, it’s time to build those beautiful bowls. Scoop your fluffy, cooked rice into serving bowls. Then, spoon generous portions of the honey garlic shrimp and that luscious sauce right over the top. You can arrange it artfully, or just pile it on – either way, it’s going to be delicious. The “swirl” is really happening within the sauce itself as it coats the shrimp, creating that beautiful, glossy finish.
Step 7: Bake
There’s no baking involved in this particular recipe! Everything is cooked stovetop, which is part of what makes it so incredibly quick and easy. The heat from the pan is what cooks the shrimp and thickens the sauce to perfection. This is a testament to how fast you can get a fantastic meal on the table without even turning on the oven.
Step 8: Cool & Glaze
The “glaze” is created during the cooking process itself in Step 4, as the sauce thickens and coats the shrimp. You don’t need to let it cool before glazing; in fact, the hot glaze is what helps it adhere beautifully. We want the sauce to be nice and warm when we toss it with the shrimp to ensure it’s perfectly distributed and has that lovely, glossy finish. The key is to get the consistency right with the cornstarch slurry so it’s thick enough to cling, but not gloopy.
Step 9: Slice & Serve
Once your shrimp are beautifully coated in that shimmering honey garlic glaze and nestled over your rice, it’s time to garnish and serve! A sprinkle of toasted sesame seeds adds a lovely crunch and nutty flavor. Finely chopped green onions bring a fresh, oniony bite and a pop of color. For those who like a little heat, a pinch of red pepper flakes is fantastic. Serve immediately while everything is hot and fragrant. Trust me, the smell alone will have everyone diving in!
What to Serve It With
The beauty of Honey Garlic Shrimp Bowls is that they’re practically a complete meal in themselves, but if you’re looking to elevate them or add some variety, there are tons of fantastic options. For a quick and easy BREAKFAST, I know it sounds unusual, but hear me out! If you have leftovers (which is rare in my house!), a small portion warmed up can be surprisingly satisfying, especially if you have some scrambled eggs on the side. It’s a protein-packed start to the day.
For BRUNCH, these bowls can be made a little more elegant. Instead of plain white rice, try serving them over coconut sticky rice or a bed of fluffy sushi rice. Add some pickled ginger on the side for a palate cleanser, and perhaps some lightly blanched asparagus spears for a touch of green. A crisp, chilled Sauvignon Blanc or a light Pinot Grigio would be a lovely beverage pairing.
As a DESSERT? Okay, this is where it gets a bit playful. While the bowls themselves are savory, the sweet notes in the glaze might make you crave something a little sweet afterwards. Think of a light, fruity sorbet or a simple bowl of fresh berries with a dollop of whipped cream. The sweet and savory contrast can be really interesting!
For COZY SNACKS or a light dinner, these bowls are perfect as is, especially with that bed of rice. But if you want to add more substance without making it too heavy, consider a simple side salad with a light, zesty vinaigrette, or some steamed edamame. My family also loves to have these with a side of quick-pickled cucumbers – the crisp, vinegary crunch is a wonderful contrast to the sweet and savory shrimp. It’s all about finding those textures and flavors that complement each other!
Top Tips for Perfecting Your Honey Garlic Shrimp Bowls
Over the years, I’ve learned a thing or two about making these Honey Garlic Shrimp Bowls absolutely perfect every single time, and I’m happy to share my hard-won wisdom with you! Let’s dive into some of my favorite tips and tricks.
Shrimp Prep is Key: This is probably the most crucial step. You absolutely MUST pat your shrimp completely dry with paper towels before they hit the pan. I mean bone dry! If they’re even a little bit wet, they’ll steam instead of searing, and you won’t get those lovely caramelized edges that add so much flavor. I learned this the hard way early on – sad, gray, steamed shrimp are not what we’re aiming for! Also, don’t overcrowd the pan. Cook your shrimp in batches if you have to. Giving them space allows them to get that beautiful golden-brown sear.
Garlic, Garlic, Garlic!: I know I mentioned it in the ingredients, but it bears repeating: USE FRESH GARLIC. Mince it finely, or even consider grating it on a microplane for maximum surface area and flavor release. Garlic powder simply won’t cut it here; you need that pungent, aromatic magic that only fresh garlic can provide. I usually aim for at least 4 cloves, but if you’re a serious garlic lover, feel free to add more! Just be mindful not to burn it in the pan.
The Slurry Secret: The cornstarch (or arrowroot powder) slurry is what transforms a thin sauce into a luscious glaze that clings beautifully to the shrimp. Make sure you mix the cornstarch with COLD water. If you use warm water, you’ll end up with lumps, and nobody wants a lumpy glaze! Whisk it until it’s perfectly smooth before adding it to the simmering sauce. And remember to stir the sauce constantly as you add the slurry and as it thickens. This ensures an even consistency and prevents sticking.
Balance is Everything: The beauty of this sauce is its balance of sweet and savory. Taste as you go! If your honey is particularly sweet, you might want to add a tiny splash more rice vinegar or soy sauce to balance it out. Conversely, if it tastes a bit too salty, a little extra honey can smooth things over. This recipe is forgiving, but a quick taste-test before you finish will guarantee perfection.
Ginger’s Zing: While optional, I almost never leave out the fresh ginger. It adds such a wonderful warmth and a subtle spicy kick that complements the garlic and honey beautifully. Grate it on a microplane for the smoothest integration into the sauce. If you don’t have fresh ginger, you *could* use a tiny pinch of ground ginger, but the fresh stuff is really where it’s at for this recipe.
“New family favorite! This Honey Garlic Shrimp Bowls was so flavorful and ridiculously easy. Crowd-pleaser for sure.”
Beyond the Rice: While rice is the classic base, don’t be afraid to get creative! Cauliflower rice is a fantastic low-carb option, and it soaks up that glaze wonderfully. Quinoa or even some spiralized zucchini noodles can also work. For a really fun twist, try serving it over a bed of lightly dressed Asian-style slaw for added crunch and freshness.
Spice It Up: If you love a little heat, don’t hesitate to add a pinch of red pepper flakes to the sauce as it simmers, or sprinkle them on top before serving. A dash of sriracha stirred into the glaze can also add a lovely kick.
Storing and Reheating Tips
Ah, the aftermath of a delicious meal! If, by some miracle, you have leftovers of these Honey Garlic Shrimp Bowls, here’s how to keep them tasting their best. The key is to cool them properly before storing. Let the shrimp and rice mixture cool down to room temperature before transferring it to an airtight container.
Refrigerator Storage: These bowls are generally best when eaten within 1-2 days. Store them in an airtight container in the refrigerator. The shrimp might firm up a bit, and the sauce might thicken even further. When reheating, I like to add a tiny splash of water or a little extra soy sauce to the pan or microwave-safe dish to loosen up the glaze and bring back some moisture. Reheat gently over medium-low heat on the stovetop or in the microwave in short bursts, stirring frequently, until just heated through. You don’t want to overcook the shrimp further, or they’ll become tough.
Freezer Instructions: While I don’t typically recommend freezing cooked shrimp dishes as the texture can sometimes suffer, if you absolutely must, let the cooled mixture cool completely. Transfer to a freezer-safe airtight container or heavy-duty freezer bags. It should be good in the freezer for up to 1 month. When you’re ready to thaw, transfer it to the refrigerator overnight. Then, reheat as described above. Be prepared that the shrimp might not be quite as plump and juicy as when it was freshly made.
Glaze Timing Advice: For the best texture, it’s ideal to reheat the entire bowl with the glaze already on. If you are storing just the shrimp and sauce separately from the rice, reheat the shrimp and sauce mixture first until it’s warmed through and the glaze is loose again. Then, spoon it over freshly prepared or reheated rice. This prevents the rice from getting soggy if you’re storing them together for an extended period.
Frequently Asked Questions
1. Reducing the amount of honey slightly.
2. Increasing the amount of soy sauce (or tamari) for more saltiness.
3. Adding a little more rice vinegar for tang.
4. A pinch of red pepper flakes can also help balance sweetness with a bit of heat.
Always taste and adjust as you go!
* A teriyaki sauce
* A sweet chili sauce
* A lemon-butter garlic sauce
* A spicy peanut sauce
You could also simply sauté the shrimp with garlic and spices and serve them over rice with fresh toppings like avocado and salsa for a completely different vibe.
Final Thoughts
So there you have it, my friends! My beloved Honey Garlic Shrimp Bowls. I really hope you give this recipe a try. It’s more than just a meal to me; it’s a little piece of weeknight sanity, a guaranteed crowd-pleaser, and proof that you don’t need hours in the kitchen to create something truly delicious. That perfect balance of sweet, savory, and garlicky goodness, with plump, juicy shrimp clinging to every grain of rice – it’s just pure comfort.
If you enjoy the quick and flavorful nature of this dish, you might also love my Speedy Teriyaki Chicken Stir-fry or my One-Pan Lemon Herb Roasted Salmon. They share that same spirit of deliciousness with minimal fuss!
I can’t wait to hear how your Honey Garlic Shrimp Bowls turn out! Please leave a comment below with your thoughts, any variations you tried, or just to say hello. Your feedback means the world to me, and I love seeing your kitchen adventures! Happy cooking!
Honey Garlic Shrimp Bowls
Ingredients
Shrimp and Marinade
- 1.5 lbs shrimp peeled and deveined
- 0.25 cup soy sauce
- 0.25 cup honey
- 2 tbsp sesame oil
- 4 cloves garlic minced
- 1 tsp grated ginger
- 0.5 tsp red pepper flakes optional
For Serving
- 2 cups cooked rice brown or white
- 1 cup broccoli florets
- 1 cup sliced carrots
- 0.5 cup sliced bell pepper any color
- 2 tbsp chopped green onions
- 1 tbsp sesame seeds
Instructions
Preparation Steps
- In a bowl, whisk together soy sauce, honey, sesame oil, minced garlic, grated ginger, and red pepper flakes (if using). Add the shrimp to the marinade and toss to coat. Let it marinate for at least 10 minutes.
- While the shrimp is marinating, steam or sauté the broccoli florets, sliced carrots, and sliced bell pepper until tender-crisp.
- Heat a large skillet or wok over medium-high heat. Add the marinated shrimp (discard excess marinade) and cook for 2-3 minutes per side, until pink and cooked through.
- To assemble the bowls, divide the cooked rice among four bowls. Top with the cooked shrimp and steamed vegetables.
- Garnish with chopped green onions and sesame seeds before serving.


