Oh, homemade peppermint patties! Just saying the words brings back a wave of happy memories. I remember being a kid, my Grandma’s kitchen always filled with the most incredible aromas, and these little green gems were a frequent visitor. They weren’t just a treat; they were a little moment of cool, minty perfection that you could pop in your mouth after dinner, or sneak one (or two!) when nobody was looking. They’re so much better than the store-bought kind, and honestly, when you crave that specific, refreshing tingle of peppermint with a rich chocolatey hug, nothing else quite cuts it. They remind me a bit of those classic Chocolate Chip Cookies, in that they’re a universally loved comfort, but with a sophisticated edge that makes them feel special. If you’ve ever wanted to recreate a bit of that nostalgic magic, or just need a simple yet impressive dessert or sweet treat, you’ve landed in the right spot. These homemade peppermint patties are my absolute go-to, and I can’t wait to share them with you!
Thank you for reading this post, don't forget to subscribe!What are some good homemade peppermint patties?
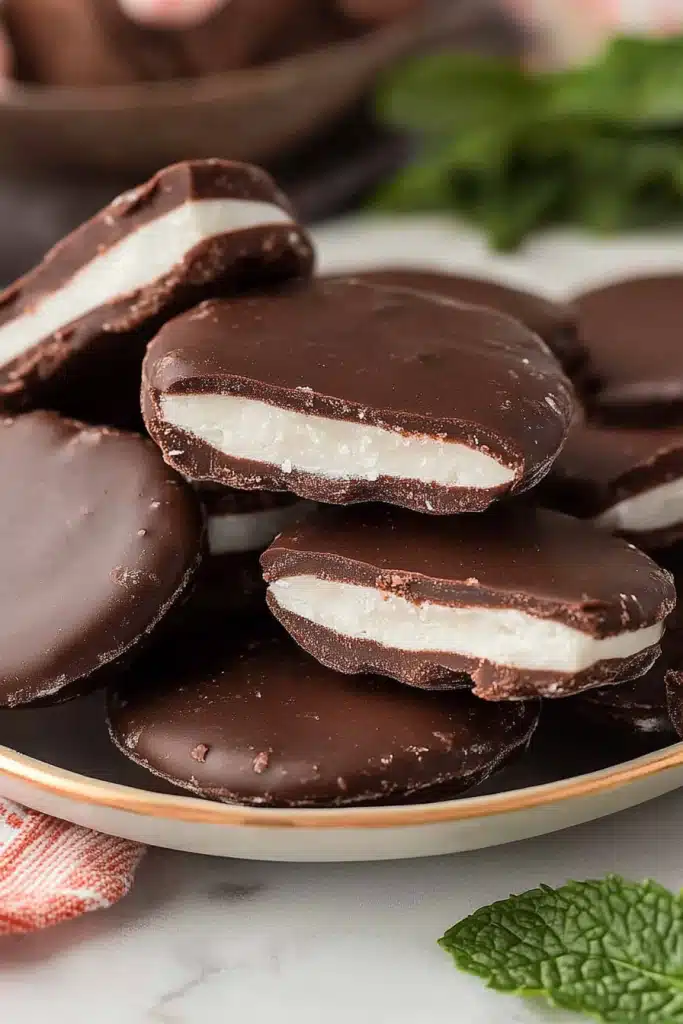
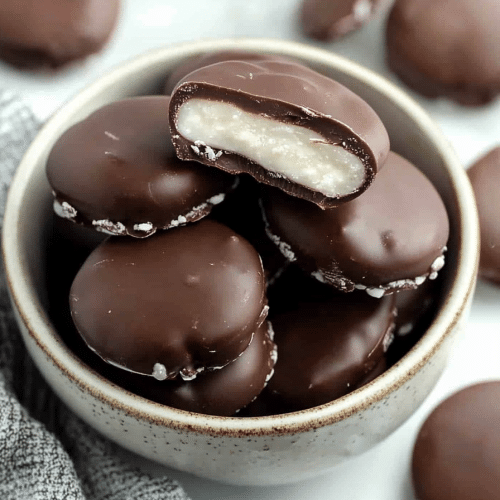
So, what exactly are these delightful little things? Think of them as a miniature, homemade version of those iconic chocolate-covered mint candies you find in every candy aisle, but with a homemade soul and a freshness that’s simply unmatched. They consist of a soft, creamy, intensely minty center, usually made with a base of powdered sugar, butter, and that all-important peppermint extract, all enrobed in a rich, Dark Chocolate shell. It’s this combination of the cool, smooth filling and the slightly bitter, decadent chocolate that makes them so addictive. My Grandma always called them her “cool treats,” and I totally get it. They’re essentially a little bit of joy, a perfect balance of sweet, minty, and chocolatey, all rolled into a bite-sized package. They’re not complicated, but they feel fancy, and that’s a win-win in my book!
Why you’ll love this recipe?
Honestly, there are so many reasons why I think you’re going to fall head over heels for this homemade peppermint patty recipe. First and foremost, the flavor is just out of this world. That burst of pure peppermint, paired with good quality dark chocolate? It’s pure bliss. You get that satisfying coolness that instantly refreshes your palate, and it’s not overly sweet, which I really appreciate. Then there’s the simplicity. Don’t let the fancy name fool you; these are surprisingly easy to whip up. You don’t need any fancy equipment, just a few basic kitchen staples and a little patience. And speaking of patience, this recipe is a lifesaver on those nights when you need a sweet fix but don’t want to commit to a whole cake or a batch of cookies that takes hours. They come together relatively quickly, especially if you have a little helper in the kitchen! Cost-efficiency is another huge plus. Making these at home is significantly cheaper than buying a similar quality chocolate or candy from a specialty store. You control the ingredients, so you can opt for high-quality chocolate without breaking the bank. And they’re so versatile! While they’re perfect as a standalone treat, I also love using them to decorate cakes or cookies, or even crushing them up to sprinkle over Ice Cream. My personal favorite aspect? It’s the pure satisfaction of making something so delicious from scratch. It feels like a little culinary triumph every single time, and the smiles on my family’s faces when they try them makes it all worth it. They’re a guaranteed crowd-pleaser, whether it’s for a holiday gathering or just a Tuesday evening treat.
How do I make homemade peppermint patties?
Quick Overview
Making these Homemade Peppermint Patties is a straightforward process that involves creating a creamy, minty center, chilling it until firm, and then enrobing it in melted chocolate. The key to success is getting the consistency of the filling just right and ensuring your chocolate is tempered properly for that beautiful sheen and snap. It’s a recipe that requires a bit of chilling time, but the active preparation is minimal, making it a perfect weekend project or something you can do in stages. You’ll be amazed at how quickly you can go from basic ingredients to these delightful, refreshing confections.
Ingredients
For the Main Batter (The Filling):
You’ll need unsalted butter, softened – about 1/2 cup (1 stick). Make sure it’s truly softened, not melted. This helps create that wonderfully smooth texture. Then comes the star: powdered sugar, also known as confectioners’ sugar. You’ll need about 3 cups, sifted if you want an extra-smooth finish, though it’s not strictly necessary. For that signature cool kick, pure peppermint extract is a must. Start with 1 teaspoon, but you can add a little more if you like it extra minty; taste as you go! A splash of milk, maybe 1-2 tablespoons, helps bind everything together and adjust the consistency. And for that lovely pale green hue that’s so classic, a few drops of green food coloring. You can skip this if you prefer a white filling, but I think it’s part of the charm!
For the Glaze (The Chocolate Coating):
For the chocolate shell, I prefer using good quality semi-sweet or Dark Chocolate chips or a chopped chocolate bar. About 1.5 to 2 cups should be plenty to coat all your patties. If you find your chocolate is a little too thick when melted, a teaspoon or two of coconut oil or vegetable shortening can help thin it out and give it a lovely smooth finish and a good snap when it hardens.
Step-by-Step Instructions
Step 1: Preheat & Prep Pan
We’re not actually baking the filling, but we will need a surface to set them on. Line a baking sheet (or two, depending on how many you plan to make) with parchment paper. This is crucial because the peppermint filling can be sticky, and the parchment paper ensures they don’t stick to the pan once they’re firm. You can also pop this lined baking sheet into the refrigerator or freezer to speed up the chilling process later.
“Packed with flavor and so simple. Exactly what I wanted from this Homemade Peppermint Treats Easy!”
Step 2: Mix Dry Ingredients
In a medium bowl, whisk together your sifted powdered sugar. If you’re using food coloring, you can add a few drops to a very small amount of the powdered sugar and mix it well before adding it to the main batch. This ensures an even color distribution. For now, just focus on having that pile of fluffy white sugar ready to go.
Step 3: Mix Wet Ingredients
In a separate, larger bowl, cream together the softened unsalted butter until it’s light and fluffy. Add the peppermint extract and the milk. If you’re using food coloring, now’s the time to add a few drops to the butter mixture until you achieve your desired shade of green. Mix it all until it’s well combined.
Step 4: Combine
Gradually add the powdered sugar to the wet ingredients, mixing on low speed (or with a sturdy spoon) until everything is just combined. You want a thick, dough-like consistency that’s still pliable. If it seems too dry and crumbly, add milk, a teaspoon at a time. If it’s too sticky, add a bit more powdered sugar. The goal is a texture that you can easily shape without it sticking to your hands excessively.
Step 5: Prepare Filling
Once your peppermint filling is mixed, it’s time to shape it. You can either roll it into small balls and then flatten them slightly, or you can press it out onto your parchment-lined baking sheet to about 1/4-inch thickness and then cut out shapes using a small cookie cutter (think circles or even little ovals). I usually go for the latter, as it gives a more uniform shape and is quicker for larger batches. If you rolled them into balls, gently press them down to about 1/2 inch thickness. Pop the prepared shapes onto your parchment-lined baking sheet.
Step 6: Layer & Swirl
This step applies if you’re doing the pressed-out method and want a more traditional look. If you’ve just made simple discs, you can skip ahead. For those who want a bit more visual flair, you can gently press two slightly different colored green discs together, or even swirl a tiny bit of white filling into the green before shaping. Honestly, though, the simple green disc is perfectly lovely and tastes just the same!
Step 7: Bake
Actually, we’re not baking these! We’re chilling them. Place the baking sheet with the shaped peppermint centers into the refrigerator for at least 30 minutes, or until they are firm to the touch. You can also pop them in the freezer for about 15-20 minutes if you’re in a hurry. They need to be firm enough to hold their shape when you dip them in chocolate.
Step 8: Cool & Glaze
While the centers are chilling, melt your chocolate. You can do this in a double boiler or in the microwave in 30-second intervals, stirring in between, until smooth. Stir in the coconut oil or shortening if you’re using it. Once the peppermint centers are firm, it’s time to dip! Use a fork or a dipping tool to carefully dip each peppermint shape into the melted chocolate, ensuring it’s fully coated. Let the excess chocolate drip off for a moment before placing it back onto the parchment-lined baking sheet. You can create little swirls or lines on top with a toothpick if you like, but it’s not essential. Let them set completely at room temperature or pop them back into the fridge for a few minutes to speed up the process. My kitchen is usually pretty cool, so they set up nicely on the counter.
Step 9: Slice & Serve
Once the chocolate is completely hardened, gently peel the homemade Peppermint Patties off the parchment paper. They are now ready to be enjoyed! For the best experience, serve them slightly chilled, but not straight from the freezer, as the chocolate can get too hard. A gentle coolness is perfect. You can stack them in an airtight container, separating layers with parchment paper if you’re making a big batch. They look beautiful piled high on a dessert platter or served alongside a cup of coffee or tea.
“The Homemade Peppermint Treats Easy turned out amazing. My kids asked for seconds. Saving this one!”
What to Serve It With
These Homemade Peppermint Patties are so versatile, they can truly fit into any occasion! For breakfast, while not a typical pairing, a tiny sliver of one with a strong cup of black coffee is a surprisingly delightful way to start the day, offering a little something sweet without being overwhelming. It’s like a little morning pick-me-up with a sophisticated twist. For brunch, they’re fantastic as a dainty dessert. Arrange them on a tiered stand with other pastries or fruit, perhaps accompanied by a sparkling rosé or a creamy cappuccino. They add a touch of elegance without demanding all the attention. As a dessert, they truly shine. They’re the perfect after-dinner treat – that cool mint cutting through any richness from a main meal. I love serving them alongside a rich chocolate cake or a creamy panna cotta. They also make for a wonderful accompaniment to a cheese board, believe it or not! That minty coolness can be a refreshing contrast to salty cheeses. And for cozy snacks? This is where they really excel in my house. They’re the ultimate comfort food for a quiet evening with a good book and a mug of hot cocoa or a soothing herbal tea. My kids always ask for these after school, and they’re the perfect little reward. I’ve even started making a slightly larger batch of the filling and cutting them into squares to serve with a scoop of vanilla bean ice cream – pure heaven!
Top Tips for Perfecting Your Homemade Peppermint Patties
I’ve made these little guys more times than I can count, and over the years, I’ve picked up a few tricks that really make a difference. When it comes to the filling, the key is the consistency. You want it to be firm enough to hold its shape but soft enough to be pliable. If it’s too dry, it will crumble; too wet, and it will be a sticky mess. My secret weapon is adding the milk very gradually, just a teaspoon at a time, until it feels right. It’s always better to add a little more than to add too much at once. For the peppermint flavor, quality matters! Use good pure peppermint extract, not imitation. You can also adjust the amount to your preference. I like a strong, clear mint flavor, so I usually go with about 1.5 teaspoons, but some people prefer it milder. Always taste the filling before chilling it to make sure the mint level is just right for you. When it comes to shaping, don’t stress about perfection. They’re homemade! If they’re a little rustic, that’s part of their charm. I often use a small cookie cutter, but if you don’t have one, simply rolling them into small, flattened discs works beautifully. For the chocolate coating, I always recommend using a good quality chocolate. It makes a huge difference in the flavor and how the chocolate sets. If your chocolate is seizing up or looking dull, adding a teaspoon of coconut oil or vegetable shortening can revive it and make it smooth and glossy. When dipping, don’t be afraid to get your fingers a little messy – it’s the easiest way to ensure full coverage, and you can always wash them! A little tip I learned: if you’re dipping a lot, keep your chocolate warm by placing the bowl over a pan of simmering water (a double boiler method). This prevents it from hardening too quickly. For the green color, a little goes a long way. Start with just a couple of drops of gel food coloring (it’s more concentrated than liquid) and add more if needed. You don’t want them to look artificial, just that pretty pastel green. And finally, for the chilling process, don’t rush it! Properly firm centers make for a much cleaner dipping experience. Patience here really pays off. I’ve learned that overmixing the filling can make it tough, so just combine until it comes together.
Storing and Reheating Tips
Storing these delightful homemade Peppermint Patties is pretty straightforward, but a few tips will ensure they stay fresh and delicious. At room temperature, they’re best stored in an airtight container. They’ll generally stay good for about 3-5 days. I always like to put a piece of parchment paper between layers to prevent them from sticking together, especially if it’s a warm day and the chocolate might soften slightly. They’re perfect at room temperature for that classic chewy-meets-crisp texture. If you live in a warmer climate or your kitchen tends to be warm, I highly recommend refrigerator storage. Pop them in an airtight container in the fridge for up to two weeks. When you take them out, let them sit at room temperature for about 10-15 minutes before serving. This prevents the chocolate from being too hard and chalky. For longer storage, these freeze beautifully! Wrap them tightly in plastic wrap, then place them in a freezer-safe bag or container. They can stay frozen for up to 2-3 months. To thaw, simply transfer them from the freezer to the refrigerator overnight. Avoid thawing them at room temperature, as this can cause condensation and make the chocolate bloom (get white streaks). I usually try to add the glaze just before they’re fully set when storing them at room temperature, so the chocolate hardens nicely. For refrigerator or freezer storage, it’s best to have them fully set before packing them away. I’ve found that if they’re kept in an airtight container, the minty flavor stays nice and potent, and the chocolate stays crisp. Just remember, the key is always an airtight seal to keep moisture out and freshness in!
Frequently Asked Questions
Final Thoughts
There you have it – my tried-and-true recipe for homemade peppermint patties! It’s one of those recipes that brings me so much joy, not just in the making, but in the sharing and, of course, the eating. They’re the perfect blend of cool, crisp mint and rich chocolate, and making them yourself just elevates the whole experience. If you’re someone who loves those classic chocolate mint flavors, I truly believe you’ll adore these. They’re simple enough for a beginner but impressive enough to serve to guests. If you enjoyed this recipe, I think you might also love my recipe for [Link to Another Recipe, e.g., “Classic Chocolate Fudge“] or my [Link to Another Recipe, e.g., “Easy No-Bake Cookies”] for more delightful homemade treats. I can’t wait to hear how your peppermint patties turn out! Please share your experiences in the comments below, and let me know if you tried any fun variations. Happy baking (or in this case, happy chilling and dipping)!
homemade peppermint patties
Ingredients
Main Ingredients
- 7 ounce marshmallow cream Fluff
- 10 tablespoons unsalted butter softened
- 1.5 teaspoons vanilla extract
- 1 teaspoon peppermint extract
- 5.5 cups powdered sugar
- 16 ounce Ghirardelli dark chocolate melting wafers
- 8 ounce Ghirardelli white chocolate melting wafers optional for decorating
Instructions
Preparation Steps
- In a large mixing bowl, beat marshmallow cream, softened butter, vanilla extract, and peppermint extract until fully combined and smooth.
- Gradually add the powdered sugar to the mixture, mixing on medium speed until well blended. This may take a few minutes for the mixture to come together and become smooth.
- Line a large baking sheet with parchment paper. Using about 1 tablespoon of the peppermint filling, roll it into a ball, then flatten slightly into a disc for the traditional patty shape. Alternatively, shape into footballs by pinching the ends.
- Continue shaping until all the filling is used. Cover the baking sheet with plastic wrap and freeze for at least 2 hours, or overnight, until the patties are firm.
- Melt the Ghirardelli dark chocolate melting wafers according to package directions (e.g., microwave or double boiler).
- Using a toothpick or a dipping fork, dip each frozen peppermint patty into the melted chocolate. Tap gently to allow any excess chocolate to drip off, then place the coated patty back on the parchment-lined baking sheet.
- Repeat until all patties are coated. Because the patties are cold, the chocolate should set relatively quickly (within minutes). If making footballs, melt white chocolate and pipe laces on them once the dark chocolate has set.
- Store the finished peppermint patties at room temperature in a covered airtight container.


