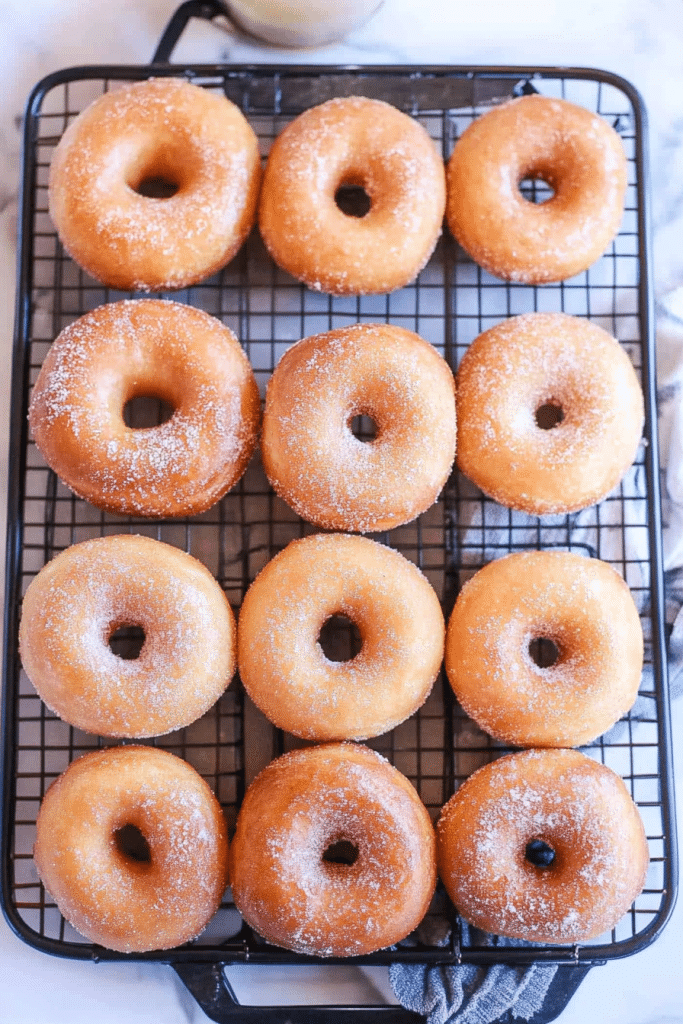
Oh, homemade doughnuts. Just saying the words brings back a flood of memories! I remember my grandma making these when I was just a little thing, the kitchen filled with the most incredible, sweet, yeasty aroma. It was pure magic. Every Saturday morning, it felt like a special occasion because Grandma was whipping up a batch of her famous homemade doughnuts. They were always so light, fluffy, and perfectly golden. Forget those dry, cakey things you sometimes get at the store; these are the real deal. They’re a little bit of pure joy, a touch of nostalgia, and a whole lot of deliciousness all rolled into one. If you’ve ever thought making doughnuts from scratch was too complicated, you’re in for a wonderful surprise. This recipe is my absolute go-to, the one I trust when I need a treat that’s guaranteed to impress. It’s like a warm hug in doughnut form, and trust me, once you try them, you’ll be hooked!
Thank you for reading this post, don't forget to subscribe!What is home made doughnuts?
So, what exactly are we talking about when we say “homemade doughnuts”? Think of them as little halos of fried dough, kissed with sweetness. Unlike the dense, cake-like doughnuts that often feel like they could double as doorstops, these are light, airy, and have a beautiful, tender crumb. They’re made from a yeast-risen dough, which is the secret to that incredible fluffiness. That gentle rise gives them a texture that’s just divine – soft, chewy, and utterly melt-in-your-mouth. They’re not just fried dough; they’re a labor of love, but one that’s so incredibly rewarding. The process itself is almost meditative, and the smell that fills your home as they cook is just heavenly. It’s the kind of treat that feels both indulgent and incredibly comforting, a true taste of home cooking at its finest.
Why you’ll love this recipe?
Honestly, there are so many reasons why this homemade doughnuts recipe has become my absolute favorite. First and foremost, the FLAVOR. It’s just… perfect. They’re slightly sweet on their own, which makes them the perfect canvas for any glaze or topping you can dream up. And the TEXTURE! Oh my goodness, the texture is what really sets these apart. They’re so wonderfully light and airy, with a delicate chew that’s just irresistible. You bite into one, and it practically melts in your mouth. Beyond the taste and texture, the SIMPLICITY of this recipe really shines. I know, “yeast doughnut recipe” can sound intimidating, but I promise, it’s incredibly straightforward. I’ve broken it down into easy-to-follow steps, and even if you’re new to working with yeast, you’ll find this totally manageable. Plus, let’s talk COST-EFFICIENCY. Making doughnuts at home is significantly cheaper than buying them from a bakery, especially if you’re buying a dozen or more. You likely already have most of the ingredients in your pantry! And the VERSATILITY? Unbeatable! You can keep them simple with a classic glaze, go wild with sprinkles, fill them with jam or cream, or even try a Cinnamon Sugar coating. They’re perfect for any occasion, from a lazy weekend breakfast to a fancy brunch or a simple afternoon pick-me-up. What I love most about this recipe is that it brings that authentic, old-fashioned doughnut shop experience right into my own kitchen. It’s a recipe that has never failed me, always delivering smiles and happy sighs with every bite.
How do I make homemade doughnuts?
Quick Overview
This recipe is all about creating a soft, enriched yeast dough that rises beautifully, gets gently fried to a golden perfection, and then is finished with a luscious glaze. We’ll mix the dough, let it rest and rise, shape our doughnuts, give them another short proof, fry them until they’re puffed and golden, and then douse them in a simple, delicious glaze. It sounds like a lot, but each step is really quite easy, and the results are absolutely worth it. You’ll be amazed at how simple it is to create something so wonderfully delicious from scratch. The key is a little patience with the rising times, and then just a few minutes of frying for each doughnut. It’s a process that feels incredibly satisfying.
Ingredients
For the Main Dough:
1 cup warm milk (about 105-115°F) – Make sure it’s warm, not hot, or it’ll kill the yeast! Whole milk gives the Best Flavor and tenderness, but I’ve tested this with 2% and even unsweetened almond milk in a pinch, and it worked out fine, though maybe a touch less rich. Don’t be afraid to use what you have!
2 ¼ teaspoons active dry yeast – This is one packet. Make sure it’s fresh! If it’s been in your pantry for ages, you might want to do a quick test in a little warm water with a pinch of sugar to make sure it’s alive and bubbly.
¼ cup granulated sugar, plus a pinch for the yeast – This helps feed the yeast and adds a touch of sweetness to the dough itself.
2 large eggs, room temperature – Letting them come to room temp helps them incorporate more smoothly into the dough. You can quickly warm up cold eggs by placing them in a bowl of warm (not hot!) water for about 5-10 minutes.
½ cup unsalted butter, melted and slightly cooled – Melted butter adds richness and tenderness. Make sure it’s not too hot when you add it, or it could affect the yeast.
1 teaspoon salt – Essential for flavor and helps control the yeast activity.
4 to 4 ½ cups all-purpose flour, plus more for dusting – Start with 4 cups and add more as needed. You want a soft, slightly sticky dough, not a tough one. I usually end up using around 4 ¼ cups.
For the Glaze:
2 cups powdered sugar, sifted – Sifting is key here to avoid lumps in your glaze. Nobody wants a lumpy doughnut!
¼ cup milk or cream – Milk makes a good glaze, but cream makes it even richer and glossier. You can also use water in a pinch.
1 teaspoon vanilla extract – This is the classic flavor, but feel free to experiment! Almond extract or even a touch of citrus zest works wonderfully.
For Frying:
Vegetable oil, canola oil, or shortening – You’ll need about 2-3 inches of oil in your pot. I prefer a neutral-flavored oil that can handle high heat.
“Made the Homemade Doughnuts Easy and Delicious tonight and wow — perfect weeknight dinner. Will definitely make again!”
Step-by-Step Instructions
Step 1: Activate the Yeast
In a large mixing bowl (or the bowl of your stand mixer), pour in the warm milk. Sprinkle the yeast and a pinch of sugar over the top. Give it a gentle stir and let it sit for about 5-10 minutes. You’ll know it’s ready when it gets nice and foamy on top – that means your yeast is alive and kicking and ready to make some magic!
Step 2: Mix the Wet Ingredients
Once the yeast is foamy, add the ¼ cup of sugar, the room temperature eggs, and the melted, slightly cooled butter to the bowl. Whisk everything together until it’s well combined and smooth. This is where all the richness and tenderness starts to come into play.
Step 3: Add Dry Ingredients and Knead
Now, stir in the salt. Then, gradually add the 4 cups of flour, mixing with a wooden spoon or the dough hook attachment of your stand mixer until a shaggy dough starts to form. If using a stand mixer, switch to the dough hook and knead on medium-low speed for about 6-8 minutes. If kneading by hand, turn the dough out onto a lightly floured surface and knead for about 8-10 minutes. The dough should be soft, smooth, and elastic, and it will be slightly tacky but shouldn’t stick excessively to your hands or the bowl. Add a little more flour, a tablespoon at a time, if it’s too sticky to handle.
Step 4: First Rise
Shape the dough into a ball and place it in a lightly greased bowl. Turn the dough to coat it lightly with oil. Cover the bowl with plastic wrap or a clean kitchen towel and let it rise in a warm place for about 1 to 1.5 hours, or until it has doubled in size. I usually pop my bowl in a slightly warm oven (turned off, of course!) or near a sunny window.
Step 5: Shape the Doughnuts
Once the dough has doubled, punch it down gently to release the air. Turn the dough out onto a lightly floured surface. You can either roll it out to about ½ inch thickness and use a doughnut cutter, or you can simply divide the dough into equal portions (about 1.5 to 2 ounces each) and roll them into small balls. If you’re not using a cutter, you can flatten the balls slightly and make a small indentation in the center with your thumb or the end of a wooden spoon to create a ring shape. Place the shaped doughnuts on parchment-lined baking sheets, leaving a little space between them.
Step 6: Second Rise (Proofing)
Cover the shaped doughnuts loosely with plastic wrap or a kitchen towel and let them rise again in a warm place for about 30-45 minutes, or until they look puffed up and have nearly doubled in size. This second rise is crucial for that super light and airy texture!
Step 7: Fry the Doughnuts
While the doughnuts are proofing, heat about 2-3 inches of oil in a heavy-bottomed pot or Dutch oven over medium heat to 350°F (175°C). Use a thermometer if you have one – it makes a huge difference! Carefully slide 2-3 doughnuts at a time into the hot oil, making sure not to overcrowd the pot. Fry for about 1-2 minutes per side, until they are a beautiful golden brown. They puff up a lot during frying, which is exactly what you want!
Step 8: Drain and Glaze
Using a slotted spoon or spider strainer, carefully remove the doughnuts from the oil and place them on a wire rack set over a baking sheet to drain. Let them cool for just a few minutes. While they’re still warm (but not piping hot), whisk together the powdered sugar, milk or cream, and vanilla extract in a shallow bowl until smooth. Dip each doughnut into the glaze, letting any excess drip off, and place them back on the wire rack to set. If you want a thinner glaze, add a tiny bit more milk; for a thicker one, add a bit more powdered sugar.
“I don’t know if I’ve ever eaten a better Homemade Doughnuts Easy and Delicious. The rub alone is wonderful, but the sauce??? Over the top!”
Step 9: Enjoy Immediately!
These homemade doughnuts are best enjoyed fresh, preferably within a few hours of making them. The smell alone as they’re glazing is enough to make your mouth water! Serve them warm and watch them disappear.
What to Serve It With
These homemade doughnuts are practically a star on their own, but they also play wonderfully with a few other things! For a classic BREAKFAST treat, you absolutely can’t go wrong with a steaming mug of good, strong coffee. The richness of the coffee cuts through the sweetness of the doughnut perfectly. I also love serving them with a glass of cold milk for the kids – it’s a morning ritual that never gets old. For BRUNCH, these doughnuts elevate everything. Imagine them piled high on a pretty tiered stand, perhaps alongside some fresh fruit salad, a creamy yogurt parfait, or even some savory breakfast items like scrambled eggs and crispy bacon. They add that touch of elegance and indulgence. As a DESSERT, they’re a dream. A simple dusting of powdered sugar or a light glaze is perfect, but you could also serve them with a dollop of Whipped Cream and some fresh berries. They’re fantastic alongside a warm chocolate sauce or even a caramel drizzle. And for those cozy, quiet MOMENTS, a warm doughnut and a cup of tea is just pure bliss. My kids often ask for them as an after-school snack, and I usually oblige because, well, who can resist? They are truly a versatile delight!
Top Tips for Perfecting Your Homemade Doughnuts
Over the years, I’ve learned a few tricks that I think really make a difference when I’m making these homemade doughnuts. First, let’s talk about the dough. The key is not to overwork it once you add the flour. You want a tender dough, and too much kneading can make it tough. I always aim for that soft, slightly tacky texture described in the recipe. It might feel a little sticky, but resist the urge to add too much extra flour – that’s a common mistake that can lead to dry doughnuts. When it comes to frying, temperature control is your best friend. If the oil is too hot, the doughnuts will brown too quickly on the outside and be doughy in the middle. Too cool, and they’ll absorb too much oil and become greasy. I really recommend using a candy or deep-fry thermometer to nail that 350°F (175°C). It makes all the difference. For the glaze, consistency is key. If it’s too thick, it’ll be hard to dip and will just clump onto the doughnut. If it’s too thin, it’ll all run off. I usually start with the base recipe and then add milk or powdered sugar a teaspoon at a time until it’s just right – thick enough to coat but still pourable. Don’t be afraid to experiment with flavorings too! A little bit of cinnamon in the dough, some lemon zest in the glaze, or even a splash of almond extract can change them up beautifully. And my biggest tip: embrace the imperfections! Sometimes a doughnut might not be perfectly round, or the glaze might drip a bit unevenly. That’s what makes them homemade and unique. They’re made with love, and that’s the best ingredient.
Storing and Reheating Tips
Homemade doughnuts are, without a doubt, best enjoyed fresh. The texture is at its peak right after they’ve cooled slightly. However, if you happen to have any leftovers (which is rare in my house!), here’s how I usually store them. At ROOM TEMPERATURE, they’re usually good for about 24 hours. I store them in an airtight container, but I try not to stack them too high or too tightly, as that can make them stick together or lose their lovely fluffy texture. If they’re glazed, the glaze can sometimes get a bit sticky at room temperature, so be mindful of that. For REFRIGERATOR STORAGE, I typically put them in an airtight container. They’ll stay good for about 2-3 days, but the texture can change – they tend to become a bit denser. If you want to REHEAT them, I find the best way is to pop them in a toaster oven or a regular oven at a low temperature (around 300°F or 150°C) for just a few minutes. This helps to revive some of that fresh-baked quality and crisp them up slightly. Be careful not to overheat them, or they’ll dry out! If you’re freezing them, I recommend freezing them plain (without glaze) for the best results. Wrap them tightly in plastic wrap, then in a layer of foil or place them in a freezer-safe bag. They should last for about 2-3 months. To thaw, let them come to room temperature, then you can glaze them, or toss them in Cinnamon Sugar. For the glaze, I always recommend glazing them just before serving if possible, especially if they’ve been stored, as it keeps the glaze looking its best.
Frequently Asked Questions
Final Thoughts
There you have it – my ultimate guide to making the most incredible homemade doughnuts right in your own kitchen! I truly believe that this recipe strikes the perfect balance between authentic flavor, delightful texture, and achievable simplicity. It’s the kind of recipe that makes you feel like a baking superstar, and the aroma alone is worth the effort. Whether you’re looking for a special weekend treat, a way to impress guests, or just a good old-fashioned dose of comfort food, these doughnuts deliver every single time. They’re a little bit of magic, a lot of deliciousness, and a whole lot of love. If you love this recipe, I think you might also enjoy my [Link to another relevant recipe, e.g., “Easy Cinnamon Rolls”] or my [Link to another relevant recipe, e.g., “Fluffy Pancakes“]. Give these homemade doughnuts a try, and I promise you won’t be disappointed. I can’t wait to hear how yours turn out! Let me know in the comments below if you have any questions or if you try any fun topping variations. Happy baking!


