
Oh, hello there! Come on in, grab a mug. I’ve been just dying to share this with you. You know how some recipes just feel like a warm hug on a chilly evening? This eggnog cake dessert is exactly that for me. It’s the kind of cake that whispers “holidays” and “comfort” all at once, and honestly, it’s become my go-to whenever I’m craving something truly special without wanting to spend hours in the kitchen. My mom used to make something similar, but this version… well, this one’s got a little something extra. It’s not just a cake; it’s a memory baked into every slice. I’ve tried so many eggnog-flavored things over the years, from cookies to Ice Cream, but nothing quite hits the spot like this moist, spiced, utterly delicious eggnog cake dessert. It’s got all the festive cheer of eggnog without being *too* heavy, making it a perfect treat any time of year, though it truly shines when the weather turns cool.
Thank you for reading this post, don't forget to subscribe!What is an eggnog cake?
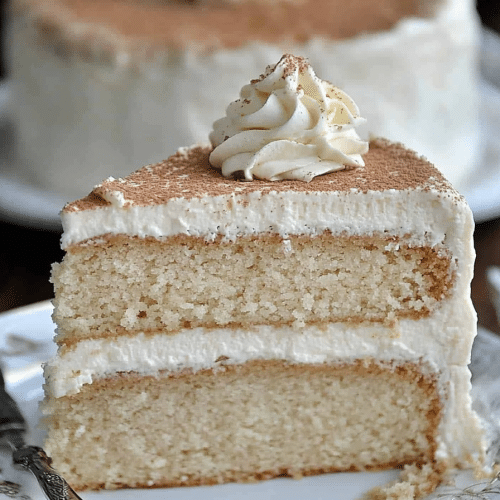
So, what exactly *is* this magical eggnog cake dessert? Think of it as the coziest, most flavorful embrace you can bake. It’s essentially a tender, moist cake infused with the quintessential spices of eggnog – nutmeg, cinnamon, and a hint of cloves – plus, of course, that unmistakable creamy, custardy essence. We get that lovely eggnog flavor from a combination of ingredients that mimic its rich profile, making it deeply satisfying. It’s not your average Pound Cake or vanilla layer cake; it’s got a unique character all its own. It’s like the best parts of a festive drink translated into a comforting baked good. It’s not overly sweet, allowing the warm spices and creamy notes to really sing. If you’ve ever loved sipping on eggnog, especially during the holidays, you are going to adore this cake. It’s a delightful spin that brings that beloved flavor to a new level of deliciousness.
Why you’ll love this recipe?
Okay, let’s talk about why this eggnog cake dessert is going to become your new best friend in the kitchen. First off, the flavor is absolutely out of this world. Imagine the creamy, slightly boozy (don’t worry, we bake the alcohol off, but the flavor notes remain!) richness of eggnog married with warm spices like nutmeg and cinnamon, all wrapped up in a cake so moist it practically melts in your mouth. It’s sophisticated enough for guests but comforting enough for a quiet afternoon treat. What I also love is how surprisingly simple it is to pull together. Seriously, even if you’re not a seasoned baker, you can absolutely nail this. It uses common pantry staples, and there’s no complicated technique involved. Plus, it’s incredibly cost-effective! You get a showstopper dessert that looks and tastes like a million bucks, but it’s made with everyday ingredients. And the versatility? Oh my goodness. You can dress it up with a simple glaze or a dollop of Whipped Cream, or just enjoy it plain. It’s perfect for holidays, potlucks, or just when you need a little pick-me-up. What truly sets this eggnog cake dessert apart for me is that it captures the essence of the season without being overly dense or cloying, unlike some other holiday cakes I’ve tried.
How do I make Eggnog cake?
Quick Overview
Making this eggnog cake dessert is a straightforward process that yields fantastic results. We’ll start by creaming butter and sugar to get a nice, fluffy base, then incorporate our eggnog-inspired wet ingredients, followed by the dry. A quick swirl of a simple, spiced filling before baking adds an extra layer of flavor and texture. The result is a wonderfully moist cake with a comforting spiced aroma that will fill your home. It’s designed to be simple and forgiving, perfect for both beginners and experienced bakers looking for a reliable, delicious treat.
Ingredients
For the Main Batter:
You’ll need 1 cup (2 sticks) unsalted butter, softened. Make sure it’s good quality butter; it really makes a difference! Then, 2 cups granulated sugar. I always like to give my sugar a quick sift to avoid any lumps, though it’s not strictly necessary. Next up, 4 large eggs, at room temperature. This is key for them to emulsify properly. For that signature flavor, we’re using 1 cup of good quality eggnog. If you can’t find store-bought eggnog or want to make your own, that works beautifully too! A teaspoon of vanilla extract and a teaspoon of rum extract (optional, but I swear it adds that authentic eggnog depth!) will round out the flavor. For the dry ingredients, you’ll want 3 cups all-purpose flour, sifted. Sifting is important here to keep the cake light and airy. Then, 1 ½ teaspoons baking powder for lift and ½ teaspoon salt to balance the sweetness. And don’t forget the spice! 1 teaspoon ground nutmeg, ½ teaspoon ground cinnamon, and a tiny pinch of ground cloves – this is what gives it that classic eggnog warmth.
For the Filling:
This is where we amp up the flavor even more! You’ll need ½ cup packed light Brown Sugar, 2 tablespoons all-purpose flour, 1 teaspoon ground cinnamon, and ¼ teaspoon ground nutmeg. These simple ingredients, when mixed together and swirled into the batter, create little pockets of spiced goodness throughout the cake.
For the Glaze:
To finish it off, we’ll make a simple glaze. You’ll need 1 ½ cups powdered sugar, sifted, of course, for smoothness. Then, 2-3 tablespoons of eggnog (or milk if you prefer) to get the right consistency. For a hint of extra flavor, I love to add ¼ teaspoon of rum extract or vanilla extract, but you can skip this if you like it plain. A pinch of nutmeg in the glaze is also divine!
“Made the Holiday Eggnog Cake Your New Favorite Dessert tonight and wow — perfect weeknight dinner. Will definitely make again!”
Step-by-Step Instructions
Step 1: Preheat & Prep Pan
First things first, preheat your oven to 350°F (175°C). Now, grab a 9×13 inch baking pan. I like to grease it really well with butter or baking spray, and then dust it with a little flour. This step is crucial to prevent any sticking, because nobody wants their beautiful eggnog cake dessert to end up in pieces. You can also line the bottom with parchment paper for extra insurance – that’s my little trick!
Step 2: Mix Dry Ingredients
In a medium bowl, whisk together the sifted flour, baking powder, salt, nutmeg, cinnamon, and cloves. Give it a good whisk until everything is thoroughly combined. This ensures that your spices and leavening agents are evenly distributed throughout the cake, so you don’t get pockets of spice or flat spots. I always do this right at the beginning so I don’t forget!
Step 3: Mix Wet Ingredients
In a large bowl, cream together the softened butter and granulated sugar with an electric mixer on medium-high speed until light and fluffy. This usually takes about 3-5 minutes. Scrape down the sides of the bowl as needed. This is where you build the foundation of a tender cake. Next, add the eggs one at a time, beating well after each addition. Stir in the vanilla extract and rum extract (if using). Finally, gradually add the eggnog, alternating with the dry ingredients, beginning and ending with the dry ingredients. Mix on low speed just until combined. Don’t overmix here; we want to keep that batter tender!
Step 4: Combine
Here’s the magic part: you’re going to add the dry ingredients to the wet ingredients in three additions, alternating with the eggnog in two additions. Start and end with the dry. So, add about a third of the dry ingredients to the butter mixture, mix on low until just combined, then add half of the eggnog, mix, then another third of the dry, mix, the remaining eggnog, mix, and finish with the last of the dry ingredients. Again, mix on low speed *just* until there are no streaks of flour. Overmixing develops the gluten in the flour, which can make your cake tough. A few tiny lumps are okay!
Step 5: Prepare Filling
In a small bowl, whisk together the packed light Brown Sugar, flour, cinnamon, and nutmeg for the filling. Mix until there are no clumps of brown sugar. This quick step creates little bursts of spiced sweetness throughout your cake.
Step 6: Layer & Swirl
Pour about half of the cake batter into your prepared baking pan and spread it evenly. Sprinkle about half of the Brown Sugar filling mixture evenly over the batter. Then, dollop the remaining batter over the filling and spread it gently to cover. Sprinkle the rest of the filling mixture over the top layer of batter. For that beautiful marbled effect, you can use a knife or a skewer to gently swirl the filling into the batter. Don’t go too deep, just a few passes will do it!
Step 7: Bake
Bake for 35-45 minutes, or until a wooden skewer or toothpick inserted into the center of the cake comes out clean. Oven temperatures can vary, so start checking around the 35-minute mark. If the top starts to brown too quickly, you can loosely tent it with aluminum foil.
Step 8: Cool & Glaze
Once it’s baked, let the cake cool in the pan on a wire rack for about 15-20 minutes. This is important for the cake to set up properly. While it’s cooling, whisk together the powdered sugar, 2 tablespoons of eggnog, and the extract for the glaze. Add more eggnog, a teaspoon at a time, until you reach your desired drizzling consistency. It should be thick enough to coat the cake but thin enough to drizzle. Once the cake has cooled slightly, drizzle the glaze all over the top. It will set as it continues to cool.
“New family favorite! This Holiday Eggnog Cake Your New Favorite Dessert was so flavorful and ridiculously easy. Crowd-pleaser for sure.”
Step 9: Slice & Serve
Let the cake cool completely in the pan before slicing. This ensures clean cuts and prevents the glaze from smearing. Once cooled, slice into squares or rectangles and serve. It’s delicious served at room temperature, but I often find it even better the next day!
What to Serve It With
This eggnog cake dessert is a star on its own, but it also plays wonderfully with other flavors and can be served in so many ways! For breakfast, imagine a warm slice with a strong cup of coffee – the spices in the cake really complement the roasted notes of the coffee. It’s also fantastic with a dollop of Greek yogurt or a side of fresh berries. For a more elegant brunch, I like to serve it with a light fruit salad, perhaps made with oranges and cranberries. A small dusting of powdered sugar can also make it look extra special. As a dessert, it’s utterly divine. Serve it with a spoonful of whipped cream, perhaps spiked with a little rum or brandy if you’re feeling festive. A scoop of vanilla bean ice cream or a drizzle of caramel sauce is also a winning combination. My family often requests it after Sunday dinner, and we sometimes pair it with a small glass of sherry or a dessert wine. For cozy snacks, it’s perfect just as it is, maybe with a warm glass of milk or spiced APPLE CIDER. It’s truly a versatile treat that can adapt to any occasion, from a casual afternoon bite to a holiday feast centerpiece.
Top Tips for Perfecting Your Eggnog Cake Dessert
Over the years, I’ve picked up a few tricks that make this eggnog cake dessert consistently amazing. First, for the batter, always use room temperature eggs and butter. This is non-negotiable for achieving that light, fluffy texture. If you forget to take your eggs out, a quick soak in warm water for 5-10 minutes does the trick. For the butter, you can give it a few quick pulses in the microwave, but be careful not to melt it! When mixing the dry ingredients, really take the time to whisk them well. This ensures you don’t end up with a bite that’s too heavy on nutmeg or baking powder. My personal rule for combining wet and dry is to mix *just* until the flour streaks disappear. Seriously, a few tiny lumps are better than a tough cake from overmixing. When it comes to the filling, make sure your Brown Sugar is soft and not hardened. If it’s clumpy, press it through a fine-mesh sieve. For that beautiful swirl effect, don’t overdo it! Just a few gentle passes with a knife or skewer is all you need. Too much swirling can incorporate the filling too deeply, making the cake muddy in appearance. Baking is where many people get anxious, but trust me, learn your oven! My oven runs a bit hot, so I often set my timer for 5 minutes less than the recipe suggests and then check. A wooden skewer or toothpick is your best friend here – it should come out clean with no wet batter clinging to it. If it has a few moist crumbs, that’s perfectly fine and means your cake is still wonderfully moist. For the glaze, the consistency is key. Start with the minimum amount of liquid and add more only if needed. It’s much easier to thin out a glaze than to thicken it! If you accidentally make it too thin, just whisk in a bit more powdered sugar. And a final tip from my kitchen to yours: this cake is even better the next day after the flavors have had a chance to meld. So, don’t feel pressured to eat it all right away (though I can’t blame you if you do!).
Storing and Reheating Tips
Storing this delicious eggnog cake dessert properly ensures you can enjoy its amazing flavor for days to come. At room temperature, tightly covered with plastic wrap or in an airtight container, it should stay fresh for about 2-3 days. This is my preferred method if I know we’ll be finishing it off relatively quickly. If it’s very warm in your house, or you want to keep it a bit longer, the refrigerator is your best bet. Wrap it well in plastic wrap and then place it in an airtight container. It will last beautifully in the fridge for up to a week. When serving chilled cake, I always recommend letting it sit out at room temperature for about 30 minutes to take the chill off and allow the flavors to fully develop. Reheating isn’t usually necessary for this cake as it’s wonderful at room temperature or slightly warmed. However, if you do prefer it warm, a few seconds in the microwave (about 10-15 seconds per slice) should do the trick. Be careful not to overheat, as it can dry out. For the glaze, it’s best to apply it only once the cake has completely cooled. If you plan on freezing the cake, it’s a good idea to freeze it *before* glazing. Wrap the cooled, unfrosted cake tightly in plastic wrap, then in aluminum foil, and it can be stored in the freezer for up to 2-3 months. Thaw it overnight in the refrigerator, and then apply the glaze once it’s fully defrosted and at room temperature. This method ensures the glaze stays nice and fresh.
Frequently Asked Questions
Final Thoughts
So, there you have it – my absolute favorite eggnog cake dessert recipe. I truly believe this cake embodies everything I love about comforting, flavorful baking. It’s rich and moist, bursting with those warm, festive spices, and it’s surprisingly easy to whip up, making it perfect for any occasion. Whether you’re looking for a showstopper for a holiday gathering or just a delightful treat to brighten your day, this eggnog cake dessert is guaranteed to impress. If you loved this recipe, you might also enjoy my Spiced APPLE CRUMBLE Pie or my Lemon Blueberry Scones – they’re also family favorites! I can’t wait to hear what you think. Please leave a comment below and let me know how your eggnog cake dessert turned out, or share any of your own favorite eggnog creations! Happy baking, everyone!
eggnog cake dessert
Ingredients
For the Spice Cakes
- 5 egg whites room temperature
- 0.75 cup buttermilk
- 0.75 cup unsalted butter softened
- 1.75 cup granulated sugar
- 2.5 cup cake flour
- 1 Tablespoon baking powder
- 0.5 teaspoon kosher salt
- 1 teaspoon cinnamon
- 1 teaspoon nutmeg
- 1 teaspoon ground ginger
For the Eggnog Cheesecake
- 16 ounce cream cheese softened (2 packages, 8 ounce each)
- 0.66 cup granulated sugar
- 0.1 teaspoon salt pinch
- 2 eggs
- 0.25 cup sour cream
- 0.33 cup heavy cream
- 0.5 teaspoon rum flavoring
- 0.5 teaspoon nutmeg
For the Eggnog Frosting
- 1 cup unsalted butter softened
- 1.5 teaspoon nutmeg
- 1 teaspoon rum flavoring
- 4 cup powdered sugar
- 0.25 cup low fat eggnog
Instructions
For the Spice Cakes
- In a small bowl, mix egg whites and 0.25 cup buttermilk. Set aside.
- In a mixing bowl, beat butter and sugar until creamy, about 2-3 minutes. Add in dry ingredients (cake flour, baking powder, kosher salt, cinnamon, nutmeg, ground ginger) and mix until combined. Slowly add in egg white mixture. Beat in remaining buttermilk.
- Divide batter evenly between two greased and floured 9-inch round cake pans. Bake in a 350 degree F oven for 25-30 minutes, or until a wooden skewer inserted into the center comes out clean.
- Remove cakes from oven and let cool in pans for 10 minutes before inverting onto a wire rack to cool completely.
For the Eggnog Cheesecake
- Preheat oven to 325 degrees F. Using a large roasting pan on the lower 1/3 of the oven, preheat the pan. Prepare a 9-inch springform pan by wrapping the bottom (outside) with a double layer of foil to prevent water seepage. Spray the pan with nonstick baking spray and line the bottom (inside) with a circle of parchment paper. Meanwhile, boil several cups of water to use later for the water bath.
- In a large mixing bowl, beat softened cream cheese with granulated sugar for 2-3 minutes until creamy. Add in salt and eggs, one at a time, beating well after each addition. Beat in sour cream, heavy cream, rum flavoring, and nutmeg until just combined. Pour the cheesecake batter into the prepared 9-inch springform pan. Place the springform pan in the center of the preheated roasting pan. Carefully pour boiling water, slowly, into the roasting pan until about one inch of water comes up the sides of the springform pan (creating a water bath).
- Bake the cheesecake for 45 minutes. Turn the oven off and let the cheesecake sit for an additional 30 minutes in the oven with the door slightly ajar. Remove from the oven and water bath, then cool completely on a wire rack. Once cooled, remove from the springform pan and place in the freezer for one hour, or overnight, until firm and ready to assemble the cake.
For the Eggnog Buttercream Frosting and Assembly
- In a large mixing bowl, beat softened unsalted butter for 3 minutes until fluffy. Add in nutmeg, rum flavoring, powdered sugar, and low fat eggnog. Beat for an additional 3-5 minutes until the frosting is light and fluffy.
- To assemble the cake: Place one cooled spice cake layer on a cake plate or serving stand. Evenly spread the chilled eggnog cheesecake layer over the first cake layer. Top with the second spice cake layer. Frost the entire cake with the prepared eggnog buttercream frosting. Serve and enjoy!


