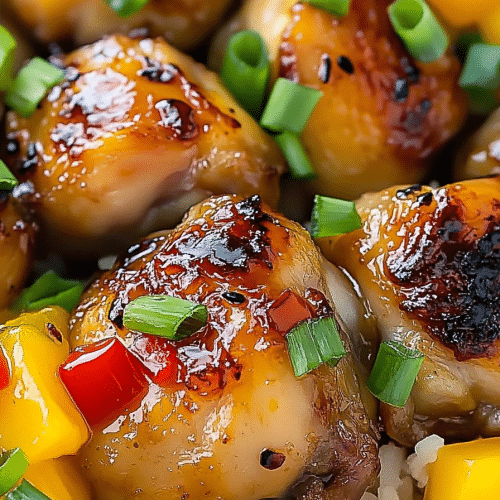
I’ve always believed that the best meals happen when you start with something simple and let the memories do the flavor work. This dish—Hawaiian chicken thighs—came from a Sunday afternoon of pretending to clean out the fridge and pretending even harder not to raid the cookie jar. The moment the pineapple met the soy-garlic-ginger kiss, the kitchen smelled like a tropical breeze and a family hug at once. It’s incredible how a handful of pantry staples can transform into something that tastes like a vacation in your own kitchen. I’m not saying it’s fancy, but I am saying it’s a lifesaver on busy nights. The kids ask for seconds, and my partner swears the glaze has a tiny spark of sunshine in it. If you’ve ever wished for a weeknight dinner that feels like a small celebration, this is it. And yes, Hawaiian chicken thighs is the star here—plenty of rich, savory depth with a bright pineapple finish that kids and adults alike crave.
Thank you for reading this post, don't forget to subscribe!What is Hawaiian chicken thigh?
Think of Hawaiian chicken thighs as the cozy aunt who brings a bright pineapple smile to a family recipe. It’s essentially chicken thighs marinated and baked with a sweet-tart glaze featuring pineapple juice, soy, garlic, and ginger. The name comes from a classic island-inspired flavor profile that leans into tropical fruit, salty soy, and a little caramelization on the edges. It’s not complicated, but it’s incredibly satisfying: tender meat, glossy glaze, and chunks of pineapple that caramelize in the oven. I love that it’s flexible too—bone-in or boneless, skin-on or skinless, and you can tailor the glaze to be extra sticky or lightly glossy depending on your mood. Think of it as weeknight-friendly, crowd-pleasing comfort with a sunny twist.
Why you’ll love this recipe?
What I love most about Hawaiian chicken thighs is how everything you需要 comes together with very little drama. The flavors are bright and balanced, the sauce clings to every bite, and the meat stays tender through the bake. Here are the big wins you’ll notice:
- Flavor:A gorgeous balance of sweet pineapple, tangy soy, and warm garlic-ginger, all caramelized to a glossy finish that’s
- Simplicity:How do you marinade, bake, glaze your hands and your timer does the heavy lifting?
- Cost-efficiency: Budget-friendly pantry staples turn into something that feels special. Thick thighs are affordable, and pineapple juice is a cheap brightness booster.
- Versatility: Leftovers shine in breakfast hashes, a quick fried rice, or tucked into warm tortillas for a casual supper. It’s a recipe you’ll reach for again and again.
What makes this recipe stand out, besides the glossy glaze, is how forgiving it is. I’ve made it with almond milk in the glaze to tweak the texture (it’s amazing how a touch of almond milk can mellow a bite without losing the snap), and I’ve swapped in fresh ginger when I’m out of powder—both work beautifully. My kids actually ask for seconds, which is basically the culinary equivalent of a trophy in our house. If you’re craving something that tastes like a little vacation but won’t derail your week, this is your go-to.
How to Make Hawaiian Chicken Thighs
Quick Overview
This dish comes together in three simple acts: marinate the chicken to soak up all that tropical goodness, roast it with pineapple until the edges blister and the glaze tightens, then finish with a glossy, sticky glaze that sings. The beauty is in the timing—no heroic juggling of pans or multi-step sauces. While the oven does its quiet magic, you can breathe easy, set the table, and pretend you’ve got all the time in the world. In the end you’ll have tender chicken, caramelized pineapple, and a sauce that coats every bite with a kiss of sweet-salty brightness.
Ingredients
For the Marinade:
- 6 bone-in, skin-on chicken thighs (about 2 pounds) for maximum juiciness
- 1/2 cup pineapple juice, good-quality and not from concentrate
- 1/4 cup soy sauce (or tamari for gluten-free)
- 2 tablespoons honey or brown sugar
- 2 cloves garlic, minced
- 1 tablespoon grated fresh ginger
- 1 tablespoon rice vinegar or lime juice for brightness
- 1 teaspoon sesame oil (optional but great for depth)
For the Pineapple Filling:
- 1 cup pineapple chunks, fresh if possible
- 1 small red onion, thinly sliced
- 1 bell pepper, sliced into bite-size strips (color optional)
For the Glaze:
- 3 tablespoons pineapple juice (reserved from the marinade or fresh)
- 2 tablespoons honey or brown sugar
- 1 teaspoon cornstarch mixed with 1 tablespoon water
- Optional: a splash of soy sauce or a pinch of chili flakes for heat
Step-by-Step Instructions
Step 1: Preheat & Prep Pan
Heat your oven to 400°F (200°C). Line a large Sheet Pan with parchment for easy cleanup and lightly oil it to keep the chicken from sticking. Pat the chicken thighs dry; moisture is the secret enemy of a good sear, so give them a quick pat-dry with paper towels. If you’ve got time, you can let the thighs air-dry in the fridge for 20 minutes to improve browning—my grandma swore by a little air-drying for extra crispness on the skin, and she was always right.
Step 2: Mix Dry Ingredients
For the dry mix, whisk a pinch of salt, Black Pepper, and a subtle dusting of onion powder in a small bowl. This is your gentle flavor base that will help the glaze cling and the meat taste balanced even after the heat of the oven.
Step 3: Mix Wet Ingredients
In a separate bowl, stir together the pineapple juice, soy sauce, honey, minced garlic, grated ginger, rice vinegar, and sesame oil. This wet blend is where the magic starts—at once sweet, salty, and fragrant. I always smile when I whisk in the ginger; the kitchen smells like a tiny island escape and I’m instantly calmer.
Step 4: Combine
Pat the chicken dry again if you did any extra moisture removal. Coat the thighs in the wet marinade first, then roll them through the dry mix for a light, even season. If you’ve got time, marinate the chicken in the fridge for 30 minutes to overnight; the longer it rests, the more deeply the flavors sink in. Spoon a portion of the marinade into the pan so the chicken can bathe as it roasts; we want maximal gloss and flavor on every surface.
Step 5: Prepare Filling
Scatter pineapple chunks, red onion, and bell pepper around the chicken on the Sheet Pan. The fruit and veg will soften as the chicken roasts, releasing their own sweetness and making a little natural glaze of their own. If you prefer extra caramelly bites, you can toss the pineapple with a whisper more honey before laying it down.
Step 6: Layer & Swirl
Spread the pineapple filling evenly around the chicken so every piece has a chance to caramelize. Brush any leftover marinade you didn’t use on the chicken and toss a few extra pineapple chunks on top. If you like a swirled look, drizzle a little extra glaze over the vegetables and give the pan a gentle swirl to distribute the shine without splashing the chicken apart.
“Packed with flavor and so simple. Exactly what I wanted from this Hawaiian chicken thighs!”
Step 7: Bake
Roast in the hot oven for about 25–30 minutes, turning the pan halfway so the bottoms brown evenly. The thighs should reach an internal temperature of 165°F (74°C). You’ll know they’re done when the skin is deeply bronzed and the glaze looks lacquered. If you’re using boneless, skinless thighs, check a bit earlier—they cook faster and you don’t want them drying out.
Step 8: Cool & Glaze
Remove the pan from the oven and let the chicken rest for 5 minutes. Warm up your glaze if it’s thickened too much, then spoon it over the chicken, brushing it on evenly. Return for a couple of minutes to allow the glaze to set. The extra minute or two is the difference between a good glaze and a show-stopping, sticky, glossy finish. If you want extra gloss, brush again right before serving.
Step 9: Slice & Serve
Slice the thighs along the grain to keep them tender, and plate with a generous heap of pineapple-flecked veggies. A sprinkle of sesame seeds and a whisper of chopped scallions make it look restaurant-worthy without much effort. I like to serve this with white rice or brown rice to soak up every last drop of that edible sunshine glaze. A quick cucumber-lime salad on the side gives a crisp counterpoint to the sweet-salty glaze, and it keeps things feeling light and bright.
What to Serve It With
This dish is naturally versatile, which is why I keep a few go-tos in the rotation for different moods and occasions.
For Breakfast: Dice leftover chicken and fold it into a fluffy breakfast burrito with scrambled eggs and a little salsa for a savory-morning twist. It’s a fun, unexpected way to start the day and it uses up any midnight leftovers without waste.
For Brunch: Serve the honey-soy glaze over warm pineapple-scented rice with a quick avocado-tomato salsa and a soft fried egg on top. Brunch done right can taste like a tiny vacation, and this keeps that vacation vibe intact well into the afternoon.
As Dessert: Okay, hear me out: make a quick pineapple glaze reduction and drizzle it over grilled pineapple with vanilla yogurt or coconut Ice Cream. The pineapple’s natural sweetness paired with a creamy finish can feel like a surprisingly delightful dessert pairing to cap off a tropical-inspired meal.
For Cozy Snacks: Turn leftovers into pineapple-glazed Chicken Sliders with a dab of mayo and a crunchy pickled cucumber on a soft bun. It’s the kind of snack that feels indulgent without being heavy, perfect for cozy nights in front of a movie.
We’ve made this countless times, and each time it feels like a little celebration in your kitchen. It’s a crowd-pleaser, a comfort dish, and a gentle reminder that good flavors don’t have to be complicated. This is the kind of recipe that travels well—from weeknights to weekend gatherings—and somehow always tastes like home.
Top Tips for Perfecting Your Hawaiian Chicken Thighs
Here are the little adjustments that have saved many a dinner, all organized by technique:
Garlic & Ginger Prep: Finely mince or grate garlic and ginger so they distribute evenly rather than sitting in one bite. A quick swirl of the knife against the garlic press helps release oils and aromatics, making every bite brighter.
Marinade Magic: If you’re short on time, even 15–20 minutes of marinating does wonders. For deeper flavor, plan ahead and marinate overnight in the fridge. Just keep the pan and the fridge in a cool, safe place so you don’t risk bacteria growth.
Glaze Consistency: If your glaze thickens too much, whisk in a little pineapple juice to loosen it. If it’s too thin, simmer it a minute longer with a tiny bit of cornstarch slurry to achieve that glossy, clingy finish without running.
Glaze Application: Brush the glaze on during the last 5–7 minutes of baking to prevent sugar from scorching. The last kiss of heat will set the gloss and intensify the pineapple aroma.
Ingredient Swaps: Swap in tamari for gluten-free needs, or use coconut aminos for a deeper, sweeter note. If you don’t have pineapple juice, a splash of orange or lime can add brightness—just keep it balanced with a touch of sweetness to mimic the tropical vibe.
Baking Tips: If your oven runs hot, rotate the pan halfway through and watch for scorching on the edges. If you’re using bone-in thighs, the bone will help maintain moisture, but you may need a touch more time; keep an instant-read thermometer handy.
“New family favorite! This Hawaiian chicken thighs was so flavorful and ridiculously easy. Crowd-pleaser for sure.”
Finish with Flair: Finish with chopped scallions, sesame seeds, or a scatter of fresh cilantro. A little green makes the dish look as lively as it tastes.
Lessons learned: don’t skip drying the chicken; the surface moisture is what makes that golden crust possible. And always use a wide pan so the heat can reach more surface area—more caramelization means more flavor in the glaze. This is one of those recipes where practice makes the glaze perfect and the chicken perfectly juicy.
Storing and Reheating Tips
Leftovers are rare around here, but when they happen, I want them to stay tasty and safe. Here’s how I handle storage and reheating so you don’t lose that glossy, tropical finish.
Room Temperature: Leftovers should not sit out for more than two hours. If you’re planning a party where guests linger, keep the dish chilled and serve with warm rice or reheated vegetables to maintain a sense of freshness.
Refrigerator Storage: Store in an airtight container for up to 3 days. If the glaze has separated, give it a quick shake before reheating to bring back the shine.
Freezer Instructions: You can freeze cooked chicken thighs for up to 2 months. Freeze in a sealed container or heavy-duty freezer bag with the glaze included. Thaw overnight in the fridge and reheat gently to avoid drying.
Glaze Timing Advice: If you’re keeping the glaze separate for later, brush it on before serving rather than during freezing. Glazes tend to hold up better when applied fresh, so consider making the glaze just before you reheat for best results.
In my kitchen, leftovers often become a new dinner—tossed with rice, stirred into a quick noodle dish, or tucked into a taco with a little fresh cilantro to brighten. The pineapple glaze still shines even after a chill, which is a small miracle I always appreciate on a busy weeknight.
Frequently Asked Questions
Final Thoughts
This recipe is a little love note to weeknight cooking—easy enough for a busy family and comforting enough to feel like a hug from someone who knows your favorite flavors. The combination of juicy chicken thighs, pineapple’s brightness, and a glossy, sesame-scented glaze feels special without demanding a lot of time or fancy equipment. It’s the kind of dish you can drop into a weeknight and let it own the dinner hour, then replay on a lazy weekend with friends. If you’re new to Hawaiian flavors, this is a gentle entry point that still delivers that tropical vibe without being intimidating. I hope you’ll try it, tweak it to your taste, and tell me how you served it. I love hearing about your twists and your own little kitchen victories. Happy cooking—and I can’t wait to hear how yours turns out!
Hawaiian chicken thighs
Ingredients
Main Ingredients
- 1.5 lbs boneless, skinless chicken thighs
- 0.5 cup soy sauce
- 0.5 cup pineapple juice
- 0.25 cup brown sugar packed
- 2 cloves garlic minced
- 1 tablespoon fresh ginger grated
- 1 red bell pepper sliced
- 1 green bell pepper sliced
- 1 cup fresh pineapple chunks
- 2 tablespoons cornstarch for thickening
- 2 tablespoons water for cornstarch slurry
- Salt to taste
- Black pepper to taste
Optional Garnish
- 2 tablespoons fresh cilantro chopped
- 1 tablespoon sesame seeds
Instructions
Preparation Steps
- In a large bowl, whisk together soy sauce, pineapple juice, brown sugar, minced garlic, and grated ginger. Add chicken thighs and toss to coat. Cover and refrigerate for at least 30 minutes, or up to 4 hours, to marinate.
- Preheat your oven to 400°F (200°C). Arrange the sliced bell peppers and pineapple chunks in a single layer in a baking dish.
- Remove the chicken from the marinade, reserving the marinade for later use. Place the chicken thighs over the vegetables and pineapple in the baking dish. Season lightly with salt and black pepper.
- Bake the chicken and vegetables for 20 minutes.
- While the chicken bakes, pour the reserved marinade into a small saucepan. Bring it to a simmer over medium heat. In a small separate bowl, whisk together the cornstarch and water to create a smooth slurry. Slowly whisk the slurry into the simmering marinade. Cook, stirring constantly, until the sauce thickens, which should take about 2-3 minutes.
- After the initial 20 minutes, carefully remove the baking dish from the oven. Pour the thickened sauce evenly over the chicken, vegetables, and pineapple. Return the dish to the oven and bake for another 10-15 minutes, or until the chicken is thoroughly cooked and reaches an internal temperature of 165°F (74°C).
- Garnish with chopped cilantro and sesame seeds, if desired. Serve hot, ideally with a side of steamed white rice.


