There’s something magical about a simple treat that can transport you back to childhood summers, isn’t there? For me, it’s definitely chocolate frozen bananas. I remember my mom making these for us on sweltering July afternoons, and the sheer delight of biting into that frozen, chocolate-covered goodness felt like the biggest luxury in the world. They were always a hit, a welcome break from the heat. Now, my own kids practically beg for them when that first warm day hits. It’s funny, I used to think making anything like this was complicated, but these chocolate frozen bananas are surprisingly straightforward. They’re my go-to when I need a quick dessert that feels special, or even just a healthier way to satisfy a late-night sweet craving without turning on the oven. Honestly, they’re a lifesaver on busy weeknights when the last thing I want to do is bake a whole cake. Forget those store-bought versions that are often too sweet or have weird ingredients; this homemade version is so much better. You can control everything that goes in, and the taste is just out of this world. It’s a classic for a reason, and once you try this recipe, you’ll see why they’re such a beloved treat for so many people, myself included!
Thank you for reading this post, don't forget to subscribe!What is chocolate frozen banana?
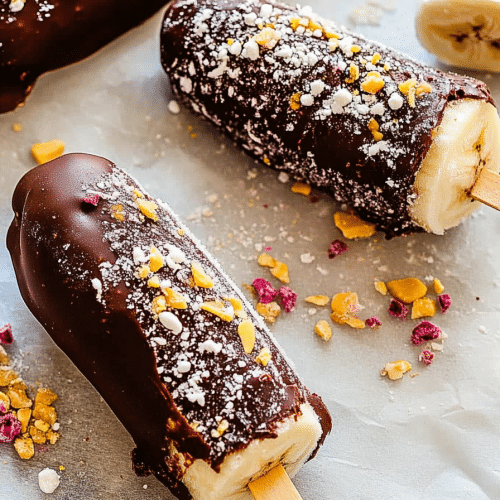
So, what exactly are chocolate frozen bananas? Think of them as nature’s Ice Cream bar, but even better because they’re so much simpler and healthier! At its core, it’s just a frozen banana, usually cut in half or quarters, speared onto a stick, and then dipped in melted chocolate. Once the chocolate hardens, you’ve got a delightful, frozen treat that’s both refreshing and satisfying. It’s essentially a frozen fruit dipped in a sweet coating. We’re going for that perfect balance – the creaminess of the frozen banana melting slightly with each bite, contrasted with the crisp snap of the chocolate shell. The beauty of this treat is its versatility. While the classic is just banana and chocolate, you can totally elevate it with toppings or different types of chocolate. It’s not about complicated techniques or fancy ingredients; it’s about taking simple, wholesome components and turning them into something incredibly delicious and fun to eat. It’s essentially a frozen banana reinvented as a decadent, yet guilt-free, dessert that everyone, from toddlers to grandparents, can enjoy.
Why you’ll love this recipe?
What are some of the best reasons to make chocolate frozen bananas?flavor is just incredible. You get that natural sweetness and creamy texture from the banana, which is perfectly complemented by the rich, sometimes slightly bitter, chocolate. It’s a match made in dessert heaven! Then there’s the sheer simplicity. Seriously, if you can peel a banana and melt some chocolate, you can make these. There’s no baking involved, no complex steps, and it comes together surprisingly fast. This makes it the perfect recipe for those evenings when you’re craving something sweet but don’t have much time or energy. And let’s talk about Cost-efficiency: What is the best way to measure cost-efficiency?. Bananas are usually one of the most budget-friendly fruits out there, and good quality chocolate can be found without breaking the bank. Compared to buying individual Ice Cream bars or fancier frozen desserts, this recipe is a total win for your wallet. What I love most about this recipe, though, is its versatility. While this post is all about the classic chocolate, I’ve got so many ideas for variations! You can mix up the type of chocolate, add different toppings, or even blend them into a smoothie later. It’s a base for so much creativity. My personal reason for coming back to this recipe again and again is how it makes my family smile. Seeing my kids’ faces light up when they grab one from the freezer, or watching my partner enjoy one with his morning coffee – it’s pure joy. It reminds me of simpler times, and it’s a treat that genuinely feels wholesome and satisfying. It’s also a fantastic way to use up bananas that are just a little too ripe to eat fresh; instead of letting them go to waste, you transform them into something amazing!
How to Make Chocolate Frozen Bananas
Quick Overview
Making these chocolate frozen bananas is ridiculously easy. You’ll essentially be freezing banana pieces, dipping them in melted chocolate, and then letting them set. The key is to have everything prepped and ready to go before you start melting the chocolate, as it can seize up quickly. You’ll slice your bananas, stick them with something to hold onto, freeze them until solid, then dip and refreeze. It’s that simple! This method ensures a perfectly frozen banana that holds up well to the chocolate coating. It’s a no-bake wonder that requires minimal effort for maximum deliciousness. This process is what makes them so incredibly satisfying – that contrast between the cold, firm banana and the snappy chocolate shell is pure magic. You really can’t go wrong with this approach.
Ingredients
For the Main Treat:
• 4-6 ripe but firm bananas: Look for bananas that are yellow with a few brown spots – they’re sweet enough but still hold their shape when frozen. Avoid overly mushy ones or ones that are completely green. I always try to buy an extra bunch for this purpose.
• 12-16 popsicle sticks or sturdy skewers: Make sure they are food-safe and long enough to handle dipping without getting your hands covered in chocolate.
For the Chocolate Coating:
• 2 cups (about 12 oz) good quality chocolate chips or chopped chocolate: I prefer using semi-sweet or Dark Chocolate chips because they have a nice balance of sweetness and richness. You can use milk chocolate if you prefer, but it tends to be sweeter. Using chocolate meant for melting (like compound chocolate) works too and is often easier, but real chocolate tastes so much better! I’ve tested both and always lean towards real chocolate for the flavor payoff.
• 1-2 tablespoons coconut oil or vegetable oil: This is crucial for achieving a smooth, dippable consistency for your chocolate. It helps the chocolate coat the bananas evenly and creates that lovely snap when it hardens. Don’t skip this!
“The Frozen Chocolate Banana Delights Easy Treat turned out amazing. My kids asked for seconds. Saving this one!”
Step-by-Step Instructions
Step 1: Prepare Bananas and Sticks
First things first, let’s get those bananas ready. Peel your bananas and slice each one into halves or thirds, depending on how big you want your frozen treats. For halves, slice lengthwise, then insert a popsicle stick horizontally into the cut side of each half, making sure it’s secure. If you’re slicing into thirds, you can insert the stick into the cut end of each piece. You want them to stand upright or be easy to hold. Arrange these prepared banana pieces on a baking sheet lined with parchment paper or wax paper. Make sure they aren’t touching each other too much, so they freeze individually and don’t stick together. This step is super important for easy handling later on.
Step 2: Freeze Solid
Once your banana pieces are all speared and arranged on the baking sheet, pop the entire sheet into your freezer. Let them freeze for at least 2-3 hours, or until they are completely solid. You can even leave them in there longer, overnight is perfectly fine. The firmer they are, the easier they will be to dip in the chocolate without them starting to melt or break. This is the most important waiting period, but trust me, it’s worth it!
Step 3: Melt the Chocolate
When your bananas are frozen solid, it’s time to melt the chocolate. You can do this using a double boiler method or in the microwave. For the double boiler, fill a saucepan with about an inch of water and bring it to a simmer. Place a heatproof bowl over the saucepan (making sure the bottom of the bowl doesn’t touch the water) and add your chocolate chips or chopped chocolate along with the coconut oil. Stir occasionally until the chocolate is completely melted and smooth. If using the microwave, place the chocolate and oil in a microwave-safe bowl and heat in 30-second intervals, stirring well after each interval, until smooth. Be careful not to overheat; melted chocolate can seize up quickly. You want a smooth, fluid consistency that will coat the bananas easily.
Step 4: Dip and Coat
Now for the fun part! Take your frozen banana pieces out of the freezer. Working one at a time, dip each banana into the melted chocolate. Use a spoon to help coat it completely, ensuring there are no bare spots. You can let any excess chocolate drip back into the bowl. If you’re adding toppings (more on that later!), sprinkle them on while the chocolate is still wet. This is where having your toppings ready and the chocolate smooth really pays off. Don’t delay – you want to work relatively quickly before the banana starts to thaw too much or the chocolate hardens.
Step 5: Add Toppings (Optional)
If you’re feeling fancy, now’s the time to add your toppings! While the chocolate is still wet, you can sprinkle on things like chopped nuts (peanuts, almonds, walnuts), shredded coconut, mini chocolate chips, colorful sprinkles, or even a drizzle of White Chocolate. I’ve found that mini chocolate chips adhere really well, and chopped peanuts give a nice crunch. Just be sure to have your toppings in small bowls ready to go right next to your dipping station.
Step 6: Refreeze to Set
Once each banana is dipped (and topped, if you’re doing so), carefully place it back onto the parchment-lined baking sheet. You’ll want to place them so they don’t touch each other again. Pop the baking sheet back into the freezer. Let them freeze for at least another 30 minutes to an hour, or until the chocolate is completely hardened and firm. This ensures you have that lovely, crisp chocolate shell.
Step 7: Enjoy!
Once the chocolate is fully set, your chocolate frozen bananas are ready to be enjoyed! You can keep them in an airtight container in the freezer for up to a month. Just grab one whenever you need a sweet treat. It’s amazing how something so simple can be so satisfying. They’re perfect for a hot day, a quick dessert, or even a fun snack for the kids after school.
“Made the Frozen Chocolate Banana Delights Easy Treat tonight and wow — perfect weeknight dinner. Will definitely make again!”
What to Serve It With
These chocolate frozen bananas are pretty much a standalone star, but they can absolutely shine in various settings! For a simple breakfast, I love to have one with my morning coffee. The sweetness of the banana and chocolate cuts through the bitterness of the coffee perfectly, making it feel like a little indulgence to start the day. It’s much lighter than a pastry but feels just as satisfying. For a more elegant brunch spread, imagine these lined up on a platter alongside fresh berries and maybe some small pastries. They add a fun, playful element that guests of all ages will appreciate. A drizzle of white chocolate or a sprinkle of flaky sea salt on top can elevate them even further for a special occasion. As a dessert, they’re fantastic on their own, but you could also serve them with a small scoop of vanilla ice cream or alongside a slice of rich chocolate cake if you’re feeling extra decadent. The contrast of textures and temperatures is divine. For cozy snacks, they are perfect for a movie night or a casual get-together. Just pull them out of the freezer, and everyone can grab their favorite. My family tradition is to have them during our summer movie nights outdoors; they’re much less messy than Ice Cream Cones and everyone gets their own individual treat. They also pair surprisingly well with a warm mug of tea or hot chocolate on a cooler evening when you’re craving something sweet but don’t want to bake.
Top Tips for Perfecting Your Chocolate Frozen Bananas
Over the years of making these, I’ve picked up a few tricks that really help ensure they turn out perfectly every single time. One of the most important aspects is the banana prep. You want bananas that are ripe enough for sweetness but firm enough not to turn to mush when frozen. If your bananas are a little too ripe, they might get mushy, and if they’re too green, they won’t be sweet enough. I usually aim for bananas that are mostly yellow with a few brown freckles. Also, make sure they’re completely dry before inserting the sticks; moisture can make them slip. For the mixing advice, the key is the coconut oil. It’s not just about making the chocolate smoother; it helps the chocolate harden with that satisfying snap. If you add too little, the chocolate will be thick and clumpy. Too much, and it might not harden properly. Start with 1 tablespoon per cup of chocolate chips and add more if needed. When it comes to swirl customization, if you’re going beyond just plain chocolate, have your toppings ready *before* you start dipping. Chopped nuts, sprinkles, or shredded coconut stick best when the chocolate is still warm and melty. For ingredient swaps, I’ve experimented with different chocolates. Using good quality chocolate makes a HUGE difference in taste. Compound chocolate (often labeled “confectionery coating”) melts easily and hardens well, but the flavor isn’t as rich as using real chocolate (chocolate chips or bars). If you use real chocolate, the coconut oil is essential for smoothness. For baking tips (though we’re not baking here!), the freezing is crucial. Make sure those bananas are rock-solid before dipping. If they start to soften, your chocolate won’t coat evenly, and they might break. A quick dip in warm water for the popsicle stick before inserting can sometimes help it grip better. Finally, for glaze variations, think beyond just plain chocolate! You can mix in a little peanut butter to the melted chocolate for a peanut butter-chocolate version, or even add a pinch of cinnamon or espresso powder for an extra flavor boost. White chocolate is another great option, either on its own or for drizzling over dark or milk chocolate. I’ve also found that drizzling a contrasting color of melted chocolate over the already hardened chocolate layer adds a beautiful visual appeal. Just make sure the first layer is completely set before adding a second drizzle.
Storing and Reheating Tips
Storing these chocolate frozen bananas is pretty straightforward, and they’re best enjoyed straight from the freezer! For room temperature storage, honestly, I wouldn’t leave them out for more than 10-15 minutes on a warm day, as the chocolate will start to melt. They’re meant to be eaten cold! If you need to keep them for a bit longer, transfer them to an airtight container and pop them back in the freezer. For refrigerator storage, this isn’t really recommended. The banana will get icy and lose its creamy texture, and the chocolate might get a bit strange. The freezer is definitely the place for these. For freezer instructions, the best way to store them is in a single layer on a baking sheet until the chocolate is firm, and then transfer them to an airtight container or a freezer bag. Make sure to press out as much air as possible if using a bag to prevent freezer burn. They’ll keep well for about 1 month, though they’re usually devoured long before that! The key is to prevent them from sticking together. If they do stick a bit after being in a bag, just let them sit on the counter for a minute or two and they usually separate easily. For glaze timing advice, always ensure the primary chocolate coating is completely hardened before attempting any decorative drizzles or adding toppings. If you’re planning to freeze them for later, make sure any toppings are also securely frozen onto the chocolate before storing.
Frequently Asked Questions
Final Thoughts
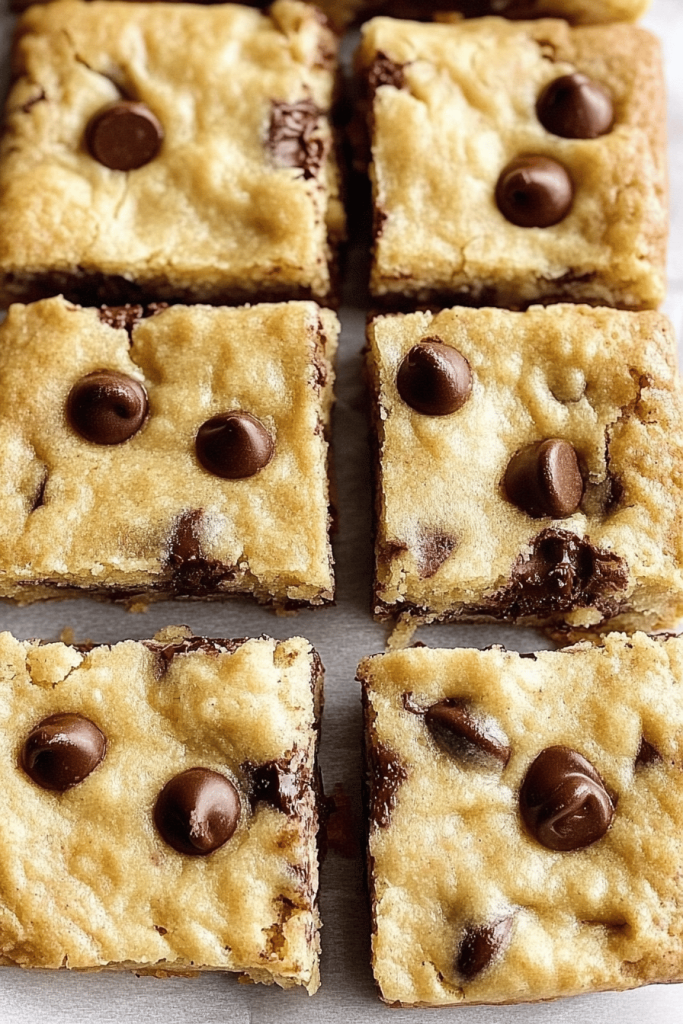
I really hope you give these chocolate frozen bananas a try! They’re such a simple pleasure, but they deliver big on flavor and satisfaction. For me, they’re more than just a treat; they’re a little slice of happy, a reminder of simpler times, and a fantastic way to enjoy fruit in a fun, new way. Whether you’re looking for a healthy dessert option, a fun activity to do with kids, or just a way to use up those ripe bananas, these are an absolute winner. They’re incredibly versatile, budget-friendly, and best of all, absolutely delicious. If you love this recipe, you might also enjoy my recipe for no-bake energy balls or my fudgy avocado brownies, as they share that same spirit of easy, delicious, and relatively healthy treats. I’d love to hear how yours turn out, or if you come up with any unique topping combinations! Don’t be shy – leave a comment below and tell me all about it. Happy freezing and happy eating!
chocolate frozen bananas
Ingredients
Main Ingredients
- 3 firm bananas peeled and cut in half
- 6 popsicle sticks
- 8 ounces dark chocolate chips chopped
- 2 tablespoons vegetable oil
Toppings (Optional)
- toasted hazelnuts or peanuts, sprinkles, coconut flakes, etc.
Instructions
Preparation Steps
- Line a sheet pan or a larger flat plate with waxed paper.
- Cut each banana in half.
- Insert a popsicle stick into the cut-end of each banana, pushing the stick halfway in.
- Place all the bananas on the waxed paper-lined sheet pan and freeze for 1 hour, or until firm.
- While bananas are freezing, add chocolate chips to a microwave-safe bowl and pour in the vegetable oil.
- Melt the chocolate and vegetable oil in the microwave. Heat in 30-second intervals, stirring after each, until smooth and fully melted. Be careful not to burn the chocolate.
- Prepare your chosen dipping decorations (like nuts, sprinkles, or coconut flakes) on separate flat plates or shallow bowls.
- Remove the firm bananas from the freezer.
- Working quickly, take one banana at a time and dip it into the melted chocolate, coating it completely. You may need to spoon some chocolate over the banana to ensure full coverage.
- Immediately after dipping, roll or sprinkle the chocolate-covered banana with your desired toppings. Place the decorated banana back on the waxed paper.
- Once all bananas are dipped and topped, return them to the freezer and freeze for at least 1 more hour, or until the chocolate is completely set and hard.
- Serve the chocolate-covered frozen bananas directly from the freezer and enjoy!


