There’s something about the holidays that just makes me want to bake. It’s not just the twinkling lights or the carols playing in the background; it’s the feeling of cozy warmth and the pure joy of sharing something delicious with the people you love. And if you ask my family, nothing captures that feeling quite like these Reindeer Treats. Honestly, they’re less like a traditional cookie and more like a soft, spiced bar that just melts in your mouth. I first stumbled upon a recipe similar to this years ago, and let me tell you, it’s become an absolute staple in our home, especially when those late-night cravings hit or when I need a quick bake-sale contribution that’ll wow everyone. It’s reminiscent of a really good Spice Cake, but somehow even more comforting and, dare I say, magical. These Reindeer Treats are the perfect blend of sweet, spice, and everything nice, and they’re surprisingly simple to whip up, even on a busy December afternoon. They’re definitely one of those recipes that feels like a hug in edible form.
Thank you for reading this post, don't forget to subscribe!What are reindeer treats?
So, what exactly *are* these “Reindeer Treats” that have earned such a special place in my heart (and my recipe box)? Think of them as a delightful little bar cookie, or perhaps a very soft, dense cake that’s been portioned into easy-to-handle squares. The name itself conjures up images of Santa’s workshop and festive cheer, and the flavor certainly lives up to that expectation! They’re rich with warm spices like cinnamon and nutmeg, have a wonderfully tender crumb, and are often topped with a simple, sweet glaze that adds just the right amount of sweetness. They’re not overly complicated, and that’s part of their charm. It’s like the comforting embrace of a classic spice cake, but in a more approachable, bite-sized format. They’re perfectly suited for dunking in a mug of Hot Cocoa or enjoying with a cup of coffee, and they always seem to disappear faster than you can say “Dasher and Dancer!”
Why you’ll love this recipe?
There are so many reasons why I keep coming back to this Reindeer Treats recipe, and I just know you’re going to fall in love with it too! Firstly, the flavor is just out of this world. It’s a beautiful harmony of warm spices – cinnamon, nutmeg, and a hint of clove – that just screams comfort and nostalgia. They have this incredible depth of flavor that’s perfectly balanced by a subtle sweetness from the batter and the dreamy glaze on top. What I love most is how incredibly tender and moist they are; they truly just melt in your mouth. Unlike some cookies that can turn out dry or crumbly, these Reindeer Treats maintain their perfect texture for days. Speaking of texture, they’re just soft enough to feel indulgent but firm enough to hold their shape, making them fantastic for snacking, packing in lunchboxes, or sharing at parties. And don’t even get me started on the simplicity! Honestly, this recipe is a lifesaver on busy nights or when unexpected guests pop over. The ingredients are all pantry staples, and the steps are so straightforward that even a beginner baker can achieve fabulous results. You don’t need any fancy equipment, just a bowl, a whisk, and a baking pan. Plus, they’re incredibly cost-effective! You get a ton of delicious treats from one batch, making it perfect for feeding a crowd without breaking the bank. Think of them as a budget-friendly way to create something truly special. They’re also wonderfully versatile. While they’re fantastic as-is, you can easily jazz them up with different mix-ins or glaze flavors, which I’ll get into later. It’s the kind of recipe that just keeps on giving.
How do you make reindeer treats?
Quick Overview
Making these Reindeer Treats is surprisingly straightforward! You’ll start by whisking together your dry ingredients, then combine them with your wet ingredients to form a wonderfully soft batter. Once that’s mixed, you’ll press it into a prepared pan and bake until golden and fragrant. The final touch is a simple, sweet glaze drizzled over the top once they’ve cooled slightly. It’s a process that takes minimal effort but yields maximum flavor and joy. The best part is how forgiving this recipe is; it’s designed for busy home bakers who want delicious results without the fuss.
Ingredients
For the Main Batter:
You’ll need all-purpose flour – about 2 cups should do it. Make sure it’s not packed too tightly into the measuring cup; I always like to spoon it in and level it off. This ensures you don’t end up with too much flour, which can make the treats dry. We’ll also add some baking soda and baking powder for that perfect lift and tenderness. For the warmth, a generous teaspoon of ground cinnamon and a half teaspoon of ground nutmeg are essential. A pinch of ground cloves adds that extra depth of flavor that really makes these sing. And of course, a bit of salt to balance out all the sweetness. Then come the wet ingredients: unsalted butter, softened, about half a cup – it gives such a lovely richness. Granulated sugar, about a cup, for that classic sweetness. Then we’ll add two large eggs, which bind everything together and add richness. And for that signature moistness, you’ll need about a cup of buttermilk. If you don’t have buttermilk on hand, don’t worry! I’ll share a super easy substitute later. A splash of vanilla extract rounds everything out.
For the Filling:
While these Reindeer Treats are delicious on their own, many versions have a spiced filling swirled in, and that’s what really elevates them! My favorite filling involves a mixture of Brown Sugar, cinnamon, and a touch of flour to help it thicken. Sometimes, I’ll even add a handful of chopped pecans or walnuts for extra crunch – it’s totally optional but so good. The key is to get a paste-like consistency so it swirls beautifully into the batter without sinking to the bottom.
For the Glaze:
This is the simple, sweet crowning glory! You’ll just need powdered sugar, a couple of tablespoons of milk or cream (or even orange juice for a citrusy twist!), and a dash of vanilla extract. The goal is a thick but pourable consistency, just enough to drizzle and create those beautiful ribbons of sweetness over the top.
“The Festive Reindeer Treats Your Family Will Love turned out amazing. My kids asked for seconds. Saving this one!”
Step-by-Step Instructions
Step 1: Preheat & Prep Pan
First things first, get that oven preheating to 350 degrees Fahrenheit (175 degrees Celsius). While it’s warming up, grab an 8×8 inch baking pan. I like to grease it really well with butter or cooking spray, and then line it with parchment paper, leaving a little overhang on the sides. This makes lifting the whole pan of treats out super easy once they’re baked, preventing any sticking disasters and making cleanup a breeze. Trust me, this little step is a game-changer!
Step 2: Mix Dry Ingredients
In a large mixing bowl, whisk together your all-purpose flour, baking soda, baking powder, cinnamon, nutmeg, cloves, and salt. Give it a really good whisk until everything is thoroughly combined. This ensures that your leavening agents and spices are evenly distributed throughout the batter, leading to consistent rise and flavor in every bite. I always like to give it a little extra whisk to make sure there are no pockets of flour hiding in the bottom.
Step 3: Mix Wet Ingredients
In a separate medium bowl, cream together your softened unsalted butter and granulated sugar until light and fluffy. This usually takes a couple of minutes with an electric mixer, or a bit longer by hand. Then, beat in the eggs one at a time, making sure each one is fully incorporated before adding the next. Stir in the vanilla extract and then gradually add the buttermilk, mixing until just combined. Don’t overmix here; we just want everything to come together smoothly.
Step 4: Combine
Now, it’s time to bring the wet and dry ingredients together. Pour the wet ingredients into the bowl with the dry ingredients. Using a spatula or a wooden spoon, gently fold everything together until just combined. It’s *so* important not to overmix here! A few streaks of flour are okay; they’ll disappear as you continue to gently mix. Overmixing develops the gluten too much, which can result in tough Reindeer Treats, and nobody wants that!
Step 5: Prepare Filling
While the batter is resting for a moment, let’s get our filling ready. In a small bowl, combine the Brown Sugar, cinnamon, and a tablespoon of flour. Mix it well until it looks like coarse, damp sand. If you’re adding nuts, stir them in now. This simple mixture will add a wonderful spiced layer throughout your Reindeer Treats.
Step 6: Layer & Swirl
Spoon about half of the batter into your prepared baking pan, spreading it evenly. Now, sprinkle the Brown Sugar filling mixture evenly over this layer of batter. Don’t worry if it’s not perfectly smooth. Then, dollop the remaining batter over the filling, spreading it gently to cover as much as possible. Here’s where the magic happens: take a butter knife or a skewer and gently swirl the filling into the batter. Make figure-eight motions or simple vertical lines, being careful not to overmix and muddy the layers. You want distinct ribbons of the spiced filling.
Step 7: Bake
Pop that pan into your preheated oven. Bake for about 25-30 minutes, or until a wooden skewer or toothpick inserted into the center comes out clean. The top should be golden brown and the edges should be starting to pull away slightly from the sides of the pan. Keep an eye on it, as oven temperatures can vary, and we don’t want them to get too dark. The kitchen will smell absolutely amazing at this point!
Step 8: Cool & Glaze
Once they’re done, carefully remove the pan from the oven and let them cool in the pan on a wire rack for about 10-15 minutes. This is crucial for them to set up properly. While they’re still warm but not piping hot, it’s time for the glaze. In a small bowl, whisk together the powdered sugar, milk (or your liquid of choice), and vanilla until smooth and drizzly. If it’s too thick, add a tiny bit more liquid; if it’s too thin, add a little more powdered sugar. Drizzle this glaze generously over the warm Reindeer Treats. It’ll set up beautifully as they cool completely. You can use a spoon or a piping bag for more control if you like.
“New family favorite! This Festive Reindeer Treats Your Family Will Love was so flavorful and ridiculously easy. Crowd-pleaser for sure.”
Step 9: Slice & Serve
Once the glaze has set and the Reindeer Treats are completely cool, use the parchment paper overhang to lift the entire slab out of the pan. Place it on a cutting board and slice into squares or bars. I usually cut mine into about 16 squares, but you can make them bigger or smaller depending on how many you need. They are truly delightful served at room temperature. They’re perfect for a mid-afternoon snack, a holiday treat, or just because!
What to Serve It With
These Reindeer Treats are so wonderfully versatile, they fit into pretty much any occasion you can think of! For a cozy breakfast, they’re absolutely divine with a steaming mug of strong black coffee or a creamy latte. The spices in the treats pair perfectly with the richness of the coffee. You could even dust them lightly with a little extra powdered sugar for a more elegant morning presentation. For a delightful brunch spread, I love serving these alongside fresh fruit salad and perhaps some Fluffy Pancakes or waffles. Their sweet, comforting nature makes them feel a bit special, and they’re easy to grab while mingling. As a dessert, oh my goodness, they’re fantastic! I often serve them slightly warmed with a scoop of vanilla bean ice cream or a dollop of whipped cream. The contrast of warm treat and cold ice cream is pure bliss. Sometimes, I’ll drizzle a little caramel sauce over the top too, just for an extra touch of decadence. And for those casual, cozy snack times? These are your go-to! They are the ultimate partner for a mug of hot chocolate, especially on a chilly evening. My kids will beg for these after school, and they’re so much healthier and more satisfying than a processed snack bar. We also have a family tradition of making a big batch around Thanksgiving and Christmas, and they always disappear faster than Santa’s sleigh on Christmas Eve!
Top Tips for Perfecting Your Reindeer Treats
Over the years, I’ve learned a few little tricks that I think make these Reindeer Treats even better, and I just have to share them with you! First, when it comes to the batter, remember that gentle mixing is key. I’ve learned the hard way that overmixing develops the gluten in the flour, which can lead to a tough, dense texture. So, fold that batter until it’s *just* combined, even if you see a few tiny streaks of flour. It’ll bake out, I promise! For the filling, I’ve found that using light Brown Sugar gives a lovely depth of flavor, and making sure it’s well-combined with the cinnamon and flour ensures it doesn’t clump up. If you’re adding nuts, toasting them briefly before chopping can really amplify their flavor. When it comes to swirling, don’t go overboard! A few gentle passes with a knife are all you need to create beautiful ribbons. Too much swirling will just blend the batter and filling into one color, and you lose that lovely visual contrast. I’ve tested this recipe with various flours, and while all-purpose is my favorite for texture, a 1:1 gluten-free blend can work quite well, though you might need to add a touch more liquid. For the baking, I always recommend using the middle rack of your oven. This ensures even heat circulation and prevents the top from browning too quickly before the inside is cooked through. And for the glaze, consistency is everything! Aim for a thick but pourable texture. If it’s too stiff, add milk a teaspoon at a time; if it’s too runny, whisk in a bit more powdered sugar. A little tip I love is to add a tiny pinch of extra cinnamon to the glaze for a little kick, or even a drop of peppermint extract during the holidays for a festive twist. Finally, don’t rush the cooling process! Letting them cool for at least 15-20 minutes in the pan before glazing and then another 30 minutes to an hour before slicing is crucial for them to set up properly. Patience truly pays off here!
Storing and Reheating Tips
One of the best things about these Reindeer Treats is how well they keep! If you’ve managed to resist eating them all in one go (which is a challenge, I know!), you can store them at room temperature for up to 3 days. Just make sure to keep them in an airtight container. I usually use a good quality plastic container with a tight-fitting lid, or I’ll wrap them well in plastic wrap. They maintain their moisture and flavor beautifully. If you need them to last a bit longer, or if your kitchen is particularly warm, I recommend storing them in the refrigerator. Again, an airtight container is your best friend here. They’ll stay fresh and delicious for about a week in the fridge. When you want to enjoy them cold from the fridge, I find they’re still perfectly tender. If you prefer them slightly warmed, you can pop a square into the microwave for about 10-15 seconds, just enough to take the chill off and bring out their lovely aroma again. For longer-term storage, these Reindeer Treats freeze exceptionally well! Once they’re completely cooled and the glaze is set, you can wrap individual squares or the whole slab tightly in plastic wrap, then in aluminum foil, and pop them into a freezer-safe bag or container. They’ll keep for up to 3 months. To thaw, simply bring them out to room temperature for a few hours, or gently reheat them in the microwave. A note on the glaze: I always recommend glazing them *after* they’ve cooled for a bit, and usually right before serving or storing at room temperature for a day or two. If you plan to freeze them with the glaze on, make sure it’s fully set and dry. Sometimes, if they’re going to be stored for a long time with glaze, I’ll opt to store them un-glazed and add a fresh glaze or a dusting of powdered sugar just before serving.
Frequently Asked Questions
Final Thoughts
Honestly, these Reindeer Treats are more than just a recipe for me; they’re a little piece of cozy, happy memories baked into every bite. They embody that feeling of home, warmth, and simple joy that I think we all crave, especially around the holidays but really, any time of year. The way the spices mingle, the incredibly tender crumb, and that sweet, satisfying glaze – it all just comes together so perfectly. They are a testament to the fact that delicious, crowd-pleasing treats don’t need to be complicated or time-consuming. If you’re looking for a bake that’s guaranteed to bring smiles and seconds, you really can’t go wrong with these. They’re a comforting hug in treat form, and I truly hope they become a beloved staple in your kitchen too. If you give these a try, please, please let me know how they turn out! I love hearing your stories and seeing your creations. You can drop a comment below or tag me on social media. Happy baking, my friends!
Reindeer Treats
Ingredients
Main Ingredients
- 12 ounces milk chocolate chips
- 10 pieces mini pretzels
- 10 pieces candy eyeballs
- 10 pieces small red M&M's
- 7 pieces peppermint candy crushed
Instructions
Preparation Steps
- Line a baking tray with parchment paper and set it aside.
- In a microwave-safe bowl, add the milk chocolate chips. Melt the chocolate in 30-second increments, stirring in between, until completely melted and smooth (this should take about 2 minutes total).
- Meanwhile, cut the mini pretzels in half exactly in the middle using a serrated knife for a smooth cut. Set them aside as antlers.
- Place the peppermint candy in a Ziploc bag and smash them until the candies are crushed into fine pieces. Set aside.
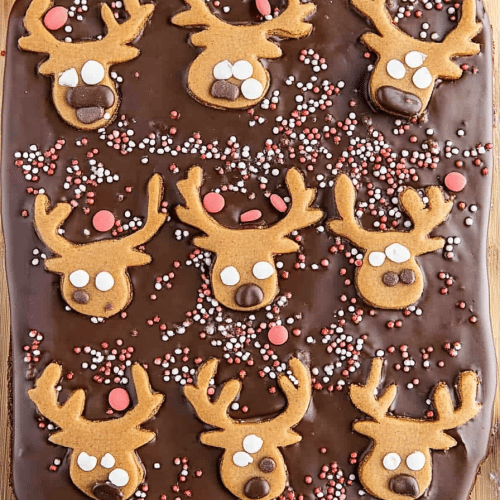
- Pour the melted chocolate onto the prepared baking tray with parchment paper. Spread the chocolate evenly and smoothly to approximately 0.125 inch (1/8 inch) thickness.
- Quickly arrange the pretzel halves like antlers on the chocolate. Place the candy eyeballs below the antlers for the reindeer eyes, and then add the red M&M's for the nose.
- Dust the crushed peppermint candy over the chocolate. Place the baking tray in the fridge for at least 30 minutes to allow the chocolate to set completely.
- Once the chocolate hardens, carefully cut the bark into desired pieces using a sharp knife.
- Store the reindeer chocolate bark in an airtight container at room temperature or in the fridge for longer freshness. Enjoy!


