You know those nights? The ones where a craving hits HARD, but the thought of preheating the oven, measuring sticky ingredients, and dealing with a sink full of dishes just feels… overwhelming? Yeah, I know them too. And for those nights, my friends, I have a secret weapon. It’s not just any dessert; it’s *the* Oreo no bake dessert that has saved me more times than I can count. It’s the kind of treat that makes your whole family sigh with happiness, the kind that disappears faster than you can say “second helping,” and the kind that requires zero baking skills whatsoever. Honestly, if you can stir a few things together, you can make this. It’s like a magical shortcut to pure joy, and it all starts with those beloved cookies. It’s a little bit like a decadent No-Bake Cheesecake meets a chocolate lover’s dream, all wrapped up in one ridiculously easy package.
Thank you for reading this post, don't forget to subscribe!What is the Oreo No Bake Dessert?
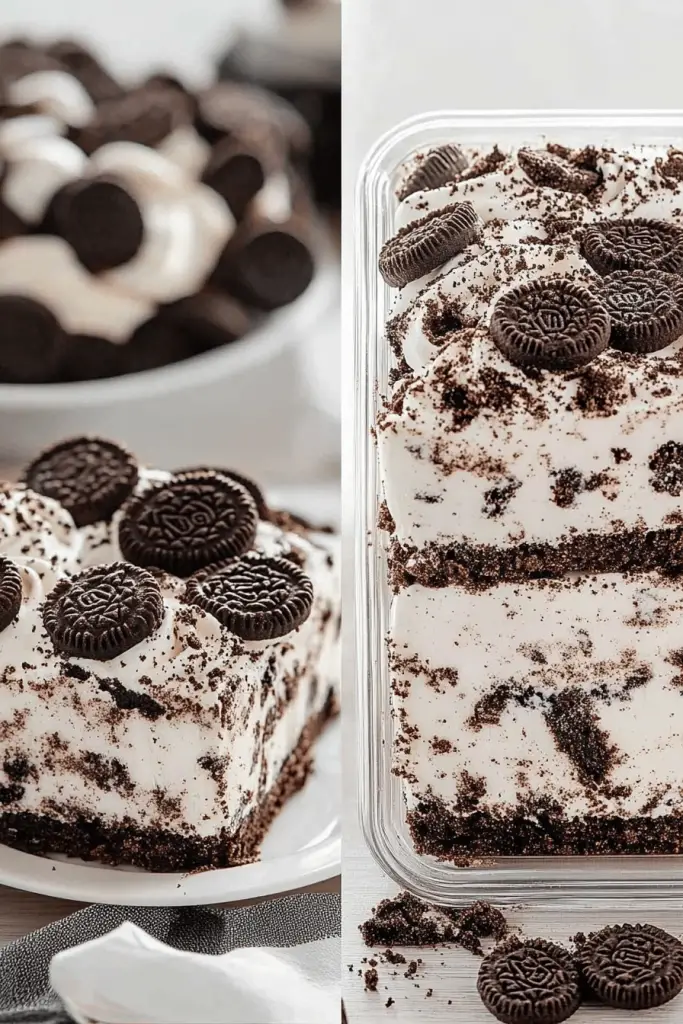
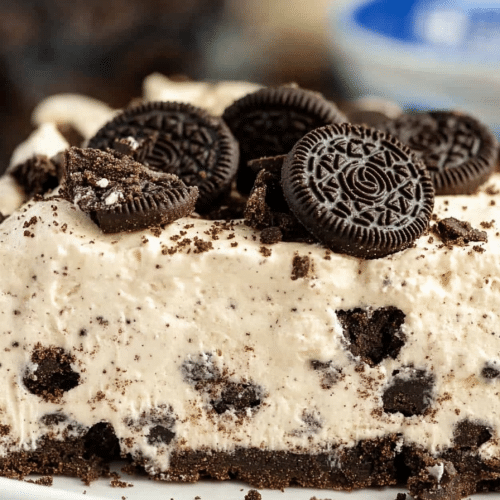
So, what exactly is this magical creation? At its heart, it’s a dreamy, creamy, layered dessert that screams comfort and indulgence without a single oven mitt in sight. Think of it as a deconstructed, no-bake cheesecake with a generous, crumbly Oreo crust and a fluffy, luscious filling that’s just begging to be scooped. The name itself, “Oreo no bake dessert,” tells you pretty much everything you need to know – it’s incredibly simple, features those iconic Chocolate Cookies, and requires absolutely no baking. It’s essentially a love letter to Oreos, a celebration of effortless deliciousness. It’s the kind of dessert that makes you feel like a kitchen wizard, even if your culinary adventures usually stop at boiling water. It’s pure, unadulterated, chocolatey bliss, made incredibly accessible for even the most kitchen-shy among us.
Why you’ll love this recipe?
Where do I even begin with why this Oreo no bake dessert is an absolute gem? Let’s break it down, because honestly, the list is long and full of delicious reasons. Firstly, the **flavor**. Oh, the flavor! You get that deep, satisfying chocolatey punch from the crushed Oreos, perfectly balanced by a sweet, velvety cream cheese filling that’s just tangy enough to keep things interesting. It’s rich, it’s decadent, and it hits all the right sweet spots. Then there’s the **simplicity**. I can’t stress this enough: this recipe is unbelievably easy. There are no complicated techniques, no tricky steps, and minimal cleanup. It’s a lifesaver on busy weeknights, perfect for last-minute guests, or when you just need a sweet treat without the fuss. What I love most about this is that it genuinely tastes like you spent hours in the kitchen, but in reality, you probably spent less than 30 minutes actively making it. It’s also surprisingly **cost-efficient**. Oreos are readily available, and the other ingredients are pantry staples for most bakers. You get a gourmet-tasting dessert without the gourmet price tag. And let’s talk **versatility**! While the classic Oreo version is divine, you can totally switch things up. I’ve experimented with adding a swirl of Peanut Butter or a sprinkle of chocolate chips, and it’s always a hit. It’s the kind of dessert that feels special enough for a birthday but casual enough for a Tuesday afternoon. It truly stands out because it delivers maximum deliciousness with minimum effort, a rare and wonderful combination in the dessert world.
How do I make Oreo No Bake Dessert?
Quick Overview
This effortless Oreo no bake dessert comes together in a few simple stages. First, we’ll crush those glorious Oreos to form our delicious base and topping. Then, we’ll whip up a dreamy, creamy filling that’s light as air and packed with flavor. Finally, we’ll layer it all up, chill it until firm, and prepare for pure dessert bliss. It’s so straightforward, you’ll wonder why you ever bothered with more complicated desserts. The beauty is in its simplicity, making it a foolproof recipe for everyone.
Ingredients
For the Oreo Crust & Topping: For the Oreo Crust & Topping: For the Oreo Crust
You’ll need about 36-40 regular Oreo cookies (or about 3 sleeves). I always go for the classic, but if you’re feeling adventurous, the golden Oreos can work too, though they’ll change the flavor profile. Make sure they’re not the double-stuffed kind unless you want an overwhelmingly rich crust. You’ll also need about 6 tablespoons of unsalted butter, melted. This helps bind the crumbs together and gives it that signature cookie-like texture. Make sure your butter is fully melted but not boiling.
For the Creamy Filling:
This is where the magic happens! You’ll need two 8-ounce blocks of Cream Cheese, softened to room temperature. This is crucial for a smooth, lump-free filling, so don’t rush this step! I’ve tried it with cold cream cheese and it’s just not the same. You’ll also need about 1 cup of powdered sugar, sifted to avoid any graininess. And for that irresistible creaminess and flavor, about 1 teaspoon of vanilla extract. Some people like to add a touch of almond extract too, but I usually stick to vanilla for a classic taste. A half cup of heavy whipping cream, also cold, will be whipped to stiff peaks and folded in to give it that light, airy texture.
For the Optional Chocolate Glaze:
While not strictly necessary, a Simple Chocolate glaze takes this Oreo no bake dessert to the next level. You’ll need about 1/2 cup of semi-sweet chocolate chips. You can also use milk chocolate if you prefer it sweeter. Add 1 tablespoon of butter or coconut oil to help it melt smoothly and give it a lovely sheen. If you want a more pourable glaze, you might add a splash of milk or heavy cream.
“Packed with flavor and so simple. Exactly what I wanted from this Easy Oreo No Bake Delight!”
Step-by-Step Instructions
Step 1: Preheat & Prep Pan
Since this is a no-Bake Recipe, you won’t be preheating an oven! Instead, grab an 8×8 inch square baking dish or a similar-sized trifle bowl. If you’re using a baking dish and want easy removal, line it with parchment paper, leaving some overhang on the sides. This makes lifting the dessert out a breeze later on. Make sure the parchment paper is smoothed out so you don’t have bumps in your crust.
Step 2: Mix Dry Ingredients
Take your Oreos and crush them into fine crumbs. You can do this in a food processor for the easiest, most consistent results. If you don’t have one, no worries! Just put the Oreos in a large zip-top bag, seal it tightly, and bash them with a rolling pin or a heavy can until they’re finely crushed. You want them to resemble coarse sand. Set aside about 1/2 cup of these crumbs for topping later.
Step 3: Mix Wet Ingredients
In a medium bowl, combine the melted butter with the majority of your crushed Oreo crumbs (reserving that 1/2 cup for topping). Stir until all the crumbs are moistened and the mixture looks like wet sand. This is what will form your glorious crust.
Step 4: Combine
Press this buttery Oreo mixture firmly into the bottom of your prepared baking dish. Use the bottom of a glass or a measuring cup to get an even, compact layer. This crust is the foundation of our deliciousness, so make sure it’s packed down well. We’ll chill this while we make the filling.
Step 5: Prepare Filling
In a large bowl, beat the softened Cream Cheese with an electric mixer until it’s completely smooth and creamy. This is where we ensure no lumps! Gradually add the sifted powdered sugar and beat until well combined and fluffy. Stir in the vanilla extract (and almond extract, if using). Make sure you scrape down the sides of the bowl periodically.
Step 6: Layer & Swirl
In a separate, clean bowl, whip the cold heavy cream with your electric mixer until stiff peaks form. Be careful not to over-whip it, or you’ll end up with butter! Gently fold the whipped cream into the Cream Cheese mixture until just combined. You want a light and airy texture, so don’t overmix here. Spoon about half of this creamy filling over the Oreo crust. Then, sprinkle about half of the remaining crushed Oreos over the filling. Dollop the rest of the creamy filling on top, smoothing it out gently. Finally, sprinkle the reserved 1/2 cup of Oreo crumbs over the top.
Step 7: Bake
As I mentioned, this is a no-bake dessert! So, no baking required. We just need to chill it to let everything set and meld together. Cover the dish tightly with plastic wrap.
Step 8: Cool & Glaze
Refrigerate the dessert for at least 4 hours, or preferably overnight, until it’s firm and well-chilled. This chilling time is crucial for the flavors to develop and for the texture to become perfectly set. Once it’s chilled and firm, you can prepare the optional glaze. Melt the chocolate chips with the butter or coconut oil in a microwave-safe bowl in 30-second intervals, stirring in between, until smooth. Or, use a double boiler. If it seems too thick, add a tiny splash of milk. Drizzle or spread this glaze over the chilled dessert just before serving.
“Made the Easy Oreo No Bake Delight tonight and wow — perfect weeknight dinner. Will definitely make again!”
Step 9: Slice & Serve
If you lined your dish with parchment paper, lift the entire dessert out. If not, slice it directly in the dish. Use a sharp knife dipped in hot water and wiped dry between slices for the cleanest cuts. Serve cold and enjoy the oohs and aahs!
What to Serve It With
This Oreo no bake dessert is so versatile, it fits into almost any occasion, from a casual family gathering to a more formal dessert spread. For **breakfast** (yes, I’ve been known to have a small slice with my coffee, don’t judge!), it’s wonderfully decadent. I like to serve a smaller portion, perhaps in individual ramekins, with a strong black coffee to cut through the sweetness. For **brunch**, it feels a bit more elegant. I’ll present it in a beautiful trifle bowl, layered beautifully with the cookie crumbs peeking through, and serve it with fresh berries on the side – raspberries or strawberries are fantastic! It adds a pop of color and a refreshing contrast. As **dessert**, this is its natural habitat, of course! After a hearty meal, a slice of this is pure indulgence. I’ll often serve it with a dollop of whipped cream and a drizzle of extra chocolate sauce, or even a scoop of vanilla bean Ice Cream. For **cozy snacks**, it’s the ultimate comfort food. On a rainy afternoon, a generous slice enjoyed with a warm mug of hot chocolate is absolute perfection. My family has a tradition of making this for movie nights; everyone gets their own little square, and it’s gone before the credits roll. It’s just that good.
Top Tips for Perfecting Your Oreo No Bake Dessert
Over the years, I’ve learned a few tricks that elevate this already fantastic Oreo no bake dessert from good to absolutely unforgettable. First, about the Oreos: for the crust, I like to leave a few slightly larger cookie chunks in the mix. It adds a bit of texture and makes it feel more homemade. Don’t crush them into dust! For the filling, the **cream cheese** is paramount. Make sure it’s truly soft. If you forget to take it out of the fridge in time, you can gently warm it in the microwave for about 15-20 seconds on low power, but be very careful not to melt it. The **sifting of the powdered sugar** is non-negotiable for me; it guarantees that silky-smooth texture and prevents any unwelcome grittiness. When folding in the whipped cream, be gentle. You want to keep all that airiness, which is what makes the filling so light and luscious. Think of it like gently lifting and turning the mixture rather than vigorous stirring. If you’re making the optional **glaze**, pay attention to consistency. If it’s too thick, a tablespoon of warm milk or cream will loosen it up. If it’s too thin, you can add a few more chocolate chips and let it sit for a minute. For **ingredient swaps**, while the classic Oreo is king, I’ve successfully used chocolate graham crackers for the base if I’m in a pinch, though the flavor is different. Some people have even tried chocolate sandwich cookies with cream filling (like the sandwich cookies with frosting), but they can make the dessert extremely sweet, so adjust the powdered sugar accordingly. For **baking** – oh wait, no baking! – for chilling, make sure it’s in a stable spot in your fridge where it won’t be jostled. The longer it chills, the better the flavors meld. I’ve found overnight is truly the sweet spot for optimal texture and taste. Lastly, for **serving**, a hot knife will give you the cleanest slices, especially through the chilled dessert. Just dip your knife in hot water, wipe it dry, and cut. Repeat as needed.
Storing and Reheating Tips
This Oreo no bake dessert is fantastic because it holds up so well, making it perfect for making ahead. For **room temperature storage**, it’s best to keep it covered with plastic wrap and out of direct sunlight for no more than a couple of hours, especially if it’s warm in your kitchen, as the cream cheese can start to soften. For **refrigerator storage**, this is where it truly shines. Store it tightly covered with plastic wrap or in an airtight container for up to 3-4 days. The texture remains delightful, and the flavors actually continue to meld and deepen. Just be sure to bring it out of the fridge about 15-20 minutes before serving to let it soften slightly, making it easier to slice and more enjoyable to eat. **Freezer instructions** are a bit trickier with no-bake desserts, but it’s possible! You’ll want to wrap the dessert very tightly in plastic wrap, then in aluminum foil, and freeze for up to 1-2 months. Thaw it overnight in the refrigerator before serving. The texture might be slightly softer than a freshly made one, but it’s still quite good. If you’ve added a glaze, it’s best to add that *after* thawing, as the glaze might crack or become uneven during freezing and thawing. I usually wait until just before serving to add any extra drizzles.
Frequently Asked Questions
Final Thoughts
Honestly, this Oreo no bake dessert is one of those recipes that just makes life a little bit sweeter, a little bit easier, and a whole lot more delicious. It’s the perfect example of how you don’t need complicated steps or a fancy oven to create something truly special. It’s the kind of dessert that brings smiles, satisfies serious sweet cravings, and makes you feel like a baking hero with minimal effort. If you’re looking for a reliable, crowd-pleasing dessert that practically makes itself, you’ve found it. I can’t wait for you to try it and see how much your own family and friends love it. If you end up making it, please let me know in the comments below how it turned out! I’d love to hear about any variations you tried or how quickly it disappeared from your kitchen. Happy no-baking!
oreo no bake dessert
Ingredients
Main Ingredients
- 14.3 ounce Oreo cookies crushed and divided
- 0.25 cup butter melted
- 1 cup heavy whipping cream
- 1 teaspoon vanilla
- 8 ounce cream cheese softened
- 3 tablespoon sugar
- 14 ounce sweetened condensed milk 1 can
Instructions
Preparation Steps
- Remove 12 Oreos from the package and set aside for later garnish.
- Crush the remaining Oreos either by placing in a Ziploc bag and using a rolling pin or using a food processor.
- Mix half of the crushed Oreo crumbs with the melted butter. Press into a 9x9 inch pan to form the crust. Refrigerate while preparing the filling.
- In a large bowl whip the heavy cream until stiff peaks form. Set aside.
- In another large bowl, cream together the cream cheese and sugar. Add the vanilla and mix again.
- Fold the whipped cream gently into the cream cheese mixture using a spatula.
- Add the sweetened condensed milk and mix gently until fully combined.
- Stir in the remaining crushed Oreo crumbs.
- Spread the mixture evenly over the chilled cookie base.
- Crush the 12 reserved Oreos and sprinkle on top of the filling.
- Cover with foil and freeze for at least 3-4 hours, overnight is best.
- Remove from freezer 15 minutes before serving for easier slicing.


