
You know, there are some recipes that just stick with you. They become more than just food; they’re memories baked into something delicious. For me, these mini chocolate Cheesecake Bites are exactly that. I remember the first time I ever made them, way back when my kids were tiny and bedtime was more of a suggestion than a rule. I was desperately craving something sweet, but the thought of making a whole traditional cheesecake felt like climbing Mount Everest. That’s when I stumbled upon the idea of mini cheesecakes, and honestly, it changed my life – or at least my dessert game! They’re so ridiculously easy, impossibly decadent, and they always disappear in minutes. Seriously, if you’re looking for a fuss-free yet utterly impressive treat, you’ve hit the jackpot. Forget those complicated dessert projects; these little wonders are your new best friend.
Thank you for reading this post, don't forget to subscribe!What are mini chocolate cheesecake bites?
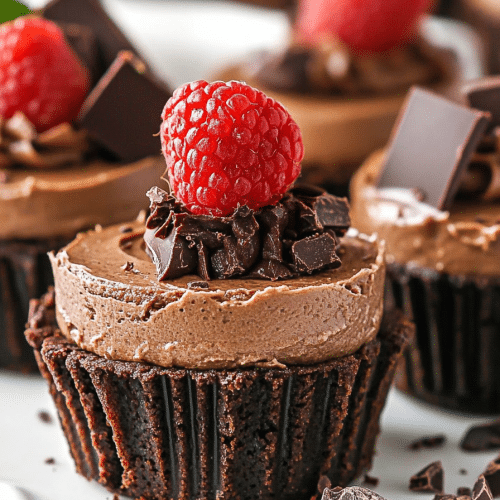
So, what exactly are these little gems? Think of them as the most delicious, bite-sized version of your favorite classic cheesecake, but with a rich, deep chocolatey twist. They’re essentially individual portions of creamy, dreamy cheesecake baked in muffin tins, often with a simple cookie crust. The magic happens in the balance – that perfect tang of Cream Cheese, the sweetness of sugar, the luxurious depth of chocolate, all nestled on a buttery, crumbly base. It’s that classic cheesecake experience, but in a more manageable, shareable, and let’s be honest, dangerously addictive form. They’re not just mini; they’re perfectly proportioned little parcels of joy that deliver all the indulgence of a full-sized cheesecake without any of the fuss.
Why you’ll love
Okay, let me count the ways I adore these mini chocolate Cheesecake Bites. First off, the flavor. Oh. My. Goodness. We’re talking a seriously rich chocolate flavor that isn’t cloyingly sweet. It’s that perfect balance that makes you close your eyes with every bite. The texture is out of this world – silky smooth and creamy on the inside, with a delightful little crunch from the graham cracker crust. And the simplicity! I’m telling you, this recipe is a lifesaver on busy nights or when unexpected guests pop over. You can whip them up with ingredients you likely already have in your pantry. Plus, they are surprisingly budget-friendly compared to buying individual desserts from a bakery. What I love most, though, is their versatility. You can dress them up or down, and they’re always a hit. They’re much less intimidating than a full-sized cheesecake, making them perfect for beginners or anyone who just wants a guaranteed win. Honestly, I’ve made this recipe countless times, and it never fails to impress. It’s that perfect sweet treat when you’re craving something special but don’t want to spend hours in the kitchen.
How do I make mini chocolate cheesecake bites?
Quick Overview
This recipe is all about layering simple flavors and textures to create something truly special. We’ll start by making a quick graham cracker crust, then whip up a decadent Chocolate Cheesecake batter. After that, it’s just a matter of filling the muffin cups and baking them until they’re perfectly set. The result is an effortless yet incredibly satisfying dessert that’s perfect for any occasion, from a casual get-together to a fancy dessert spread. It’s so straightforward; even if you’re new to baking, you’ll find yourself mastering these in no time.
Ingredients
For the Crust:
You’ll need about 1 ½ cups of Graham Cracker crumbs. I usually just toss a whole sleeve of graham crackers into my food processor, but you can also put them in a Ziploc bag and crush them with a rolling pin if you’re feeling a bit more energetic! Make sure they’re finely ground. Then, we’ll add ¼ cup of granulated sugar for a little sweetness and 6 tablespoons of melted unsalted butter. Using unsalted butter gives you more control over the saltiness. It’s crucial to use melted butter so it binds the crumbs together properly. I’ve found that using slightly more butter makes for a more cohesive crust that doesn’t crumble too much when you bite into it.
For the Filling:
This is where the magic really happens! You’ll need two 8-ounce blocks of cream cheese, softened to room temperature. This is super important; lumpy cream cheese is a cheesecake’s worst enemy! I always take mine out of the fridge at least an hour before I plan to bake. Then, we’ll add ¾ cup of granulated sugar. You can adjust this slightly depending on how sweet you like your desserts. Next, two large eggs, also at room temperature. Cold eggs can seize up the batter, leading to a less smooth texture. For the chocolatey goodness, you’ll need ¼ cup of unsweetened cocoa powder. Good quality cocoa powder makes a huge difference here, trust me! And finally, 1 teaspoon of vanilla extract to enhance all those lovely flavors.
For the Glaze (Optional but Recommended!):
This is totally optional, but it takes these bites to a whole new level. You can make a simple chocolate ganache by melting ½ cup of semi-sweet chocolate chips with ¼ cup of heavy cream. Or, for something a bit lighter, you can just dust them with a bit of extra cocoa powder or powdered sugar once they’re cooled. If you do the ganache, make sure the cream is heated (not boiling) before pouring it over the chocolate chips, then let it sit for a minute before whisking until smooth. It should be pourable but thick enough to coat the tops nicely.
“Packed with flavor and so simple. Exactly what I wanted from this Easy Mini Chocolate Cheesecake Bites!”
Step-by-Step Instructions
Step 1: Preheat & Prep Pan
First things first, let’s get our oven ready. Preheat it to 325°F (160°C). Now, grab a standard 12-cup muffin tin. You’ll want to line each cup with a paper or foil muffin liner. I find that using liners makes cleanup a breeze and helps the mini cheesecakes release easily. Make sure the liners are well-seated at the bottom of each cup.
Step 2: Mix Dry Ingredients
In a medium bowl, combine your graham cracker crumbs and granulated sugar. Give them a good stir with a fork to make sure they’re well mixed. This ensures that the sugar is evenly distributed throughout the crust for a consistent flavor.
Step 3: Mix Wet Ingredients
Add the melted butter to the graham cracker and sugar mixture. Stir everything together until the crumbs are evenly moistened. It should resemble wet sand. This is key for a crust that holds its shape!
Step 4: Combine
Spoon about 1 to 1 ½ tablespoons of the crumb mixture into each muffin liner. Gently press the crumbs down with the back of a spoon or the bottom of a small glass to form an even crust. You want a nice, compact layer that will hold up to the cheesecake filling. Don’t press too hard, or it can become tough.
Step 5: Prepare Filling
Now for the star of the show! In a large bowl, beat the softened cream cheese with an electric mixer until it’s completely smooth and creamy. Seriously, no lumps allowed! Gradually add the granulated sugar and beat again until it’s well combined and smooth. Next, beat in the eggs one at a time, mixing just until each egg is incorporated. Don’t overmix here, as that can lead to cracking. Finally, stir in the unsweetened cocoa powder and vanilla extract until everything is just combined and you have a gorgeous, smooth chocolate batter. Scrape down the sides of the bowl as needed to ensure everything is incorporated evenly.
Step 6: Layer & Swirl
Spoon the chocolate cheesecake batter evenly over the crusts in the prepared muffin cups. Fill each one about two-thirds to three-quarters full. You want to leave a little room for them to puff up slightly as they bake. I like to use an ice cream scoop for this part; it makes it super easy to get an even amount in each cup. Give the muffin tin a gentle tap on the counter to help settle the batter and release any air bubbles.
Step 7: Bake
Bake for 18-22 minutes, or until the edges are set and the centers are just slightly jiggly when you gently shake the pan. They shouldn’t be liquidy, but they will firm up as they cool. Overbaking can lead to a dry or crumbly texture, so keep a close eye on them towards the end of the baking time. Trust your gut on this one; every oven is a little different!
Step 8: Cool & Glaze
Once baked, remove the muffin tin from the oven and let the cheesecakes cool in the tin for about 10-15 minutes. This allows them to set up properly before you remove them. Then, carefully lift the cheesecakes out of the tin by their liners and place them on a wire rack to cool completely. Once they are completely cool (and I mean *completely* cool, otherwise your glaze will melt!), you can drizzle them with your optional chocolate glaze or dust them with powdered sugar. If you’re using the ganache, let it cool slightly until it’s thick but still pourable before drizzling.
“I don’t know if I’ve ever eaten a better Easy Mini Chocolate Cheesecake Bites. The rub alone is wonderful, but the sauce??? Over the top!”
Step 9: Slice & Serve
These are best served chilled. You can serve them directly from the refrigerator. For a little extra flair, you could top them with a dollop of whipped cream or a fresh berry. They’re perfectly portioned, so no slicing is needed, which is one of the best parts! Just pick one up and enjoy!
What to Serve It With
These mini chocolate cheesecake bites are so versatile, they fit in everywhere! For a casual coffee morning, I love serving them alongside a steaming mug of freshly brewed coffee. The slight bitterness of the coffee is a wonderful counterpoint to the rich chocolate. If you’re planning a brunch spread, these look incredibly elegant nestled amongst other pastries and fruits. A glass of bubbly prosecco or a light fruit juice pairs beautifully. For a more formal dessert setting, they are delightful after dinner, perhaps with a small scoop of raspberry sorbet or a dusting of cocoa powder. And for those late-night cravings or cozy movie nights? They’re perfect on their own, perhaps with a glass of cold milk. My kids absolutely love them with a side of fresh strawberries. Honestly, they’re so good, they don’t *need* anything else, but a little something extra can elevate them even further!
Top Tips for Perfecting Your Mini Chocolate Cheesecake Bites
Over the years, I’ve picked up a few tricks that I think make these mini cheesecakes even better. First, about the cream cheese: make sure it’s truly softened. I can’t stress this enough! If it’s even a little cold, you’ll end up with a lumpy batter, and nobody wants that. I learned this the hard way early on! For the crust, I always press it down firmly but not so hard that it’s rock solid. A good, even press creates that perfect base. When you’re mixing the filling, avoid overmixing once the eggs are in. Overbeating incorporates too much air, which can cause the cheesecakes to puff up too much and then collapse, often leading to cracks. Gentle is key! For baking, I’ve noticed that placing the muffin tin on a baking sheet can catch any potential drips and makes it easier to move the tin in and out of the oven. If you’re concerned about them cracking, you can try the water bath method, though for mini cheesecakes, it’s usually not necessary. I usually just bake them until the edges are set and the center is still a tiny bit wobbly. They finish cooking as they cool. And for the glaze – make sure your cheesecakes are completely cool before drizzling. I once tried glazing warm ones, and it just melted into a sad puddle! A small offset spatula is your best friend for smoothing out the ganache if you’re going for that look. Lastly, don’t be afraid to experiment with the crust! While graham crackers are classic, I’ve also had success with chocolate wafer cookies or even finely crushed Oreos (filling and all!) for an extra chocolatey punch. These little tweaks can really make them your own.
Storing and Reheating Tips
These little treasures are surprisingly forgiving when it comes to storage. If you’ve got any leftovers (which is rare in my house!), you can store them at room temperature for a few hours, but for longer storage, the refrigerator is best. Pop them into an airtight container. They’ll stay wonderfully fresh and creamy in the fridge for up to 4 days. I usually just cover the muffin tin loosely with plastic wrap if I’m not transferring them right away. If you want to make them even further in advance, you can absolutely freeze them! Place them on a baking sheet in a single layer until firm, then transfer them to a freezer-safe container or bag. They’ll keep in the freezer for about 1-2 months. Thaw them overnight in the refrigerator. For reheating, I generally don’t recommend it, as they are best served chilled. However, if you absolutely must, you can gently warm them in a low oven for a few minutes, but they might lose some of their perfect cheesecake texture.
Frequently Asked Questions
Final Thoughts
So there you have it – my go-to recipe for the most delightful mini chocolate cheesecake bites! They truly are a labor of love, but the kind of love that results in pure, unadulterated joy. They’re perfect for when you want something special without the stress, or when you just need a little sweet pick-me-up. I hope you love them as much as my family and I do. If you give these a try, I would absolutely adore hearing about it! Let me know in the comments how yours turned out, or if you tried any fun variations. Happy baking, and enjoy every single bite!
mini chocolate cheesecake
Ingredients
For the Oreo Crust
- 1 cup Oreo cookie crumbs
- 2 tablespoons unsalted butter melted
For the Cheesecake Filling
- 12 ounces cream cheese room temperature
- 0.5 cup granulated sugar
- 2 tablespoons natural unsweetened cocoa powder
- 0.25 cup sour cream room temperature
- 0.5 teaspoon vanilla extract
- 2 large eggs room temperature
- 4 ounces semi-sweet or bittersweet chocolate chopped and melted
For the Chocolate Ganache
- 3 ounces semi-sweet chocolate chips
- 0.25 cup heavy whipping cream
For the Chocolate Whipped Cream
- 0.75 cup heavy whipping cream cold
- 3 tablespoons powdered sugar
- 3 tablespoons natural unsweetened cocoa powder
- 0.5 teaspoon vanilla extract
For Garnish (Optional)
- Mini chocolate bars for topping, optional
Instructions
Oreo Crust Preparation
- Preheat oven to 325°F (162°C). Line a cupcake pan with paper liners.
- In a bowl, combine the Oreo crumbs and melted butter. Divide the mixture evenly among the cupcake liners and press firmly into the bottoms.
- Bake the crusts for 5 minutes. Remove from oven and allow to cool while you prepare the filling.
- Reduce oven temperature to 300°F (148°C).
Cheesecake Filling Preparation and Baking
- In a large bowl, beat the room temperature cream cheese, granulated sugar, and cocoa powder on low speed until well combined and smooth. Scrape down the sides of the bowl.
- Add the sour cream and vanilla extract. Beat on low speed until just combined.
- Add the large eggs one at a time, beating slowly and scraping the sides of the bowl after each addition, until just incorporated.
- Gently stir in the melted semi-sweet or bittersweet chocolate until fully blended.
- Spoon the cheesecake filling into each prepared cupcake liner, filling them mostly full.
- Bake cheesecakes for 15 minutes. After 15 minutes, turn off the oven but leave the cheesecakes inside with the door closed for an additional 10 minutes.
- Crack the oven door open slightly and allow the cheesecakes to cool in the oven for 15-20 minutes. Then, transfer them to the refrigerator to cool completely. Once cool, carefully remove them from the pan and liners.
Chocolate Ganache Preparation
- Place the semi-sweet chocolate chips for the ganache into a small, heatproof bowl.
- Heat the heavy whipping cream in a small saucepan or microwave just until it begins to boil.
- Pour the hot cream over the chocolate chips. Let it sit for 1-2 minutes, then whisk until the chocolate is completely melted and the ganache is smooth.
- Spoon a small amount of chocolate ganache over the top of each cooled cheesecake.
Chocolate Whipped Cream and Assembly
- To make the whipped cream, add the cold heavy whipping cream, powdered sugar, cocoa powder, and vanilla extract to a large mixer bowl. Whip on high speed until stiff peaks form.
- Pipe or dollop the chocolate whipped cream onto each mini chocolate cheesecake. If desired, top each with a mini chocolate bar.
- Refrigerate cheesecakes until ready to serve.


