
There’s something about the crunch and freshness of broccoli slaw that just makes my heart happy. I always do this when I need a quick side or a snack that’s healthy but still totally satisfying. Honestly, it’s one of those recipes I keep coming back to because it’s so versatile and forgiving — and it tastes like summer on a plate, even in the dead of winter. My kids ask for this all the time, especially when I tell them it’s “dessert,” thanks to the touch of sweetness I add. I remember the first time I made it; I was juggling a million things in the kitchen and needed something that came together fast but still felt special. The smell alone brings everyone to the dinner table — fresh, zesty, and a little sweet. Once I found out how easy it was and how much everyone loved it, I was sold. Trust me, once you try this, it’ll be on your rotation too. It’s perfect for picnics, potlucks, or just a weekday lunch, too. Basically, it’s one of those recipes that’s better than it looks — and it looks pretty darn good! Let’s dive in, shall we?
Thank you for reading this post, don't forget to subscribe!What is Broccoli Slaw?
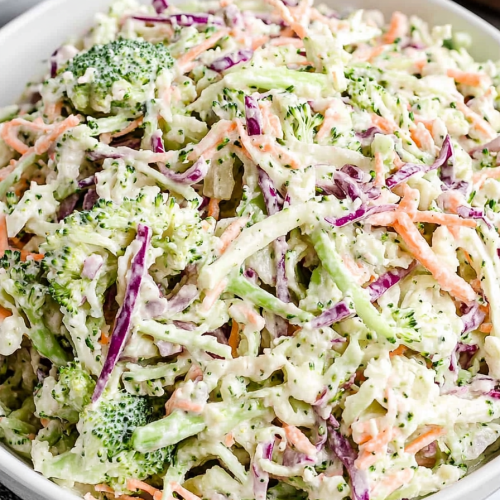
Broccoli slaw might sound fancy, but it’s really just a clever way to say “crunchy, fresh slaw made with broccoli” — kind of like a rainbow of raw veggies shredded into a vibrant, healthy salad. Think of it as a cross between your typical coleslaw and a veggie-packed side that’s a lot less heavy. It’s essentially shredded broccoli stems and heads, layered with colorful carrots, and sometimes cabbage, mixed with a tangy dressing. It’s popular in health-conscious circles because it’s super low-calorie and packed with nutrients. The name “slaw” usually makes people think of mayo-laden, heavy salads, but with broccoli slaw, we’re going for brightness and freshness. I love how easy it is to customize — add a handful of nuts, dried fruit, or even some crumbled cheese if you’re feeling fancy. It’s basically a blank canvas that lets the flavors of the dressing shine, making it perfect to serve alongside just about anything, from grilled chicken to fish tacos. It’s a no-fuss, fresh, and lively dish that I promise will become a staple in your kitchen, just like it is at mine.
Why you’ll love this recipe?
What I love most about this broccoli slaw is that it’s a real time-saver with so many winning qualities. First off, the flavor is surprisingly complex — the tangy dressing pairs so beautifully with the earthy crunch of the broccoli and the sweetness of the carrots. It’s like a little party in your mouth every time. Plus, it’s so easy to throw together — no cooking involved, just a quick chop and stir, making it perfect on busy weeknights or whenever you need a stress-free side. Budget-wise, it’s hard to beat — broccoli stems are usually the leftover bits from another recipe or a bargain find in the store. And honestly, the leftovers are even better the next day because the flavors meld so nicely. I’ve tested numerous variations, and what stands out is how adaptable it is. You can swap ingredients depending on what’s in your fridge — I’ve added diced apples for a sweet twist or toasted nuts for crunch. This slaw is incredibly versatile; I’ve served it with grilled chicken, tucked it into wraps, or just scooped it out of the bowl for a crunchy snack. The best part? It gets everyone eating more greens without any fuss. Truly, I think you’ll find it’s one of those recipes that just kind of sneaks its way into your weekly menu, and you’ll be glad it did.
How do you make Broccoli Slaw?
Quick Overview
This broccoli slaw is basically a mix-and-serve marvel. First, you shred the broccoli stems and heads, usually with a mandoline or a sharp knife. Then you toss in some julienned carrots and other optional veggies. The magic happens in the dressing — a bright combination of lemon juice, APPLE CIDER vinegar, olive oil, a touch of honey, and some salt and pepper. Mix everything, chill for at least 15 minutes and watch the flavors come alive. It’s really that simple — no cooking involved, and you can have a healthy, fresh side on the table in about 10 minutes. The best part is that once it’s mixed, it only gets better as it sits, so it’s perfect to prep ahead. You’ll love how effortlessly this integrates into your weekly routine.
Ingredients
For the Main Slaw: What is the main slaw?
- 1 large head of broccoli (or about 4 cups shredded broccoli florets and stems)
- 2 large carrots, julienned or shredded
- 1/4 cup red onion, finely chopped (optional but adds a punch!)
- ¼ cup dried cranberries or raisins (for a sweet burst)
- ½ cup chopped nuts (almonds, walnuts, or pecans — toasted for extra flavor)
For the Dressing:
- ¼ cup fresh lemon juice (about 1 large lemon)
- 2 tablespoons apple cider vinegar
- ¼ cup olive oil
- 1 tablespoon honey or maple syrup (trust me on this — it balances everything)
- Salt and freshly ground black pepper, to taste
Step-by-Step Instructions
Step 1: Preheat & Prep Pan
No oven preheat here! But I do recommend washing your broccoli and carrots. If you have a mandoline, grab it — it’s my favorite tool for shredding the broccoli stems into tiny, tender pieces. If not, a sharp knife works just fine. Chop the broccoli into manageable chunks, then shred them into fine pieces. You want that delicate, almost rice-like texture. Before shredding, I always do a quick blanch of the broccoli stems in boiling water for 30 seconds, then ice bath — gives it a tender bite without losing brightness. Let it drain completely. This little trick keeps the slaw from being too watery. Meanwhile, peel and julienne the carrots. If you’re using a red onion, finely chop it now, and toast your nuts in a dry skillet over medium heat — they’ll taste way better that way.
Step 2: Mix Dry Ingredients
In a large bowl, add all your shredded broccoli, carrots, onion, dried fruit, and nuts. Mix gently; you want to distribute everything evenly without mashing up the veggies. It’s kind of like building a vibrant veggie mosaic — the more colorful, the tastier it looks!
“Packed with flavor and so simple. Exactly what I wanted from this Easy Green Slaw Recipe for a Fresh Bite!”
Step 3: Mix Wet Ingredients
In a small jar or bowl, whisk together lemon juice, Apple Cider vinegar, honey, salt, and pepper. Then slowly drizzle in the olive oil while whisking, so everything emulsifies into a tangy, glossy dressing. Trust me on this: always add the oil last to get the best, smooth consistency. Taste it! If it’s too tangy, add a touch more honey. Too sweet? Splash in some more vinegar. Personalizing this just takes a second.
Step 4: Combine
Pour your dressing over the veggie mixture. Toss gently to coat everything evenly. I usually toss with two spoons — it’s easier on my hands. Don’t overmix — you want that lovely, naturally shredded texture to stay intact. Cover the bowl with plastic wrap and pop it in the fridge for at least 15 minutes; that’s what helps those flavors really marry. The crunch, the zing — it all gets so much better when you give it a bit of time.
Step 5: Prepare Filling
If you’re adding other accents like cheese or extra fruits, do it right before serving — you don’t want the cheese to get soggy or the fruit to discolor. I love adding a sprinkle of feta or crumbled goat cheese for a salty tang, but even just a few extra nuts on top take it to the next level.
Step 6: Layer & Swirl
I usually don’t do fancy presentation here — just serve it in a big bowl and let everyone help themselves. But if you’re feeling fancy, layer the slaw in a glass with some colorful toppings, swirl a little for visual flair, and serve in individual bowls. It’s all about making it look inviting and vibrant.
Step 7: Bake
No baking—this is a raw, fresh slaw. But I do recommend letting it sit for at least 15 minutes, or up to a few hours if you have the time. The longer it chills, the more the flavors meld, and the crunch softens just a touch, which is honestly perfect.
Step 8: Cool & Glaze
It’s ready to serve straight from the fridge. If you want to add a little extra sweetness or zing right before serving, drizzle a tiny bit of honey or squeeze more lemon on top. Some people love to sprinkle a bit of fresh chopped herbs like parsley or cilantro to brighten it up even more.
Step 9: Slice & Serve
It’s best served cold, really. Spoon out generous portions into bowls, add any last-minute toppings, and enjoy the crunch and tang. It’s perfect as a side, a light lunch, or even as a topping for tacos or grilled meats. And honestly, leftovers—if you have any—are just as delicious the next day, maybe a little softer but still packed with flavor.
What to Serve It With
This broccoli slaw is sort of a chameleon—it goes with almost everything. For breakfast, I love it piled onto a fried Egg Sandwich or tucked into a breakfast burrito along with some scrambled eggs. It’s a bright, crunchy contrast to something warm and savory. During brunch, it’s the perfect fresh side for dishes like quiche or frittata, especially when paired with a cold glass of sparkling lemonade or a fruity mimosa.
As a dinner side, it pairs wonderfully with grilled chicken, fish tacos, or even pulled pork. I’ve even served it as a topping on baked Sweet Potatoes — trust me, it’s delicious! It’s a crowd-pleaser at picnics and potlucks, and my personal favorite way to enjoy it is straight from the bowl — no garnish needed. Just a quick chill, a handful of nuts on top for crunch, and some extra lemon if I want to amp up the freshness. It’s also a hit at cookouts or casual gatherings, where everyone appreciates the burst of vibrant flavor and texture.
And because it’s so light, I feel good about filling my plate with it — a real win when you’re trying to eat healthfully but still want a dish that totally hits the spot.
“Made the Easy Green Slaw Recipe for a Fresh Bite tonight and wow — perfect weeknight dinner. Will definitely make again!”
Top Tips for Perfecting Your Broccoli Slaw
Years of experimenting have taught me a few tricks to get this just right. First, shred the broccoli stems small — I’ve learned that larger pieces tend to be tough and fibrous, and nobody wants that. If you happen to have a food processor, give the broccoli a quick whirl; it saves time and produces a uniform texture. I always blanch the stems before shredding — it takes just 30 seconds in boiling water, then an ice bath — this keeps them tender and bright. Never skimp on the dressing — it’s what makes the dish pop. I’ve tested different acids, and lemon juice combined with apple cider vinegar gives it that perfect tang. When it comes to the nuts, toasting them makes all the difference; it brings out their aroma and crunch.
Want to change things up? Swapping out honey for maple syrup gives a deeper sweetness, while adding a pinch of chili flakes adds a spicy kick. I’ve also tried mixing in some chopped apples or pears — adds a lovely sweetness and crunch. The biggest tip? Taste as you go. Everything should taste balanced — a touch more salt here, a squeeze more lemon there. It’s like music — a little tweak can make all the difference. Oh, and don’t forget: make enough! This dish disappears fast — I always double the recipe because leftovers are just as good, if not better.
Lastly, if you prefer a creamier texture, you can stir in a dollop of Greek yogurt or even a splash of mayo — but honestly, I love it just as it is: fresh, tangy, and a little sweet. It’s a true sign that simple often beats complicated after all.
Storing and Reheating Tips
If you have leftovers — which, spoiler alert, you probably will — store them in an airtight container in the fridge. This broccoli slaw keeps well for 2-3 days, though I like to eat it sooner for maximum crunch. The veggies soften slightly as it sits, but the flavor only gets better. If you want to keep it crispier, add the nuts and any fresh herbs just before serving. Want to make it ahead? Mix everything but the dressing — that way, you can toss it together right before you’re ready to eat. When reheating, I never bother because it’s best served cold or at room temperature. Reheat? Nah, it’s a fresh dish, best enjoyed chilled. And if you’re worried about the dressing drying out, just give it an extra splash of lemon or vinegar when serving again.
For the glaze or extra toppings, I recommend adding them right before serving — that keeps everything looking and tasting fresh.
Frequently Asked Questions
Final Thoughts
This broccoli slaw has truly earned a spot in my weekly lineup. It’s a fresh, vibrant way to add more greens to any meal, and I love how forgiving it is — you can swap ingredients, add your own flair, and it still tastes incredible. It’s light yet satisfying, and it’s honestly the type of dish that gets better the longer it sits. Whether I’m serving it alongside crispy roasted chicken, packing it into a lunchbox, or just munching straight from the bowl while cooking dinner, it never disappoints. I encourage you to experiment with your own twists — maybe toss in some sliced apples for sweetness, or add a pinch of chili flakes if you like a little heat. I’d love to hear your variations! Drop a comment below or share a photo on social media — I can’t wait to see how yours turns out. Happy eating, friends — and here’s to many more delicious, healthy adventures in the kitchen!
broccoli slaw
Ingredients
Main Ingredients
- 24 ounces broccoli slaw
- 0.5 red onion red onion finely chopped
- 1.25 cups mayonnaise
- 1 tablespoons apple cider vinegar
- 1.25 teaspoons sugar
- 0.5 teaspoon salt
- 0.5 teaspoon ground black pepper
- 1 tablespoons lemon juice
Instructions
Preparation Steps
- In a large mixing bowl add broccoli slaw and chopped onion. Set aside.
- In a small mixing bowl combine mayonnaise, apple cider vinegar, sugar, salt, pepper, and lemon juice. Use a whisk to mix together.
- Pour sauce over the broccoli slaw and use tongs to toss the salad until it is well dressed.
- Add additional salt and pepper to taste.
- Refrigerate for 30 minutes or until ready to serve.


