Oh, where do I even begin with these cowboy cookies? They’re not just cookies; they’re a little slice of happiness, a hug in cookie form, and honestly, my go-to when I need something that feels both incredibly special and surprisingly easy. I remember the first time I tried a truly good cowboy Cookie Recipe. It was at a friend’s potluck, and everyone was raving about them. I was a little skeptical, thinking “cowboy” just meant “oats,” but oh, was I wrong! These aren’t your average oatmeal cookies. They’re packed with so much goodness – a little bit of everything that makes a cookie downright irresistible. If you’re like me and sometimes crave that perfect chewy-crisp texture with a mix of sweet and a hint of salty, then you are going to fall head over heels for this cowboy cookie recipe. It’s the kind of recipe that makes your kitchen smell like pure magic, and it’s a lifesaver on busy weeknights when the sweet tooth hits hard, but you don’t want to spend hours baking.
Thank you for reading this post, don't forget to subscribe!What is a cowboy cookie?
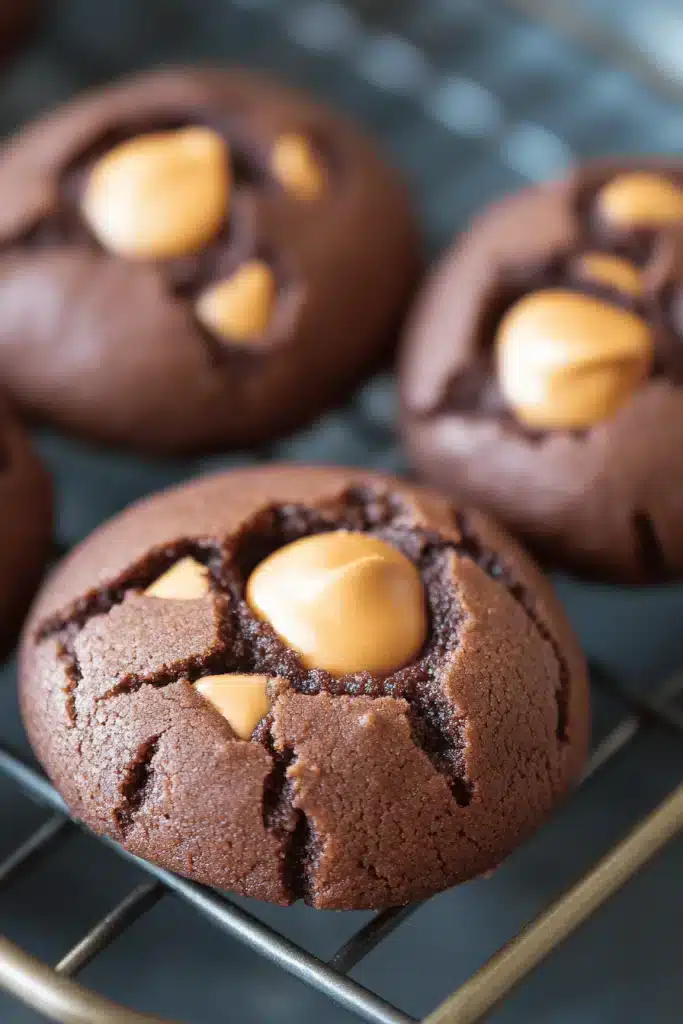
So, what exactly makes a cookie a “cowboy cookie”? Think of it as the ultimate “everything but the Kitchen Sink” cookie, but in the best possible way! It’s essentially a fantastic base cookie dough, usually with oats for that wonderful texture, but then it gets jazzed up with a delightful medley of mix-ins. We’re talking chocolate chips, nuts, and sometimes even things like shredded coconut or bits of toffee. The name itself conjures up images of hearty, straightforward goodness, something substantial that could fuel a long day. It’s not fussy; it’s just packed with flavor and texture. It’s that one cookie that manages to be both comforting and exciting with every single bite. It’s the kind of cookie that makes you want to grab a glass of milk and just savor the moment. It’s essentially a well-loved classic that’s been perfected over time to be the ultimate crowd-pleaser.
Why you’ll love this recipe?
Honestly, there are so many reasons why this cowboy cookie recipe has become a staple in my kitchen, and I’m so excited for you to experience it too! First off, let’s talk about the flavor. It’s a symphony of textures and tastes. You get the satisfying chew from the oats, the sweet burst of chocolate chips, the delightful crunch from the pecans (or walnuts, if that’s your jam!), and that perfect balance of sweet and slightly salty. It’s just *right*. And the simplicity? You won’t believe it. I’ve had friends who thought they were terrible bakers whip these up with no problem. It’s a one-bowl wonder for the dry ingredients, and the wet ingredients come together in a flash. It’s genuinely forgiving, which is a huge plus in my book!
Beyond the amazing taste and ease, this recipe is incredibly cost-effective. The ingredients are pretty standard pantry items for most home bakers, making it an affordable treat. Plus, the versatility is out of this world! I’ll share some of my favorite variations later, but you can truly customize this to your heart’s content. What I love most about this cowboy cookie recipe is that it’s perfect for almost any occasion. Whether it’s a school bake sale, a casual get-together with friends, or just a simple treat for yourself after a long day, these cookies deliver. They’re a step up from a basic Chocolate Chip Cookie but still have that familiar comfort. They remind me of the cookies my grandma used to make, but with my own little modern twists. They just make people happy, and isn’t that what baking is all about?
How do you make cowboy cookies?
Quick Overview
Making these incredible Cowboy Cookies is surprisingly straightforward! You’ll start by creaming your butter and sugars, then mix in the eggs and vanilla. Next, you’ll gently combine the dry ingredients with the wet. Finally, the fun part: folding in all those delicious mix-ins! The dough will be thick and loaded with goodies. You’ll drop spoonfuls onto your baking sheets, and before you know it, you’ll have warm, fragrant cookies ready to enjoy. This method ensures a perfect balance of chewy and slightly crisp textures, and it’s all done in just a few simple steps. It’s the kind of baking that feels therapeutic.
Ingredients
For the Main Batter:
Butter: 1 cup (2 sticks) unsalted butter, softened. Make sure it’s truly softened, not melted! I usually leave mine out on the counter for about an hour before I start. It makes a huge difference in getting that creamy texture.
Sugars: 1 cup packed light Brown Sugar and 1/2 cup granulated sugar. The brown sugar is key for that chewy texture and rich flavor, while the granulated sugar helps with crispiness.
Eggs: 2 large eggs. Room temperature eggs incorporate better into the batter.
Vanilla Extract: 2 teaspoons pure vanilla extract. Don’t skimp on the good stuff here; it really adds depth to the flavor!
Flour: 2 1/2 cups all-purpose flour. I like to measure mine by spooning it into the cup and leveling it off with a straight edge, rather than scooping directly from the bag, to avoid too much flour.
Baking Soda: 1 teaspoon baking soda. This is what gives the cookies a little lift and helps them spread just right.
Salt: 1/2 teaspoon salt. A little salt balances out the sweetness and brings out all the other flavors.
“I don’t know if I’ve ever eaten a better Easy Cowboy Cookie Recipe You’ll Love. The rub alone is wonderful, but the sauce??? Over the top!”
Oats: 3 cups old-fashioned rolled oats. Please, please use old-fashioned, not instant! The texture is so much better, and they won’t get mushy.
For the Mix-ins (This is where the cowboy magic happens!):
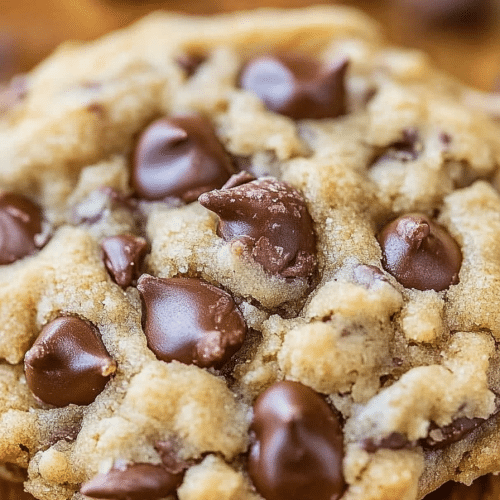
Chocolate Chips: 2 cups semi-sweet chocolate chips. You can use milk chocolate or dark chocolate too, or a combination! I sometimes add a handful of mini chips for extra distribution.
Nuts: 1 cup chopped pecans or walnuts. Toasting them lightly beforehand really amps up their flavor, but it’s not absolutely necessary if you’re short on time.
Optional additions: 1/2 cup shredded sweetened coconut, 1/2 cup toffee bits. These are my personal favorites for adding extra layers of flavor and texture!
Step-by-Step Instructions
Step 1: Preheat & Prep Pan
First things first, preheat your oven to 350°F (175°C). Line your baking sheets with parchment paper. This is a lifesaver for easy cleanup and ensures your cookies won’t stick. If you don’t have parchment, a lightly greased baking sheet will do, but parchment is my secret weapon for perfect cookies every time.
Step 2: Mix Dry Ingredients
In a medium bowl, whisk together the all-purpose flour, baking soda, and salt. Give it a good whisk to make sure everything is evenly distributed. This simple step helps ensure your leavening agents are spread throughout, leading to consistent cookies.
Step 3: Mix Wet Ingredients
In a large bowl (or the bowl of your stand mixer), cream together the softened butter, packed light brown sugar, and granulated sugar until light and fluffy. This usually takes about 3-5 minutes. Beat in the eggs one at a time, then stir in the vanilla extract. Make sure you scrape down the sides of the bowl occasionally to get everything incorporated.
Step 4: Combine
Gradually add the dry ingredients to the wet ingredients, mixing on low speed until just combined. Be careful not to overmix here! Overmixing can lead to tough cookies. You just want to see the flour streaks disappear. Then, stir in the rolled oats until they’re evenly distributed.
Step 5: Prepare Filling (Oops, I mean Mix-ins!)
Now for the really fun part! Gently fold in your chosen mix-ins: the chocolate chips, chopped nuts, and any optional additions like coconut or toffee bits. I like to use a sturdy spatula for this. Make sure everything is well distributed throughout the dough. This dough is going to be thick and absolutely packed with goodies – that’s exactly what you want!
Step 6: Scoop & Shape
Drop rounded tablespoons of dough onto your prepared baking sheets, leaving about 2 inches between each cookie to allow for spreading. I like to use a cookie scoop for uniform size, but two spoons work just as well. You can gently press them down a little if you like your cookies a bit flatter, but I usually leave them as is for a nice, thick cookie.
Step 7: Bake
Bake for 10-13 minutes, or until the edges are golden brown and the centers look set but still slightly soft. Ovens can vary, so keep an eye on them towards the end. I like my cookies to have a slightly chewy center, so I tend to pull them out when they just start to look done.
Step 8: Cool & Enjoy!
Let the cookies cool on the baking sheets for about 5 minutes before transferring them to a wire rack to cool completely. This is crucial for them to firm up. Honestly, resisting the urge to eat them straight off the baking sheet is the hardest part! These are best enjoyed warm, but they’re also fantastic at room temperature.
Step 9: Slice & Serve (Optional, but recommended for sharing!)
Once fully cooled, serve them up! They’re perfect for a casual treat. If you want to get fancy, you can even drizzle them with a simple glaze, though they’re absolutely delicious just as they are. They make for a wonderful dessert or an afternoon pick-me-up.
What to Serve It With
These cowboy cookies are wonderfully versatile and can be paired with so many things! For breakfast, they’re fantastic alongside a steaming mug of coffee or a glass of cold milk. I sometimes break one in half and let it soak up a little coffee – pure decadence! If you’re serving them for brunch, consider plating them with some fresh fruit salad and perhaps a yogurt parfait. They add a lovely homemade touch to any spread.
“Packed with flavor and so simple. Exactly what I wanted from this Easy Cowboy Cookie Recipe You’ll Love!”
As a dessert, they’re a guaranteed hit. I love serving them with a scoop of vanilla bean ice cream for a simple yet sophisticated ice cream sandwich. They’re also wonderful on their own after dinner, perhaps with a warm cup of herbal tea. For cozy snacks, they’re just perfect. My kids love them after school with a glass of milk, and honestly, they’re my go-to for a late-night craving when I don’t want anything too heavy. I’ve also found they pair beautifully with hot chocolate on a chilly evening. My family tradition is to have these on movie nights, and they disappear faster than you can say “popcorn!”
Top Tips for Perfecting Your Cowboy Cookies
I’ve made these cowboy cookies more times than I can count, and over the years, I’ve picked up a few tricks that make them even better. For the oats, *please* use old-fashioned rolled oats. They hold their shape and give you that perfect chewy texture. Instant oats will turn into mush, and steel-cut oats won’t cook through properly. When it comes to mixing, it’s crucial not to overwork the dough once you add the flour. Overmixing develops the gluten too much, which can result in tough, dense cookies. Just mix until the flour streaks disappear, and then stop.
The mix-ins are where you can really play! I love a combination of semi-sweet chocolate chips and toasted pecans for that classic cowboy cookie flavor. If you’re feeling adventurous, try adding some butterscotch chips or even a bit of dried cranberry. For a different textural element, a handful of shredded coconut adds a lovely chewiness and tropical note. When it comes to baking, pay attention to your oven. Every oven is different! I usually bake mine until the edges are golden brown and the centers look just set. They’ll continue to cook a bit on the hot baking sheet after you pull them out, so it’s better to err on the side of slightly underbaked if you want a chewy cookie. For ingredient swaps, if you don’t have brown sugar, you can use a mix of granulated sugar and molasses, but it won’t quite achieve the same chewy depth. And if you’re out of eggs, a flax egg (1 tablespoon flaxseed meal mixed with 3 tablespoons water, let sit for 5 minutes) can work in a pinch, though the texture might be slightly different.
I’ve also learned that chilling the dough for at least 30 minutes (or even overnight!) can lead to a thicker, chewier cookie because it allows the fats to firm up and the flavors to meld. It’s not strictly necessary, but it does make a difference, especially if you want to avoid too much spreading. And for that perfect golden edge, make sure your oven rack is in the center position. If your cookies tend to get too brown on the bottom, try lining your baking sheet with a second layer of parchment or even using a dark baking sheet, which requires slightly lower temperatures or shorter baking times. Trust me on this one; a little attention to these details can elevate your cookies from good to absolutely divine!
Storing and Reheating Tips
These cowboy cookies are pretty sturdy and store well, which is one of the reasons I love them so much! At room temperature, they’ll stay delicious in an airtight container for about 3-5 days. Make sure they’ve cooled completely before storing them, otherwise, you’ll end up with condensation and soggy cookies. I usually just put them in a good quality cookie tin or a plastic container with a tight-fitting lid.
If you need them to last a bit longer, the refrigerator is your friend. Stored in an airtight container in the fridge, they can last up to a week. They’ll be a bit firmer when cold, but honestly, I find them just as tasty. If you prefer them warm, you can gently reheat them. A few seconds in the microwave (about 10-15 seconds) is usually enough to take the chill off and bring back some of that fresh-baked warmth and softness. Just be careful not to overheat them, or they can become tough.
And for those times when you want to make a big batch and stash them away for later, freezing is the way to go! You can freeze the baked cookies or even the cookie dough. For baked cookies, wrap them tightly in plastic wrap, then place them in a freezer-safe bag or container. They’ll keep well for about 2-3 months. Thaw them at room temperature or gently warm them in the microwave. If you’re freezing the dough, scoop it into balls, place them on a parchment-lined baking sheet, freeze until firm, then transfer them to a freezer bag. You can then bake them directly from frozen, adding a couple of extra minutes to the baking time. For the glaze, I always recommend waiting until the cookies are completely cool before adding it, whether you’re storing them at room temp or in the fridge. Adding glaze to warm cookies will just make a mess!
Frequently Asked Questions
Final Thoughts
There you have it – my absolute favorite cowboy cookie recipe! I truly hope you give these a try. They’re more than just a sweet treat; they’re a testament to how simple ingredients, when combined with a little love and a lot of delicious mix-ins, can create something truly magical. The aroma that fills your kitchen while these bake is just intoxicating, and the first bite is always a moment of pure joy. They’re the kind of cookies that bring people together, sparking smiles and happy conversations. Whether you’re an experienced baker or just starting out, this recipe is foolproof and incredibly rewarding.
If you love these cookies as much as I do, I think you might also enjoy my recipe for chewy chocolate chip cookies or my decadent double fudge brownies – they’re in a similar vein of comforting, crowd-pleasing baked goods! I can’t wait to hear what you think of these cowboy cookies! Please leave a comment below to share your experience, your favorite mix-ins, or any brilliant variations you’ve come up with. And if you share photos of your creations on social media, be sure to tag me – I’d absolutely love to see them! Happy baking, and enjoy every delicious bite!
cowboy cookie recipe
Ingredients
Main Ingredients
- 1 large egg
- 0.5 cup unsalted butter softened
- 0.5 cup light brown sugar packed
- 0.25 cup granulated sugar
- 2 teaspoons vanilla extract
- 1 cup all-purpose flour
- 1 cup old-fashioned whole-rolled oats not quick-cook or instant
- 1 teaspoon baking soda
- 0.5 teaspoon salt or to taste
- 1 cup semi-sweet chocolate chips
- 0.75 cup Cornflakes or Special K cereal Frosted Flakes or similar may be substituted
- 0.75 cup sweetened shredded coconut
- 0.5 cup pecans coarsely chopped (walnuts or raisins may be substituted)
Instructions
Preparation Steps
- To the bowl of a stand mixer fitted with the paddle attachment (or large mixing bowl and electric mixer) add the egg, butter, sugars, vanilla, and beat on medium-high speed until creamed and well combined, about 4 minutes.
- Stop, scrape down the sides of the bowl, and add the flour, oats, baking soda, salt, and beat on low speed until just combined, about 1 minute.
- Stop, scrape down the sides of the bowl, and add the chocolate chips, Cornflakes, coconut, pecans, and beat on low speed until just combined, about 1 minute.
- Using a large cookie scoop, 0.25-cup measure, or your hands, form approximately 13 equal-sized mounds of dough.
- Place mounds on a large plate or tray, cover with plastic wrap, and refrigerate for at least 2 hours, up to 5 days. Do not bake with unchilled dough because cookies will bake thinner, flatter, and be more prone to spreading.
- Preheat oven to 350°F, line a baking sheet with a Silpat or spray with cooking spray. Place dough mounds on baking sheet, spaced at least 2 inches apart (I bake 8 cookies per sheet) and bake for about 10 to 12 minutes (11 minutes in my oven is just right), or until edges have set and tops are just set, even if slightly undercooked, pale, and glossy in the center; don’t overbake. Cookies firm up as they cool.
- Allow cookies to cool on baking sheet for about 10 minutes before serving. I let them cool on the baking sheet and don’t use a rack.


