If you’ve ever wanted a dessert that blends childhood nostalgia with a slice of indulgence, then you’re going to fall head over heels for this Oreo Delight. I first made this one rainy Sunday afternoon when I needed something sweet but didn’t want to turn on the oven — you know those days, right? This treat is essentially an adorable layered dessert that’s foolproof, super versatile, and honestly, a total crowd-pleaser. My kids ask for this all the time, and even my picky sister can’t get enough of that rich, creamy vibe. The smell alone when it’s baking or setting just takes me right back to my grandma’s kitchen, where simple ingredients came together to make magic. Trust me—this is a dessert that’s equal parts comfort and wow factor, and I promise, once you try it, it’ll become a staple in your recipe stash too.
Thank you for reading this post, don't forget to subscribe!What is Oreo Delight?
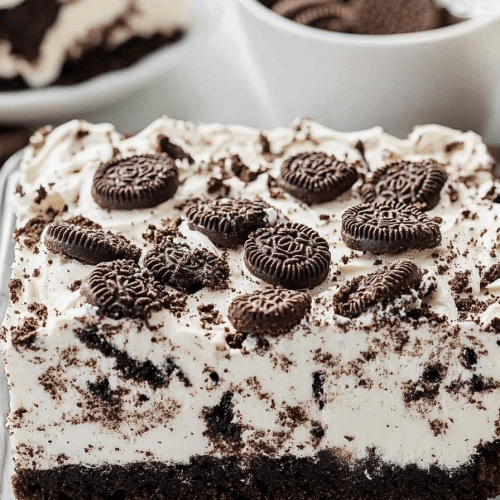
Think of Oreo Delight as a no-bake layered dessert, kind of like a crust, cream, and cookie paradise all rolled into one. It’s essentially a sweet, creamy concoction that’s got a buttery, crumbly base, topped with a luscious layer of vanilla or chocolate cream, and finished with a generous sprinkle of crushed Oreos. Sometimes, I add a drizzle of chocolate or a dash of sprinkles just for fun. Its origin isn’t officially documented anywhere fancy—honestly, it’s the kind of recipe that emerges in kitchens when you’re craving something satisfying but don’t want to fuss with complex steps. My version is a little homey twist on those classic layered desserts you see at potlucks or family gatherings, but with a few personal touches. It’s perfect for sharing, and I love how it stays fresh in the fridge for a couple of days, which makes it a lifesaver on busy nights or last-minute get-togethers.
Why you’ll love this recipe?
What I love most about this Oreo Delight is how incredibly easy it is to throw together. You don’t need any fancy equipment—just a mixing bowl, a handful of ingredients, and some patience while it chills. The flavor is a perfect balance of sweet, creamy, and crunchy with that unmistakable Oreo punch. It’s kind of like a no-bake cheesecake but with that unmistakable cookie crunch that everyone loves. Plus, it’s budget-friendly because most of the ingredients are pantry staples—think store-bought Oreos, Cream Cheese, and a bit of heavy cream or whipped topping. I’ve tested this with different variations, from swapping out the cream cheese for Greek yogurt for a tangy twist to using gluten-free Oreos for friends with dietary needs, and it always turns out delicious.
Another reason I keep coming back to this recipe is its versatility. You can make it even more decadent with chocolate ganache, or keep it light by using fresh berries or a splash of citrus zest. This dessert is a blank canvas, and that’s what makes it so fun! Sometimes, I add a layer of crushed pretzels or Peanut Butter for extra texture. Honestly, this disappears in minutes at my house — no leftovers, and many times, I find myself doubling the recipe just so I can enjoy some the next day.
How do I make Oreos?
Quick Overview
The process couldn’t be simpler: start by crushing Oreos for the base, mix up a creamy filling, layer everything in a dish, chill it until set, and then add a final touch of Oreos or toppings before serving. It’s a small effort for big reward. What makes this special is how the layers come together—crunchy, creamy, and just the right amount of sweetness. This is perfect when you’re craving something quick and satisfying without messing around in the kitchen for hours. I always do this when I want to impress friends with minimal fuss, and let me tell you, it never fails to get rave reviews.
Ingredients
For the Main Base:
– 2 cups of crushed Oreos (about 15-20 cookies)
– 4 tablespoons of unsalted butter, melted
– Optional: 2 tablespoons granulated sugar if you want a slightly sweeter crust
For the Filling:
– 8 oz (about 225g) of Cream Cheese, softened
– 1 cup of powdered sugar
– 1 teaspoon vanilla extract
– 1 cup of heavy cream or whipped topping
– ½ cup crushed Oreos for mixing in
“Packed with flavor and so simple. Exactly what I wanted from this Easy Cookie Delight Recipe!”
For the Topping / Glaze:
– A handful of crushed Oreos
– Optional drizzle of chocolate ganache or caramel sauce for extra luster and flavor
– Whipped Cream or fresh berries for garnish
Step-by-Step Instructions
Step 1: Preheat & Prep Pan
No oven required! Just grab a 9-inch square dish or any shallow serving dish. Lightly spray or line with parchment for easy cleanup. If you want a neat, tidy edge, a parchment lining is your friend. Keep your crushed Oreos and melted butter ready—these are your foundation.
Step 2: Mix Dry Ingredients
Crush your Oreos into fine crumbs—trust me, this is the part where a mini food processor comes in handy, but a sturdy zip-top bag and rolling pin work just fine. Mix the crushed Oreos with melted butter and sugar (if using) until the mixture resembles wet sand.
Step 3: Mix Wet Ingredients
Beat the softened Cream Cheese with powdered sugar and vanilla until smooth and creamy. In a separate bowl, whip the heavy cream until stiff peaks form. I love doing this by hand for that satisfying feeling, but a mixer works just as well. Gently fold the whipped cream into the cream cheese mixture—stop as soon as it’s blended to keep it fluffy.
Step 4: Combine
Add most of the crushed Oreos into the filling for texture, saving a handful for topping. Fold everything together gently—you want the cream to stay airy. It’s okay if it’s slightly streaky, just don’t overmix.
Step 5: Prepare Filling
The filling is rich and luscious, perfect for spreading in your prepared dish. Dollop it over the Oreo crust and smooth it out with a spatula. For an artistic swirl, I sometimes drop in more crushed Oreos and use a toothpick for a marbled effect.
Step 6: Layer & Swirl
Spread the filling evenly across the crust, then sprinkle the reserved crushed Oreos on top. If you’re feeling fancy, add some chocolate drizzle or Mini Chocolate chips now. Use a toothpick or skewer to swirl the toppings into the filling for a pretty marbled look.
Step 7: Bake
Although this is a no-bake, I love to chill it in the fridge for at least 4 hours, preferably overnight. If you want it even firmer or for special occasions, pop it in the freezer for an hour or two before serving.
Step 8: Cool & Glaze
If you’re adding a chocolate ganache or caramel, do it after chilling. Pour or spread your glaze over the set dessert and let it firm up in the fridge for another 30 minutes—this finishing touch makes it look polished and professional.
“I don’t know if I’ve ever eaten a better Easy Cookie Delight Recipe. The rub alone is wonderful, but the sauce??? Over the top!”
Step 9: Slice & Serve
Use a sharp knife dipped in hot water for clean slices, and serve chilled. I like to garnish with Whipped Cream, fresh berries, or even a dusting of powdered sugar. Pretty and delicious!
What to Serve It With
This Oreo Delight is a true chameleon—you can dress it up or keep it casual. For breakfast (if you’re feeling cheeky), serve a small slice with a hot cup of coffee or a glass of cold milk. Kids love it as an after-school treat paired with milk or their favorite juice. When you’re hosting brunch, try adding some fresh berries on top or a sprinkle of chopped nuts for a crunch. It makes a stunning finale after a hearty meal, especially with vanilla Ice Cream or whipped cream on the side. As a snack, I’ve found that keeping it chilled in the fridge works best, and it’s perfect for days when you want that sweet kick to brighten your afternoon. I even serve it at picnics, tucked into a little container—trust me, it travels well and tastes just as good after hours in the cooler.
Top Tips for Perfecting Your Oreo Delight
Over my years of making this, I’ve picked up a few tricks that help it turn out flawless every time. First, when crushing the Oreos, don’t go too chunky—finely crushed crumbs help create that smooth, cookie crumb crust. I used to leave some bigger pieces, and while that’s tasty, it messes with the texture of the crust. For the filling, don’t overmix—stir until just combined, otherwise, it can get runny or lose its fluffiness. When folding whipped cream into the cream cheese mixture, use a gentle motion to keep it airy; otherwise, it’ll end up dense. If you want an extra decadent look, layer some melted chocolate between the filling and the topping—it looks beautiful and adds richness. I’ve also tested substituting mascarpone for cream cheese, which gives it a softer, silkier feel, but make sure to adjust the sugar because mascarpone is naturally sweeter. Baking isn’t involved here, but chilling times are key—you want it to be well set before slicing. For the glaze, I prefer a silky, slightly thickened ganache that spreads easily, but you can also do a simple dusting of cocoa powder or a drizzle of caramel for different effects. Every time, I learn a little more, and honestly, that’s part of the fun.
Storing and Reheating Tips
This dessert keeps beautifully in the fridge for up to 3 days if covered tightly. I suggest wrapping the dish with plastic wrap or storing it in an airtight container to prevent it from drying out. If you’re planning to make this ahead of a gathering, I recommend assembling everything the night before—just add the glaze and toppings right before serving to keep it looking fresh. For longer storage, you can freeze individual slices—wrap each piece in plastic wrap and store in a freezer bag for up to a month. Thaw slices in the fridge for a few hours before serving for best texture. I’ve found that re-adding a drizzle of warm chocolate or a splash of milk can revive the creamy filling if it gets a tad firm in the fridge, but honestly, it’s pretty forgiving. If you want to add the glaze after it’s chilled, just warm it slightly to pourability and spread it quickly on the cooled dessert. The key is avoiding overhandling once it’s set—less is more. If you’re a topping enthusiast like me, adding fresh berries or whipped cream right before serving keeps everything looking vibrant and tasting fresh.
Frequently Asked Questions
Final Thoughts
This Oreo Delight is one of those recipes that makes you feel like a dessert hero without breaking a sweat. It’s creamy, crunchy, sweet, and just the right amount of indulgent. Over the years, it’s become a go-to for me when I want to impress friends at potlucks or surprise my family on a lazy weekend. Its simplicity is what makes it stand out—no fancy ingredients or complicated steps, just good, honest comfort food. I love how flexible it is too; you can swap ingredients, add layers, or dress it up for special occasions. Honestly, once you get the hang of it, you’ll be coming back to this recipe over and over. I can’t wait to hear how yours turns out — so feel free to leave a comment or share your own twists. Happy baking and indulging, my friend!
Oreo Delight
Ingredients
Main Ingredients
- 50 cookies Oreo cookies
- 0.5 cup unsalted butter melted
- 8 oz cream cheese softened
- 1 cup confectioners' sugar
- 16 oz Cool Whip two 8-ounce tubs
- 6.8 oz instant chocolate pudding two 3.4-ounce packages
- 2.5 cups milk
Instructions
Preparation Steps
- Spray a 9x13-inch baking dish with nonstick spray.
- Use a food processor to crush the Oreos until they are fine crumbs. Remove 0.75 cups of crushed Oreos and set aside for toppings.
- Combine remaining crushed Oreos with melted butter.
- Press the Oreo and butter mixture into the bottom of the prepared dish. Freeze for a few minutes.
- Beat cream cheese and confectioners’ sugar until smooth.
- Beat in one tub of Cool Whip into the cream cheese mixture.
- Layer the cream cheese mixture over the Oreo crust. Drop evenly.
- In a separate bowl, beat together milk and pudding packets. Beat for 2 minutes.
- Spread pudding evenly over the cream cheese layer.
- Spread the remaining Cool Whip over the top and sprinkle with reserved Oreo crumbs.
- Chill for at least 6 hours before serving.


