Oh, honey, pull up a chair. I’m so excited to share this with you today because this isn’t just any cake recipe; this is *the* recipe. You know how sometimes you see that beautiful, perfect slice of dessert behind the glass case and you think, “There’s no way I can make that look half as good at home”? Well, forget that thought right now. This homemade **Boston Cream Pie Recipe** is the real deal—moist, fluffy, and swimming in that incredible vanilla custard and rich chocolate ganache. I remember the first time I tried to tackle this classic. It felt intimidating, like I needed a pastry degree just to get the cake right. I ended up with something flat and sad. Don’t worry, I’ve learned from all those kitchen disasters so you don’t have to! This version is so tender, it practically melts the moment it hits your tongue. It tastes exactly like that iconic dessert from the best bakeries in Boston, but made right here in your own oven. Seriously, it’s shockingly simple, and the payoff is huge. Get ready for rave reviews!
Thank you for reading this post, don't forget to subscribe!What is Boston Cream Pie?
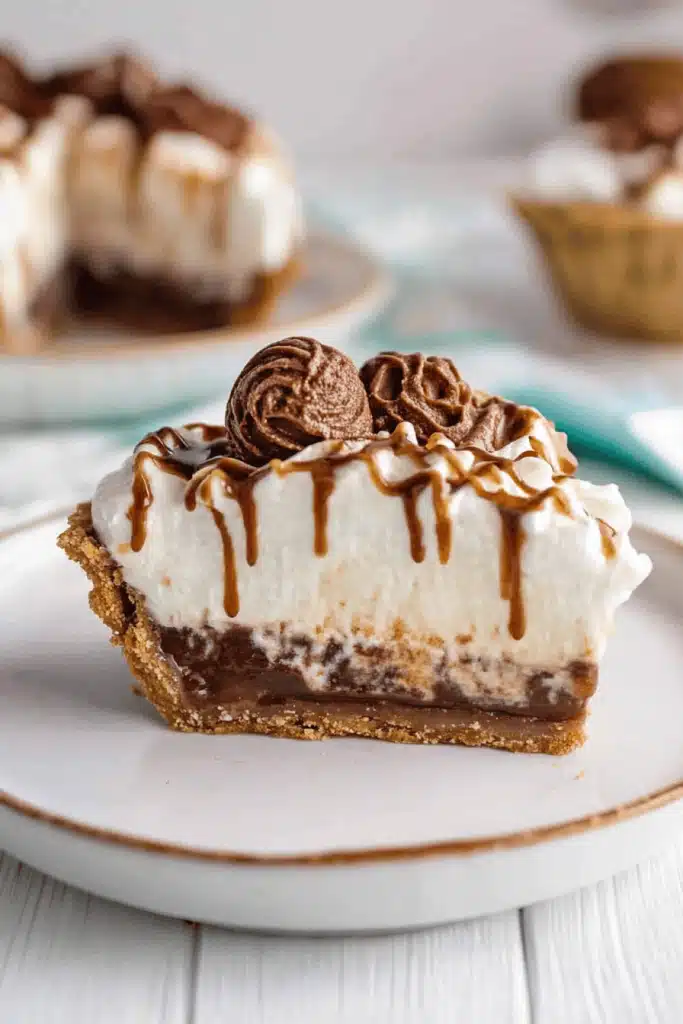
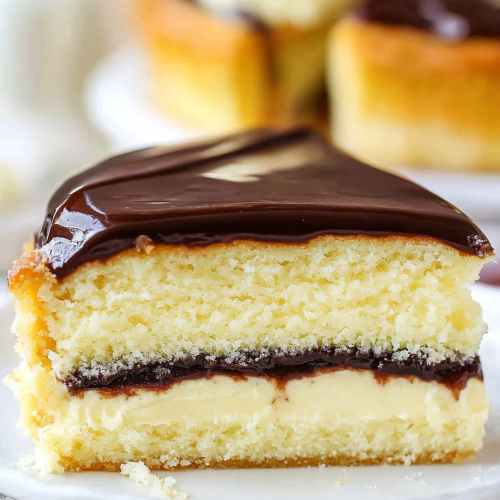
So, what exactly *is* a Boston Cream pie? That’s the first question everyone asks, and it’s a fun one! Despite the name, it’s technically a cake, not a pie. Think of it as a beautiful layered creation: two perfect discs of tender, buttery yellow cake (which, let’s be honest, is closer to a sponge cake than a standard layer cake), split down the middle and generously filled with a silky, bright vanilla pastry cream. But the grand finale? That smooth, gorgeous chocolate glaze that just drips perfectly down the sides. It’s the ultimate trifecta of texture and flavor. The name probably comes from the fact that when it was first created back in the 1800s at the Parker House Hotel in Boston, they baked it in a deep, round, pie-style pan! It’s historical comfort food, really. It manages to be rich without feeling heavy, thanks to that light cake base and the cool, creamy filling. It’s the dessert you bring out when you want to impress without stressing yourself out. It’s sweet, it’s creamy, it’s got that slight textural contrast from the glaze—it hits all the right notes.
Why you’ll love this recipe?
I’ve tried a lot of different versions over the years, messing with the thickness of the custard and the richness of the chocolate, but this combination is the winner. Here’s why I keep coming back to this specific What is the recipe for Boston cream pie? time and time again. First, the flavor profile is just magic. The cake isn’t overly sweet, allowing the star—that luxurious vanilla custard—to really shine. I use a whole vanilla bean in mine sometimes when I’m feeling fancy, and the little black specks just scream “homemade quality.” It’s an explosion of creamy, buttery deliciousness. Second, and this is crucial for busy people like us, it’s actually quite manageable. Unlike fussy multi-layered cakes, the components here are straightforward. You bake the cake layers, you cook a simple custard, and you melt some chocolate. That’s it! What I love most about this is the make-ahead potential. You can bake the cakes a day ahead, and the filling and glaze can be prepped in the afternoon. When evening rolls around, you just assemble. It’s a lifesaver when you’re hosting! Also, let’s talk budget. These ingredients are pantry staples—flour, sugar, eggs, milk. You aren’t hunting down specialty items, which makes this an excellent choice when you’re craving something decadent but trying to keep costs down. If you love things like classic yellow cake or even homemade pudding cups, this takes those comforting flavors and elevates them into something truly showstopping. My kids, who are usually suspicious of anything that isn’t bright orange or covered in sprinkles, absolutely devour this. They always ask if we can have “the fancy cake” for birthdays now instead of the usual frosted SHEET CAKE. That’s the highest compliment a recipe can get in my house.
How do I make Boston Cream Pie?
Quick Overview
This entire process boils down to three main components: baking the two cake layers, making a thick, luscious pastry cream, and finishing with a glossy chocolate topping. We’re aiming for a light, slightly springy cake base that can absorb the moisture from the custard without turning soggy. The key here is patience during the chilling process; a warm filling melts the chocolate glaze instantly, and nobody wants a soupy mess! We’ll use a gentle folding technique for the batter to keep air in, ensuring that classic fluffy texture that holds up beautifully to the heavy cream filling. Don’t rush the cooling steps, and I promise, you’ll have a masterpiece.
Ingredients
For the Main Batter:
2 cups all-purpose flour (Spoon and level this, please! Don’t scoop it straight from the bag.)
1 1/2 cups granulated sugar
1 tablespoon baking powder
1/2 teaspoon salt
1/2 cup unsalted butter, softened to true room temperature (this is non-negotiable for creaming properly)
3 large eggs, room temperature
1 cup whole milk, room temperature (I tested this with almond milk once and it actually made it even creamier, but whole milk gives the best traditional flavor)
2 teaspoons pure vanilla extract
For the Filling:
1 1/2 cups whole milk
1/2 cup heavy cream
1/2 cup granulated sugar
1/4 cup cornstarch (This is our thickening agent, don’t skimp or swap)
4 large egg yolks (save the whites for meringues later!)
2 tablespoons unsalted butter, cut into small pieces
1 teaspoon vanilla extract, or 1/2 vanilla bean, scraped
For the Glaze:
4 ounces high-quality bittersweet or semi-sweet chocolate, finely chopped (The better the chocolate, the better the shine!)
1/2 cup heavy cream
1 tablespoon unsalted butter (optional, for extra gloss)
Step-by-Step Instructions
Step 1: Preheat & Prep Pan
Preheat your oven to 350°F (175°C). You need two 9-inch round cake pans. Don’t use one deep pan—we need two thinner layers for the perfect filling-to-cake ratio. Grease the pans really well, line the bottoms with parchment paper circles, and then lightly flour the sides. This ensures zero sticking. Parchment is a lifesaver here; never skip it for a cake you plan to remove cleanly.
“Made the Easy Boston Cream Pie Classic Recipe tonight and wow — perfect weeknight dinner. Will definitely make again!”
Step 2: Mix Dry Ingredients
In a medium bowl, whisk together the flour, baking powder, and salt. Whisking does the job of sifting, saving you time, and it evenly distributes the leavening agents. Set this aside. You want it ready to go when the wet ingredients are mixed.
Step 3: Mix Wet Ingredients
In the bowl of your stand mixer (or using a hand mixer), cream the softened butter and sugar together on medium-high speed until it’s genuinely light and fluffy—this takes about 3 to 4 minutes. You’re looking for a pale yellow color. Beat in the eggs one at a time, making sure each is fully incorporated before adding the next. Mix in the vanilla extract.
Step 4: Combine
Now, alternate adding the dry ingredients and the milk to your butter mixture, starting and ending with the dry. Mix on low speed until *just* combined. I mean it—stop mixing the second you don’t see streaks of flour. Overmixing develops gluten, and we want tender cake, not chewy bread!
Step 5: Prepare Filling
While the cakes bake (or while they cool, ideally), make the custard. In a saucepan, whisk the milk and heavy cream together over medium heat until steaming, but don’t let it boil. In a separate bowl, whisk the sugar, cornstarch, and egg yolks until pale yellow and smooth. Slowly, very slowly, temper the hot milk mixture into the egg mixture, whisking constantly. Pour everything back into the saucepan. Cook over medium-low heat, whisking non-stop, until it bubbles and becomes very thick—like pudding. It has to boil for about a minute after it thickens to cook out the cornstarch flavor. Remove from heat, stir in the butter and vanilla (or bean seeds). Pour the filling into a shallow bowl, press plastic wrap directly onto the surface (this prevents that ugly skin from forming!), and chill completely, preferably for at least 3 hours.
Step 6: Layer & Swirl
Once the cakes are completely cool (warm cake + filling = disaster), carefully level the tops if they domed much. Place one layer on your serving plate. If the tops are perfectly flat, you can use them as is. If not, slice the dome off. Spread the cold, thick pastry cream evenly over the bottom layer, leaving a small half-inch border. Place the second cake layer gently on top. I usually chill the assembled cake for about 30 minutes here to let the layers settle before glazing.
Step 7: Bake
Divide the batter evenly between your two prepared pans. Bake for 28–32 minutes. The edges should be just starting to pull away from the sides, and a toothpick inserted into the center should come out clean or with a few moist crumbs clinging to it. Don’t overbake! This is where most people go wrong. They dry out the cake trying to make sure it’s ‘done.’
Step 8: Cool & Glaze
Let the cakes cool in the pans for about 10 minutes before inverting them onto a wire rack to finish cooling completely. While they cool, make the glaze. Heat the heavy cream until simmering, then pour it over the finely chopped chocolate in a heatproof bowl. Let it sit for 5 minutes, then whisk until smooth. Whisk in the tablespoon of butter if using. Let the glaze cool for about 10–15 minutes until it’s pourable but starting to thicken slightly—this is critical for a nice drape. Pour the glaze over the chilled, assembled cake, working quickly, letting it flow naturally over the top and down the sides. You can gently coax it with an offset spatula, but a natural drip looks best.
Step 9: Slice & Serve
This cake *must* chill after glazing for at least an hour for the chocolate to set up nicely. When serving, use a long, sharp, thin knife. Wipe the knife clean between each slice for those beautiful, clean cuts. Serve slightly cool, not ice-cold, as that lets the custard flavor bloom.
What to Serve It With
This dessert really sings on its own, but presentation and pairing can elevate it from “great homemade treat” to “showstopper.” For Breakfast? Hear me out: if you have leftovers (which is rare in my house), a small, warmed slice with a strong, black cup of coffee is pure heaven. The bitterness of the coffee cuts through the richness perfectly. If you’re serving it for a more formal Brunch setting, I like to plate individual slices with a very light dusting of powdered sugar around the plate edge and maybe a few fresh raspberries for a pop of color—the slight tartness of the berry is such a lovely contrast. For an elegant Dessert setting, you absolutely need a little something creamy on the side. I often whip a small bowl of unsweetened Whipped Cream—just heavy cream and a tiny splash of vanilla—and serve a dollop beside the slice. It makes the whole experience feel richer. When it comes to Cozy Snacks, if I’m feeling indulgent late at night, I’ll sometimes warm a small piece slightly (just 10 seconds in the microwave) so the chocolate glaze gets melty again. It’s pure bliss with a cozy mug of herbal tea, maybe peppermint or chamomile, to keep things light.
Top Tips for Perfecting Your Boston Cream Pie
I’ve really put this recipe through the wringer, and over the years, I’ve picked up a few crucial details that separate an okay result from an absolutely show-stopping one. First, the Mixing Advice: when combining wet and dry ingredients in Step 4, remember the goal is to hydrate the flour, not develop the gluten network. I use the lowest speed on my mixer, and when I get near the end, I often switch to folding by hand with a rubber spatula. Stop as soon as the last streak of flour disappears. If you see white powder, keep folding. If the batter looks smooth, stop immediately—even if you think it needs “just a little more mixing.” Trust me on this one; that’s the secret to that melt-in-your-mouth texture.
“New family favorite! This Easy Boston Cream Pie Classic Recipe was so flavorful and ridiculously easy. Crowd-pleaser for sure.”
For the Filling Consistency: When you make the custard, make sure you bring it to a full, rolling boil *after* it thickens. I know it feels scary to boil egg yolks, but the cornstarch needs that heat to activate fully. If you don’t boil it long enough, the filling will weep or become runny when it sits. I always whisk vigorously while it boils for a full 60 seconds. Also, chilling the custard is non-negotiable. If you try to assemble with warm or even room-temperature custard, it will make the cake soggy right where it touches, and it won’t hold its shape when you slice it. Make the custard first and let it chill while you bake and cool the cake layers.
Regarding Glaze Variations: While the bittersweet chocolate is my go-to, sometimes I want something slightly softer. For that, I swap the heavy cream for evaporated milk in the glaze, which results in a softer, fudgier topping that sets up less hard. If you want an intensely Dark Chocolate flavor, bloom the cocoa powder in a tiny bit of hot water before mixing it with the melted chocolate and cream—it deepens the color and intensifies the cocoa notes beautifully. The optional tablespoon of butter in the glaze is my little trick; it adds an unbeatable sheen that looks professional under any light.
Finally, a note on Baking Tips: Since we are using two 9-inch pans, make sure your oven racks are situated so that the pans are not touching each other or the oven walls. Good air circulation around the pans ensures even baking. If your oven runs hot, drop the temperature to 325°F and bake a few minutes longer. The goal is a light golden edge, not a brown one.
Storing and Reheating Tips
Because this dessert involves a dairy-heavy custard filling, storage is important to maintain freshness and safety. For Room Temperature storage, this is tricky. If your kitchen is cool (under 70°F) and you plan to eat it within 4-6 hours of assembly, you can leave it covered loosely on the counter. Any longer than that, and you risk the custard—bring it inside! For best results, especially if you’re making this ahead of time, opt for the refrigerator. For Refrigerator Storage, always store it in an airtight container or covered tightly with plastic wrap right on the serving plate. It keeps beautifully for up to three days. The cake layers actually soften slightly after the first day in the fridge, absorbing more custard flavor, which I personally love. The glaze stays firm, of course.
If you need to keep it longer, Freezer Instructions are viable, but you have to be strategic about the glaze timing. If you freeze the assembled cake *without* the chocolate glaze, it lasts wonderfully for up to two months. Thaw overnight in the refrigerator before glazing. If you freeze it with the glaze on, sometimes the chocolate can crack when thawing, though it still tastes fine. To thaw, move the wrapped cake to the fridge the day before serving. When ready to eat, let it sit on the counter for about an hour before slicing. For that fresh-from-the-oven feel, you can gently microwave a slice for about 10-15 seconds, which makes the custard warm and gooey—pure comfort! Always use Glaze Timing Advice in your favor; glazing right before serving is best for aesthetics, but glazing the day before works well if you’re storing it in the fridge, provided it’s tightly covered.
Frequently Asked Questions
Final Thoughts
Honestly, making this Boston cream pie recipe feels like unlocking a secret level of home baking competence. It’s impressive, it’s nostalgic, and it tastes like pure, unadulterated comfort. I hope you give yourself the gift of making this classic dessert. Remember that the secret weapon isn’t fancy equipment; it’s patience, especially when chilling that custard and letting the glaze set properly. Don’t rush those moments! When you finally slice into that perfectly set layer of bright yellow cream nestled between those soft cake layers, you’ll understand why this dessert has been famous for over a century. It’s a labor of love, but the reward is absolutely worth the effort. If you enjoy this style of cake, you might also want to check out my recipe for my classic French Vanilla Pudding Cake—it uses similar techniques but offers a slightly different, lighter texture. Let me know in the comments below if you tried the whole vanilla bean in the custard, or if you stuck with extract! I’m always so curious how everyone personalizes their bakes. Happy baking, my friend, and I can’t wait to hear how yours turns out!
Boston cream pie recipe
Ingredients
For the Pastry Cream
- 4 large egg yolks room temperature
- 0.75 cup granulated sugar
- 4 tablespoons cornstarch
- 2 cups whole milk room temperature
- 2 tablespoons unsalted butter
- 2 teaspoons vanilla extract
For the Cake Layers
- 1.75 cups all-purpose flour (measured properly)
- 2 teaspoons baking powder
- 0.5 teaspoon salt
- 3 large eggs room temperature
- 1.5 cups granulated sugar
- 1 tablespoon vanilla extract
- 0.75 cup whole milk
- 0.5 cup unsalted butter
For the Chocolate Ganache
- 6 ounces semi-sweet chocolate chips
- 2 tablespoons corn syrup
- 0.5 cup heavy whipping cream
Instructions
To Make the Pastry Cream
- Place egg yolks in a medium bowl and gently beat them. Set aside.
- In a large saucepan, whisk together sugar and cornstarch until no lumps remain. Stir in the whole milk.
- Cook the mixture over medium heat, stirring continuously, until it just begins to thicken and simmer. Do not let it boil vigorously.
- Temper the egg yolks: Add a small amount of the hot milk mixture to the beaten egg yolks, whisking quickly. Then, pour the egg yolk mixture back into the saucepan with the remaining milk mixture, whisking constantly.
- Return the pan to the heat and bring to a light boil, stirring continuously, for 1 minute until large bubbles appear. Be careful not to overcook.
- Remove from heat and stir in the butter and vanilla extract until smooth. Pour into a bowl, cover with plastic wrap pressed directly against the surface to prevent a skin from forming, and refrigerate for 1-2 hours until completely cool. If lumpy, you can strain it.
To Make the Cake Layers
- Preheat your oven to 350°F (175°C). Prepare two 9-inch round cake pans by greasing the sides and lining the bottoms with parchment paper circles.
- In a medium bowl, whisk together the all-purpose flour, baking powder, and salt. Set aside.
- In a large mixer bowl, combine the eggs, granulated sugar, and vanilla extract. Whip on high speed for about 4 minutes until the mixture is pale, fluffy, and thickened.
- While the eggs are whipping, heat the whole milk and butter in a small saucepan until the butter is melted and the mixture is very hot (it doesn't need to boil).
- Gently fold half of the dry ingredients into the whipped egg mixture until mostly combined. Then, fold in the remaining dry ingredients until just well combined.
- Add the hot milk and butter mixture to the cake batter and gently whisk until thoroughly combined and smooth.
- Divide the batter evenly between the prepared cake pans. Bake for 20-23 minutes, or until a toothpick inserted into the center of the cakes comes out clean.
- Remove cakes from the oven and let them cool in the pans for 2-3 minutes, then invert them onto a wire rack to cool completely.
To Assemble the Boston Cream Pie
- Once the pastry cream and cake layers are completely cooled, prepare the chocolate ganache. Place chocolate chips and corn syrup in a medium-sized heatproof bowl.
- Heat the heavy whipping cream in a small saucepan until it just begins to boil. Pour the hot cream over the chocolate chips and corn syrup. Let it sit for 1-2 minutes, then stir until smooth and glossy.
- Level the tops of the cooled cake layers if necessary. Place one cake layer on a serving platter. Stir the cooled pastry cream to smooth it out, then spread it evenly over the cake layer, leaving about 1 inch from the edge for spreading. Carefully place the second cake layer on top.
- Pour the chocolate ganache over the top of the cake, spreading it gently towards the edges and allowing some to drip decoratively down the sides.
- Refrigerate the Boston cream pie until ready to serve. Store any leftovers in an airtight container in the refrigerator for 3-4 days.


