Okay, so you know how some recipes just become *the* recipe? The one you make on repeat, the one everyone asks for, the one that feels like a warm hug on a plate? This Banana Bread strawberry swirl loaf is absolutely that for me. It’s my go-to when I have a few overripe bananas staring at me, begging for a purpose beyond the compost bin. And the strawberry? Oh, it’s just the cherry on top – or, well, the strawberry swirl! It takes that classic, comforting banana bread and elevates it into something truly special. Think of it as your favorite cozy sweater, but for your taste buds. I’ve experimented with countless banana bread variations over the years, but this one… this one is a game-changer. It’s proof that sometimes, the simplest additions make the biggest difference. If you’ve ever thought banana bread was a bit… well, *basic*, prepare to have your mind changed. This is banana bread with personality, and it’s guaranteed to be a hit.
Thank you for reading this post, don't forget to subscribe!What is banana bread?
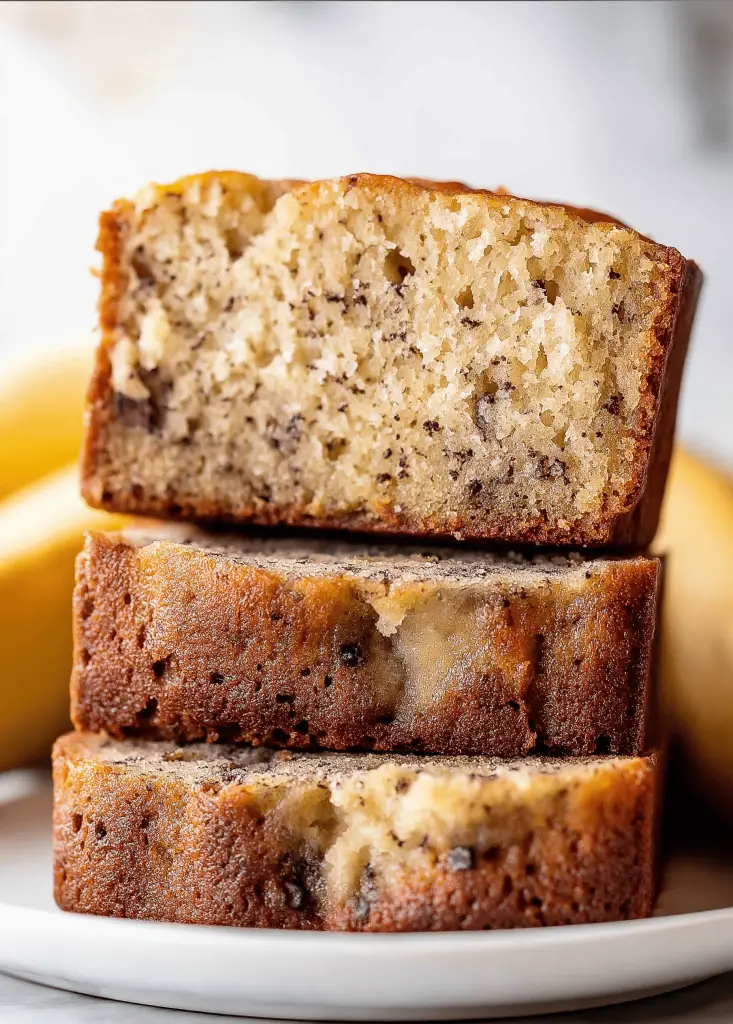
So, what exactly is this magical creation? At its heart, it’s your beloved, moist, and flavorful Banana Bread, but with a vibrant, slightly tart strawberry ribbon running through it. It’s not just a few chopped strawberries thrown in (though that’s good too!), but a beautiful, marbled effect that looks as stunning as it tastes. The name itself tells the story: it’s the comforting familiarity of banana bread, that comforting aroma that fills your kitchen, combined with the bright, fresh burst of strawberries. It’s like a classic love story with a delightful plot twist! It’s essentially a hug in loaf form, made even more interesting with that pop of fruity goodness. This isn’t your grandma’s plain banana bread (though I love hers too!), this is banana bread with a modern, fun flair that still feels wonderfully homemade and approachable.
Why you’ll love this recipe?
Let me count the ways! First, the flavor. Oh, the FLAVOR! You get that deep, caramel-sweetness from the ripe bananas, perfectly balanced by the slightly tangy, juicy strawberry swirl. It’s a symphony of sweet and fruity. It’s not overly sweet, which I really appreciate, and the textures are just divine – moist, tender crumb from the Banana Bread, with little pockets of tender strawberry goodness. And the simplicity? You won’t believe how easy this is. If you can stir a few things together, you can make this. No fancy techniques, no weird ingredients. My kids, who can be super picky eaters, actually devour this. It’s a lifesaver on busy mornings when we need something quick and satisfying, or as a special treat for after school. Plus, it’s incredibly cost-efficient. Those overripe bananas that would otherwise go to waste? They become the star of the show! And the versatility! You can enjoy a slice for breakfast, a mid-afternoon snack, or even as a light dessert with a dollop of yogurt or cream. What I love most about this recipe is how it feels both comforting and a little bit fancy, all at once. It’s the perfect thing to whip up when you’re craving something sweet but don’t want to spend hours in the kitchen. It’s a winner, hands down.
How do you make banana bread with strawberries?
Quick Overview
This recipe is wonderfully straightforward. You’ll start by mashing your ripe bananas and mixing them with wet ingredients, then combine that with your dry ingredients. While that’s happening, you’ll quickly whip up a simple, vibrant strawberry swirl. The magic happens when you layer the batter and swirl in the strawberry mixture, creating those beautiful marbled patterns. It bakes up into a moist, fragrant loaf that’s perfect for slicing and enjoying. It’s really that easy to transform a classic into something spectacular!
Ingredients
For the Main Batter:
3 very ripe bananas, mashed (the spottier the better, trust me!)
1/3 cup unsalted butter, melted and slightly cooled
1/2 cup granulated sugar (you can adjust slightly depending on banana sweetness)
1 large egg
1 teaspoon vanilla extract
1 1/4 cups all-purpose flour
1 teaspoon baking soda
1/2 teaspoon ground cinnamon
1/4 teaspoon salt
For the Filling:
1 cup fresh or frozen strawberries, hulled and finely chopped (if frozen, no need to thaw)
2 tablespoons granulated sugar
1 teaspoon lemon juice (optional, but adds brightness)
For the Glaze:
1/2 cup powdered sugar
1-2 tablespoons milk or lemon juice (adjust for desired consistency)
Step-by-Step Instructions
Step 1: Preheat & Prep Pan
First things first, get your oven preheating to 350°F (175°C). Grab a standard Loaf Pan (about 9×5 inches). I like to grease it really well with butter or cooking spray, and then line it with parchment paper. Leave a little overhang on the sides – this makes it super easy to lift the finished loaf out later. That little bit of extra effort saves you a headache when it’s time to cool!
Step 2: Mix Dry Ingredients
In a medium bowl, whisk together your flour, baking soda, cinnamon, and salt. Give it a good whisk until everything is evenly distributed. This step is super important for ensuring your leavening agent (the baking soda) is spread out, so you get an even rise. You don’t want any weird dense spots!
Step 3: Mix Wet Ingredients
In a larger bowl, mash those ripe bananas really well. You want them to be quite smooth, but a few little lumps are totally fine; they add character! Then, stir in the melted butter, granulated sugar, egg, and vanilla extract. Mix until everything is well combined and looks like a lovely, creamy base.
Step 4: Combine
Now, pour the dry ingredients into the wet ingredients. Gently fold them together with a spatula until just combined. Seriously, *just* combined. Stop as soon as you don’t see any more dry streaks of flour. Overmixing is the enemy of tender quick breads, it can make them tough. A few small lumps in the batter are perfectly okay – it’s better than overworking it!
Step 5: Prepare Filling
While your batter is resting for a moment, let’s get that strawberry goodness ready. In a small bowl, combine the finely chopped strawberries, 2 tablespoons of sugar, and the optional lemon juice. Stir it all together. If you’re using fresh strawberries, they’ll start to release their juices. If you’re using frozen, they’ll thaw and create a lovely, slightly syrupy mixture.
“The Easy Banana Bread with Roasted Strawberries turned out amazing. My kids asked for seconds. Saving this one!”
Step 6: Layer & Swirl
Now for the fun part! Pour about half of your Banana Bread batter into your prepared loaf pan, spreading it out evenly. Spoon about half of the strawberry mixture over the top. Then, add the remaining banana bread batter, followed by the rest of the strawberry mixture. Now, take a knife or a skewer and gently swirl the strawberry mixture into the batter. Don’t over-swirl, you want distinct ribbons, not a uniform pink color. Just a few gentle passes will do the trick!
Step 7: Bake
Pop that beautiful loaf into your preheated oven. Bake for about 50-65 minutes. Baking times can vary depending on your oven, so it’s important to check for doneness. You’ll know it’s ready when a toothpick inserted into the center (avoiding any obvious strawberry pockets) comes out clean or with just a few moist crumbs attached. If the top starts to brown too quickly, you can loosely tent it with aluminum foil.
Step 8: Cool & Glaze
Once it’s baked, let the loaf cool in the pan on a wire rack for about 15-20 minutes. This helps it set up properly. Then, use those parchment paper overhangs to carefully lift the loaf out of the pan and let it cool completely on the wire rack. Once it’s totally cool, you can whip up the glaze: whisk together the powdered sugar and milk (or lemon juice) until smooth. Drizzle it over the top of the cooled loaf. Let the glaze set for a bit before slicing.
Step 9: Slice & Serve
The hardest part is waiting for it to cool completely, especially with that amazing glaze! Once cooled and the glaze has set, slice it up with a serrated knife for clean cuts. Enjoy it at room temperature. The combination of the tender banana bread and the sweet, slightly tart strawberry swirl is pure bliss.
What to Serve It With
Honestly, this banana bread strawberry swirl loaf is a star all on its own! But if you’re looking to round out a meal or add a little something extra, here are some ideas.
For Breakfast: A warm slice is fantastic on its own with your morning coffee. For a slightly more indulgent start, pair it with a side of creamy Greek yogurt and a sprinkle of granola. It’s a quick and satisfying option for busy weekdays.
For Brunch: Elevate it with a dollop of whipped cream or a light crème fraîche. It looks beautiful on a brunch spread alongside fresh fruit salad and maybe some savory breakfast items like scrambled eggs or bacon. A nice glass of sparkling rosé or mimosas would be a lovely beverage pairing.
As Dessert: This makes a wonderful light dessert. Serve a generous slice with a scoop of vanilla bean ice cream or a drizzle of raspberry sauce for an extra fruity punch. It’s not too heavy after a meal, but still feels like a real treat.
For Cozy Snacks: On a rainy afternoon, there’s nothing better than a thick slice of this with a steaming mug of tea or hot chocolate. My kids love it as an after-school snack with a glass of cold milk. It’s the ultimate comfort food, elevated.
My family has a tradition of having this on Sunday mornings – it makes the weekend feel extra special without any fuss.
Top Tips for Perfecting Your Banana Bread Strawberry Swirl Loaf
After making this countless times, I’ve picked up a few tricks that I think really make a difference. These aren’t complicated, but they are the little things that take it from good to truly amazing.
Zucchini Prep: Wait, zucchini? Oh, I meant BANANA prep! My apologies, my brain is on overdrive today. For the bananas, you absolutely want them RIPE. I’m talking brown spots, maybe even looking a bit mushy. The riper they are, the sweeter and more flavorful your bread will be. Just mash them well with a fork; you don’t need a mixer for this part. A few tiny lumps are perfectly fine and add texture.
Mixing Advice: This is crucial for tender quick breads. Once you combine the wet and dry ingredients, fold them *just* until they come together. Seriously, stop mixing as soon as you don’t see big patches of dry flour. Overmixing develops the gluten too much, which can lead to a tough, dense loaf instead of a light and tender one. Embrace those few lumps!
Swirl Customization: The swirl is where you get to play! For a more dramatic swirl, don’t overmix the strawberry filling into the batter. Just a few passes with a knife or skewer is all you need to create those beautiful marbled patterns. If you want bolder color, you can add a tiny drop of red food coloring to your strawberry mixture, but I usually find the natural color is beautiful enough.
Ingredient Swaps: If you don’t have strawberries, you could try raspberries or even a mixed berry blend for the swirl. For a dairy-free version, I’ve had success using a neutral oil like vegetable or canola oil instead of butter, and a plant-based milk in the glaze. For the flour, I’ve successfully used a gluten-free all-purpose blend (1-to-1 style) with good results, though the texture might be slightly denser.
“I don’t know if I’ve ever eaten a better Easy Banana Bread with Roasted Strawberries. The rub alone is wonderful, but the sauce??? Over the top!”
Baking Tips: Every oven is different! Start checking for doneness around the 50-minute mark. Use the toothpick test – it’s your best friend. If the top is browning too quickly before the inside is cooked, you can loosely tent the loaf pan with aluminum foil. I usually bake mine on the middle rack for even heat distribution.
Glaze Variations: The glaze adds a lovely finishing touch, but it’s optional. If you prefer a less sweet topping, you can simply dust the cooled loaf with a bit of powdered sugar. For a tangy kick, use lemon juice instead of milk in the glaze. You can also add a little vanilla extract to the glaze for extra flavor.
Storing and Reheating Tips
This banana bread strawberry swirl loaf is so good, you’ll want to savor every bite, so knowing how to store it is key. I usually make one that disappears within a day or two, but if you need to keep it longer, here’s what I do.
Room Temperature: Once completely cooled (and the glaze is set, if you added it), you can store the loaf wrapped tightly in plastic wrap or in an airtight container at room temperature. It should stay fresh and moist for about 2-3 days. This is perfect for when you plan to eat it within a couple of days – it’s often even more moist on day two!
Refrigerator Storage: For longer storage, up to a week, keep it in an airtight container in the refrigerator. Be aware that refrigeration can sometimes dry out baked goods a bit, so it’s best to reheat it slightly before enjoying. The flavors actually meld nicely in the fridge, so it’s still delicious.
Freezer Instructions: If you want to keep this treasure for longer, freezing is your best bet. Wrap the cooled loaf tightly in plastic wrap, then in a layer of aluminum foil, or place it in a freezer-safe bag. It should keep well in the freezer for up to 3 months. When you’re ready to enjoy, thaw it overnight in the refrigerator, or at room temperature for a few hours. You can also reheat slices after thawing.
Glaze Timing Advice: If you plan to store your loaf for more than a day or two, or especially if you’re freezing it, I recommend glazing it *after* you thaw and reheat it. If you glaze it before freezing, the moisture from the bread and freezer can sometimes make the glaze a bit sticky or uneven. Glazing just before serving ensures it looks and tastes its best.
Frequently Asked Questions
Final Thoughts
So there you have it – my go-to banana bread strawberry swirl loaf. It’s more than just a recipe to me; it’s a taste of home, a reliable treat, and a fantastic way to use up those overripe bananas before they go to waste. The combination of comforting banana bread and vibrant strawberry is just irresistible, and the easy swirl technique makes it feel special without any added stress. I truly believe this is a recipe everyone should have in their repertoire, whether you’re a seasoned baker or just starting out. It’s forgiving, it’s delicious, and it always brings smiles. If you love this, you might also enjoy my recipe for [Link to a similar recipe, e.g., “Lemon Blueberry Scones”] or my “Chocolate Chip Banana Bread” for another twist on a classic!
I can’t wait to hear how yours turns out! Please leave a comment below with your thoughts, any variations you tried, or how your family enjoyed it. Happy baking!

banana bread strawberry
Ingredients
Main Ingredients
- 1.25 cups strawberries diced
- 3 medium ripe bananas mashed
- 2 tbsp unsweetened apple sauce
- 1.25 cups white whole wheat flour or all-purpose
- 0.75 tsp baking soda
- 0.25 tsp kosher salt
- 2 tbsp butter softened
- 0.5 cup light brown sugar not packed
- 2 large egg whites
- 1 tsp vanilla extract
- baking spray for greasing pan
Instructions
Preparation Steps
- Preheat oven to 350°F (175°C). Lightly spray a loaf pan with baking spray.
- Place the diced strawberries on a baking sheet and roast for 25 minutes, then remove and set aside to cool.
- In a medium bowl, combine flour, baking soda, and salt with a wire whisk. Set aside.
- In a large bowl, cream softened butter and light brown sugar with an electric mixer until light and fluffy.
- Add egg whites, mashed bananas, apple sauce, and vanilla extract to the creamed mixture, and beat at medium speed until thick. Scrape down the sides of the bowl.
- Gradually add the flour mixture to the wet ingredients and blend at low speed until just combined. Be careful not to overmix.
- Gently fold in the roasted strawberries. Pour the batter into the prepared loaf pan. Bake in the center rack for about 50 minutes, or until a toothpick inserted into the center comes out clean.
- Let the bread cool in the pan for at least 20 minutes before removing it to a wire rack. The bread should be at room temperature before slicing for best results.


