There’s just something about pulling out a plate of warm, fresh green bean bundles that instantly makes everyone feel at home. I remember my grandma casually rolling these little bundles of goodness and how her kitchen would fill with the aroma of garlic, butter, and just a hint of nuttiness from toasted almonds. Honestly, this recipe has been a staple at my family dinners for years now— it’s simple, hearty, and so sadly underrated. Sometimes I think people overlook how elegant and comforting a few tender Green Beans, wrapped and roasted, can be. I always do this when I want something that’s not just delicious but looks impressive enough to serve to friends without much fuss. Plus, they disappear in minutes at my house, which is a testament to how crave-worthy they really are. Keep reading— I’m about to share my secret tricks, and trust me on this one, once you try these green bean bundles, they’ll become a regular in your recipe lineup too!
Thank you for reading this post, don't forget to subscribe!What is green bean bundle?
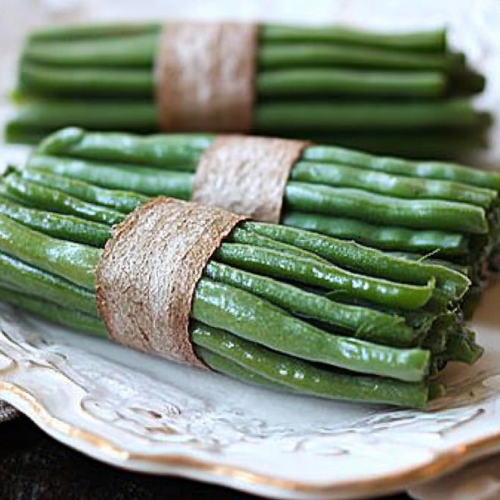
Think of Green Bean bundles as little pockets of crunchy, savory goodness packed with flavor, wrapped up like gifts. It’s essentially fresh green beans tied into small bunches, then baked or roasted until tender, with a divine coating of butter, garlic, and sometimes sprinkled with nuts or crispy bacon bits. The name’s pretty straightforward—they’re just bundles of green beans, but the way they’re assembled and baked makes them so much more than just a veggie side. It’s like a fancy, yet totally doable, way to elevate your typical green bean side dish. The concept probably originated from classic French or Mediterranean kitchens, where presentation and flavor go hand in hand, but honestly, it’s super easy to make at home and always looks like you put a lot of effort in—so it’s perfect for both weeknights and special dinners. My version, of course, has a few personal twists I think you’re going to love.
Why you’ll love this recipe?
What I love most about these green bean bundles is how they strike that perfect balance between elegance and simplicity. First off, the flavor: tender green beans with that whisper of garlic and butter— it’s comforting, but also flavorful enough to impress. The nutty crunch from the toasted almonds or crispy bacon adds that surprise element that keeps everyone reaching for seconds. Plus, the whole thing comes together with hardly any fuss: you just tie, bake, and serve— no complicated steps involved. It’s written all over my face how much I adore this dish because it’s one of those rare recipes that taste gourmet but are insanely practical. I’ve made this for fancy dinner parties, and my guests always ask for the recipe. Also, it’s budget-friendly; green beans are one of the most affordable veggies, and the ingredients are stuff you usually already have in the pantry. The versatility is endless— I’ve added cheese, lemon zest, even a dash of hot sauce for extra kick. Trust me on this: once you try it, it’ll become a go-to, especially on nights when you want Comfort Food that’s still impressive.
How do I make green bean bundles?
Quick Overview
This recipe is as easy as it gets— a handful of fresh green beans, some flavor-packed butter or olive oil, garlic, and your choice of crunch, all wrapped into little bundles. You start by trimming the beans, then tying them into small bunches with kitchen twine or toothpicks. After tossing with a simple Garlic Butter mixture, you arrange them on a baking sheet, sprinkle with nuts or bacon if you like, and bake until tender and slightly caramelized. The magic is in the roasting— it deepens the flavors and gives the green beans a satisfying crisp. It’s perfect for busy weeknights when you need something quick, but still want to serve up something special. Once out of the oven, a quick drizzle of lemon or a sprinkle of parmesan elevates these little bundles into a real crowd-pleaser. The best part? It’s practically hands-off— the oven does all the work while you set the table.
Ingredients
For the Main Bundles:
– 1 pound fresh green beans (look for firm, bright green beans— fresher is always better)
– 2 tablespoons olive oil or melted butter (I prefer butter for richness)
– 3 cloves garlic, minced (don’t skimp on garlic— it’s the flavor backbone)
– Salt and freshly ground Black Pepper, to taste
– Kitchen twine or toothpicks (for tying the bundles)
For the Crunch & Garnish:
– 1/3 cup sliced almonds or chopped pecans, toasted (trust me, toasted nuts make all the difference)
– 4 slices bacon, cooked and crumbled (optional, but adds a smoky layer)
– Lemon zest or freshly squeezed lemon juice (brightens everything up)
– Grated Parmesan or crumbled feta (if you’re feeling cheesy)
Step-by-Step Instructions
Step 1: Preheat & Prep Pan
Set your oven to 375°F (190°C). Line a baking sheet with parchment paper or a silicone mat— this makes cleanup a breeze. Meanwhile, rinse your green beans and trim off the stem ends. I always do this under cool running water and pat dry so they don’t steam in the oven.
“The Easy Bacon Green Bean Bundles Delight turned out amazing. My kids asked for seconds. Saving this one!”
Step 2: Mix Dry Ingredients
In a small bowl, whisk together the minced garlic, salt, and pepper. This little step ensures your garlic is evenly distributed and your seasoning balanced. I tested this with a dash of smoked paprika once, and wow—it added a subtle smoky undertone that’s fantastic.
Step 3: Mix Wet Ingredients
In another bowl, melt the butter or whisk together the olive oil with a squeeze of lemon juice if you’re using it. Add the minced garlic mixture right into it. The smell alone will make your kitchen smell like a cozy café.
Step 4: Combine
Now, toss your green beans in this garlicky butter mixture until they are nicely coated. It’s best to do this in a large bowl, using your hands or tongs so everything is evenly flavored. Avoid over-soaking—just a good toss to coat is enough.
Step 5: Prepare Filling
If you’re adding toasted nuts or bacon, have them ready now. Toast your sliced almonds in a dry skillet over medium heat until golden and fragrant—about 3 minutes. For bacon, cook until crispy, crumble, and set aside. Both add wonderful texture and flavor.
Step 6: Layer & Swirl
Lay out your green bean bundles on the baking sheet, about 2-3 inches apart. Tie each into a small bunch with kitchen twine or toothpicks. If you’re feeling decorative, arrange them in different directions for a charming presentation. If you want more marbling, give each bundle a gentle swirl after tying, so the garlic butter seeps into the beans for extra flavor.
Step 7: Bake
Pop the tray into your preheated oven. Roast for 20-25 minutes, turning once halfway through. You want the beans tender but still with a slight crunch, and the tops caramelized. Keep an eye on them—every oven varies a bit, so start checking around the 20-minute mark. If your beans are thick or very fresh, you might need an extra 5 minutes.
Step 8: Cool & Glaze
Once baked, remove from oven and let them cool just a tad. If you’re adding a fresh squeeze of lemon, do it now—this brightens the flavors. Drizzle with a little more melted butter or sprinkle with Parmesan and toasted nuts for that wow factor.
Step 9: Slice & Serve
Carefully slide off the twine or remove toothpicks. Plate the bundles carefully—these look adorable when served directly on a platter, with some extra lemon wedges on the side. I love the look of them arranged in a little circle, garnished with more nuts or a sprinkle of herbs. They’re perfect warm or at room temperature, so I often make these ahead and just give them a quick warm-up before serving.
“I don’t know if I’ve ever eaten a better Easy Bacon Green Bean Bundles Delight. The rub alone is wonderful, but the sauce??? Over the top!”
What to Serve It With
Honestly, these green bean bundles go with just about anything. They’re a natural side for roasted chicken, grilled steak, or fish. I especially love serving them alongside creamy mashed potatoes or fluffy rice—they soak up all those garlicky juices beautifully. For a more festive vibe, I sometimes add a drizzle of balsamic glaze or a sprinkle of crumbled feta on top. When I serve these at my family gatherings, I like to pair them with a chilled crisp white wine or sparkling water infused with lemon and mint. For brunches, they’re perfect with a poached egg on top or alongside flaky croissants. My kids actually ask for this all the time—because who can resist tender green beans wrapped in buttery garlic? Trust me, once you see how pretty and flavorful they are, you’ll be hooked too!
Top Tips for Perfecting Your Green Bean Bundles
Every time I make these, I learn a little more. First, use fresh beans—seriously, the difference in flavor and texture is night and day. If your beans are a little limp, toss them in ice water for 10 minutes—they perk right up! When tying the bundles, don’t be too tight—just enough to hold the beans together; otherwise, they might break or tear during baking. I tested this with slightly larger beans, and leaving a tiny bit of slack helps keep everything intact. For the garlic butter, I’ve experimented with adding a pinch of red pepper flakes or a splash of soy sauce—that adds a lovely umami kick that’s so tempting. If you want a really crispy top, broil for the last 2-3 minutes carefully—keep a close eye, as it can go from perfect to burnt fast! Personal lessons learned: toast your nuts thoroughly for maximum flavor, and always prep everything in advance—these come together so quickly once you’re at the oven.
Storing and Reheating Tips
If you have leftovers—ha!—these are surprisingly good cold or reheated. Store in an airtight container in the fridge for up to 2 days. To reheat, just pop them in a 350°F (175°C) oven for 10 minutes, or microwave briefly—cover loosely so they don’t dry out. If you want to keep that crispy edge, give them a quick broil for a minute or two. For longer storage, you can freeze the bundles unbound—wrap tightly in plastic wrap, then foil, and freeze up to a month. Thaw in the fridge overnight when ready to serve, then warm as above. I avoid adding the glaze before storing—sometimes it can make the nuts soggy—so I wait to add that just before serving for that fresh, crunchy finish. Trust me, reheated or not, these green bean bundles are like a warm hug on your plate.
Frequently Asked Questions
Final Thoughts
There’s a cozy, nostalgic feeling that comes with making and sharing these green bean bundles. They’re a special yet fuss-free way to serve up a veggie that everyone will actually want to eat. I love how they look adorable on the plate—like tiny, elegant presents— and how versatile they are. Whether you’re whipping these up for a weeknight dinner or a fancy dinner party, I promise they’ll steal the show. Once you’ve tried tying those green beans into little bundles and roasting them to perfection, you’ll find yourself making this dish again and again. So grab some fresh beans, get your garlic ready, and enjoy the process—this is one of those recipes that’s good for the soul. Happy baking, and I can’t wait to hear how yours turns out! Feel free to leave a comment below if you try any fun twists or want to share your experience. Cheers to delicious, beautiful food!
green bean bundles
Ingredients
Main Ingredients
- 1 pound Haricots verts or green beans ends trimmed
- 4 slices center cut bacon cut in half
- 1 none olive oil spray
- 0.125 tsp garlic powder
- none salt pinch
- none fresh cracked pepper to taste
Instructions
Preparation Steps
- Blanch the green beans for 3 minutes, then dry on paper towel.
- Preheat oven to 400°F. Spray a baking sheet with olive oil spray.
- Make 8 even bundles and wrap each bundle (about 1.6 oz each) in one half slice of bacon.
- Place the bundles seam side down on the baking sheet.
- Lightly spray the tops with a little more oil, season with salt, pepper, and garlic powder, then bake for about 14-16 minutes.


