If you’re like me, you probably grew up loving that gooey, cheesy classic—mac and cheese. But as I got older and started experimenting with healthier twists, I realized how crave-worthy a cauliflower-based version can be. It’s one of those dishes that feels indulgent but secretly sneaks in vegetables, making it perfect for weeknights when everyone’s hungry and you’re wanting something comforting yet a bit lighter. I always do this when I want something cheesy without feeling heavy afterward. Plus, the smell alone—think melted cheese and roasted cauliflower—brings everyone straight to the kitchen. This cauliflower mac and cheese has become a household favorite, especially because it’s surprisingly easy and flexible. My kids ask for this all the time — they never believe it’s mostly cauliflower! Trust me on this one: once you try it, it’s going to be your new go-to Comfort Food, no matter the season.
Thank you for reading this post, don't forget to subscribe!What is Cauliflower Mac and Cheese?
Think of cauliflower mac and cheese as a cozy, veggie-packed upgrade to the traditional bowl. It’s essentially a creamy, cheesy dish where cauliflower acts as the base instead of pasta—though I always add a bit of pasta for that perfect balance. The idea is to blend cooked cauliflower into a smooth sauce, then toss it all with al dente pasta and plenty of melted cheese. The name comes from the fact that it takes the comforting essence of classic mac and cheese but swaps out the carb-heavy pasta for cauliflower, making it not only tastier but friendlier to your waistline and your veggie goals. It’s like giving the kids (and honestly, yourself) a big warm hug with every bite. And if you’re gluten-free or just trying to cut carbs, this dish is a total game-changer, because the creamy cauliflower sauce feels decadent without loading up on flour or bread crumbs.
Why you’ll love this recipe?
What I love most about this cauliflower mac and cheese is how flexible and forgiving it is. It’s like a blank canvas that you can tailor to your mood or what you have in the fridge. The flavor? Oh, it’s rich, cheesy, and totally addictive. The cauliflower adds a subtle earthiness, balancing out the gooey cheese with a hint of nuttiness that I find surprisingly delicious. Plus, it’s ridiculously simple to make—no fancy cooking skills required. Just a quick roast or boil of the cauliflower, blend everything smooth, and stir in the cheese—that’s it! It’s budget-friendly too because cauliflower and cheese are pretty inexpensive. I’ve tested this with different cheeses—cheddar, Gruyère, even a dash of Parmesan—and it always turns out amazing. And the best part? My kids actually ask for seconds of this, which is rare in our house. Whether you want a comforting weeknight dinner or a side to wow your friends at potlucks, this dish is a total lifesaver.
How do I make cauliflower mac and cheese?
Quick Overview
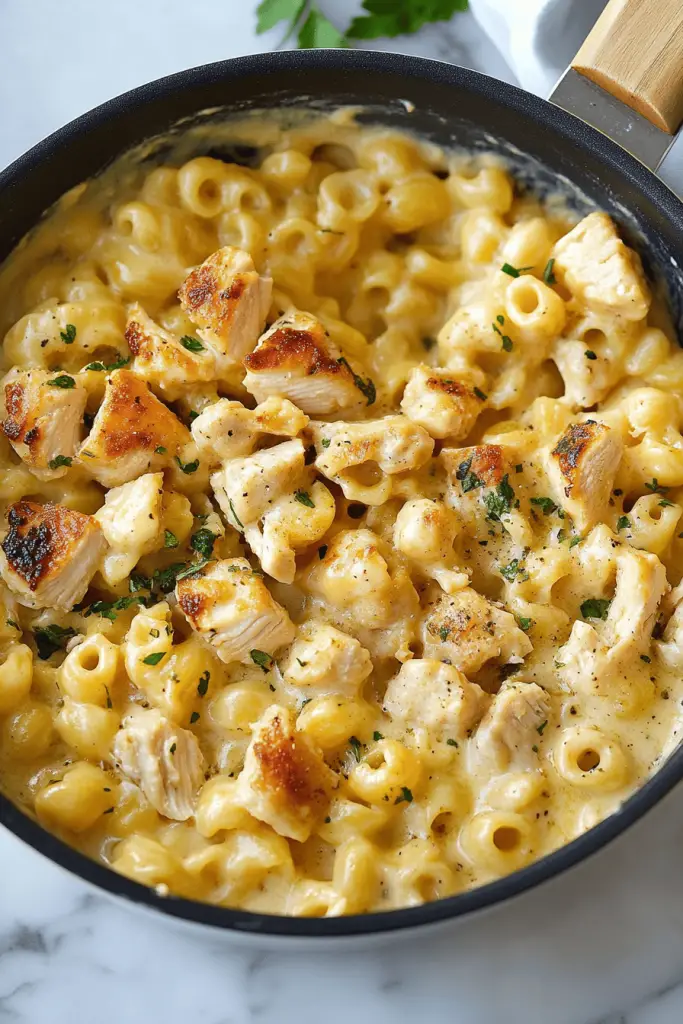
This dish starts with roasting or boiling cauliflower until it’s tender. Then, I blend it into a silky sauce with some milk, cheese, and a few flavor-enhancing ingredients. Meanwhile, I cook pasta just until al dente. After that, I combine everything, layer it with extra cheese or toppings if I feel fancy, and bake until bubbly. The result? An irresistibly creamy, cheesy casserole that feels like a hug in a bowl. It’s fast enough for busy weeknights but fancy enough to serve to guests.
Ingredients
What is the main sauce?
– 1 large head cauliflower (about 1 to 1 ½ pounds), washed and chopped
– 1 cup milk (whole, almond, or oat for dairy-free)
– ½ cup grated cheddar cheese (or your favorite melting cheese)
– 2 cloves garlic, minced
– 1 teaspoon Dijon mustard (for a little savory punch)
– Salt and Black Pepper to taste
– 1 tablespoon olive oil or butter
For the Filling:
– 8 ounces pasta (elbow macaroni, shells, or anything you like)
– Salt for pasta water
For the Glaze (optional but delicious):
– Extra shredded cheese for topping
– Fresh herbs like parsley or chives (for garnish)
– A dash of paprika or smoked paprika for color and flavor
“I don’t know if I’ve ever eaten a better Creamy Cauliflower Mac and Cheese Recipe. The rub alone is wonderful, but the sauce??? Over the top!”
Step-by-Step Instructions
Step 1: Preheat & Prep Pan
Start by heating your oven to 375°F (190°C). Lightly grease a baking dish or use parchment paper—trust me, this makes cleanup way easier. Set a big pot of salted water to boil for your pasta and prepare a baking sheet if you plan to roast your cauliflower for extra flavor.
Step 2: Mix Dry Ingredients
Since this recipe is pretty straightforward, you’ll just set your pasta water to a boil and measure out your cheese. No dry mix needed yet, but having everything organized makes the process smoother.
Step 3: Mix Wet Ingredients
In a blender or food processor, combine the roasted or boiled cauliflower, milk, garlic, Dijon, and oil. Blend until super smooth and creamy—this is the magic behind the sauce. If it’s too thick, add a splash more milk; if it’s too thin, a little more cheese helps thicken it up and bring that cheesy richness.
Step 4: Combine
Cook your pasta just until al dente, then drain. Immediately toss the hot pasta into your cauliflower sauce, stirring gently to coat evenly. Avoid overmixing, or the sauce might get gummy—trust me, I’ve been there.
Step 5: Prepare Filling
If you want extra cheesy layers, sprinkle some shredded cheese or add cooked bacon bits, herbs, or spices at this point. I love mixing in a little goat cheese or a pinch of cayenne for a flavor punch. Keep it versatile—this is your dish.
Step 6: Layer & Swirl
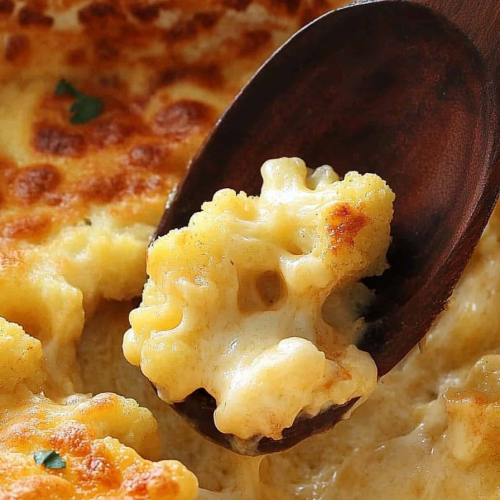
Transfer the cauliflower-pasta mixture into your prepared baking dish. For that picture-perfect look, dollop some extra cheese on top and use a toothpick or knife to swirl it into the dish for a marbled effect. It looks pretty and tastes even better.
Step 7: Bake
Bake uncovered at 375°F for about 20-25 minutes, or until it’s bubbling and golden around the edges. Keep an eye on it—every oven is different, and I’ve had mine ready in 18 minutes and sometimes closer to 30. Use your nose and a quick look to judge doneness.
Step 8: Cool & Glaze
Allow it to sit for 5 minutes out of the oven before serving—this helps everything set. If you’re adding a glaze or extra cheese, sprinkle it on while the dish is still hot, then broil for just a minute for that crispy, cheesy finish.
“Packed with flavor and so simple. Exactly what I wanted from this Creamy Cauliflower Mac and Cheese Recipe!”
Step 9: Slice & Serve
Use a sharp knife for clean slices, and serve hot—top with fresh herbs or a dash of hot sauce if you’re feeling spicy. This dish pairs beautifully with a simple green salad and a glass of crisp White Wine or sparkling water with lemon.
What to Serve It With
Honestly, this cauliflower mac and cheese is so good on its own, but I love pairing it with some steamed broccoli or Roasted Brussels Sprouts to add a bit of crunch. For a lil’ celebratory vibe, serve it with garlic bread or a charcuterie board. At my house, my kids love it alongside scrambled eggs or even as the star of a cozy weekend lunch. It’s hearty enough to stand alone, but adding a protein like grilled chicken or crispy bacon bits takes it over the top. Even leftovers make a delightful next-day meal—just nuke and enjoy. This dish is perfect for potlucks and family dinners because everyone leaves the table with a smile, and I always get asked for the recipe.
Top Tips for Perfecting Your Cauliflower Mac and Cheese
Over the years, I’ve tested quite a few tricks to make this dish even better. First, when prepping cauliflower, I always try to squeeze out excess moisture after steaming or roasting—less water in the sauce means a creamier finish. For the cheese, I sometimes mix a stronger cheese like aged cheddar or Gruyère to deepen the flavor; just remember, the sharper the cheese, the more pungent the dish will be. When blending the cauliflower, I’ve learned that gently warming the milk before adding it to the blender prevents clumping and makes everything smoother. If you want to customize the flavor, try adding a pinch of smoked paprika or nutmeg—just a little adds a whole new dimension. I’ve made this with almond milk, and honestly, it made the sauce even creamier without sacrificing flavor. One tip I swear by is broiling the cheese topping for a minute or two to get that irresistible golden crust—so worth the extra minute in the oven. The key is tasting as you go—cheese adjustments can make all the difference! And if you’re feeling adventurous, try swapping out some of the cauliflower for carrots or Sweet Potatoes for an extra touch of sweetness and color.
Storing and Reheating Tips
This dish keeps beautifully, which is great because you’ll want leftovers (and trust me, there will be!). If you’re saving some for next day, let it cool completely before storing in an airtight container. In the fridge, it’s good for up to 3 days—just give it a quick stir and reheat in the microwave or on the stovetop. If you prefer it extra creamy, add a splash of milk when reheating. Freezing is also an option, but I recommend freezing the unbaked mixture and baking fresh, so you get that crispy top. Wrap tightly in plastic and aluminum foil—just be aware that the texture might change slightly after thawing, but the flavor remains amazing. For the best results, I’d wait to add any extra toppings or cheese glaze until you reheat and serve, so it stays melty and fresh. And honestly, it’s one of those dishes that tastes even better the next day—I swear the flavors deepen and meld the longer it sits.
Frequently Asked Questions
Final Thoughts
Honestly, I’ve made this cauliflower mac and cheese countless times, and it never fails to impress. It’s a playful twist on a classic that feels special enough to serve at gatherings but easy enough for a weeknight dinner. The best part? It’s a sneaky way to get more vegetables into your family’s diet without anyone batting an eye. Plus, the creamy, cheesy texture is so satisfying, no one even notices the hidden cauliflower. Once you get the hang of blending and layering, you’ll see how forgiving and fun this dish really is. I always encourage experimenting—try different cheeses, add your favorite spices, or top it with crispy bacon or herbs. Do yourself a favor and give this recipe a go. I can’t wait to hear how yours turns out—share your twists in the comments! Happy baking!
cauliflower mac and cheese
Ingredients
Main Ingredients
- 32 oz cauliflower florets
- 2 tablespoons olive oil
- 1.5 teaspoons garlic powder
- 1 teaspoon onion powder
- 0.125 teaspoon salt
- 0.125 teaspoon black pepper
- 1.5 tablespoons unsalted butter
- 2 tablespoons white whole wheat flour
- 1.5 cups 2% milk
- 1.5 cups shredded cheddar cheese
- 0.25 cup plain Greek yogurt
- 2 tablespoons cream cheese
- 0.125 teaspoon salt
- 0.33 cup shredded parmesan cheese
Instructions
Preparation Steps
- Preheat oven to 400°F. Lightly grease a casserole dish.
- Toss cauliflower florets with olive oil, garlic powder, onion powder, salt, and pepper. Roast for 15 minutes.
- Transfer roasted cauliflower to a bowl. In a saucepan, melt butter over medium heat. Stir in flour and cook for 1 minute.
- Gradually stream in milk, whisking constantly until sauce thickens. Remove from heat.
- Stir in cheddar cheese, Greek yogurt, cream cheese, and parmesan cheese until melted and smooth.
- Mix sauce with roasted cauliflower, then transfer mixture to casserole dish.
- Bake for 20 minutes until bubbly. Optional: broil for 2-3 minutes for golden top.