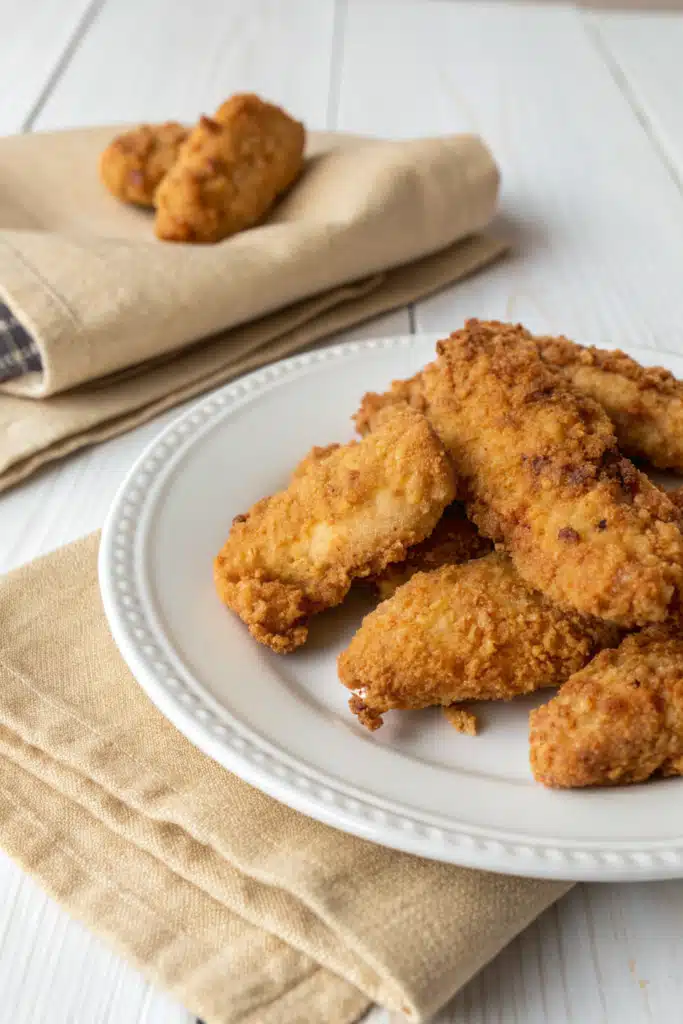
Perfectly Crispy Chicken Tenders Recipe
If you’re craving something that’s both comforting and deliciously satisfying, you can’t go wrong with a plate of golden, crispy chicken tenders. Whether it’s for a quick family dinner or an Easy Weeknight Meal, these tender strips are always a hit. They’re juicy on the inside, crunchy on the outside, and packed with flavor. Plus, they’re so versatile—you can serve them up as finger food, pair them with your favorite dipping sauces, or even add them to salads or wraps for extra protein. The best part? You don’t need fancy equipment or complicated steps. Just simple ingredients and a little bit of love (and maybe some secret seasoning tricks). I first made these during a busy school week when I needed something fast but still impressive. My kids devoured them, and now they’re our go-to whenever we’re short on time but long on hunger. Trust me, once you try this recipe, you’ll want to make it again and again.
Thank you for reading this post, don't forget to subscribe!What Is Chicken Tenders?
Chicken tenders, also known as chicken strips or nuggets (though not to be confused with store-bought), are bite-sized pieces cut from the pectoral muscle of a Chicken Breast. This area is naturally tender, lean, and cooks quickly—making it ideal for frying, baking, or grilling. Unlike regular chicken breasts, which can sometimes dry out if overcooked, tenders stay moist because of their smaller size and even thickness. When properly prepared, they have a beautiful golden-brown crust from the coating and a succulent interior that just melts in your mouth. Traditionally, they’re breaded or battered before cooking, giving them that irresistible crunch. But here’s where I like to get creative: instead of using just flour and breadcrumbs, I layer my coating with panko, a sprinkle of garlic powder, paprika, and a pinch of cayenne for heat. That combo gives them serious flavor without being too heavy. And honestly? They’re so much better than fast-food versions—homemade means control over ingredients, salt levels, and how crispy you want them. Whether you fry them, air-fry, or bake, these chicken tenders are a crowd-pleaser every single time.
Why You’ll Love This Recipe
This Chicken Tenders Recipe isn’t just about taste—it’s about convenience, flavor, and making every bite count. First off, it’s incredibly easy to customize. Want them spicy? Add more cayenne. Prefer a milder version? Skip the pepper entirely. Need gluten-free options? Swap regular flour for almond or coconut flour. The base technique stays the same, but the possibilities are endless. Another reason this recipe shines? It delivers maximum flavor with minimal effort. By double-coating the chicken (first in seasoned flour, then in beaten egg, then in panko mixed with spices), you get that perfect crunch that holds up well during transport—ideal if you’re packing lunch or feeding picky eaters. Plus, using boneless, skinless chicken breasts keeps things healthy while ensuring tenderness. Cooking them in hot oil (or air fryer!) locks in moisture so they never turn rubbery. And let’s talk about serving suggestions—these work beautifully with honey mustard, BBQ sauce, ranch, or even buffalo-style butter. Pair them with sweet potato fries, coleslaw, or a fresh garden salad, and you’ve got a complete, restaurant-quality meal at home. What really sets this recipe apart, though, is its simplicity. No marinating overnight, no soaking in buttermilk, no overly complex steps. Just prep, coat, cook, and enjoy. Whether you’re cooking solo or feeding a hungry household, this recipe adapts to your needs without sacrificing quality. Honestly, it’s one of those dishes that makes you feel like a kitchen superstar—even if you burned toast yesterday.
How to Make Chicken Tenders
Quick Overview
Making great chicken tenders doesn’t have to be a multi-hour ordeal. In fact, with this method, you’ll have tender, crispy strips ready in under 45 minutes. Start by slicing chicken breasts into uniform strips—this ensures even cooking. Then, set up a classic triple-coat system: dredge each piece in seasoned flour, dip it in beaten egg, and press firmly into panko mixed with herbs and spices. Heat oil to the right temperature (around 350°F/175°C) or use an Air Fryer for a lighter option. Fry or air-fry until golden brown and internal temperature reaches 165°F (74°C). Drain briefly on paper towels to remove excess grease, then serve immediately while hot and crunchy. The key is patience during coating—don’t rush! Press the panko onto the chicken so it sticks well. Also, avoid overcrowding the pan or air fryer basket; otherwise, the chicken will steam instead of crisp up. With these tips, you’ll end up with restaurant-worthy results every time.
Ingredients
- 1 lb boneless, skinless chicken breasts (about 2 medium)
- 1 cup all-purpose flour
- 1 tsp garlic powder
- 1 tsp onion powder
- ½ tsp paprika
- ¼ tsp cayenne pepper (optional, for heat)
- Salt and freshly ground black pepper, to taste
- 2 large eggs
- 2 tbsp milk (any kind)
- 1½ cups panko breadcrumbs (Japanese-style works best)
- Oil for frying (vegetable, canola, or peanut oil)
- Lemon wedges and fresh parsley (for garnish, optional)
Step-by-Step Instructions
Step 1: Preheat & Prep Pan
Heat about 1 inch of oil in a deep skillet, Dutch oven, or electric fryer to 350°F (175°C). While the oil warms, prepare your workspace: line a baking sheet with paper towels nearby for draining later. If using an Air Fryer, preheat it to 400°F (200°C).
Step 2: Slice & Season Chicken
Pat chicken breasts dry with paper towels. Trim off any visible fat or connective tissue. Cut each breast horizontally into 1-inch-wide strips. Place strips between two sheets of parchment paper and gently pound them with a meat mallet or rolling pin until even in thickness (about ½ inch). Lightly season both sides with salt and pepper.
Step 3: Set Up Breading Station
In three shallow bowls, create your coating stations:
Bowl 1: Combine flour, garlic powder, onion powder, paprika, cayenne (if using), and ½ tsp salt.
Bowl 2: Whisk together eggs and milk.
Bowl 3: Spread panko crumbs evenly. For extra crunch, toast panko in a dry skillet over medium heat for 3–5 minutes until golden.
“Packed with flavor and so simple. Exactly what I wanted from this chicken tenders!”
Step 4: Coat Each Strip
Dredge each chicken strip in Bowl 1 (flour mixture), pressing lightly to coat. Shake off excess. Dip into Bowl 2 (egg wash), letting excess drip back into bowl. Finally, press firmly into Bowl 3 (panko), ensuring full coverage. Place coated strips on a wire rack (not directly on counter) and repeat with remaining chicken. Let rest 5–10 minutes—this helps the coating adhere better during cooking.
Step 5: Fry Until Golden
Cook chicken in batches: 4–5 strips at a time for stovetop, or 3–4 in an air fryer basket. Fry for 3–4 minutes per side until deep golden brown and internal temp hits 165°F (74°C). Air fry for 10–12 minutes total, flipping halfway. Transfer cooked tenders to paper towel–lined baking sheet to drain briefly.
Step 6: Serve Immediately
Garnish with lemon wedges and chopped parsley if desired. Serve warm with your favorite dipping sauces like ranch, honey mustard, or BBQ. These are best eaten straight from the pan!
What to Serve It With
Chicken tenders are wonderfully flexible, so pairing them with complementary sides elevates the whole meal. Classic favorites include crispy sweet potato fries, crunchy coleslaw, or a tangy tomato-based dipping sauce. For a lighter option, toss them with a fresh garden salad dressed simply with olive oil and vinegar. If you’re going casual, serve them with corn on the cob, baked beans, or mac and cheese. On game days, nothing beats loaded nachos topped with shredded cheese, jalapeños, and sour cream—add the tenders as the star topping! For a healthier twist, wrap them in lettuce leaves with avocado slices and a drizzle of lime crema. Even rice bowls or grain salads work beautifully, especially if you mix in some roasted vegetables. The key is balancing textures and flavors: creamy, crunchy, sweet, or zesty. Whatever you choose, keep portions generous and sauces on the side so everyone can customize their experience.
Top Tips for Perfecting Your Chicken Tenders
Crispier coatings, juicier interiors, and foolproof cooking—here’s how to nail every aspect of your chicken tenders.
- Uniform Sizing Matters: Cutting strips evenly prevents some from drying out while others are still raw. Pound them slightly if needed.
- Don’t Overcrowd: Whether frying or air-frying, give each piece space. Steam = soggy tenders. Cook in small batches.
- Double-Dip for Extra Crunch: Re-dipping in egg after the first flour coat creates a thicker, crispier crust.
- Temperature Is Key: Use a thermometer to check oil (350°F) or chicken internal temp (165°F). Cold oil leads to greasy food; undercooked chicken is unsafe.
- Panko > Regular Breadcrumbs: Panko has bigger flakes that create air pockets, resulting in a lighter, crunchier texture.
- Rest Before Cooking: Let coated tenders sit 5–10 minutes. This helps the coating stick and reduces splattering when frying.
- Avoid Soaking in Egg: Too much egg wash makes the coating slide off. Just a light dip is enough.
- Air Fryer Hack: Spray lightly with oil before air-frying for extra crispiness without deep-frying.
Storing and Reheating Tips
Got leftovers? No problem! Proper storage keeps your chicken tenders tasting fresh and crispy.
- Cool Completely: Allow tenders to cool fully before storing. Warm food traps moisture, leading to sogginess.
- Refrigerate Promptly: Store in an airtight container or sealed bag in the fridge for up to 3 days.
- Freeze Raw or Cooked: For longer storage, freeze uncooked tenders on a tray, then transfer to a freezer-safe bag. Cook directly from frozen, adding 2–3 minutes to cooking time. Or freeze cooked tenders for up to 2 months—reheat thoroughly.
- Reheat Like a Pro: Skip the microwave (it flattens everything). Instead, reheat in a 400°F oven for 8–10 minutes, or air fry at 375°F for 5–7 minutes until hot and crispy. A quick spray of oil helps restore crunch.
Frequently Asked Questions
“I don’t know if I’ve ever eaten a better chicken tenders. The rub alone is wonderful, but the sauce??? Over the top!”
Final Thoughts
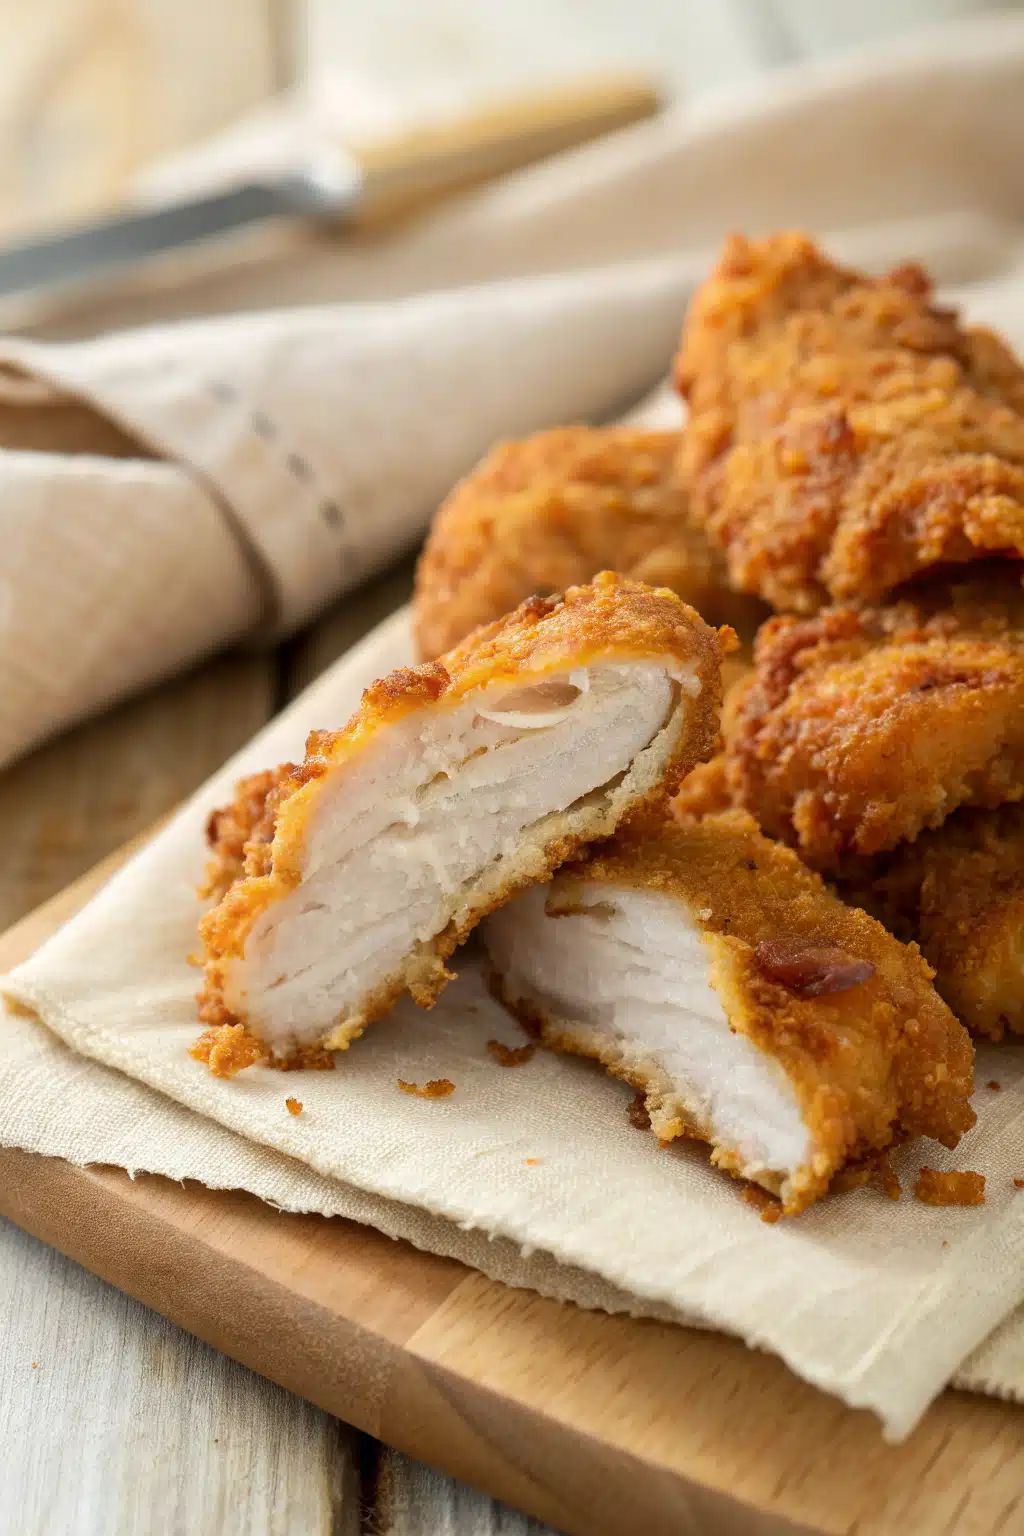
There’s something truly special about biting into a perfectly crispy, golden-brown chicken tender that gives way to tender, juicy meat underneath. This recipe proves you don’t need a ton of ingredients or hours of prep to create something extraordinary. It’s simple, it’s reliable, and it brings people together—whether it’s a quiet dinner at home or a lively gathering with friends. Every detail matters: the right oil temperature, the double-coating technique, the balance of spices… but honestly, even if you tweak a few things along the way, it’s hard to mess up. These tenders are forgiving and adaptable. And when served with a squeeze of lemon and a side of your favorite sauce, they transform into pure comfort food heaven. So next time hunger strikes (and honestly, it will), remember this recipe. Whip up a batch, invite someone over, and enjoy the magic of homemade goodness. Because sometimes, the simplest meals bring the biggest joy.

Crispy Chicken Tenders
Ingredients
Main Ingredients
- 1 lb chicken tenderloins
- 1 cup all-purpose flour
- 1 tsp garlic powder
- 1 tsp paprika
- 0.5 tsp salt
- 0.25 tsp black pepper
- 2 large eggs
- 0.5 cup milk
- 1 cup panko breadcrumbs
- 0.5 cup grated Parmesan cheese
- 1 cooking spray or olive oil spray
Instructions
Preparation Steps
- Preheat the oven to 425°F (220°C). Line a baking sheet with parchment paper or a silicone mat.
- Pat the chicken tenders dry with paper towels and set aside.
- In a shallow bowl, mix the flour, garlic powder, paprika, salt, and pepper.
- In another bowl, whisk together the eggs and milk.
- In a third bowl, combine the panko breadcrumbs and Parmesan cheese.
- Dredge each chicken tender in the seasoned flour, shaking off excess. Then dip into the egg mixture, allowing excess to drip off. Finally, coat thoroughly in the panko-Parmesan mixture.
- Place the coated tenders on the prepared baking sheet. Lightly spray the tops with cooking spray for crispiness.
- Bake for 18–20 minutes, flipping halfway through, until golden brown and internal temperature reaches 165°F (74°C).
- Let rest for 2–3 minutes before serving. Serve with your favorite dipping sauces.


